PROYEK ARDUINO PENYIRAM TANAMAN OTOMATIS DENGAN SENSOR KELEMBABAN TANAH SIMULASI TINKERCAD ARDUINO
Summary
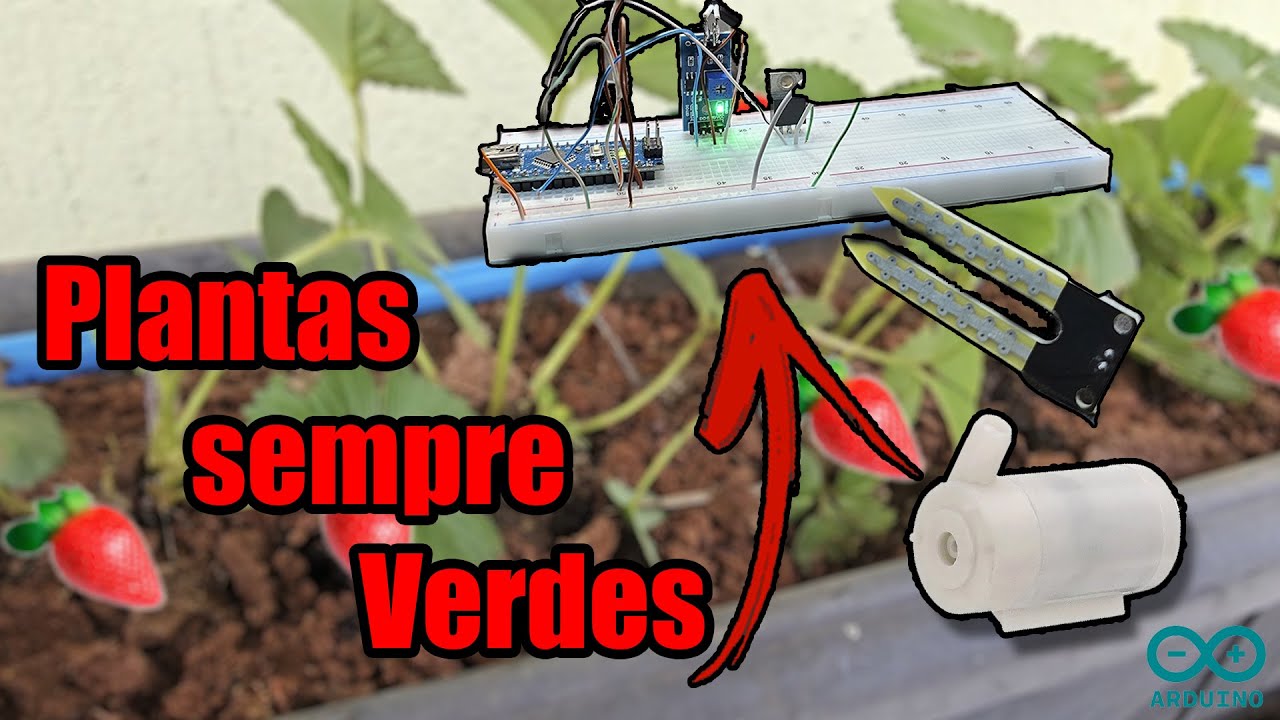
TLDRIn this video tutorial, the presenter demonstrates how to create an automatic plant watering system using an Arduino, soil moisture sensor, and a relay to control a water pump. The system detects soil dryness and triggers the pump via a relay when the moisture level drops below a set threshold. The tutorial covers the components used, the schematic design, and the Arduino code. The presenter also explains how the system can be simulated using online software, providing a step-by-step guide to set up and test the project. The final result is an efficient and automated way to water plants based on soil moisture levels.
Takeaways
- 😀 The project demonstrates how to create an automatic plant watering system using an Arduino Uno and a soil moisture sensor.
- 😀 The project simulates the system using the online software Cloud ErCat to visualize the operation.
- 😀 The system is designed to activate a pump (simulated by a DC motor) when the soil is dry, and deactivate it when the soil is wet.
- 😀 Components used in the project include an Arduino Uno, soil moisture sensor, LED indicator, relay, power supply, and a DC motor.
- 😀 The soil moisture sensor provides an analog output that is read by the Arduino's A0 pin.
- 😀 The relay controls the motor to simulate the watering of plants, turning on when the soil is dry and turning off when the soil is wet.
- 😀 The program for the project uses a simple `if-else` structure to read sensor values and control the relay based on soil moisture.
- 😀 The threshold for soil dryness is set at a sensor value below 40, at which point the system activates the watering process.
- 😀 The system can be monitored via the serial monitor, where the analog sensor readings are displayed in real time.
- 😀 Users can adjust the soil moisture threshold to their preference in the program to control when the system activates or deactivates.
- 😀 The video concludes with a demonstration of the system in action, showing the motor activating and deactivating based on the soil moisture levels.
Q & A
What is the main purpose of the project in the video?
-The main purpose of the project is to create an automatic plant watering system using an Arduino Uno and a soil moisture sensor. The system waters the plant when the soil moisture is below a certain threshold and stops watering when the soil is wet.
Which components are used in this automatic watering system project?
-The components used in the project include an Arduino Uno, a soil moisture sensor, an LED as an indicator, a relay, a power supply, and a DC motor (simulating a water pump).
How does the system determine when to water the plant?
-The system uses a soil moisture sensor to measure the soil’s moisture level. If the soil is dry (below a certain threshold, typically 40), the system activates the relay, which in turn powers the DC motor to simulate watering.
What is the role of the relay in this system?
-The relay acts as a switch that controls the DC motor (simulating the pump). It is activated when the soil moisture is below the threshold and deactivated when the soil moisture is above the threshold, turning the motor on and off accordingly.
How is the sensor connected to the Arduino?
-The soil moisture sensor is connected to the analog pin A0 of the Arduino, which reads the sensor’s analog output to measure the soil moisture levels.
What does the LED indicator do in this project?
-The LED lights up when the relay is activated, indicating that the motor (pump) is running and the watering process is ongoing.
How does the code handle the soil moisture readings?
-The code continuously reads the soil moisture value using the `analogRead()` function on pin A0. If the reading is below 40, the relay is activated, and the motor is turned on. If the reading is above 40, the relay is deactivated, and the motor turns off.
What happens when the soil moisture is below 40?
-When the soil moisture is below 40, the system turns on the relay, which activates the DC motor (simulating the pump), and the LED lights up to indicate that the watering system is active.
Can the threshold for soil moisture be adjusted?
-Yes, the threshold for soil moisture can be adjusted in the program by changing the value in the `if` statement (currently set to 40). This allows users to customize when the system should start watering based on the moisture level they desire.
What kind of simulation software is used in this project?
-The project is simulated using the online software Cloud Ercat, which helps visualize the circuit and test the functionality of the system before actual implementation.
Outlines

This section is available to paid users only. Please upgrade to access this part.
Upgrade NowMindmap

This section is available to paid users only. Please upgrade to access this part.
Upgrade NowKeywords

This section is available to paid users only. Please upgrade to access this part.
Upgrade NowHighlights

This section is available to paid users only. Please upgrade to access this part.
Upgrade NowTranscripts

This section is available to paid users only. Please upgrade to access this part.
Upgrade NowBrowse More Related Video

Automatic Plant Watering System using Arduino & Soil Moisture Sensor | LCD display [with CODE]
Sistema de Irrigação Automática com Arduino e Sensor de Umidade do Solo

Penyiram Tanaman Otomatis Soil Moisture Sensor VLOG118

How to make Automatic Plant Watering System using Arduino UNO and Soil Sensor || Techie Lagan

Prototipe Penyiram Tanaman Otomatis

PROJECT ARDUINO PENYIRAM TANAMAN OTOMATIS /SMARTGARDEN BERBASIS ARDUINO NANO DAN SENSOR SOILMOISTURE
5.0 / 5 (0 votes)