Zebra ZT610 Printer Calibration Tutorial

EMP Tech Group
25 Jan 202303:10

Summary

TLDRThis tutorial video provides a straightforward guide on calibrating a Zebra zt610 printer to ensure proper label printing. It addresses common issues like media out errors and irregular label printing by demonstrating a quick calibration method. The process involves accessing the calibration menu, removing label backing for the printer to recognize, and then reloading the media correctly. The video concludes with a test to confirm successful calibration, offering a practical solution for maintaining printer accuracy.

Takeaways

  • πŸ“ Calibrating a Zebra zt610 printer is essential for teaching the printer the length of the label and where to start and stop printing.
  • 🚫 A media out error can be resolved by calibrating the printer, even if the media is already loaded.
  • πŸ”„ If labels are skipping or behaving irregularly, it's a good time to calibrate the printer to ensure proper printing.
  • πŸ”˜ Pressing the cancel and pause button simultaneously brings up the calibration menu on the printer.
  • πŸ“ The calibration process includes a step-by-step diagram, but a simpler method is demonstrated in the script.
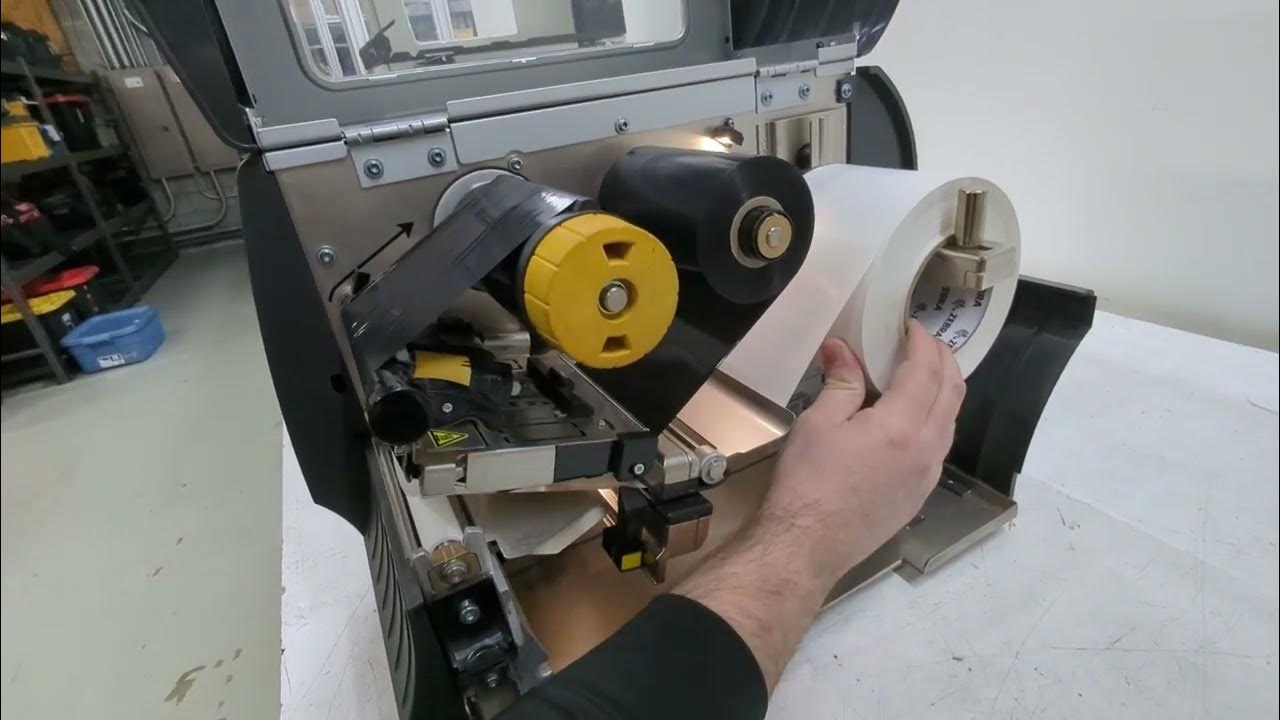
  • πŸ”¦ When the pause light is flashing, remove the backing from the labels to teach the printer what it looks like with just the backing.
  • πŸ‘οΈ Ensure the sensor under the printhead detects only the backing, not the labels or ribbon.
  • 🎭 Move the ribbon out of the way, like sliding a curtain, to one side before closing the printhead.
  • ♻️ After setting the backing under the sensor, close the printhead and press pause to begin the calibration process.
  • πŸ”„ Reload the printer with the ribbon and labels, ensuring the labels are properly aligned for the printer to find the gap between them.
  • ⏱️ The printer will take a minute to measure and calibrate, adjusting to the presence of the ribbon and the correct label positioning.
  • πŸ“„ To test if the calibration was successful, press the feed button once; if one label comes out and stops correctly, the calibration is complete.

Q & A

  • What does the term 'calibrating a Zebra zt610 printer' refer to?

    -Calibrating a Zebra zt610 printer means teaching the printer how long the label is and where to start and stop printing.

  • Why might you need to calibrate your Zebra zt610 printer?

    -You might need to calibrate your printer if you experience a media out error even with loaded media, or if labels are skipping or behaving irregularly.

  • How can you access the calibration menu on a Zebra zt610 printer?

    -You can access the calibration menu by pressing the cancel and pause button simultaneously on the printer.

  • What is the first step in the simplified calibration process described in the script?

    -The first step is to remove the backing from the labels by opening the printhead, pulling out some labels, and peeling off a couple.

  • Why is it important to feed the labels with the backing removed under the sensor?

    -It is important to feed the labels under the sensor to teach the printer what it looks like with just the backing, ensuring the sensor sees only the backing.

  • What should you do with the ribbon during the calibration process?

    -You should move the ribbon out of the way, similar to sliding a curtain off to the right, without completely removing it from the printer.

  • What action should be taken after closing the printhead during calibration?

    -After closing the printhead, press the pause button to begin the calibration process, during which the printer will recognize the state with no ribbon and only the backing.

  • How do you proceed after the initial calibration step?

    -After the initial calibration, you should reload the printer with the ribbon back on and pull the labels out until actual labels are exposed, then close the printhead.

  • What does pressing the pause button again after reloading do?

    -Pressing the pause button again starts the actual calibration process, where the printer measures the gap between the labels and ensures the ribbon is loaded properly.

  • How can you test if the calibration was successful?

    -To test if the calibration was successful, press the feed button once. If one label comes out and stops where it should, the calibration was done correctly.

  • Who produced the video script provided?

    -The video script is from an EMP Technical Group video.

Outlines

00:00

πŸ–¨οΈ Printer Calibration Basics

This paragraph explains the purpose of printer calibration, which is to teach the printer the length of the label and where to start and stop printing. It addresses common issues like media out errors and irregular label printing, suggesting that calibration can resolve these problems. The speaker introduces a quick method to access the calibration menu by pressing the cancel and pause button simultaneously and provides a step-by-step guide, starting with the removal of label backing to teach the printer to recognize the label length.

Mindmap

Keywords

πŸ’‘Calibration

Calibration in the context of the video refers to the process of adjusting and fine-tuning the printer settings to ensure the labels are printed correctly according to their length and where they should start and stop. This is essential for avoiding errors like media out errors and irregular label printing. The script mentions that if there are issues such as skipping labels, it's a good time to calibrate the printer.

πŸ’‘Zebra zt610

The Zebra zt610 is a specific model of label printer that the video script is discussing. It is the subject of the calibration process described in the video, indicating that the instructions are tailored to this particular device. The script uses this term to set the context for the audience, specifying the exact model that the tutorial is applicable to.

πŸ’‘Media Out Error

A media out error is a common issue that can occur with printers, indicating that the printer is unable to detect media or that there is a problem with the media path. In the script, it is mentioned as a problem that can be resolved by calibrating the printer, suggesting that this error may be due to incorrect printer settings or sensor issues.

πŸ’‘Label

In the video script, a label refers to the material that is printed by the Zebra zt610 printer. The entire calibration process is centered around ensuring that these labels are printed correctly, with the right dimensions and without any irregularities. The script uses the term to describe the end product of the printing process that the viewer needs to be concerned with.

πŸ’‘Cancel and Pause Button

The cancel and pause button is a control on the Zebra zt610 printer that, when pressed simultaneously, brings up the calibration menu. This is a key step in the calibration process described in the script, allowing the user to access the necessary settings for adjusting the printer.

πŸ’‘Diagram

The script mentions a diagram that is displayed on the printer, which provides a step-by-step guide for calibration. This visual aid is part of the printer's user interface, assisting users in understanding and performing the calibration process correctly.

πŸ’‘Backing

The backing is the non-printed part of the label that is peeled off after printing. In the context of the video, the backing is used during the calibration process to teach the printer how to recognize the label's length without the inked part interfering. The script describes peeling off a couple of labels to expose the backing for the calibration process.

πŸ’‘Sensor

The sensor mentioned in the script is a component of the printer that detects the presence and position of the label. During calibration, it is important that the sensor correctly identifies the label's backing to ensure accurate printing. The script emphasizes the need to position the label under the sensor for successful calibration.

πŸ’‘Ribbon

The ribbon in the video script refers to the inked part of the printer that comes into contact with the label to transfer the ink during the printing process. The script describes moving the ribbon to the side during calibration to ensure that it does not interfere with the printer's ability to recognize the label's backing.

πŸ’‘Feed Button

The feed button is a control on the printer used to manually advance the label through the printer. In the script, it is suggested as a test to check if the calibration has been done correctly. If one label is fed out and stops correctly, it indicates that the calibration was successful.

πŸ’‘EMP Technical Group

EMP Technical Group appears to be the organization or company that produced the video. The script ends with a thank you note, indicating that the video is part of a series or collection of technical guides produced by this group, which likely specializes in providing technical support and tutorials.

Highlights

Calibrating a Zebra zt610 printer involves teaching it the length of the label and where to start and stop printing.

Media out errors can be resolved by calibrating the printer, even if the media is loaded.

Irregular label printing, such as skipping, is an indication that the printer needs calibration.

The quickest method to access the calibration menu is by pressing the cancel and pause button simultaneously.

A diagram in the calibration menu guides users through the process step by step.

A simpler calibration method involves removing the backing from labels and feeding them under the sensor.

The sensor must detect only the backing without the ribbon for accurate calibration.

The ribbon should be moved aside like a curtain during the calibration process.

After adjusting the ribbon and labels, close the printhead to proceed with calibration.

Pressing pause initiates the calibration process, which measures the label and ribbon setup.

The printer calibrates by identifying the gap between labels and ensuring the ribbon is loaded correctly.

The calibration process takes a minute as the printer measures the label and ribbon setup.

Once calibration is complete, the printer is ready to print accurately.

To test if the calibration was successful, press the feed button once to see if a label feeds correctly.

EMP Technical Group provides educational videos on printer calibration and other technical topics.

Transcripts

play00:00

foreign

play00:08

discussing calibrating a Zebra zt610

play00:12

printer

play00:13

calibration really just means teaching

play00:16

your printer how long your label is and

play00:18

where to start and stop it's pretty easy

play00:20

to do but if you've ever gone to your

play00:22

printer and notice that there is a media

play00:24

out error even though it's already

play00:26

loaded

play00:27

there's a way to fix that and that's by

play00:29

calibrating your printer also if you

play00:31

notice any labels that are skipping or

play00:34

doing anything irregular that's a good

play00:36

time to calibrate your printer as well

play00:37

and this is how to do it the quickest

play00:40

way is to press the cancel and pause

play00:43

button simultaneously

play00:46

and that will bring up the calibration

play00:47

menu

play00:50

there is a diagram here that will tell

play00:53

you and you can walk step by step

play00:54

through it however I'm going to show you

play00:56

a little simpler way

play00:58

so once you've done it and you see the

play01:00

pause light flashing

play01:02

we want to remove the backing from our

play01:04

labels

play01:05

and what that means is you want to open

play01:07

the printhead

play01:09

bring out some of the labels

play01:13

and peel off a couple

play01:15

we're going to teach the printer what it

play01:17

looks like with just the backing

play01:20

once you get two or three peeled off

play01:22

you're going to feed it back inside the

play01:24

printer

play01:27

[Applause]

play01:30

and the important thing is to get that

play01:33

under the sensor which is right here

play01:36

so we want to make sure the sensor sees

play01:38

just the backing once you have that done

play01:40

we want to get the ribbon out of the way

play01:43

you don't have to take it all the way

play01:45

off but you can just slide it like a

play01:47

curtain off to the right

play01:51

so once that's done you can close the

play01:54

printhead

play01:56

and now we're going to press pause and

play01:58

it's going to begin to calibrate

play02:02

and what it's doing right now is seeing

play02:04

what it looks like with no ribbon and

play02:06

with only the backing

play02:08

and that's done the next step is just to

play02:11

reload everything like normal

play02:20

so ribbon back on and then pull your

play02:22

labels out until you have actual labels

play02:25

and close the printhead

play02:27

so once it's reloaded you press the

play02:29

pause button again

play02:32

so it's actually calibrating now to find

play02:35

that Gap in between the label and to

play02:38

show that the ribbon is loaded properly

play02:40

it takes a minute as it's kind of

play02:42

measuring

play02:44

but eventually it will stop

play02:46

and you're all set

play02:48

so unpause

play02:49

and a good way to test if you're

play02:51

calibrated is to hit the feed button one

play02:53

time

play02:55

if one label comes out and stops where

play02:58

it should you've done it correctly

play03:00

thank you for watching another EMP

play03:02

technical group video

Rate This
β˜…
β˜…
β˜…
β˜…
β˜…

5.0 / 5 (0 votes)

Related Tags
Zebra PrinterLabel CalibrationMedia ErrorTroubleshootingPrinter MaintenanceRibbon LoadingSensor AlignmentLabel FeedingTechnical GuideEMP Video