How to Wire Up Ethernet Plugs the EASY WAY! (Cat5e / Cat6 RJ45 Pass Through Connectors)

Switched On Network
27 May 202106:16

Summary

TLDRThis video script offers a tutorial on the improved method of crimping RJ45 plugs onto Ethernet cables using pass-through or snap plugs, which eliminates the need for guessing wire length and reduces the risk of misalignment. It details the necessary tools, including a blade-equipped crimping tool and a cable tester, and provides a step-by-step guide on cutting, stripping, arranging, and verifying the correct wiring order according to T-568A or T-568B standards. The process ensures a neat and functional cable every time, with strain relief boots to prevent damage. The script also emphasizes the importance of testing the cable for proper connections before use.

Takeaways

  • 🔌 The video discusses a better way to attach RJ45 plugs to Ethernet cables using pass-through or snap plugs.
  • 🛠️ Essential tools for the process include a drum of Ethernet cable (Cat5e, Cat6, or Cat6a), RJ45 pass-through plugs, strain relief boots, a crimping tool with a blade, snips, a mini wire stripper and punch down tool, and a cable tester.
  • ✂️ The process starts with cutting the required length of cable, leaving excess to account for trimming and potential mistakes.
  • 🧵 Network cables consist of 4 twisted pairs of color-coded wires, with Cat6 cables having a plastic core to reduce crosstalk.
  • 📏 After stripping the outer jacket, the plastic crosstalk separator and ripcord thread are removed, and the wires are untwisted and straightened.
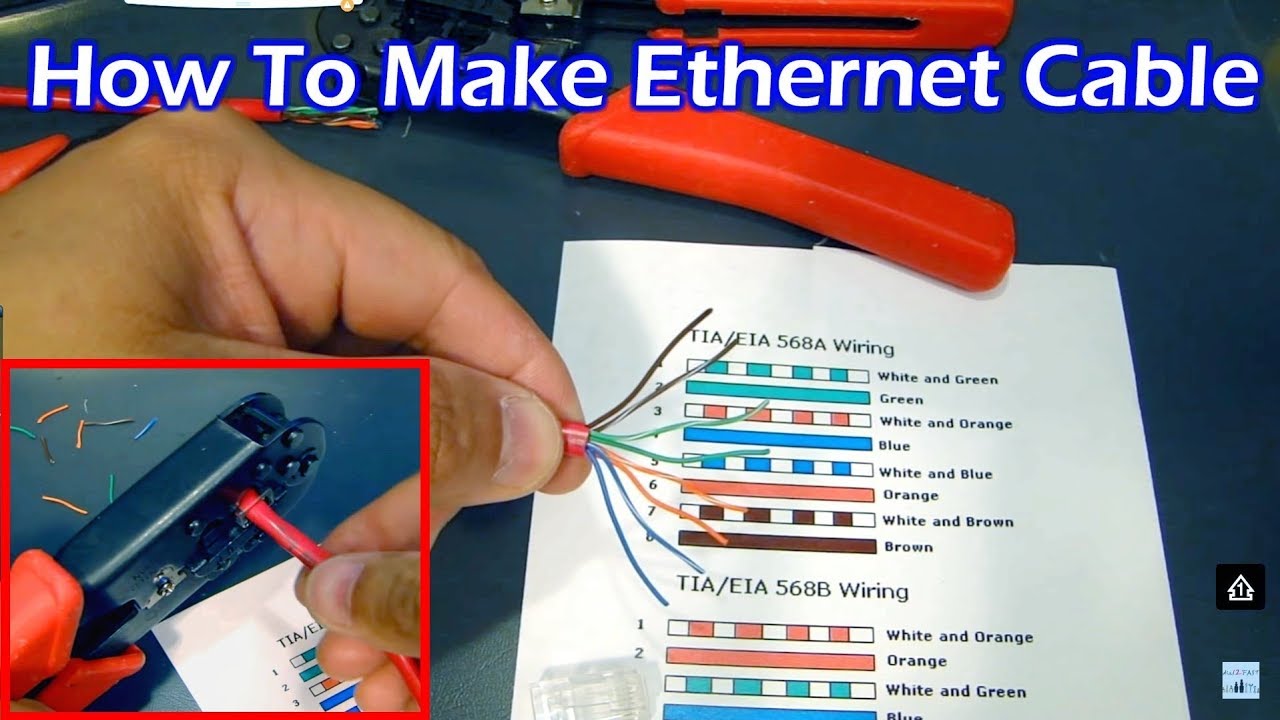
  • 📋 The correct order of wires must be followed, with two main standards, T-568A and T-568B, with the key being consistency between cable ends.
  • 🔄 The video suggests using T-568B due to its widespread use, detailing the specific color order for the wires.
  • 🔄 When adding to an existing setup, it's important to match the wiring standard already in use for consistency.
  • 📐 The pass-through plug allows for checking the wire order before crimping, ensuring alignment and preventing the need to start over.
  • 🔧 The crimping tool not only secures the plug but also trims excess wire, resulting in a neat finish.
  • 🔄 The process is repeated for the other end of the cable, with the same wiring order, followed by testing with a cable tester to verify correct connections.
  • 🚫 The cable tester checks for proper wiring sequence and functionality, identifying any mistakes in the process.

Q & A

  • What is the main problem with traditional RJ45 plugs and crimping methods?

    -Traditional RJ45 plugs require precise measurement and can lead to misalignment of wires inside, causing the need to start over, wasting plugs and shortening the cable with each failure.

  • What type of RJ45 plug is recommended in the script for a better crimping experience?

    -Pass-through RJ45 plugs, also known as snap plugs, are recommended for their open ends that allow for double-checking the wire order before crimping.

  • What are the essential tools needed for the improved RJ45 crimping process described in the script?

    -The essential tools include a drum of Ethernet cable (Cat5e, Cat6, or Cat6a), pass-through RJ45 plugs, strain relief boots, an RJ45 crimping tool with a blade, a pair of snips, a mini wire stripper and punch down tool, and a cable tester.

  • Why are strain relief boots used in the RJ45 crimping process?

    -Strain relief boots are used to prevent the clip lever on the RJ45 plug from snapping, providing additional durability to the cable connection.

  • What is the purpose of the cable tester mentioned in the script?

    -The cable tester is essential to verify that all 8 connections in the cable are correct and working before using it in a network setup.

  • How much excess cable should be left when cutting for the cable run?

    -A generous amount of excess should be left, partly because a few centimeters will be chopped from either end, and also to ensure there is enough length in case the cable is found to be too short.

  • What are the two main RJ45 wiring standards mentioned in the script, and what is the key difference between them?

    -The two main standards are T-568A and T-568B. The key difference is that the greens and oranges trade places in their wiring order.

  • Why is it important to maintain the same wiring standard on both ends of a cable?

    -Maintaining the same wiring standard on both ends ensures that the cable works correctly and is consistent with any existing setup, making it easier for future use and troubleshooting.

  • How does the pass-through RJ45 plug help prevent misalignment of wires during the crimping process?

    -The open ends of pass-through plugs allow wires to be poked through, enabling a double-check of the order before crimping, and guaranteeing that all wires align correctly and reach the tip of the plug.

  • What should be done if the wire order is found to be incorrect after inserting into the pass-through plug?

    -If the wire order is incorrect, the plug can be slid off, the wires corrected, and reinserted without wasting the plug or shortening the cable.

  • How does the cable tester confirm that the cable is working perfectly?

    -The cable tester sends a pulse down each wire from the Master to the Remote, checking all 8 wires individually. A correct sequence from 1 to 8 on both ends indicates that the cable is wired correctly and functioning properly.

Outlines

00:00

🔌 Improving Ethernet Cable Assembly with Snap Plugs

This paragraph introduces a new method for attaching RJ45 plugs to Ethernet cables using pass-through or snap plugs, which are easier to use and reduce the chances of errors. The narrator discusses the problems with traditional crimping methods, such as misalignment and wasted plugs, and lists the tools and materials needed for this improved process, including a drum of Ethernet cable (Cat5e, Cat6, or Cat6a), RJ45 snap plugs, strain relief boots, a crimping tool with a blade, snips, a mini wire stripper and punch down tool, and a cable tester. The paragraph emphasizes the importance of having the right tools for a successful cable assembly and provides affiliate links for purchasing them.

05:03

🛠 Step-by-Step Guide to Assembling an Ethernet Cable with Snap Plugs

The second paragraph provides a detailed guide on how to assemble an Ethernet cable using the new method. It starts with cutting the required length of cable, ensuring there is enough excess for adjustments. The narrator explains the process of removing the outer jacket, the plastic crosstalk separator, and the ripcord thread, followed by untwisting and straightening the wires. The importance of arranging the wires in the correct order according to the T-568A or T-568B standard is highlighted, with a preference for T-568B due to its widespread use. The paragraph then describes how to insert the wires into the pass-through plug, ensuring the order is correct before crimping. It also mentions the advantage of being able to adjust the wires before crimping, avoiding the need to start over if an error is made. Finally, the paragraph explains how to use the crimping tool to secure the plug and trim excess wires, and the importance of testing the cable with a cable tester to verify correct wiring and functionality.

Mindmap

Keywords

💡RJ45 plug

An RJ45 plug is a type of electrical connector commonly used for Ethernet connections. It is characterized by its distinctive eight-position modular design. In the video, the RJ45 plug is the focus for a new method of cable termination, which is highlighted as a more efficient and reliable way to connect Ethernet cables. The script mentions the use of 'pass through' or 'snap plugs' which allow for easier and more accurate wiring.

💡Ethernet cable

Ethernet cable refers to a type of cable used to connect devices to a local area network (LAN). It is composed of multiple pairs of wires, typically four twisted pairs, which are color-coded. In the script, the process of preparing and connecting these cables using RJ45 plugs is detailed, emphasizing the importance of correct wiring and testing to ensure network functionality.

💡Crimping tool

A crimping tool is a device used to secure a connector to the end of a cable by compressing the connector's metal contacts around the wires. In the video, a crimping tool with a blade is specifically mentioned as essential for attaching RJ45 snap plugs, ensuring a neat and secure connection.

💡Cat5e/Cat6/Cat6a

These terms refer to categories of Ethernet cable specifications, with Cat5e, Cat6, and Cat6a indicating increasing levels of performance and features. The script mentions these categories as potential types of Ethernet cable to be used, each with different use cases and capabilities, such as reduced crosstalk and higher data transmission rates.

💡Strain relief boots

Strain relief boots are protective covers used on cables to prevent strain and stress on the cable connectors, thereby reducing the risk of disconnection or damage. In the script, they are suggested as an optional accessory to use with RJ45 plugs to enhance the durability of the cable connections.

💡Wire stripper and punch down tool

A wire stripper and punch down tool is a device used for removing the insulation from wires and for arranging and securing wires in a specific pattern within a connector. The script describes its usefulness in the process of preparing the Ethernet cable for connection, ensuring that the wires are correctly exposed and arranged before being inserted into the RJ45 plug.

💡Cable tester

A cable tester is a device used to verify the continuity, integrity, and correct wiring of cables. In the video, it is emphasized as an essential tool to ensure that the Ethernet cable is functioning correctly after being assembled, by checking each wire individually and confirming the correct sequence of connections.

💡T-568A/T-568B

T-568A and T-568B are two wiring standards for Ethernet cables, with the primary difference being the order of the green and orange pairs. The script explains the importance of using the same standard on both ends of a cable for consistency and compatibility, with T-568B being the more commonly used standard.

💡Twisted pairs

Twisted pairs refer to the way wires are arranged in Ethernet cables, where each pair of wires is twisted together to reduce crosstalk and electromagnetic interference. The script mentions that network cables consist of four twisted pairs, totaling eight wires, which are color-coded for easy identification during the wiring process.

💡Crosstalk

Crosstalk is a phenomenon in which signals from one wire interfere with the signals in another wire, typically in a cable with closely spaced wires. The script refers to a plastic core in Cat6 cables designed to reduce crosstalk between the twisted pairs, improving the overall performance of the cable.

💡Master and Remote

In the context of cable testing, 'Master' and 'Remote' refer to the two parts of a cable tester used to verify the integrity of long cable runs. The script suggests separating these parts for testing cables longer than the immediate reach of the tester, placing one at each end of the cable to ensure proper functionality.

Highlights

Introduction of a new method for attaching RJ45 plugs to Ethernet cables using pass-through or snap plugs for improved alignment and reduced waste.

Recommendation of using a drum of Ethernet cable such as Cat5e, Cat6, or Cat6a depending on the use case.

Emphasis on purchasing pass-through RJ45 plugs and the optional use of strain relief boots to prevent clip lever snapping.

Necessity of a crimping tool with a blade for snap plugs, a pair of snips, and a mini wire stripper and punch down tool for efficient cable preparation.

Importance of a cable tester to verify the correctness and functionality of all 8 connections in the cable.

Provision of affiliate links in the video description for all the necessary items mentioned.

Advice on cutting the cable with a generous excess to account for trimming and potential rework.

Instructions on preparing the cable by stripping off the outer jacket and removing the plastic crosstalk separator and ripcord thread.

Guidance on untwisting and straightening the 4 pairs of wires for proper arrangement.

Explanation of the two main RJ45 wiring standards, T-568A and T-568B, and the importance of consistency in wiring.

Preference for T-568B due to its widespread use and the provided color order for wiring.

Suggestion to match the wiring standard of an existing setup when adding or replacing cables.

Technique for checking and ensuring the correct order of wires before crimping the plug.

Advantage of pass-through plugs allowing for double-checking the wire order before crimping.

Process of inserting wires into the plug, ensuring the outer jacket is fully inside, and checking the wire order once more.

Description of the crimping process using a tool with a blade that also trims excess wire for a neat finish.

Final step of sliding the strain relief boot over the clip and testing the cable with a cable tester to ensure correct wiring and functionality.

Use of the cable tester to check the sequence of connections from 1 to 8 on both cable ends to confirm proper wiring.

Troubleshooting guidance for identifying mistakes in cable wiring through the tester's sequence results.

Mention of the capability of Cat5e and Cat6 cables to support long cable runs of up to 100m.

Transcripts

play00:00

For years and years I’ve been putting RJ45 plugs onto ethernet cable like this, with

play00:05

closed plugs where you have to measure the length, or guess like this, and then hope

play00:09

and pray they all align up fully and properly at the tip and don’t swap places inside

play00:13

without you realising until it’s too late, and then crimping with one of these standard

play00:17

tools.

play00:18

Although I got pretty good at it, I’ve still lost count over the years of the number of

play00:21

times I’ve had to snip an end off and start again from scratch, wasting a plug which can’t

play00:25

be used again and making the cable shorter and shorter with each failure.

play00:29

Well, there’s now a better way using a slightly different type of RJ45 plug and a different

play00:35

A drum of Ethernet cable - probably either Cat5e, Cat6 or possibly even Cat6a, it will

play00:40

depend on your use case but we won’t get into the differences in this video

play00:43

RJ45 plugs - make sure you buy pass through plugs, sometimes called snap plugs, and optionally

play00:50

the strain relief boots which help stop the little clip lever from snapping

play00:53

An RJ45 crimping tool - it must be one with a blade (for snap plugs)

play01:00

A pair of snips

play01:01

And one of these mini wire stripper and punch down tools is useful to own and will also

play01:05

be useful if you want to wire up any wall sockets as well

play01:08

Finally, a Cable tester - this is essential to verify the cable and all 8 connections

play01:13

are correct and working before you go to use it in your network setup.

play01:17

I’ve left affiliate links in the video description for all these items.

play01:21

So, take your wire cutters and cut however much cable you need for the cable run you’re

play01:26

working on - being sure to leave a generous amount of excess, partly because a few centimetres

play01:30

will get chopped from either end, and because it’s always better to have a little bit

play01:33

of excess rather than realise the cable’s too short! Some crimping tools also include

play01:38

a cutter and a stripper, although I tend to use my own separate wire cutters and strippers

play01:42

- but it’s up to you.

play01:46

If you’re going to be putting strain relief boots on, slide one on now before you proceed

play01:49

to start putting the end on.

play01:53

Network cable consists of 4 twisted pairs, so 8 wires in total. Cat6 cable usually also

play01:58

has a loose plastic core running down the centre, to reduce crosstalk between those

play02:02

4 twisted pairs. Each pair is colour-coded, with one of the pair being a solid colour

play02:07

and the other is a tribute act to an American rock duo from Detroit.

play02:12

Strip off about a 3cm length of the outer jacket, being careful not to damage the conductors

play02:16

inside.

play02:20

Snip off the plastic crosstalk separator and the ripcord thread that both run along inside

play02:24

the cable. Then untwist all 4 pairs of wires, and pinch each wire tightly between your thumb

play02:29

and forefinger and run along like this to straighten them all out as best you can.

play02:33

Next, it’s time to arrange the 8 wires in the correct order so that we can feed them

play02:37

into the plug. I keep this little printout in my tub of connectors, or you can just Google

play02:42

“RJ45 wiring diagram”. There are 2 main standards, T-568A and T-568B - the only difference

play02:50

is the greens and the oranges trade places. The key importance is that the wiring is the

play02:54

same on both ends of the cable, so if you’re just making a length of cable for yourself

play02:58

at home and terminating both ends with an RJ45 plug then it really doesn’t make any

play03:02

difference - as long as you use the same both end. I tend to use T-568B because it’s the

play03:07

most widely used. So that’s orange and white, solid orange, green and white, solid blue,

play03:15

blue and white, solid green, brown and white, solid brown.

play03:23

If you’re adding cabling to an existing setup, or replacing a faulty end, then make

play03:27

sure you use whatever standard is already in use at the location, to make things easier

play03:31

for yourself and any other engineers who might do work there after you.

play03:36

So, arrange them in the right order and again, run your fingers along to help straighten

play03:40

them out even more so that they sit right and in the correct position. I find it helpful

play03:44

at this point to take my wire cutters and gently grip the cables - but don’t snip

play03:48

them just yet - and to bunch the ends right up to each other and double check the colours

play03:52

are still in the correct order. Then, holding the base of the wires firmly with your thumb,

play03:57

snip a short length from the end so that we have a really neat, tight bunch at the end.

play04:03

Next, take an end plug. These pass through ones, unlike the one I showed you at the start

play04:08

of the video, have open ends which means you can poke the strands right through, allowing

play04:12

you to double check the order is definitely correct before you commit and crimp the plug

play04:16

on, and it also guarantees that they all line up correctly and right to the very tip for

play04:20

a perfectly formed cable every time.

play04:23

So once you’ve cut a short length from the end, carefully slide the arranged wires into

play04:27

the plug and allow them to pass through it, hence the name, keeping going until the outer

play04:31

jacket (which is white in this case) is fully inside as far as it will go. Then, examine

play04:37

the 8 wires and check again that all 8 are still in the correct order. If you accidentally

play04:42

loosened your grip too soon whilst putting the end on, and any cables got in the wrong

play04:45

order for example, you can of course just slide it off, correct, and reinsert without

play04:49

having to start again, waste a plug and make the cable a bit shorter again.

play04:55

Once you’re happy with the end, insert into the crimping tool and squeeze it closed tightly

play04:59

- this will do two things, not only will it crimp the plug, holding the entire cable in

play05:03

place and splicing all 8 contacts into the 8 wires but the sharp blade on the rear will

play05:07

also trim all the excess off resulting in a perfect, neat job every time. You can then

play05:17

slide the strain relief boot up and over the clip and that’s the first end done! Repeat

play05:21

exactly the same process with the same wiring order for the other end, and then be sure

play05:25

to test the cable with a cable tester like this.

play05:28

This checks all 8 wires individually - it will tell you that the 8 connections are good

play05:32

on both ends and also that it’s wired up correctly on both ends in the right order

play05:36

- or at least the same order both ends. It does this by sending a pulse down each wire

play05:41

in turn, from the Master to the Remote. You should see the sequence going from 1 to 8

play05:45

on both ends, and when it does you know that the cable is working perfectly. If you get

play05:54

a sequence like this then you know you’ve made a mistake somewhere. If it’s a long

play06:01

cable run - and both Cat5e and Cat6 cable are good for 100m - then you can separate

play06:05

the Master and Remote parts of the cable tester and put one at each end of the cable run to

Rate This

5.0 / 5 (0 votes)

Related Tags
RJ45 CablingEthernet CableCable TesterNetwork SetupWire StrippingPass Through PlugsStrain ReliefWiring StandardsDIY NetworkTech Tutorial