Learn How To Create Master Detail Pages in Oracle APEX - Part 10
Summary
TLDRThis Tech mining video tutorial guides viewers on creating a system for customer order management, featuring interactive reports and professional order forms. It demonstrates setting up a master-detail relationship between 'demo orders' and 'demo order items' tables, with functionalities to view, add, modify, and delete orders and line items. The video also covers navigation preferences, server-side conditions, and the use of triggers and sequences for automatic data population, aiming to enhance user experience and streamline the order processing workflow.
Takeaways
- 📝 The video introduces a setup for taking customer orders and creating professional order forms.
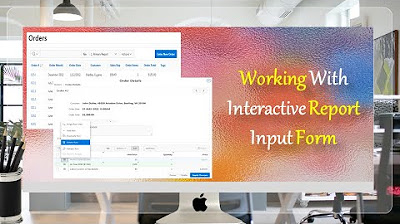
- 🔗 The initial page is an interactive report listing all orders, with the order number serving as a link to detailed pages.
- 🔍 Clicking an order number navigates to a page displaying details of the selected order, with data retrieved from a master table and order details in an interactive grid.
- ⏭️ Auto-generated buttons on the order details page allow for easy navigation between customer orders.
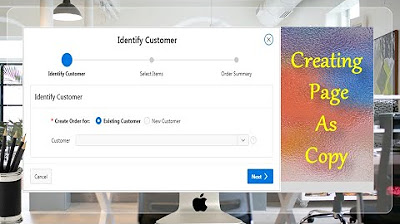
- 🛒 Orders are taken through a sequence of wizard steps, starting with selecting or creating a customer, then selecting products, and finally reviewing a summary of the order.
- 🖥️ The setup is based on two database tables: 'demo orders' and 'demo order items'.
- 🔑 The primary key column for orders is automatically populated using a trigger and sequence, facilitating record navigation.
- 📊 The detail page reflects a one-to-many relationship between the two tables and includes an interactive grid for line item management.
- 🛂 The wizard automatically creates pages and processes, including a master-detail page and DML operations for order management.
- 🔄 The interactive grid supports adding, modifying, and deleting line items, with processes to handle these DML operations.
- 🔄 The server processes requests, performs validations, and evaluates navigation branches to determine the landing page after a page submission.
- 🛂 The order details page includes navigational buttons for browsing orders and controls like a date picker for the order timestamp field.
Q & A
What is the main purpose of the video 'Tech mining'?
-The video 'Tech mining' is designed to teach viewers how to create a setup for taking orders from customers and generating professional-looking order forms.
How does the initial page of the setup function in the video?
-The initial page is an interactive report that lists all orders. Clicking on an order number takes the user to another page showing the details of the selected order.
What is the role of the upper and lower pane on the order details page?
-The upper pane retrieves data from the master table, while the lower pane displays order details in an interactive grid.
What are the auto-generated buttons for on the order details page?
-The auto-generated buttons are for record navigation, allowing users to move from one customer order to another.
How are customer orders taken in the described setup?
-Customer orders are taken through a sequence of wizard steps, starting with selecting an existing customer or creating a new one, followed by selecting ordered products, and ending with a summary of the placed order.
How can an order be viewed, modified, or deleted after it is created?
-Once an order is created, it can be viewed, modified, or deleted through the order details page using the order number link column in the orders main page.
What is the relationship between the two tables 'demo orders' and 'demo order items'?
-The 'demo orders' table and 'demo order items' table have a one-to-many relationship, where the 'demo orders' table is the master table and 'demo order items' is the relational child table carrying line item information for each order.
How is the primary key column populated in the 'demo orders' table?
-The primary key column in the 'demo orders' table is populated automatically using a trigger named 'demo orders' and a sequence named 'demo order sequence'.
What is the purpose of the 'demo order items' trigger?
-The 'demo order items' trigger is used to populate the primary key column of the 'demo order items' table, getting the next primary key values from a sequence named 'demo order item sequence'.
What are the navigation preferences set in the setup?
-The navigation preferences are set to map to an existing entry and set the existing navigation menu entry to 'orders'.
How does the interactive grid region on the details page function?
-The interactive grid region allows users to view, add, modify, and delete line items. It is associated with a process that handles DML operations on the 'demo order items' table.
What happens when the 'Next' or 'Previous' buttons are clicked on the order details page?
-When the 'Next' or 'Previous' buttons are clicked, the page is submitted to get the next or previous order record from the server, and the visibility of these buttons is controlled by a server-side condition.
What is the purpose of the 'Save', 'Create', and 'Delete' buttons on the order details page?
-The 'Save' button is used to record updates to an existing order, the 'Create' button is for new orders to handle the insert operation, and the 'Delete' button removes a complete order, with a confirmation dialog appearing when clicked.
How does the Oracle Apex server handle page submissions?
-When a page is submitted, the Oracle Apex server receives a submit request, performs the associated processes and validations, and then evaluates where to land in the application via branches.
What is the significance of the 'Behavior' and 'Server-side condition' properties in the branches?
-The 'Behavior' property specifies the action to take when a branch is followed, such as redirecting to a different page, while the 'Server-side condition' determines whether a branch is followed based on certain conditions.
How can a user add more products to the order details section?
-A user can add more products to the order details section by clicking the 'Add Row' button in the interactive grid region.
What is the issue with the current setup from a professional viewpoint?
-From a professional viewpoint, the current setup is not user-friendly because adding a new product requires manual entry of its ID, and the interactive grid is not visible when creating a new order.
Outlines
📊 Interactive Order Management System Overview
This paragraph introduces a video tutorial on setting up an interactive order management system using Tech mining. It explains the initial setup, which includes an interactive report listing all orders with clickable order numbers that link to detailed order pages. The system allows for viewing, modifying, and deleting orders through a sequence of wizard steps for order creation, including selecting customers, choosing products, and reviewing order summaries. The video also mentions the creation of two main pages and the use of database tables 'demo orders' and 'demo order items' to manage the order data.
🔍 Deep Dive into Order Details and Wizard Steps
The second paragraph delves deeper into the order details page, which fetches master row data from the 'demo orders' table and includes a static content region for master information and navigational buttons for record navigation. It discusses the server-side conditions controlling the visibility of navigation buttons and the functionality of the 'cancel', 'delete', 'save', and 'create' buttons. The paragraph also describes the interactive grid region for managing line items and the automatic row processing DML type processes generated by the wizard for handling DML operations. The video script outlines the server's role in processing page submissions, evaluating application navigation, and the use of branches to determine the landing page after processing.
Mindmap
Keywords
💡Tech mining
💡Order forms
💡Interactive report
💡Master table
💡Detail page
💡Auto-generated buttons
💡Wizard steps
💡One-to-many relationship
💡DML operations
💡Navigation menu entry
💡Branches
Highlights
Introduction to creating a setup for taking customer orders and creating professional order forms.
Interactive report as the initial page lists all orders with clickable order numbers to view details.
Details page shows data from master table and order details in an interactive grid.
Auto-generated buttons for record navigation to move between customer orders.
Order taking process through a sequence of wizard steps for customer selection and product ordering.
Summary of placed order displayed in the last wizard step.
Ability to view, modify, or delete orders through the order details page using order number links.
Creating two main pages using a conventional route for order management.
Master-detail page setup reflecting a one-to-many relationship between database tables.
Setting navigation preferences to map to an existing entry for order management.
Automatic population of primary key columns using triggers and sequences.
Detail page properties configuration for relational child tables carrying line item information.
Master-detail page creation with interactive grid for viewing and managing line items.
Wizard-generated processes for handling DML operations on master and detail tables.
Server-side conditions controlling the visibility of navigation buttons.
Redirect action for cancel button to return to the main orders page without saving.
Delete, save, and create buttons for order management with corresponding database operations.
Branches for application navigation after DML operations with server-side conditions.
Run setup from the orders navigation menu entry for interactive order management.
Upper master region and lower interactive grid region on the order details page for comprehensive order viewing.
Navigational buttons for browsing through orders and a date picker for the order timestamp.
Suggestions for improving user-friendliness and avoiding manual data entry issues.
Transcripts
a very warm welcome to Tech mining
this video will teach you how to create
a setup to take orders from customers
and how to create professional looking
order forms
initial page of this setup is an
interactive report that lists all orders
first order number column acts as a link
when you click an order number you see
another page of this setup this page
will show details of selected order
upper pane of this page retrieves data
from master table while lower pane shows
order details in an interactive grid
page also contains a couple of
auto-generated buttons for record
navigation
you can use these buttons to move from
one customer order to another
orders from customers will be taken
through a sequence of wizard steps
this first wizard step will allow you to
select an existing customer or create a
new one
in this second wizard step you will
select ordered products
after placing order this last wizard
step will show summary of placed order
once an order is created you can view
modify or delete it through order
Details page using order number link
column in orders main page
let's create two main Pages using the
conventional route
[Music]
stir detail page reflects a one-to-many
relationship between two tables in a
database
select the drill down option which opens
input form in a separate page
fill the page attributes on next screen
foreign
[Music]
this setup is based on two database
tables demo orders and demo order items
[Music]
set navigation preference to map to an
existing entry set existing navigation
menu entry to orders
[Music]
click next
[Music]
primary key column is populated
automatically behind the scene using a
trigger named demo orders via a sequence
named demo order sequence
order ID column selected is the
navigation order column used by previous
and next buttons on the order Details
page to navigate to a different Master
record
click next
[Music]
set following properties on the detail
page screen
[Music]
foreign
[Music]
you specify the relational child table
which carries line item information for
each order
[Music]
click next
[Music]
primary key column of this table is
populated automatically via a trigger
named demo order items which gets the
next primary key values from a sequence
named demo order item sequence
in the master detail foreign key list
you select the sole auto-generated
foreign key which creates a relationship
between the master and detail tables
click create page button
[Music]
Master detail page created
before running these Pages let's see
what the wizard has done for us
this master page page 4 is created with
an interactive report to display a list
of all order from the orders master
table
The Details page page 29 on the other
hand has many things to reveal
this process fetches Master Row from
demo orders table
if you see a different process name then
there is nothing to worry about as it
sometimes happens due to change in Apex
version
this first region is a static content
region which displays Master information
like customer ID order date and so on
[Music]
these buttons are added to the master
region to fetch previous and next orders
respectively
for example when you click the next
button the page is submitted to get the
next order record from the server
visibility of the next and previous
buttons is controlled by a server-side
condition which says that these buttons
will be visible only when their
corresponding hidden items have some
values
foreign
cancel button closes page 29 and takes
you back to page 4 without saving an
order
for this a redirect action is generated
in the behavior section with page 4 set
as the target
[Music]
delete button removes a complete order
when this button is clicked a
confirmation dialog pops up using its
Target property
save button records updates to an
existing order in the corresponding
database table
this button is visible when you call an
order for modification
create button is used for new orders to
handle the insert operation
this button is visible when you are
creating a new order
this is an interactive grid region which
is generated to view add modify and
delete line items
[Music]
click processing tab
this automatic row processing DML type
process is generated by the wizard to
handle DML operations performed on The
Master row of an order which gets into
the demo orders table
it comes into action when you click
delete save or create buttons
save interactive grid data processes
responsible to handle DML operations on
the details table demo order items
this process is associated with the
details section interactive grid to
insert update or delete interactive grid
rows
when you submit a page Oracle Apex
server receives a submit request and
performs the processes and validations
associated with that request
after that it evaluates where to land in
the application via these branches
by default it selects the current page
as the target page
a branch has two important properties
behavior and server-side condition
first two branches are created to keep
you on page 29. these branches are
associated with next and previous
buttons see when button pressed
properties of these branches
the third one takes you back to page
four when you click any other button on
this page see the behavior section that
specifies the redirect
[Music]
foreign
run this setup from the orders
navigation menu entry
[Music]
the first page page 4uc is an
interactive report
it has a create button which is used to
create a new order
click the edit link represented with a
pencil icon in front of any record to
call the order Details page page 29
the order Details page has two regions
the upper region which is called the
master region displays information from
the demo orders table while the lower
interactive grid region shows relevant
line item information from the demo
order items table
besides usual buttons the master region
has two navigational buttons at the top
these buttons help you move forward and
backward to browse orders
the order timestamp field is
supplemented with a date picker control
[Music]
you can add more products to the details
section by clicking the add row button
from a professional Viewpoint this page
is not user-friendly
if you try to add a new product you have
to enter its ID manually
moreover if you try to create a new
order you won't see the interactive grid
to avoid all such problems follow the
subsequent parts of video to make the
setup user-friendly
thanks for watching
[Music]
Voir Plus de Vidéos Connexes
Data Entry Form Oracle APEX - Part 20
Give a New Look to Interactive Report & Input Form - Part 15(B)
Create Select Item Place Order Page - Part 18(B)
Create Setup to Display Records In an Order Calendar - Part 28
Customize Interactive Report With Actions Menu - Part 11
Final Step of Order Creation Wizard (Order Summary) - Part 19
5.0 / 5 (0 votes)