Data Entry Form Oracle APEX - Part 20
Summary
TLDRThis Tech mining video offers a streamlined method for managing orders through a single interface. It guides viewers on creating master and detail pages, setting up SQL queries, and configuring properties for order ID columns and interactive grids. The tutorial covers modifying attributes for buttons, implementing PL/SQL code for DML operations, and testing order creation, modification, and deletion functionalities, all within a user-friendly model dialog page layout.
Takeaways
- π The video demonstrates a simplified approach to add, modify, and delete orders using a single interface.
- π’ The master page is set to number 404, and the detail page to number 429, with specific instructions on how to create these pages.
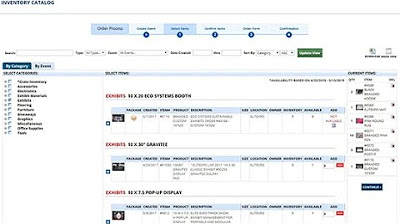
- π A SQL query source code is provided for the orders region, which should replace the auto-generated query.
- π« The 'Order ID' column type is set to 'Hidden' for certain steps in the process.
- π The 'Order Number' column is transformed into a link column to navigate to the correct page number.
- π The 'Clear Cache' properties are set to ensure the correct page number is pointed to.
- π οΈ The 'Create' button's attributes are modified to initiate a direct entry of a new order instead of calling page 11.
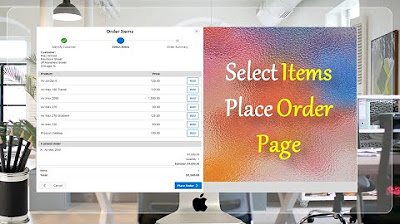
- π The 'Page Mode' property is set to 'Model Dialog' for Page 429, with specific width, height, and maximum width properties.
- π The 'Customer ID' item is rendered as a select list, showing the names of all customers for easier selection.
- π The 'Previous' and 'Next Order ID' buttons are positioned on top of the region for easier navigation.
- π The interactive grid's source type is set to a SQL query, with server-side conditions adjusted to always show the grid.
- π The process form's type is changed from 'Interactive Grid Automatic Row Processing' to 'PL SQL Code' for manual handling of insert, update, and delete operations.
Q & A
What is the main purpose of the video?
-The main purpose of the video is to demonstrate a simpler approach to add, modify, and delete orders using a single interface.
What are the master and detail pages mentioned in the video?
-The master and detail pages referred to in the video are the pages used to manage orders, where the master page is set to number 404 and the detail page to 429.
How does the video suggest modifying the order ID column?
-The video suggests transforming the order ID column into a link column and setting its column type to Hidden.
What is the source type for the 'Orders' region set to in the video?
-The source type for the 'Orders' region is set to SQL query in the video.
What is the purpose of setting the 'Save public report' option to true?
-Setting the 'Save public report' option to true allows the report to be shown at runtime.
How does the video describe modifying the 'Create' button's attributes?
-The video describes modifying the 'Create' button's attributes to call page 429 directly for entering a new order instead of initiating the order wizard by calling page 11.
What page mode is suggested for the detail page in the video?
-The video suggests setting the page mode property to 'model dialog' for the detail page.
What does the video instruct regarding the 'Customer ID' item in the select list?
-The video instructs that the 'Customer ID' item, which was displayed as a display-only item in the previous method, will now be rendered as a select list carrying the names of all customers.
How is the interactive grid's visibility managed in the video?
-The video instructs to remove the server-side condition by choosing a select placeholder, making the interactive grid visible every time the page is accessed.
What process type is recommended for the 'Process form on demo orders' in the video?
-The video recommends changing the process type from 'interactive grid automatic row processing' to 'PL SQL code'.
What is the final step demonstrated in the video for testing order deletion?
-The final step demonstrated in the video for testing order deletion is clicking the 'Delete' button on the order details page.
Outlines
π οΈ Master and Detail Page Configuration
The video script introduces a streamlined approach to manage orders through a single interface, focusing on the creation and setup of master and detail pages. It guides the user to set the master page number to 404 and the detail page to 429, with specific instructions on how to replace the auto-generated SQL query with a custom one provided in the video description. The script emphasizes the importance of validation and proper configuration of columns, such as setting the 'Order ID' column to hidden and transforming it into a link column. It also details the process of configuring the 'Create' button to initiate a new order on page 429, and the setup of the page properties to ensure a functional model dialog.
π Interactive Grid and DML Operations
This paragraph delves into the customization of the interactive grid region and the implementation of DML operations for order management. It describes the process of setting the source type to SQL query for the order details and modifying columns with specific properties. The script explains how to remove server-side conditions to ensure the grid's visibility and how to configure buttons for navigation and operations within the grid. It also covers the setup of a PL/SQL code process to handle insert, update, and delete operations manually, including the configuration of success and error message boxes. The paragraph concludes with a demonstration of how to use these functionalities in the application, including entering a new order, editing order details, and aligning columns for reporting.
π Order Modification and Deletion Process
The final paragraph outlines the steps for adding, modifying, and deleting products within an order using the interactive grid. It provides instructions on how to add more products to an order, modify quantities, and apply changes using the 'apply changes' button. The script also demonstrates how to remove a product from an order using the 'delete rows' option and how to delete an entire order from the order details page. The video concludes with a teaser for the next video, which will cover looping through the interactive grid, and ends with a thank you note to the viewers.
Mindmap
Keywords
π‘Tech mining
π‘Interface
π‘Master and Detail Pages
π‘SQL Query
π‘Validation
π‘Hidden Column Type
π‘Link Column
π‘Page Mode
π‘Select List
π‘Interactive Grid
π‘DML Operation
π‘Success and Error Message Boxes
Highlights
Introduction to a simpler approach for adding, modifying, and deleting orders using a single interface.
Demonstration of creating master and detail pages with specific page numbers set to 404 and 429.
Setting the Source type to SQL query and providing the source code link in the video description.
Ensuring validation success and setting the 'Order ID' column type to Hidden.
Transforming the order number column into a link column for navigation.
Clearing cache properties to ensure correct page navigation.
Enabling the 'Save public report' option for runtime visibility.
Customizing attributes for the 'Create' button to initiate direct order entry.
Setting page mode to 'model dialog' for enhanced user interaction.
Adjusting properties for customer ID to render as a select list with customer names.
Positioning 'Previous' and 'Next' order ID buttons for easier navigation.
Configuring the interactive grid region with a custom SQL query.
Removing server-side conditions to make the interactive grid always visible.
Editing column properties for the interactive grid to enhance data presentation.
Creating a 'Buttons' region for better organization of interactive elements.
Customizing button actions and placements under the 'Buttons' region.
Switching process type to PL/SQL code for manual handling of DML operations.
Specifying SQL insert, update, and delete statements within the PL/SQL code.
Configuring success and error message boxes for user feedback.
Testing the new order creation process with customer selection and order date entry.
Adding and modifying products in an order using the 'Add Row' and 'Apply Changes' features.
Demonstrating order deletion using the 'Delete' button on the order details page.
Preview of looping through interactive grid in the next video.
Transcripts
a very warm welcome to Tech mining
this stuff is added purposely to present
something that would be helpful to you
in your future endeavors
however in this video I'll demonstrate a
simpler approach to add modify and
delete orders using just one interface
execute all the steps performed to
create the two master and details Pages
as we did previously
[Music]
this time set number of the master page
to 404
[Music]
.
[Music]
foreign
[Music]
number of The Details page to 429
[Music]
foreign
[Music]
etail page created
on this page click orders region
set Source type to SQL query
source code link is in video description
open part 7 folder to get file used in
video
replace this auto-generated query with
the source code 1. make sure validation
must be successful
expand columns node
make sure order ID column type is set to
Hidden
for the format mask property
select this value
[Music]
transform this order number column into
a link column
[Music]
clear cache properties to 429 to point
to the correct page number
set the name property to p429 order ID
[Music]
click orders region then attributes tab
select this value to exclude the link
column
under actions menu turn on Save public
report option to show it at runtime
set the following attributes for this
create button
note that previously this buttons was
used to initiate the order wizard by
calling page 11.
[Music]
here we are calling page 429 to directly
enter a new order
click this save button to save your work
[Music]
in this page finder box enter 429
then press this go button to call Page
429 in the page designer
click this root node set the page mode
property to model dialog which comes
above a normal page
set width height and maximum width
properties to 900 800 and 1200
respectively also set dialog template to
wizard model dialog
these following items individually and
set their corresponding properties this
customer ID item which was displayed as
display only item in the previous method
will now be rendered as a select list
carrying the names of all customers
[Music]
this SQL query defined for the select
list automatically shows the correct
customer name when you navigate from one
order to another
[Music]
foreign
[Music]
in this region buttons node forget
previous and next order ID buttons set
position property to edit to place them
on top of the region
click this order details interactive
grid region
set its source type to SQL query and
replace this default query with this
source code query
[Music]
scroll down to server-side condition
section
[Music]
and choose this select placeholder for
this property this step removes this
condition and makes the interactive grid
visible every time you access this page
expand this columns node
edit these following columns using their
specified properties and values
[Music]
foreign
[Music]
foreign
[Music]
-click this wizard buttons node
select create region
set title of this new region to buttons
[Music]
template to buttons container
in regions buttons node
click this cancel button
set its region property to buttons
set this region for delete save and
create buttons too
this action will place all the four
buttons under the buttons region
click this processing tab
make sure that this process form form on
demo orders sits before this order
details save interactive grid data
process switch this process type from
interactive grid automatic row
processing to PL SQL code
in this code we specified SQL insert
update and delete statements to manually
handle the three operations for the
interactive grid data
[Music]
in this success message box
enter the DML operation performed
successfully
similarly enter could not perform the
DML operation in the error message box
then save your work
open page 404
foreign
[Music]
application button
click this enter New Order button
select a customer
and pick an order date
[Music]
click this edit button in the order
details region
with this product appearing in first row
along with its default quantity enter
some value in the unit price column then
click this create button
the order will be saved and you will see
this success message on this order
Master page click this actions menu then
click columns
from do not display columns move all
columns to display in report section
then align these columns using these
buttons
[Music]
foreign
thank you
click order number you just saved
then click this add row button to add
some more products
just select a product enter some value
in the quantity column
[Music]
then click apply changes button
the modified order will be saved as well
[Music]
from this row actions menu using this
delete rows option try to remove a
product from this order
finally click this delete button on the
order Details page to test order
deletion
[Music]
in the next video we will perform
looping through interactive grid
thanks for watching
[Music]
Browse More Related Video
Final Step of Order Creation Wizard (Order Summary) - Part 19
Create Select Item Place Order Page - Part 18(B)
Customize Interactive Report With Actions Menu - Part 11
Give a New Look to Form Page Interactive Report - Part 15(A)
Display Images in Oracle APEX Interactive Reports and Forms - Part 8
Create Setup to Display Records In an Order Calendar - Part 28
5.0 / 5 (0 votes)