KONFIGURASI CISCO PACKET TRACER || UKK JURUSAN TKJ 2025 PAKET 2
Summary
TLDRIn this tutorial, the instructor walks through designing a network using Mikrotik. The video covers essential devices such as routers, switches, home routers, PCs, and laptops, guiding users on how to wire, configure, and assign IP addresses. Key steps include connecting the devices, setting up wireless networks with WPA2 security, and testing the network to ensure successful communication between devices. Troubleshooting tips are also provided for resolving connection issues. The tutorial highlights the importance of following each step carefully for effective network setup and management.
Takeaways
- 😀 The tutorial teaches how to design and configure a network using essential devices like Cloud, Switch, Router, Home Router, PC, and Laptop.
- 😀 A step-by-step approach is used to connect devices starting with the Cloud and Switch, followed by Router and Home Router.
- 😀 Properly configure each device by ensuring that correct cables are used and devices are powered on in the correct sequence.
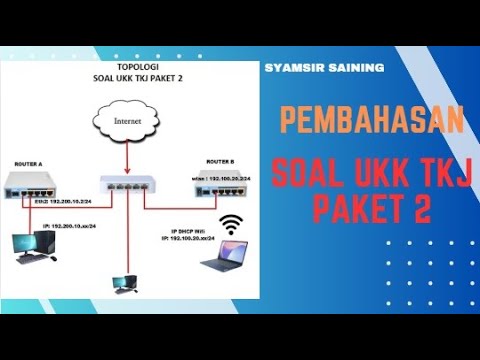
- 😀 It’s essential to assign appropriate IP addresses for all devices in the network for proper communication (e.g., Router 200.100.1.x, PC 100.10.x).
- 😀 The Home Router setup involves configuring Wi-Fi security with WPA2 PSK, setting the SSID (e.g., SMK Bisa), and providing the correct password.
- 😀 The tutorial emphasizes the importance of turning off devices before modifying certain settings, such as changing RJ45 to wireless modules.
- 😀 To connect the Laptop wirelessly, switch to the Wi-Fi module and ensure the SSID and password are correctly set.
- 😀 Regular testing of the network connections (Laptop to Home Router, Home Router to Router, Router to PC) is crucial to ensure everything is functioning properly.
- 😀 If any connection issues arise, the scenario can be deleted and reset to start fresh with new configurations.
- 😀 The tutorial explains the distinction between wireless (on the right) and wired (on the left) network configurations, showing how both work together.
- 😀 The network design process is hands-on and should be done step-by-step to avoid mistakes, with attention to device connections and IP assignments.
Q & A
What is the main purpose of this tutorial?
-The main purpose of this tutorial is to teach how to design a network using MikroTik, including setting up different devices like routers, switches, and computers, and configuring their IP addresses and network settings.
What are the essential components required for the network design in this tutorial?
-The essential components required are a Cloud, Switch, Router, Home Router, PC, and Laptop.
Why do we need to turn off the Cloud before adding the RJ45 slot?
-The Cloud needs to be powered off before adding the RJ45 slot because its port is empty by default, and the slot must be inserted properly before the device is powered back on.
What types of cables are used to connect the devices in this network setup?
-The devices are connected using Ethernet cables, specifically cross cables or straight cables, depending on the connection.
What is the significance of the IP addresses assigned to each device?
-The IP addresses are used to uniquely identify and allow communication between the devices on the network. Each device must have a distinct IP address to function properly within the network.
How do you configure the IP addresses for the Router, PC, and Home Router?
-The IP addresses are configured as follows: the Router gets 100.100.100.1, the PC gets 100.100.100.100, and the Home Router gets 100.100.100.101.
What security settings should be applied to the Home Router's wireless network?
-The Home Router's wireless network should be secured with WPA2 PSK (Pre-Shared Key) for better security, and the password should be between 1 to 8 characters long.
What is the function of the Home Router's SSID in this network?
-The SSID (Service Set Identifier) is the name of the Wi-Fi network. In this tutorial, the SSID is set to 'SMK Bisa', which helps users identify the wireless network to connect to.
What should you do if a connection fails during the network setup?
-If a connection fails, you can reset the scenario and start over by using the 'New Scenario' option to attempt the setup again without any prior configurations.
How do you test the network after configuration?
-After configuring the devices, test the network by ensuring successful connections between the laptop and home router, home router and router, and router and PC.
Outlines

Cette section est réservée aux utilisateurs payants. Améliorez votre compte pour accéder à cette section.
Améliorer maintenantMindmap

Cette section est réservée aux utilisateurs payants. Améliorez votre compte pour accéder à cette section.
Améliorer maintenantKeywords

Cette section est réservée aux utilisateurs payants. Améliorez votre compte pour accéder à cette section.
Améliorer maintenantHighlights

Cette section est réservée aux utilisateurs payants. Améliorez votre compte pour accéder à cette section.
Améliorer maintenantTranscripts

Cette section est réservée aux utilisateurs payants. Améliorez votre compte pour accéder à cette section.
Améliorer maintenantVoir Plus de Vidéos Connexes
Pembahasan Soal Uji Kompetensi Keahlian TKJ Paket 2 Tahun 2025

Tutorial Cara Belajar Mikrotik Tanpa Routerboard Lengkap Dengan Virtualbox | Bagian 1

Cara Setting Mikrotik | Cara Konfigurasi Dasar Mikrotik
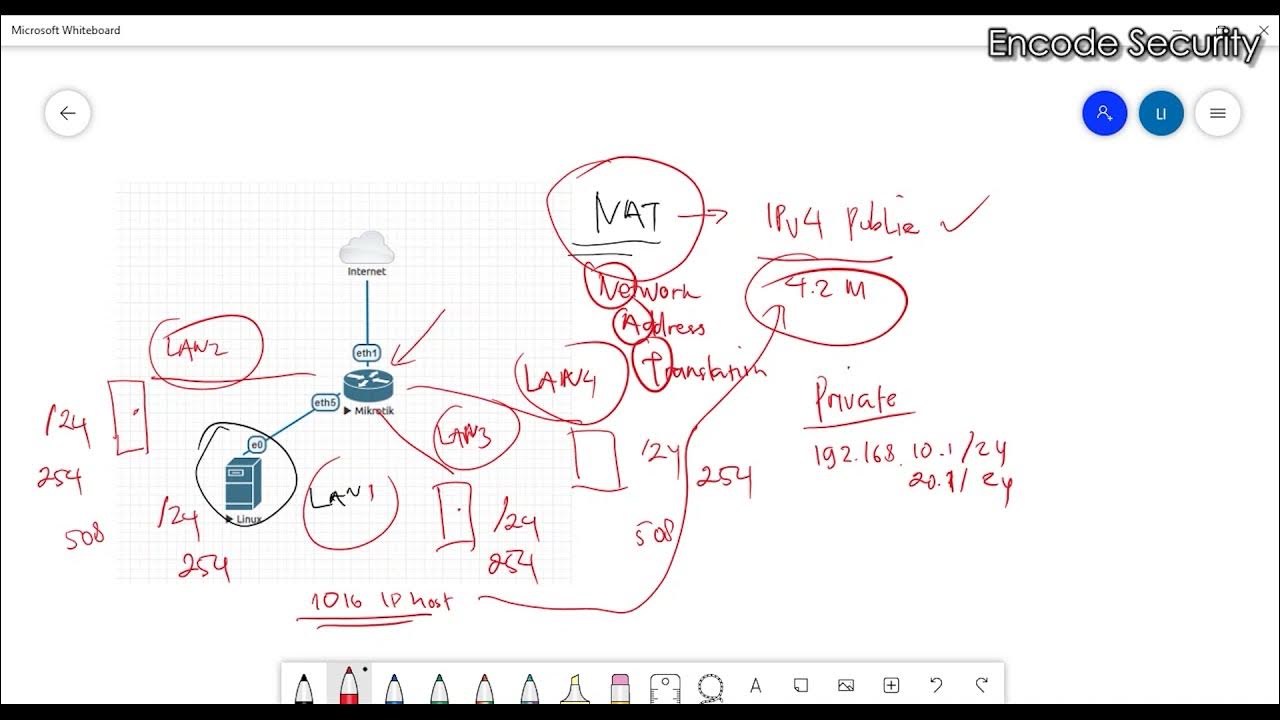
Apa itu NAT ? Bagaimana NAT Bekerja ?

Konfigurasi Mikrotik Dasar Part 3 Membuat Hotspot Pada Mikrotik

KONFIGURASI VLAN PADA ROUTERBOARD RB 941 - RB 750 - MIKROTIK TUTORIAL
5.0 / 5 (0 votes)
