Microsoft Project - Full Tutorial for Beginners in 13 MINUTES!

Skills Factory
18 Jan 201713:34

Summary

TLDRThis tutorial video offers a comprehensive guide to mastering Microsoft Project Professional 2016. It covers the essentials of task organization, including creating and managing tasks, adjusting timelines, and setting up working days and holidays. The video also delves into advanced features such as task dependencies, resource allocation, and generating project reports. Viewers are encouraged to provide feedback for future guides, highlighting the interactive and informative nature of the content.

Takeaways

  • 📊 Microsoft Project is a tool for organizing tasks, duties, appointments, and resources in both personal and business settings.
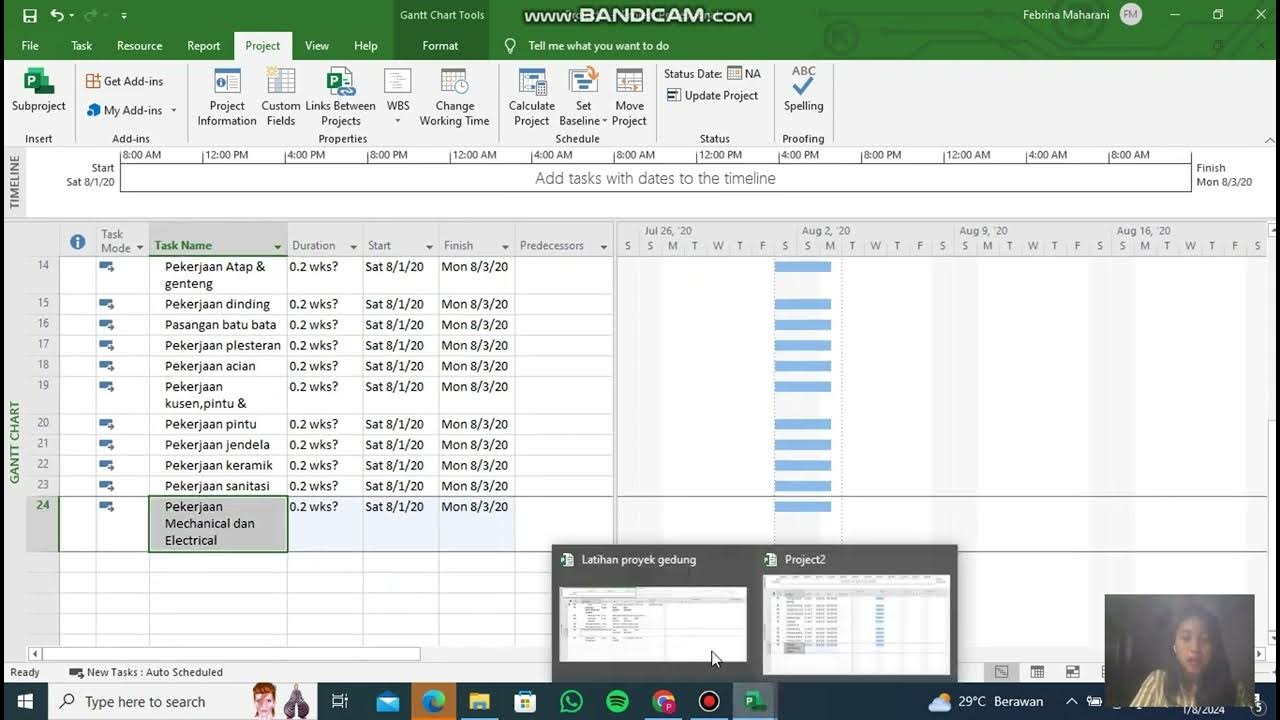
  • 🖥️ The interface is divided into a task list on the left and a Gantt Chart on the right, which visualizes tasks over time.
  • ➡️ Tasks can be added, named, and assigned start and finish dates, with durations displayed as colored rectangles on the Gantt Chart.
  • 🔄 Users can adjust task durations and timings directly on the Gantt Chart by clicking and dragging.
  • 🗓️ Non-working days and holidays can be set under 'Change Working Time' to accurately reflect project timelines.
  • 🔄 Tasks can be split into multiple parts, affecting start and finish dates but not the overall duration.
  • 📈 The timeline at the top of the workspace can be customized to show specific tasks, and tasks can be added or removed from it.
  • 🔗 Task dependencies can be managed through links, with different types of links available (Finish-to-Start, Start-to-Start, Finish-to-Finish, Start-to-Finish).
  • 📌 Tasks can be manually scheduled or auto-scheduled, with auto-scheduled tasks being organized by Project based on constraints.
  • 👥 Resources can be added and assigned tasks in the Team Planner view, with over-allocations highlighted to ensure resources are not overburdened.
  • 📊 Reports can be generated to analyze work distribution, resource load, and other project details, with customization options available.

Q & A

  • What is Microsoft Project Professional used for?

    -Microsoft Project Professional is used to organize tasks, duties, appointments, and resources in both private and business environments.

  • How do you start a new project in Microsoft Project 2016?

    -To start a new project, you click on 'Blank Project' from the welcome screen, which then opens the general workspace.

  • What are the two main sections of the Microsoft Project workspace?

    -The workspace is divided into two main sections: the task list on the left and the Gantt Chart on the right.

  • How can you add a new task in Microsoft Project?

    -You can add a new task by defining it under 'Task Name', setting the 'Start' and 'Finish' dates, and it will appear as a colored rectangle on the Gantt Chart.

  • How do you customize the appearance of a task in the Gantt Chart?

    -You can customize the appearance of a task by double-clicking on it or using the bar in the bottom right corner to modify the zoom.

  • What does the length of a task bar in the Gantt Chart represent?

    -The length of a task bar in the Gantt Chart represents the entire duration of the task.

  • How can you delete a task in Microsoft Project?

    -You can delete a task by right-clicking on it and selecting 'Delete Task'.

  • How does Microsoft Project handle non-working days and holidays?

    -Non-working days and holidays are indicated by dark grey columns in the Gantt Chart, and you can set them up by going to 'Change Working Time' under the Project tab.

  • What is the purpose of the 'Split Task' feature in Microsoft Project?

    -The 'Split Task' feature allows you to split a task into multiple parts, which affects the Start and Finish dates but not the Duration.

  • How can you adjust the percentage of completion of a task in Microsoft Project?

    -You can adjust the percentage of completion by hovering on the far left side of the task bar and moving the thin dark line that represents the completion.

  • What is the difference between Manually Scheduled and Auto Scheduled tasks in Microsoft Project?

    -Manually Scheduled tasks are controlled by the user, while Auto Scheduled tasks are fully edited and organized by Project according to constraints like workload, deadlines, and holidays.

  • How do you create a link between dependent tasks in Microsoft Project?

    -To create a link, select all dependent tasks in the correct order, hold CTRL, and click on 'Link the Selected Tasks'.

  • How can you save your work in Microsoft Project?

    -You can save your work by going to 'File' and then 'Save As', and choose a location on your computer to save the .mpp file.

  • What is the Team Planner in Microsoft Project used for?

    -The Team Planner is used to add resources, assign tasks to team members, and manage the distribution of work within a business team.

  • How can you handle overallocated resources in Microsoft Project?

    -If a resource is overallocated, you can distribute the working hours across different resources or tasks to ensure each resource works a maximum of eight hours per day.

Outlines

00:00

📊 Introduction to Microsoft Project Professional 2016

This paragraph introduces viewers to Microsoft Project Professional 2016, a tool designed for task and resource management in both personal and business settings. It explains the basic features and the initial steps to start using the software. The welcome screen is highlighted, which offers ready templates and access to past projects. The general workspace is described as divided into a task list on the left and a Gantt Chart on the right. The process of creating tasks, customizing their appearance, and adjusting their duration and timing on the Gantt Chart is outlined. Additionally, the paragraph covers how to delete tasks, modify working days and holidays, split tasks, and adjust the percentage of task completion. It also introduces the timeline feature and how to manage task information, including setting priorities, durations, and deadlines.

05:05

🔗 Task Dependencies and Scheduling in Microsoft Project

Paragraph 2 delves into the concept of task dependencies and different types of scheduling in Microsoft Project. It explains how to create and manage task links to ensure that certain tasks are completed before others can begin, using Finish-to-Start links as the default. The paragraph also discusses how to identify and edit task dependencies, with a focus on the Predecessors column and the Task Information panel. The difference between Manually Scheduled and Auto Scheduled tasks is clarified, with Auto Scheduled tasks being automatically organized by the software based on constraints. The paragraph further explains how to add and manage tasks that are not yet defined, as well as the use of Summaries and Milestones to group and track tasks effectively.

10:08

👥 Resource Management and Task Assignment in Microsoft Project

The final paragraph focuses on resource management and task assignment within Microsoft Project. It describes how to add and configure resources, including setting their availability and non-working days. The process of assigning tasks to resources and the implications of over-allocation are discussed, along with solutions to distribute workloads effectively. The paragraph also touches on the Task Usage workspace for detailed resource allocation and the ability to assign multiple resources to a single task. The creation of reports to analyze project plans is introduced, emphasizing the use of various design tools to generate insights into work distribution and resource load. The video concludes with a call to action for viewers to subscribe for more Microsoft Office guides.

Mindmap

Keywords

💡Microsoft Project Professional

Microsoft Project Professional is a project management software application developed by Microsoft. It is designed to assist a project manager in developing a plan, assigning resources to tasks, tracking progress, managing the budget, and analyzing workloads. In the context of the video, it is the primary tool being introduced and demonstrated, with the aim of teaching viewers how to use it for organizing tasks, duties, appointments, and resources effectively.

💡Gantt Chart

A Gantt Chart is a type of bar chart that illustrates a project schedule. It is used to show the start and finish dates of the terminal elements and summary elements of a project. In the video, the Gantt Chart is a central feature of Microsoft Project, used to visually represent the timeline of tasks, with each task depicted as a colored rectangle whose length indicates the duration of the task.

💡Tasks

In project management, a task is a piece of work that is undertaken to achieve a specific goal or to deliver a specific outcome. The video script describes how to define tasks within Microsoft Project, including setting their names, start and finish dates, and durations. Tasks are fundamental to the video's theme as they are the building blocks of any project plan within the software.

💡Working Days

Working days refer to the days of the week when work is typically conducted. The video explains how to set up working days and holidays in Microsoft Project, which is crucial for accurately calculating task durations and scheduling. By default, Microsoft Project considers Monday to Friday as working days, but users can customize this to include or exclude specific days as needed.

💡Dependencies

Dependencies in project management refer to the relationships between tasks where the completion of one task is contingent upon the completion of another. The video demonstrates how to create links between tasks in Microsoft Project, which helps in managing task sequences and ensuring that dependent tasks are not started before their prerequisites are completed.

💡Resources

Resources in project management are the assets needed to perform the tasks within a project. In the video, resources are discussed in the context of assigning people to tasks within Microsoft Project. Resources can be added, and their availability and working days can be defined, which is essential for planning and allocating work effectively.

💡Timeline

A timeline in project management is a graphical representation of a project's schedule, showing the sequence and duration of the project's tasks. The video mentions a timeline feature in Microsoft Project, which allows users to select which tasks are displayed along the top of the Gantt Chart, providing a high-level view of the project's progress.

💡Summaries

In Microsoft Project, a Summary task is a roll-up of multiple tasks, allowing for the grouping of related tasks into a single higher-level task. The video explains how to create and manage summaries, which can help in simplifying the view of complex projects by consolidating smaller tasks under a broader category.

💡Milestones

A Milestone in project management is a significant point or event in a project. It represents a major deliverable or a key event in the project timeline. The video script includes instructions on how to add milestones in Microsoft Project, which can be used to mark important dates or checkpoints within the project schedule.

💡Task Mode

Task Mode in Microsoft Project refers to whether a task is manually scheduled or auto-scheduled. Manually Scheduled tasks are those where the user specifies the start and finish dates, while Auto Scheduled tasks are automatically scheduled by the software based on constraints and dependencies. The video discusses both modes and how they can be set within the software.

💡Reports

Reports in Microsoft Project are used to analyze and present project data in a structured format. The video mentions creating reports to view and quantify the distribution of work, resource load, and other project-related information. Reports can include descriptions, charts, and tables, and are an essential tool for project analysis and communication.

Highlights

Introduction to Microsoft Project Professional 2016 for quick and easy task organization.

Overview of Microsoft Project's utility in organizing tasks, duties, appointments, and resources.

Explanation of the welcome screen and its features, including ready templates and past projects.

Guidance on starting a new project from a blank document.

Introduction to the workspace layout, including the task list and Gantt Chart.

How to define tasks, including naming, start, and finish dates.

Customization of task appearance and zoom adjustments on the Gantt Chart.

Instructions on deleting tasks and modifying their duration and time period.

Understanding working days, holidays, and how to set them up in the project.

Splitting tasks into multiple parts and its impact on scheduling.

Adjusting the percentage of task completion and its visual representation.

Using the timeline to selectively display tasks and its management.

Accessing and editing task information, including priority, duration, and deadlines.

Managing task dependencies and creating links between tasks.

Differentiating between Manually Scheduled and Auto Scheduled tasks.

Adding and managing tasks that are not yet defined or inactive.

Utilizing Summaries and Milestones to group and mark tasks.

Saving a Project document and understanding the .mpp file format.

Combining multiple projects into one for comprehensive management.

Integrating Resources into the project plan and assigning tasks to team members.

Managing Resource allocation, avoiding overallocation, and distributing workload.

Creating and customizing Reports to analyze project data and resource distribution.

Encouragement to subscribe for more Microsoft Office video guides.

Transcripts

play00:08

Hello there, and welcome to this video! Let's discover all the tips and

play00:12

features you need to learn to start using Microsoft Project Professional

play00:16

2016 quickly and easily!

play00:18

Leave us feedback in the video description to improve our following guides

play00:23

for Microsoft Office!

play00:25

Microsoft Project is used to organize tasks, duties, appointments and

play00:29

also resources in the best and easiest way, in both private and business

play00:34

environments. In this video we will cover the very basic features to start.

play00:40

When you open Project a welcome screen appears, showing ready templates

play00:44

with different topics you can start from. Furthermore, on the left, you can

play00:49

directly open projects made in the past.

play00:53

In order to understand how to use Microsoft Project, let's start from a

play00:57

blank document, by clicking on Blank Project. At this point, the general

play01:01

workspace opens. This is divided in two main sides: on the left you have

play01:07

a quick table that will contain the full list of the tasks to be done; and

play01:11

on the right you have the Gantt Chart, which is used to check the job

play01:14

spread over the timeline above, indicating one day per column.

play01:20

First, you have to define the tasks to be completed on the left.

play01:25

Under Task Name, give a name to your task, and define when it starts under

play01:31

Start, and when it should finish under Finish. Once created, the new task

play01:38

appears on the Gantt Chart as a colored rectangle. The length depicts the

play01:44

entire duration of the task. You can customize its appearance by

play01:49

double-clicking on it.

play01:54

Also, use the bar in the bottom right corner to modify the zoom on the

play01:58

Gantt chart.

play02:01

In case you make as mistake and you want to remove a task from the list,

play02:04

just right-click on it and go to Delete Task.

play02:09

You can extend or shorten the time duration of the task directly on the

play02:12

Gantt Chart as well, by clicking and dragging from its edges, or move the

play02:18

time period by clicking and dragging it.

play02:22

On the left, under Duration, you can see the total number of working days

play02:26

(d) required between the Start and the Finish date. By default, the

play02:31

working days are counted from Monday to Friday, with no holidays in between.

play02:37

You can set up the working days and the holidays by going to the Project

play02:41

tab on top, and then to Change Working Time. Below, under Exceptions, add

play02:47

all holidays and non-working days you need. Apply these changes by pressing

play02:53

the OK button.

play02:55

Inside the Gantt Chart, all non working days and holidays are indicated

play02:59

by dark grey columns.

play03:02

Also, if you right-click on a task bar, and go to Split Task, you can split

play03:06

a task in multiple parts. This will have an impact on the Start and the

play03:11

Finish dates, but not on the Duration time. The several bars will become

play03:16

independent, changing length according to the working days under Duration.

play03:21

If you hover on the far left side of the bar, you will be able to adjust

play03:25

the percentage of completion of the task, indicated by a thin dark line

play03:29

on the bar itself. Notice that this follows the working days only.

play03:37

Besides the tasks list and the Gantt chart, you also have a timeline at

play03:42

the very top. This does not list all the tasks you have, but just the ones

play03:45

you prefer to show off. To add tasks to the timeline, just right-click on

play03:51

a task and go to Add to Timeline. To remove it, right-click on it from the

play03:57

timeline and go to Remove from Timeline.

play04:02

You can check all the information related to one task by double-clicking on

play04:06

it.

play04:07

Inside the Task Information panel you can adjust percentage, priority,

play04:12

duration and dates under General; you can add custom comments under Notes,

play04:20

and you can also specify the final Deadline for each task under Advanced.

play04:23

This should be the date you must take into account, and this is indicated

play04:28

as a down green arrow on the Gantt chart. If you edit your task and you go

play04:32

over the Deadline, Project will warn you under the information column on

play04:35

the left.

play04:39

In case you have tasks that are dependent, for example when one can't

play04:42

start if another is not finished yet, you can use the links.

play04:47

To create a link, you have to first select all the tasks that are dependent.

play04:52

Just hold CTRL down, and select all the tasks in the correct order. Then

play04:57

just click on Link the Selected Tasks.

play05:00

In the Gantt chart, all Links are indicated through arrows, indicating the

play05:05

type of dependence. By default you create Finish-to-Start links, which

play05:09

means that the following task must not start until the preceding one (or

play05:14

Predecessor) is finished. These Links are quite useful, since Project will

play05:18

automatically organize your tasks in order to respect this dependence.

play05:23

On the left, the Predecessors column indicates the row number the task is

play05:30

dependent on. If it is 3, such task is dependent on the third row task in

play05:32

the list.

play05:34

If you go to Predecessors on the Task Information panel, you can check

play05:39

all the links related to the task. Under Type, you can also change the kind

play05:44

of link: choose Start-to-Start to make it start when the Predecessor starts;

play05:50

choose Finish-to-Finish to make it finish when its Predecessor finishes; or

play05:58

choose Start-to-Finish to make the task finish when the Predecessor starts.

play06:03

Always check the Gantt chart for a quick representation. Consider that the

play06:08

Start and Finish dates of the tasks may change depending on the link

play06:12

chosen. You can still move and edit tasks as you like, but do respect the

play06:17

time dependence given from the links in order not to get any errors. In

play06:22

case you make any bad or conflicting entries, task bars may have dashed

play06:25

contours.

play06:29

Inside Project you have two kinds of tasks. So far we have seen the

play06:33

Manually Scheduled tasks, indicated by a pin symbol under the Task Mode

play06:38

column. You can also choose an Auto Scheduled task, indicated by a blue

play06:42

rectangular symbol. Separate from the other tasks, the Auto Scheduled tasks

play06:48

may be fully edited and organized by Project according to the several fixed

play06:52

constraints, such as work load, deadlines and holidays. Indeed, the way to

play06:57

edit them is identical to the Manually Scheduled Tasks.

play07:01

In the Task Information panel of the Auto Scheduled Task, under Advanced,

play07:06

you can set the same options as seen, plus other new details, such as

play07:11

Constraint type, date, and Task type, that are specific for the Auto

play07:16

Scheduled tasks.

play07:19

In case you have tasks that are not yet defined, you can simply add them in

play07:22

your task list, and leave them off by going to Inactivate above. In this

play07:29

way, these won't interfere at all with the management of the other tasks.

play07:34

Besides tasks, you can also add and use Summaries and Milestones. You can

play07:41

find these under the Task tab, in the Insert section.

play07:45

The Summary is a collection of several tasks grouped together. Create a

play07:49

new Summary, rename it, and set it Manually or Auto under Task Mode. With

play07:58

the Summary open, add all the tasks that it must contain, or simply

play08:04

select existing ones from the far left, right-click and use Cut and then

play08:10

Paste to add these inside the Summary. Close the Summary to add new tasks

play08:16

outside of it.

play08:19

In the Gantt chart, the Summary is a simple container, long enough to

play08:23

contain the earliest Start and the latest Finish date of all its task.

play08:29

Just in case the Summary is defined as Manually Scheduled you are able to

play08:33

modify its duration directly. Just include all the relevant tasks in the

play08:38

time, or it will show errors indicated by a red colored bar.

play08:47

a single point, with a label indicating its day and month.

play08:52

To save your Project document, just go to File and then to Save As. Choose

play08:58

Browse to save inside your computer. Project documents are saved with a

play09:03

.mpp file format.

play09:05

You can also include multiple projects inside one, especially if you want

play09:09

to take care of multiple projects at the same time. If you go to the

play09:14

Project tab, and then to Subproject, you can browse for your Project file

play09:18

to import it into the current one. This will show up as an Auto Scheduled

play09:22

Summary. This is a live link: if the imported projects are edited, you

play09:28

will see all the changes that are affected.

play09:34

Project Professional is also very useful to organize tasks inside a

play09:38

business team, composed by Resources, these are people that are going to

play09:42

perform the different tasks listed inside the plan.

play09:47

In the bottom right corner, click on Team Planner. This workspace lets you

play09:51

add the Resources and assign their respective tasks. On top, under the

play09:57

Resource tab, click on Add Resources to add people. You can import from

play10:02

your own Address Book, or add manually by using Work Resource....

play10:07

Then, double-click on the new row to define the Resource Name, Email, Group,

play10:14

telephone number, their availability under Resource Availability, and other

play10:18

options. If you go to Change Working Time... you can add non working days

play10:24

and holidays to the specific Resource. Click OK to apply all.

play10:30

Additionally, under Unassigned Tasks, you have all the tasks that must

play10:34

still be assigned to your team. You may drag and drop a task to the correct

play10:39

Resource row, matching the correct time placement by observing the timeline

play10:43

above. In case you have a task split in several parts, you can assign it by

play10:49

moving the last part, and even assign different parts to different

play10:53

Resources.

play10:55

When you come back to the Gantt Chart workspace, you will see the Resource

play10:58

names assigned to each task.

play11:01

While assigning tasks, Project highlights bad entries through a thin red

play11:05

contour. For example when a task starts on a non-working time, or when

play11:11

you assign too many tasks to a single Resource, making it overallocated.

play11:16

In case a Resource is overallocated, you have to distribute the daily

play11:20

working hours in the correct way. If you go to the Task Usage workspace,

play11:25

you can check day by day the total working hours per Resource for each

play11:29

single task listed. By default, each Resource can work a maximum eight

play11:35

hours per working day in total: if you assign more than this amount, the

play11:41

Resource will be overallocated, as the red icon on the far left suggests.

play11:47

In this case, you have to spread the working hours through different

play11:52

Resources or tasks in order to reach maximum eight hours. You can change

play11:55

the hours by selecting the cell and typing inside. For complex projects,

play12:01

the Auto Scheduled tasks are managed automatically, depending on the

play12:04

constraints inserted.

play12:07

You can also assign a single task to multiple Resources. Inside the Task

play12:13

Usage workspace, if you right-click on a task, and go to Assign Resources...

play12:16

you can add other Resources to work on a single task. Just select the

play12:21

Resource to add and then go to Assign. This will make it easier to

play12:25

distribute the working hours on each task.

play12:32

Inside Project, you have the possibility to make quick Reports on your

play12:37

project plan. If you go to the Report tab, you can create a new sheet

play12:40

through the New Report button. These Reports are used to see and quantify

play12:45

the distribution of the work to be done, the load of each single Resource

play12:49

and additional information through descriptions, charts and tables that you

play12:53

can add and edit through all the design tools on top.

play12:57

All these Reports are saved inside the Report workspace, in the bottom

play13:02

right corner, and listed under the Recent button on top.

play13:06

Thanks for watching this video! Subscribe to us for more amazing free

play13:10

video guides for Microsoft Office!

Rate This

5.0 / 5 (0 votes)

Etiquetas Relacionadas
Project ManagementMicrosoft ProjectTask SchedulingGantt ChartResource PlanningWorkflow OptimizationTime ManagementSoftware TutorialTeam CollaborationProfessional Skills
¿Necesitas un resumen en inglés?