CSS NC II COC 3: SET UP COMPUTER SERVER. #computersystem #computernetwork #computerrepair #css

IT.RexChannel
10 Feb 202426:19

Summary

TLDRIn this tutorial, ITX guides viewers through setting up a Windows Server 2012 R2 for CSS, NC2, and CC3. The process involves disabling antivirus, configuring firewall settings, adding DHCP, DNS, and file service roles, and promoting the server to a domain controller. The video also covers folder redirection, creating organizational units, and configuring Group Policy Management. Finally, it demonstrates how to add a user and change a computer from a workgroup to a domain, providing step-by-step instructions for a successful setup.

Takeaways

  • πŸ› οΈ The video is a tutorial on setting up a Windows Server with specific services, starting with disabling antivirus software like 360 Antivirus.
  • πŸ”§ After disabling antivirus, the script instructs to disable the Windows Firewall and enable all inbound and outbound rules to prepare the server for configuration.
  • 🌐 The tutorial covers the process of setting up network sharing by creating a shared folder with read and write permissions for all users.
  • πŸ–₯️ The script details the steps to add roles to the server such as DHCP, DNS, and File Services, which are crucial for network management and client connectivity.
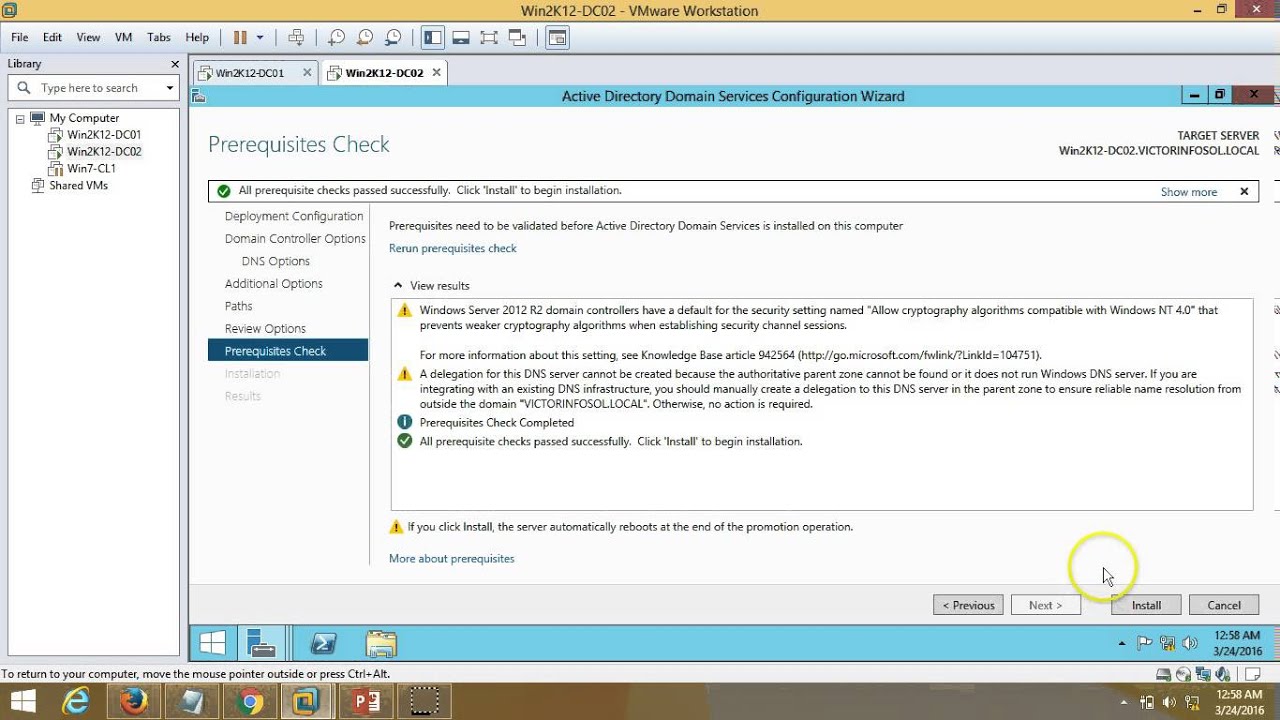
  • πŸ“ The video explains how to complete the DHCP configuration and promote the server to a domain controller using the Active Directory Domain Services Configuration Wizard.
  • 🏒 It guides through the creation of a new forest with a root domain name, setting up organizational units, and configuring Group Policy Management (GPM).
  • πŸ“ The process of folder redirection is explained, which involves setting up a network path for users' folders to be redirected to a common location.
  • πŸ‘€ The script includes the creation of a new user account in Active Directory, specifying the username, password, and organizational unit.
  • πŸ”„ The tutorial demonstrates how to change a client computer from a workgroup to a domain, including updating network settings and logging in with the new domain credentials.
  • πŸ”„ Similar to the client setup, the script also covers the process for setting up a netbook to join the domain.
  • πŸ“š The video concludes with verifying that the domain setup was successful by checking the domain name and user access on the client and netbook.

Q & A

  • What is the first step mentioned in the video script for setting up a CSS, nc2, and cc3 server?

    -The first step is to disable the antivirus, specifically the 360 antivirus, by right-clicking the icon and toggling the button to permanently close it.

  • Why is it necessary to disable the antivirus before setting up the server?

    -Disabling the antivirus is necessary to prevent it from interfering with the setup process or blocking certain necessary actions during the server configuration.

  • What is the purpose of opening the Network and Sharing Center in the server setup process?

    -The Network and Sharing Center is opened to access the Windows Firewall settings, which need to be configured to allow the proper functioning of the server.

  • How many profiles are mentioned to be turned off for the Windows Firewall in the script?

    -Three profiles are mentioned to be turned off: domain, private, and public.

  • What does the script suggest doing with the inbound and outbound rules in the Windows Firewall?

    -The script suggests enabling all the rules for both inbound and outbound traffic in the Windows Firewall.

  • What are the four roles that need to be added in the server manager during the setup process?

    -The four roles to be added are DHCP, DNS, File Services, and Active Directory Domain Services.

  • What is the significance of the 'css.org' domain name mentioned in the script?

    -The 'css.org' domain name is used as an example for setting up the root domain name during the Active Directory Domain Services configuration.

  • What is folder redirection and how is it configured in the script?

    -Folder redirection is a Group Policy setting that allows the redirection of a user's folder to a network location. In the script, it is configured by creating a new folder on the local disk D, sharing it with read and write permissions, and then setting the policy to redirect everyone's folder to this network path.

  • How is the organizational unit (OU) created in the Active Directory Users and Computers tool according to the script?

    -The OU is created by navigating to the server manager, selecting tools, then Active Directory Users and Computers, right-clicking on the domain, and choosing 'New' followed by 'Organizational Unit'. The name 'CSS' is given to the OU.

  • What is the process described in the script for creating the first user in the domain?

    -The process involves going to the Active Directory Users and Computers tool, right-clicking on the CSS Users OU, selecting 'New' and then 'User', filling out the user details such as first name, last name, and username, setting a password, and finally clicking 'Finish' to create the user.

  • What steps are taken to change a computer from a workgroup to a domain in the script?

    -The steps include opening the Network and Internet settings, changing the adapter options to use the server's IP address as the preferred DNS server, and then changing the computer's domain from the workgroup to the domain 'css.org', followed by a restart of the computer.

Outlines

00:00

πŸ› οΈ Setting Up CSS, NC2, and CC3 Infrastructure

The video script begins with the host, ITX, guiding viewers through the initial setup of a computer server for CSS, NC2, and CC3. The first steps involve disabling antivirus software and adjusting the Windows Firewall settings to turn off the firewall for all profiles and enable all inbound and outbound rules. Following this, the script moves on to configuring server manager with the addition of DHCP, DNS, and file services. The host emphasizes the importance of each step in setting up the server environment correctly.

05:00

🌟 Post-Deployment Configuration and Domain Controller Promotion

After successfully installing the necessary server roles, the script proceeds with post-deployment configuration, which includes completing the DHCP configuration and promoting the server to a domain controller. The host uses the Active Directory Domain Services Configuration Wizard to create a new forest with a root domain name 'css.org'. A strong password policy is highlighted by setting 'CSS@12345' as the domain admin password. The script details the steps to verify the domain creation and the installation process, culminating in a server restart.

10:02

πŸ“ Folder Redirection and Organizational Unit Creation

The script continues with folder redirection by creating and sharing a 'Folder Redirection' folder on the local D drive, setting permissions for 'Everyone' to have read and write access. It then describes the process of creating an Organizational Unit (OU) within Active Directory Users and Computers for the CSS domain. The Group Policy Management (GPM) configuration follows, where a Group Policy Object (GPO) is created and linked to the CSS OU to manage folder redirection settings across the domain.

15:04

πŸ‘€ Creating the First User Account in Active Directory

The host demonstrates how to create the first user account in the newly configured Active Directory. The process involves navigating to Active Directory Users and Computers, creating a new user within the CSS OU, and setting up the user's properties, including username, password, and account options. The script emphasizes the importance of remembering the username and password for future access and the need to restart the server to apply the settings.

20:04

πŸ”„ Transitioning from Workgroup to Domain for Client and Netbook

The script outlines the process of changing a client computer's network configuration from a workgroup to the newly created 'css.org' domain. This involves configuring network settings, such as IP addresses and DNS, and updating the workgroup/domain settings in the system properties. The host provides a step-by-step guide on how to log in with the newly created user account, Geraldine, and confirms the successful transition to the domain.

25:05

πŸ”„ Replicating Domain Transition Process for Netbook

The final paragraph of the script briefly mentions the process of transitioning a netbook to the 'css.org' domain, which is identical to the process followed for the client computer. The host assures viewers that the steps are the same, indicating a consistent approach to domain integration for all devices. The video concludes with a reminder for viewers to ask questions, like, and subscribe to the channel for more tutorials.

Mindmap

Keywords

πŸ’‘CSS

CSS in the script likely stands for a fictional organization's name, 'C2', which seems to be the abbreviation for 'CSS'. It is used to illustrate the setting up of a domain in a Windows Server environment, as seen in the script where the domain name 'css.org' is created.

πŸ’‘Antivirus

Antivirus software is a program designed to detect, prevent, and remove malicious software. In the video, it is mentioned to disable antivirus, specifically '360 antivirus', before starting the setup process to avoid any interference with the server configuration.

πŸ’‘Windows Firewall

Windows Firewall is a security feature in the Microsoft Windows operating system that comes configured with a set of predefined rules to protect the computer from unauthorized access. The script instructs viewers to disable the firewall temporarily during the server setup process.

πŸ’‘Inbound and Outbound Rules

Inbound and outbound rules in the context of Windows Firewall refer to the permissions set for incoming and outgoing network traffic. The script describes enabling all inbound and outbound rules to ensure that the necessary network traffic is allowed for the server's operation.

πŸ’‘Server Manager

Server Manager is a Microsoft Management Console snap-in that provides a unified interface for managing the roles and features installed on a server. The script mentions accessing Server Manager to add roles such as DHCP, DNS, and File Services to the server.

πŸ’‘DHCP

DHCP stands for Dynamic Host Configuration Protocol, a network management protocol used to dynamically assign IP addresses and other network configuration parameters to devices on a network. The script includes adding the DHCP server role to the Windows Server.

πŸ’‘DNS

DNS stands for Domain Name System, which is the system that translates human-friendly domain names (like 'css.org') into IP addresses that computers use to identify each other on the network. The script involves adding the DNS server role to the server.

πŸ’‘Active Directory Domain Services

Active Directory Domain Services is a feature of Windows Server that provides a centralized repository for storing and retrieving information about network resources. The script describes installing this feature to manage the domain 'css.org'.

πŸ’‘Organizational Unit (OU)

An Organizational Unit in Active Directory is a container used to organize objects such as users, groups, and computers. The script mentions creating an OU named 'CSS' to structure the domain environment.

πŸ’‘Group Policy Management (GPM)

Group Policy Management is a feature in Windows Server that allows administrators to centrally manage user and computer settings. The script describes configuring GPM to redirect user folders to a common network path, which is part of setting up a domain environment.

πŸ’‘Folder Redirection

Folder Redirection is a feature that allows administrators to move the location of commonly used folders to a network location. In the script, it is used to redirect users' desktop folders to a shared folder on the server, enhancing data management and accessibility.

πŸ’‘Domain Controller

A domain controller is a server that responds to security authentication requests and accesses the network logon process. The script details the process of promoting a server to a domain controller, which is essential for managing user authentication and access within the 'css.org' domain.

πŸ’‘Workgroup to Domain

The process of changing a computer's network configuration from a workgroup to a domain involves joining the computer to a domain, allowing it to be centrally managed. The script provides steps for changing a client computer from a workgroup to the 'css.org' domain.

Highlights

Disabling antivirus software is the first step in setting up a CSS, NC2, and CC3 server.

Instructions on how to disable 360 antivirus and enable the toggle button for server setup.

Navigating to Network and Sharing Center to adjust Windows Firewall settings.

Turning off the firewall for all profiles: domain, private, and public.

Enabling all inbound and outbound rules in Windows Firewall for server setup.

Accessing Server Manager to add roles and features for DHCP, DNS, and file services.

Completing the installation of server roles and features.

Configuring the DHCP and committing changes for post-deployment setup.

Promoting the server to a domain controller using the Active Directory Domain Services Configuration Wizard.

Creating a new forest with a root domain name 'css.org'.

Setting a functional level for Windows Server 2012 R2 and configuring domain settings.

Verifying NetBIOS name and proceeding with domain installation.

Restarting the computer to apply changes and logging in with the new domain.

Folder redirection setup by sharing a folder on the local disk D.

Creating an Organizational Unit (OU) in Active Directory Users and Computers.

Configuring Group Policy Management (GPM) to redirect everyone's folder to the same network path.

Creating the first user 'Geraldine' in the CSS domain.

Instructions on changing a computer from a workgroup to a domain.

Updating network settings and logging in as the first user in the domain.

Final steps to ensure the client computer is successfully joined to the 'css.org' domain.

Process for setting up additional client computers to join the domain.

Transcripts

play00:00

hello everyone welcome back to my

play00:03

channel this is I Rex after your service

play00:07

for today's video I will share to you

play00:10

the CSS

play00:12

nc2 coc3 set up computer

play00:17

server

play00:28

G

play00:34

to start with cc3 first you have to

play00:38

disable the

play00:40

antivirus so 360 antivirus

play00:44

disable icon and right click

play00:49

then green uh

play00:53

toggle button so you have to click that

play00:56

one then you have to

play00:58

click permanent ly

play01:02

close and

play01:08

okay after

play01:11

antivirus we'll go to the

play01:13

network right click then open Network

play01:16

and Sharing

play01:18

Center then go to Windows

play01:21

Firewall click then go to advanced

play01:28

settings

play01:31

then go to Windows

play01:33

Firewall with Advanced Security on local

play01:36

computer have to right click and

play01:40

properties so there are three profile

play01:45

to uh off the firewall so domain private

play01:49

and public so e

play01:51

off click that one off

play01:55

private

play01:56

of public of and apply then

play02:02

okay so if You observe

play02:05

so profile domain profile private

play02:08

profile and public so turn off

play02:13

firewall then next go to inbound

play02:16

rules then if You observe there are

play02:21

uh choices all you have to do to enable

play02:25

all rules so you have to uh control a to

play02:29

select all then right

play02:31

click enable

play02:34

rule

play02:36

yeah after inbound so proceed to

play02:39

outbound rules same process CR a right

play02:44

click then enable

play02:48

rule so so Ang H before start S3

play02:55

so configure or set

play02:58

up after inbound and outbound rules so

play03:02

go

play03:03

to server

play03:05

manager icon server manager so click

play03:08

this

play03:13

one then so this is the server manager

play03:18

dashboard so in cc3 we have to add rules

play03:22

there are four rules to be added so we

play03:25

have DHCP adds DNS and file serice

play03:31

so so click this

play03:33

one then so add RS and future Reser so

play03:38

just follow my process so click

play03:42

next then

play03:45

next then next

play03:48

again

play03:53

then okay check the DHCP

play03:56

server then add

play03:58

features then

play04:03

continue then click the DNS

play04:06

server add

play04:08

features then

play04:11

continue then also active directory

play04:14

domain

play04:20

services so click this one then add

play04:25

features then so the part Services is

play04:29

already

play04:30

um added

play04:33

so check and proceed to

play04:38

next then next

play04:40

again then

play04:42

next then next next again and

play04:48

install

play04:58

so

play05:00

so I'll just

play05:04

wait okay so Futures installation

play05:08

progress installation succeeded on

play05:10

server soos y complete now then

play05:18

close so after the

play05:20

install server cut long rules so we'll

play05:25

go to this triangle warning then right

play05:28

click then complete the hcp

play05:33

configuration just

play05:35

commit then

play05:38

close

play05:42

so so this time post deployment

play05:46

configuration so promote This Server to

play05:49

a domain controller so click this

play05:53

one then so active directory domain

play05:57

Services configuration wizard

play06:03

so click this add new Forest add a new

play06:09

Forest then create a root domain name or

play06:13

domain name so in our case so since we

play06:17

are CSS and C2 so we'll just uh put

play06:22

css. org so meaning of org is

play06:26

organization remember the domain

play06:30

and click

play06:38

next so loing

play06:42

sa so just wait few

play06:50

minutes so this time oh this is now the

play06:53

Windows Server 2012 R2

play06:56

so loing so

play07:00

this steps is creating a domain now

play07:03

which is the cs.org

play07:07

so work group domain

play07:11

na so there will be a password and

play07:14

confirmed password so our password will

play07:16

be

play07:18

CSS at 1 2 3 4 5 then also here CSS at 1

play07:26

2 3 4

play07:27

5 okay so if

play07:31

ever password create so next

play07:37

is

play07:41

unfunctional Windows Server 2012 so

play07:48

example password confirm

play07:53

password so that is now correct password

play07:58

so we'll proceed

play08:01

next then just click

play08:04

next so verify net

play08:13

bios so

play08:16

CSS so we'll just proceed next

play08:22

soy Lang Yan

play08:28

domain

play08:32

then proceed next

play08:35

again then

play08:38

next so a so we'll just proceed to click

play08:42

the

play08:45

install they will

play08:47

install this one so we will wait again

play08:51

for the complete of

play08:53

installation

play08:58

so

play09:09

restart

play09:14

computer so yeah so restarting the

play09:19

computer so after

play09:22

restart so if You

play09:26

observe CSS SL administrator so result

play09:31

domain which is cis.org or c.

play09:39

organization

play09:43

Adat to domain server so password CSS at

play09:51

1 2 3 4

play09:57

5 this time this will be the the next

play09:59

step for cc3 which is the folder red

play10:02

Direction

play10:04

so go to file file explorer then so we

play10:10

have local desk C and local desk d so

play10:14

folder red Direction local desk

play10:20

d then

play10:22

create then new then folder

play10:26

so folder

play10:29

red

play10:33

Direction then we have to share this

play10:37

one so right click then go to properties

play10:43

then

play10:44

sharing and share this

play10:47

folder and drop down menu everyone add

play10:51

then read and

play10:53

write so then

play10:56

share then done so we not anymore go to

play11:00

this Advan sharing so all we have to do

play11:03

is to get this network path CU magam

play11:08

next steps so this one you just have to

play11:12

highlight then right click then

play11:18

copy again copy and

play11:22

close then we will go to the next step

play11:24

which is to create organizational unit

play11:27

so go to server

play11:30

manager then

play11:33

tools then go to active directory users

play11:37

and

play11:38

computer

play11:41

click then so if You observe cs.org so

play11:47

click that one so just click this one

play11:50

then right

play11:51

click then

play11:54

new and organizational

play11:57

unit then

play12:00

click so we'll get the name CSS Capital

play12:06

then

play12:12

okay next step is the group group policy

play12:16

management

play12:18

configuration or the GPM

play12:21

configuration so go to tools then click

play12:24

the group policy

play12:27

management

play12:30

then click the forest so par triangle so

play12:36

you have to click that

play12:38

one then go to

play12:42

domains then go to c.

play12:45

orb

play12:47

so CSS or the organizational unit so CSS

play12:52

so we have to right click this one and

play12:55

create a GPO in this domain and Link it

play12:58

here

play13:00

then

play13:03

so

play13:06

direct

play13:10

desktop then

play13:12

okay so we'll do the

play13:14

process so right click this one

play13:18

then

play13:22

edit then go to users configuration just

play13:26

double

play13:27

click

play13:29

then policies double

play13:31

click window setting double

play13:33

click folder red Direction double

play13:37

click

play13:39

then go to

play13:41

desktop so right

play13:43

click then go to

play13:46

properties so click the drop down menu

play13:50

then click the basic redirect everyone's

play13:52

folder to the same

play13:55

location then so there will be a root

play14:00

path

play14:01

so network path

play14:04

soe so right click then paste yeah so

play14:09

just

play14:11

apply then do you want to continue yes

play14:15

then

play14:17

okay so y steps for GPM configuration so

play14:22

we just close this one para distract

play14:26

another

play14:27

steps

play14:30

so next step we will create a a first

play14:34

user which is the

play14:37

client from work group CS

play14:42

T css.org

play14:46

so so follow the steps go to server

play14:49

manager then go to tools then active

play14:53

directory users and computer

play14:57

click then

play15:00

organizational unit which is the

play15:03

CSS users or

play15:06

user first is the client then

play15:10

next then next Naman is the netbook so

play15:14

we'll just proceed to the client so

play15:18

right click then go to new then

play15:22

users so for example

play15:26

so first name example so

play15:32

Geraldine so y Ang Client First user

play15:38

then so last name is

play15:43

spirit so full name so user L name so

play15:47

example Geraldine so we'll just name it

play15:51

as

play15:53

uh

play15:55

geraline then put at least 1 2 3 4 5 so

play16:00

y so

play16:02

if username be sure name and

play16:07

number sometimes user if name or one

play16:14

letter in input

play16:19

so convincing

play16:24

username so remember the username so

play16:27

next

play16:29

then confirm password so again

play16:32

CSS at 1 2 3 4 5

play16:36

then this is at 1 2 3 4 5

play16:41

so you will select the second and third

play16:46

checkbox so we will select this one so

play16:49

error so once error so meaning to say we

play16:53

have to uh uncheck this first para

play16:57

second and third so uncheck then check

play17:02

then check so then next then

play17:07

finish soong first user which is

play17:11

geraldin espir 2 so remember

play17:15

the um username so after that one we

play17:19

will have to restart this one to uh

play17:22

update the settings

play17:25

and um user when we create the client

play17:30

computer uh to change from work group to

play17:34

domain

play17:37

so

play17:38

so

play17:41

restart the

play17:47

server so restart

play17:51

Now log

play17:57

in

play18:00

okay before we proceed with the uh setup

play18:02

of the client to make it uh from work

play18:05

group to domain so we'll just remember

play18:08

the IP address of the

play18:14

server

play18:16

uh effect or gagana client from work

play18:21

group to domain

play18:23

soita so then type

play18:27

CMD

play18:29

then so IP address which is first you

play18:33

have to type ip

play18:36

config command IP so IP address server

play18:45

192.168.0.1 02 so

play18:48

gagam

play18:52

client uh change to domain and also the

play18:55

netbook it change to domain so first

play18:58

user is Geral so C

play19:04

isange okay

play19:07

so

play19:10

you so we are now in a client computer

play19:16

so domain which is first user

play19:20

Geral

play19:22

so Cent name

play19:27

soain

play19:29

Geral Gerald so we will have to get the

play19:34

uh steps for uh creating uh from work

play19:38

group to the main so first go

play19:43

to file explorer then this PC right

play19:48

click and

play19:50

properties so it work

play19:55

CDA which is the css.org

play19:58

so Change

play20:00

setting then

play20:02

change

play20:04

then from CS

play20:06

tesda we'll make it a domain so our name

play20:11

is

play20:14

css.org

play20:17

so uh

play20:20

domain before you enter the okay

play20:26

so my effect or gagana itong domain so

play20:30

we'll go to the this one the network so

play20:34

right click then open network and

play20:36

internet

play20:37

settings so go to change adapter

play20:41

option this one so

play20:48

palita y so go to Properties or Nang uh

play20:53

change adapter

play20:55

option then ethernet double click then

play21:00

properties

play21:02

yeah so internet uh protocol version

play21:08

4 then properties

play21:12

so so if you if you recall

play21:19

soize IP address server which is

play21:24

192.168.0.1 so y ilagay

play21:28

before

play21:35

proed preferred DNS

play21:39

server okay so is set up here in that

play21:44

work then go

play21:45

to uh work group to

play21:48

domain let proceed

play21:51

SO2 168

play21:55

0102 so Ang IP

play22:00

server

play22:02

from simple work

play22:05

grou so

play22:07

okay then close so you have to close

play22:11

then

play22:13

close then here so C is.org so we'll

play22:18

just

play22:21

click pop up username at password n

play22:25

first user so click

play22:28

okay so yeah so n so what's the name of

play22:34

the user so we have

play22:40

Geraldine 1 2 3 4 5 soan a user

play22:46

so then

play22:48

password the CSS at 1 2 3 4 5 so if ever

play22:55

uh you D with your password so you can

play22:57

click this one show password

play23:00

yeah okay so then click

play23:04

okay

play23:07

soim from work group to domain so

play23:09

welcome to the css.org domain so from

play23:12

work

play23:14

grpa belong na server na cis.org then

play23:20

okay then okay then close then restart

play23:26

now

play23:31

so restart client so we'll click this

play23:35

one so if You

play23:37

observe password which is client so

play23:41

Geraldine 1 2 3 4 5 user

play23:48

so other

play23:51

user so click this one then username so

play23:57

Geraldine

play24:02

then 1 2 3 4

play24:04

5 then password CSS at 1 2 3 4 5 so if

play24:10

you have doubt with your password so you

play24:12

can click this one for

play24:14

confirmation

play24:16

then log in so geraldin Spirit 2 welcome

play24:20

so Yan Ang

play24:23

start domain so we will check

play24:26

if uh not change ba Ang kanyang domain

play24:30

name

play24:32

Yan okay so set up aan

play24:47

J this might take several minutes so

play24:51

almost

play24:52

there then na so if You observe naala

play24:59

file client so let's check to prove if

play25:05

change into domain so click then this

play25:09

one so yeah so username is geraldin

play25:12

espirit to and

play25:14

then is file explorer then go to

play25:19

properties

play25:21

y then so from work group domain this is

play25:27

the or so meaning to say

play25:30

um

play25:32

successful first um user which is the

play25:36

client so next is the netbook

play25:42

so process s

play25:45

Netbook so what we do in uh client make

play25:50

it domain same process with the

play25:54

netbook and that's it for today's video

play25:57

video tutorial in CP if you have any

play26:01

question just comment below and don't

play26:04

forget to like And subscribe to my

play26:07

channel again this is ITX At Your

play26:18

Service

Rate This
β˜…
β˜…
β˜…
β˜…
β˜…

5.0 / 5 (0 votes)

Related Tags
Server SetupCSS TutorialAntivirus DisableFirewall SettingsNetwork SharingWindows ServerDomain ControllerActive DirectoryUser ManagementGroup Policy