How to setup RADIUS in MikroTik (HapLite) and Windows Server

Nino Duque
21 Jan 202425:40

Summary

TLDRThis tutorial video guides viewers through setting up RADIUS on MikroTik and Windows Server for admins and clients. It covers the installation of Windows Server 2008 R2, initial server configuration, networking setup, and adding roles like DHCP and NPS. The video also demonstrates configuring MikroTik's hotspot, integrating it with RADIUS, and testing user authentication. It concludes with configuring network policies and client tutorials for both wired and wireless connections.

Takeaways

  • πŸ’» **Windows Server 2008 R2 Setup**: Begin with language, time, and keyboard settings, then proceed with the installation by selecting the Enterprise operating system and custom partition allocation.
  • πŸ” **Administrator Account Security**: Set a strong password for the administrator account to enhance server security.
  • 🌐 **Networking Configuration**: Configure the server with a static IP address, subnet mask, gateway, and DNS settings to ensure proper network communication.
  • πŸ–₯️ **Computer Name Customization**: Change the computer name to 'WinServer' for identification purposes and restart the system to apply changes.
  • πŸ“‘ **Role Addition**: Add necessary roles like Active Directory Domain Services (ADDS) and DHCP to manage network services effectively.
  • πŸ”„ **DNS and DHCP Setup**: Install and configure DNS for domain resolution and DHCP for automatic IP address assignment.
  • πŸ› οΈ **NPS (Network Policy Server) Configuration**: Install and configure NPS to manage network access policies and integrate with RADIUS for authentication.
  • πŸ‘€ **User Management**: Create users and groups in Active Directory, set passwords, and manage group memberships to control access.
  • πŸ”— **RADIUS Integration**: Configure the MikroTik router to use RADIUS for authentication by setting up the MikroTik hotspot with the Windows Server as the RADIUS server.
  • πŸ”„ **Policy Customization**: Tailor account policies, such as password and account lockout policies, to meet specific security requirements.
  • πŸ“± **Client Connection Testing**: Test the setup by connecting clients to the hotspot and verifying that they can authenticate successfully against the Windows Server.

Q & A

  • What is the first step in setting up Windows Server 2008 R2 as described in the video?

    -The first step is to follow the onscreen instructions for language, time, and keyboard input, then click 'Next', 'Install Now', and select the Enterprise operating system.

  • How many times does Windows Server 2008 R2 restart during the installation process?

    -The video mentions that Windows Server 2008 R2 restarts a couple of times after the initial setup.

  • What is the initial configuration task for setting up the administrator account on Windows Server 2008 R2?

    -The initial configuration task includes setting a password for the administrator account, which is done by clicking 'OK' and entering a password such as 'admin1223'.

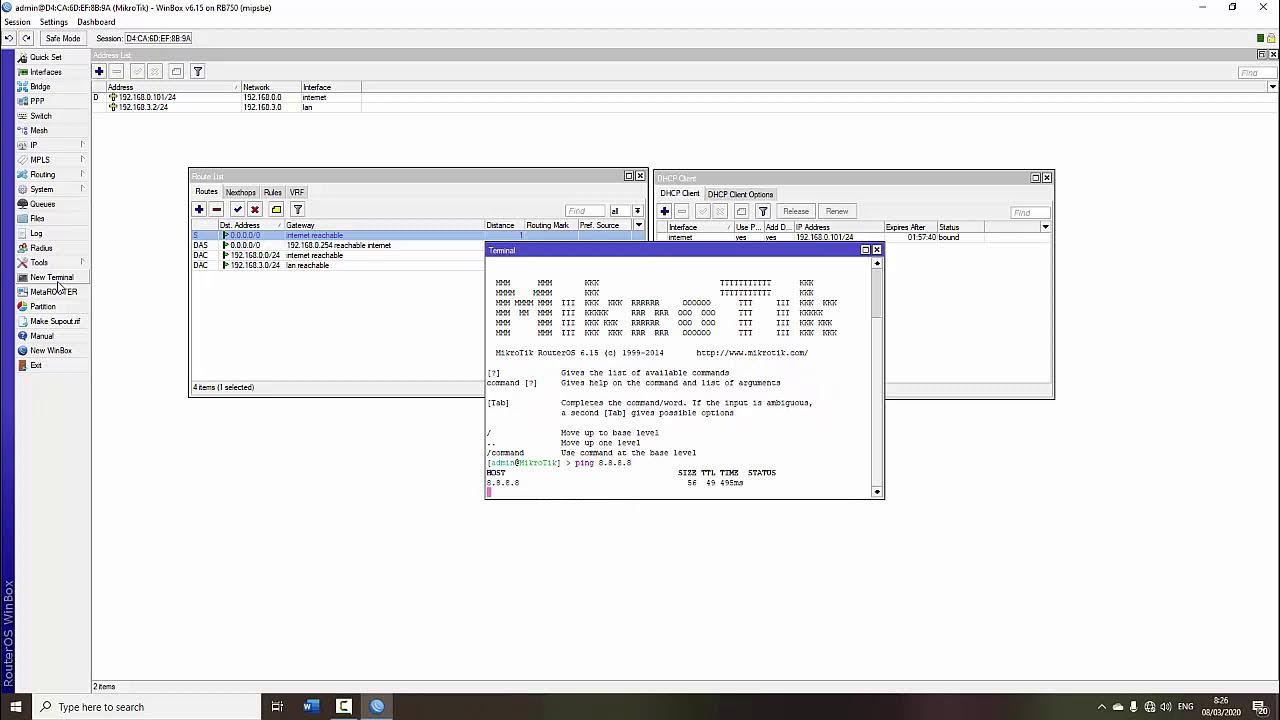
  • What IP address is used for the static IP configuration in the video?

    -The static IP configuration uses the IP address 192.168.10.2, with a subnet mask of 255.255.255.0, a gateway of 192.168.10.1, and the same IP address for DNS.

  • What is the computer name changed to in the video?

    -The computer name is changed to 'WinServer' during the initial configuration tasks.

  • Which roles are added to the Windows Server during the setup process?

    -The roles added include Active Directory Domain Services (ADDS), DNS, DHCP, and Network Policy Server (NPS).

  • What is the purpose of adding a DHCP scope in the video?

    -The DHCP scope is added to specify the range of IP addresses that can be assigned to devices connecting to the network, starting from 192.168.10.2 and ending at 192.168.10.254, allowing for 60 devices.

  • What is the shared secret used for the RADIUS client in the video?

    -The shared secret used for the RADIUS client is 'adminSS'.

  • How is the connection between the MikroTik router and the Windows Server tested in the video?

    -The connection is tested by pinging the IP address of the server from the MikroTik router and vice versa.

  • What is the default username for accessing the MikroTik router as mentioned in the video?

    -The default username for accessing the MikroTik router is 'admin', and no password is required.

  • What is the final step to ensure the RADIUS connection works between the MikroTik router and the Windows Server?

    -The final step is to test the user login on the hotspot of the MikroTik router using the credentials created in the Windows Server.

Outlines

00:00

πŸ’» Setting Up Windows Server 2008 R2

The video begins with a tutorial on setting up RADIUS in MikroTik and Windows Server for both admin and client. It details the installation process of Windows Server 2008 R2, including selecting language, time, and keyboard input, accepting terms, and custom partitioning. After installation, the video guides through initial configurations such as setting a password for the administrator account, configuring networking with static IP, and changing the computer name to 'WinServer'. It also covers adding roles like Active Directory Domain Services (ADDS), installing DNS, and setting up DHCP scope.

05:11

πŸ”§ Configuring Network and Adding Roles

This section continues with the setup process, focusing on verifying network configurations and adding necessary roles to the server. It includes checking the local area network for correct IP addresses, renaming the computer to 'WinServer', and adding roles like Server Manager, ADDS, and DHCP. The tutorial also covers installing Network Policy Server (NPS) and setting up a DHCP scope with a range of IP addresses for device connectivity.

10:18

πŸ‘€ Creating Users and Configuring NPS

The video then moves on to creating users and configuring the Network Policy Server (NPS). It demonstrates how to add users and groups in Active Directory Users and Computers, set user passwords, and add users to groups. The tutorial also includes registering the NPS to the Active Directory, adding a RADIUS client (MikroTik), and configuring network policies with EAP settings.

15:19

🌐 MikroTik Router Configuration

This part of the video script details the process of configuring a MikroTik router. It covers connecting to the router, changing interface names, setting up a wireless LAN, creating a bridge, and configuring DHCP client and server. The tutorial also includes setting up a hotspot, configuring RADIUS for the hotspot, and testing the connection between the MikroTik router and the Windows Server.

20:27

πŸ”— Finalizing RADIUS Setup and Testing

The final segment of the video script involves finalizing the RADIUS setup and testing the connection. It includes binding MAC addresses, setting up RADIUS on the MikroTik router, and ensuring a connection between the MikroTik and Windows Server. The tutorial concludes with testing the user login on the hotspot and discussing policy configurations for password and account lockout settings.

25:29

πŸŽ‰ Client Tutorial and Conclusion

The last paragraph wraps up the tutorial with a client tutorial for both wired and wireless connections. It explains how to log in with the created user account on the hotspot page for MikroTik, and how to view active connections and policies on the MikroTik's active tab. The video concludes with a thank you note and a sign-off.

Mindmap

Keywords

πŸ’‘RADIUS

RADIUS stands for Remote Authentication Dial-In User Service. It is a networking protocol that provides centralized Authentication, Authorization, and Accounting (AAA) management for users who connect and use a network service. In the context of the video, RADIUS is crucial for setting up secure access to a network, ensuring that only authorized users can access the network resources. The video guides viewers through configuring RADIUS on a MikroTik router and Windows Server, illustrating its setup with a MikroTik hotspot and Windows Server's Network Policy Server (NPS).

πŸ’‘Windows Server 2008 R2

Windows Server 2008 R2 is an operating system developed by Microsoft, designed to power servers in a business environment. It includes features for managing and securing a network. The video uses Windows Server 2008 R2 as the platform for setting up RADIUS services, highlighting its role in network administration and the initial setup process, such as language selection, partition allocation, and the installation of Active Directory Domain Services (ADDS).

πŸ’‘Active Directory Domain Services (ADDS)

Active Directory Domain Services is a directory service that Microsoft Windows Server uses to keep a database of objects like users, computers, and other entities. It is used for managing user and computer accounts, as well as access control. In the video, ADDS is installed on the Windows Server to manage user accounts and groups, which are essential for implementing RADIUS authentication.

πŸ’‘MikroTik

MikroTik is a company that produces networking hardware and software, including routers and switches. The video focuses on configuring a MikroTik router for RADIUS authentication, demonstrating how to set up a hotspot and integrate it with a Windows Server for network access control. MikroTik's RouterOS is shown being used to manage network interfaces, DHCP, and hotspot services.

πŸ’‘DHCP

DHCP, or Dynamic Host Configuration Protocol, is a network management protocol used on IP networks whereby a server dynamically assigns an IP address and other network configuration parameters to each device on a network, so they can communicate with other IP networks. In the video, DHCP is configured on the MikroTik router to automatically assign IP addresses to devices connecting to the network, which is essential for managing network resources efficiently.

πŸ’‘Network Policy Server (NPS)

Network Policy Server is a role service in Windows Server that provides centralized policy management for network access. It is used to define and enforce authentication, authorization, and accounting policies for network access. The video demonstrates how to install and configure NPS on Windows Server to work with RADIUS, including setting up a RADIUS client for MikroTik and creating network policies for user access.

πŸ’‘IP Address

An IP address is a unique numerical label assigned to each device connected to a computer network that uses the Internet Protocol for communication. In the video, static IP addresses are configured for the Windows Server and MikroTik router to ensure consistent network communication. IP addresses are also assigned dynamically by the DHCP server and are crucial for network connectivity and management.

πŸ’‘Hotspot

A hotspot is a physical location where people may obtain Internet access, usually by using Wi-Fi technology. In the video, a MikroTik router is set up as a hotspot, allowing users to connect wirelessly to the network. The hotspot is configured to use RADIUS for authentication, ensuring that only users with valid credentials can access the Internet through the hotspot.

πŸ’‘Shared Secret

A shared secret is a passphrase or a piece of information that is known only to the communicating parties and is used to authenticate the identity of the parties. In the context of RADIUS, the shared secret is used between the MikroTik router and the Windows Server to ensure that communication between them is secure. The video mentions setting up a shared secret for RADIUS authentication.

πŸ’‘Group Policy

Group Policy is a feature of Windows that allows administrators to control the working environment of user and computer accounts. It is used to specify configurations for users and computers, including security settings, software installation, and user settings. In the video, Group Policy is used to configure account policies such as password requirements and account lockout policies, which are essential for maintaining network security.

Highlights

Setting up RADIUS in MikroTik and Windows Server for admin and client tutorial.

Installation of Windows Server 2008 R2 with language, time, and keyboard input setup.

Custom partition allocation during Windows Server installation.

Initial server setup includes installing updates and setting administrator password.

Configuring static IP address for the server's local area connection.

Changing the computer name to 'Win-Server' for clarity and identification.

Adding roles such as Active Directory Domain Services (ADDS) to the server.

Installation of DNS as part of the server's role configuration.

Setting up DHCP role to manage IP address assignment on the network.

Configuring Network Policy Server (NPS) for managing network access policies.

Creating organizational units, groups, and users in Active Directory.

Assigning users to groups and adding them to the domain for centralized management.

Registering NPS to Active Directory and configuring RADIUS client in MikroTik.

Setting up network policy in NPS for EAP authentication and access restrictions.

Connecting to MikroTik router using WinBox and configuring interfaces.

Configuring DHCP client and server on MikroTik for IP address management.

Setting up hotspot functionality on MikroTik with RADIUS authentication.

Binding MAC address and applying settings for secure hotspot access.

Testing user authentication on the MikroTik hotspot using created Active Directory accounts.

Configuring account policies and restrictions for security and management purposes.

Client tutorial for connecting to the hotspot and logging in with user credentials.

Transcripts

play00:00

hi guys so for today's video is how to

play00:02

set up radius in microtic and Windows

play00:05

server for the admin and client tutorial

play00:08

the Windows Server 2008 R2 setup should

play00:11

start follow the onscreen instructions

play00:14

choose language time and keyboard input

play00:17

then click next install now and the

play00:20

setup is now

play00:22

starting select the Enterprise operating

play00:28

system

play00:31

next is read the terms then accept the

play00:33

terms and

play00:37

next choose custom install allocate your

play00:41

desired partition then next and that's

play00:44

all for the installation of Windows

play00:46

Server 20082 then that will restart a

play00:49

couple of

play00:51

times after the restart let's check

play00:54

first our guide in setting up the

play00:58

server I'm going to put a check check

play01:00

mark on the number one guide which is to

play01:02

install and for the second adding a

play01:05

password for the administrator

play01:08

account let's set up the initial

play01:10

configurations click Oak then enter a

play01:13

password admin

play01:22

[Music]

play01:28

1223

play01:30

for the administrator account confirm

play01:33

then proceed the password has been

play01:35

changed click okay next let's check the

play01:38

guide and put a check mark on number

play01:45

[Music]

play01:50

two now we proceed to configure the

play01:52

networking after the creation of

play01:54

password for the administrator there is

play01:56

initial configuration task every start

play02:00

and on the initial configuration task

play02:02

there's a guide or a shortcut to

play02:04

configure the networking click that then

play02:07

rightclick the local area connection

play02:09

then go to the properties choose the IP

play02:12

V4 and properties for the IP we'll use a

play02:15

static IP address so we manually

play02:17

configure the IP addressing for the IP

play02:20

address is

play02:22

192.168 10.2 then press tab for auto

play02:26

subnet mask the Gateway is 100

play02:32

92168 10.1 and for the DN is

play02:38

192.168 10.2 same as the IP address then

play02:42

click

play02:53

[Music]

play02:58

okay next up is let's provide or let's

play03:01

change the computer name but before that

play03:04

let us put a check mark for the number

play03:06

three for configuring the network for

play03:09

the number four let's change the name of

play03:11

the computer to wind server on the same

play03:13

initial configuration

play03:18

task click on the provide computer name

play03:21

and domain click on change change the

play03:25

computer name to Wi server thin click

play03:28

okay after that it will prompt you to

play03:30

restart to apply the changes in the

play03:32

computer then click restart

play03:35

[Music]

play03:46

now now that we have configured the

play03:48

network and the computer name we may now

play03:51

proceed to adding some roles needed in

play03:54

our setup let's put a check mark on the

play03:57

number four while

play03:58

waiting

play04:00

[Music]

play04:11

after configuring the network and the

play04:13

name of the computer let's check if our

play04:15

configurations is really working we need

play04:18

to check the local area network if it

play04:20

has the IP addresses we inputed click

play04:23

that then details as we can see it works

play04:27

and for the name we have the wind server

play04:29

the computer

play04:31

[Music]

play04:34

name and now let's proceed in the adding

play04:37

of roles in the adding of roles we can

play04:40

have the server

play04:41

[Music]

play04:48

manager and here is the interface of it

play04:51

we can add roles here and also in the

play04:54

initial configuration

play04:55

[Music]

play04:58

task

play04:59

[Music]

play05:10

so let's add active directory domain

play05:13

services or adds check then add features

play05:17

as needed then click next next and next

play05:20

then

play05:21

[Music]

play05:28

install

play05:34

after the installation of adds we check

play05:37

again our server manager click on the

play05:39

add then run the DC

play05:44

[Music]

play05:54

promo.for us named CS U.C cab.com

play06:04

[Music]

play06:28

then next for the ver we choose it is

play06:30

2008 R2

play06:32

[Music]

play06:42

then now we have the options to install

play06:45

the DNS and before that let's put a

play06:47

check mark on the adds then proceed to

play06:51

the installation of

play06:54

[Music]

play06:58

DNS

play07:05

let's just click NE and next then add

play07:07

the dsrm password which is admin ER rest

play07:12

for confirm password then next and

play07:18

[Music]

play07:27

review and next to install and check the

play07:31

reboot after the completion so that it

play07:33

apply after the configuration and while

play07:35

waiting let's put a check mark on the

play07:38

DNS after the restart we may now proceed

play07:41

to adding the DHCP roll as usual every

play07:46

after opening the Windows Server it will

play07:48

pop up the initial configuration tasks

play07:51

but then again we can also add rolles in

play07:53

the server manager and now let's click

play07:56

add roles next find the DHC CP put a

play08:00

check mark then next as you can see we

play08:03

already have the ipv4 address which is 1

play08:06

1921

play08:08

68102 we may now proceed to click next

play08:12

and we can change the preferred DNS to

play08:14

what we have which is the same IP

play08:17

address of the server as our DNS

play08:19

invalidate then next and next for this

play08:23

we need to add a DHCP scope let's add

play08:26

CICS com laab is our opening and the our

play08:30

starting IP is 1 1921

play08:33

68102 and our ending IP is 1

play08:38

192.168.10.0 so we can have 60 devices

play08:41

they can connect to and please remember

play08:43

this is our only preferences you can add

play08:46

more as you

play08:47

[Music]

play08:58

want

play09:01

[Music]

play09:05

and click then next let's disable since

play09:07

we're not using

play09:10

V6 then next and now double check of

play09:13

what we inputed in our DHCP and

play09:19

[Music]

play09:25

install and after the successful

play09:28

installation let's put a check mark on

play09:30

DHCP on our

play09:40

guide next up is The NPS or our Network

play09:43

policy server let's then again add roles

play09:47

click next and find the network policy

play09:49

and

play09:51

next proceed to the next and check the

play09:54

network policy server then

play09:58

install

play10:02

and that's it for the adding of roles in

play10:04

the Windows

play10:17

Server now let's put a check mark on

play10:26

NPS now that we're done with the setup

play10:29

and installation for the wind server we

play10:31

may now add its user so first go to the

play10:34

server

play10:40

manager expand the roles and expand

play10:44

adds then go to active directory users

play10:47

and computer expand the forest you have

play10:50

created which is CS .c lab.com

play10:54

rightclick then new organizational unit

play10:57

named students

play11:01

and under the students Out Create a new

play11:04

group named

play11:09

[Music]

play11:22

bsit then after that create a user also

play11:25

with a logon named bsit tore the last

play11:28

name

play11:29

[Music]

play11:40

and click next and for the password we

play11:42

have

play11:43

bitor pass then put a check mark for

play11:46

user cannot change password and password

play11:49

never expires for testing purposes and

play11:52

click next

play11:53

[Music]

play11:57

then

play12:00

[Music]

play12:05

then after that we now add the user to

play12:08

the group right click add user to a

play12:10

group and type bsit then check names and

play12:13

also add the user to The Domain

play12:17

[Music]

play12:27

users

play12:30

then press okay and to check if our user

play12:33

is member of the bsit group just

play12:35

doubleclick the group and got to members

play12:38

and we will see the user we just add and

play12:40

now let's put a check mark on number

play12:43

[Music]

play12:57

six

play13:03

and proceed now to The NPS we just need

play13:06

to expand that also and right click on

play13:08

The NPS local then register it to the

play13:11

active

play13:16

[Music]

play13:27

directory

play13:29

[Music]

play13:41

click okay and add your radius client

play13:44

which is your micro tick click new and

play13:46

named micro tick and the IP or DNS is

play13:49

the one from your micro tick IP address

play13:52

since we didn't configure fist our micro

play13:54

tick and our scope is from 1

play13:57

192.168 10.20 to 80 we may now use

play14:01

temporarily the20 and verify and resolve

play14:07

it for the shared secret is admin SS so

play14:12

it's easy to remember then click

play14:14

[Music]

play14:23

okay and next let's add a network policy

play14:26

just expand the policies under

play14:29

NPS then go to network policy and new

play14:32

for the policy name is

play14:34

bsit then next add Windows group then

play14:37

add Group which is the bsit group then

play14:41

next

play14:43

[Music]

play14:48

next and add an EAP specifically

play14:51

protected EAP then okay and check the

play14:54

encrypted and unencrypted authentication

play14:57

then next next and finish and that's it

play15:01

for the adding of user and configuring

play15:03

The

play15:08

NPS now that we're done configuring the

play15:11

users and NPS we may now proceed to the

play15:14

micro tick halflight configurations so

play15:17

first let's connect to the micro tick

play15:19

router through

play15:21

[Music]

play15:27

windbox

play15:30

open windbox and connect to the router

play15:33

using the IP address or Mac address of

play15:35

your router the default username name

play15:38

there is admin without password then

play15:41

Connect Now That We're connected to the

play15:43

router we may now change the interface's

play15:45

name to what we desired to be and enable

play15:48

our way

play15:53

[Music]

play15:57

one

play16:04

and after that go to the wireless and

play16:06

setup W lan1 to AP bridge and default

play16:09

Sid is micro TI then to the general tab

play16:12

renamed W lan1 and add AP to the

play16:16

[Music]

play16:24

[Music]

play16:25

name next is Let's Make a bridge named

play16:29

Comm laab hs- bridge and for the ports

play16:32

we may add The Ether 3 four in the W

play16:35

land 1ap to the bridge we've just

play16:38

[Music]

play16:57

created

play16:59

[Music]

play17:13

next up is the DHCP client under the IP

play17:16

add a client which is for The Ether 2

play17:18

lay click apply then okay and after that

play17:22

we may now have an IP address of 1

play17:27

192.168.1.2

play17:35

and as we can see we have the 20 on our

play17:38

addresses now let's add an IP address

play17:41

for the bridge let's have a 172

play17:45

2016.11

play17:48

[Music]

play17:57

sl24

play18:02

since we have the IP address for our

play18:04

ports let's add a DHCP server click dcct

play18:08

setup and choose either to land click

play18:10

next next and for the addresses to give

play18:13

out let's have a 80

play18:17

[Music]

play18:19

1:41 for the DNS server we may add also

play18:23

the 8.8.8.8 or

play18:27

8.4.4 for Google's DNS and after that

play18:30

let's set up also our Bridge with the

play18:32

same

play18:34

[Music]

play18:40

procedure after the DHCP client and

play18:43

server let's proceed now in setting up

play18:45

our hotspot under the IP click on the

play18:48

hotspot then Hotspot Setup for either

play18:51

toand click next and make sure to check

play18:54

the Masquerade Network then next and for

play18:56

the dn's name is CSS u.

play19:01

csab

play19:03

[Music]

play19:17

Doh and for the addresses to Mac let's

play19:20

limit that to one peric addresses

play19:24

[Music]

play19:27

only

play19:29

and again for the bridge it is the same

play19:32

setup but remove the second Hots spot to

play19:34

make it only one hot spot for all then

play19:37

change the bridge profile and click

play19:39

apply then

play19:45

[Music]

play19:57

okay

play19:59

[Music]

play20:09

[Music]

play20:12

now for the hspr One enable or use

play20:15

radius for that hot

play20:17

[Music]

play20:27

spot

play20:34

[Music]

play20:36

and go to the host tab as we can see we

play20:39

have one IP address there that is our

play20:41

win server find the MAC address make

play20:44

binding then bypassed and click apply

play20:47

then

play20:57

okay

play21:02

[Music]

play21:12

we can see now in the IP bindings tab

play21:14

the make address we

play21:20

bind we may now proceed to the last step

play21:23

which is setting up the radius and under

play21:26

radius check the hot spot and for the

play21:29

address is the wind server IP address

play21:32

which is 1

play21:35

192.168.1.2 and the shared secret is

play21:40

[Music]

play21:57

admin

play22:00

[Music]

play22:01

now that we're done let's see first if

play22:03

there is a connection between the micro

play22:05

tick and wind server in the micro tick

play22:08

part go to the terminal and ping the IP

play22:11

address of the server and for the wind

play22:13

server open the command prompt and ping

play22:16

the IP address of the micro tick then if

play22:18

it is all good we may now test the user

play22:21

we have created in the wind server from

play22:23

the hotspot of micro

play22:26

tick

play22:29

[Music]

play22:32

now that is all good and we have a

play22:33

connection on both we may now log in the

play22:36

user we have created in the wind server

play22:38

specifically in the adds part but first

play22:42

let's go to the micro tick and from the

play22:44

hotspot server profile let's uncheck

play22:47

first the HTP chap since our password is

play22:50

only using the htpp pap type of password

play22:54

and go to our client computer and

play22:56

connect to the hotspot and now that we

play22:58

in the hotspot page let's input the

play23:00

username and password of our user and as

play23:02

we can see it works that's all for the

play23:05

radius connection here's now our policy

play23:08

and please note the policy may vary and

play23:10

this is our only preferences you can add

play23:13

many policies as you want for the

play23:15

password and account lockout policy go

play23:18

to the group policy management then

play23:21

expand and rightclick default domain

play23:23

policy then choose edit and after that

play23:26

go to the window settings next is the

play23:28

security settings then go to the account

play23:31

policies under account policy We There

play23:34

is the account and password policy

play23:37

configure that to your desired policy

play23:40

the same with the account lockout

play23:43

[Music]

play23:52

[Music]

play23:56

policy

play24:08

[Music]

play24:10

and for the idle session and daytime

play24:13

restriction timeout policy just go to

play24:15

The NPS in the winds server roles

play24:18

doubleclick your network policy named

play24:21

bsit then go to the constraints and we

play24:24

will see there the idle timeout session

play24:27

timeout and day and time restriction

play24:30

configure to your desired timeout or

play24:32

just note that for every Network policy

play24:34

you will create they are not on the same

play24:36

constraints or conditions every policy

play24:39

means different configurations or to be

play24:42

tailored to that

play24:49

policy and that's all for the admin

play24:52

tutorial in configuring the radius in

play24:54

micro tick and Windows server to finish

play24:57

all up

play24:58

here's the client tutorial for the wired

play25:00

connection just go to the the hotspot

play25:03

page when you're already connected then

play25:05

just log in the user we created then

play25:07

after that you can see on the Hotpot in

play25:09

the micro tick in the active tab that

play25:11

the user that is connected can be seen

play25:14

including some of the policy we created

play25:16

and for the wireless connection same

play25:18

procedure but Wireless connect to the

play25:21

hotspot via Wi-Fi of the router then go

play25:24

to the hotspot page then log in the user

play25:26

and that's it for the client tutorial

play25:29

thank you and have a good

play25:32

[Music]

play25:38

day

Rate This
β˜…
β˜…
β˜…
β˜…
β˜…

5.0 / 5 (0 votes)

Related Tags
Network SetupMikroTikWindows ServerRADIUS ConfigurationAdmin TutorialNetworkingIT GuideSecurity SetupServer ManagementTech Tutorial