Fusion 360 beginner's Exercise #9 - Fusion 360 tutorial

SPARK PLUG
19 Dec 201908:00

Summary

TLDRThis tutorial video guides viewers through creating a 3D body in Fusion 360's surface workspace. Starting with a sketch on the front plane, the instructor demonstrates how to extrude shapes, trim excess material, and create holes. The process involves drawing arcs and circles, applying constraints, and using the trim tool to refine the design. The video concludes with stitching surfaces together and adding final touches, providing a comprehensive practice exercise for Fusion 360 users.

Takeaways

  • 🎨 The tutorial is focused on creating a body in Fusion 360's surface workspace.
  • 🔍 The video serves as a practice exercise, guiding viewers through the process step by step.
  • 📐 The tutorial begins with creating a sketch in the front view, which is the starting point for the design.
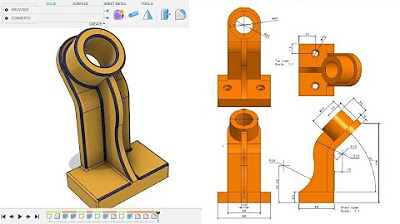
  • 📏 Key dimensions are provided, such as 71.35mm and 50mm, which are crucial for the sketch's accuracy.
  • 🔳 The outer curve of the design is created first, followed by extrusion from a specific point with an additional distance of 16mm.
  • 🔄 The tutorial involves creating arcs and lines with specific radii, such as 14mm for the connecting arc.
  • 📚 Viewers are directed to find the drawing link in the video description for reference.
  • 🛠 Techniques like extruding, trimming, and creating sketches are demonstrated throughout the video.
  • 🔄 The process includes creating a cylindrical surface and using it as a tool to trim the body of the design.
  • 🔲 The tutorial covers creating and manipulating sketches on different planes, such as the front and top planes.
  • 🌐 The final part of the tutorial involves stitching surfaces together to complete the design.

Q & A

  • What is the main topic of the video tutorial?

    -The main topic of the video tutorial is to demonstrate how to create a specific body design in Fusion 360's surface workspace.

  • What workspace of Fusion 360 is the tutorial focused on?

    -The tutorial is focused on the 'Surface' workspace in Fusion 360.

  • What is the first step in the tutorial process?

    -The first step is to switch to the new workspace and create a sketch on the front plane.

  • Where can viewers find the link to the drawing mentioned in the tutorial?

    -Viewers can find the link to the drawing in the description below the video.

  • What is the extrusion distance given for the initial extrude operation?

    -The extrusion distance given for the initial extrude operation is 60 mm.

  • How is the outer curve of the body created in the tutorial?

    -The outer curve is created by drawing three lines and an arc with a radius of 14 mm, and then using the trim command to refine the sketch.

  • What is the radius of the circle that is drawn in the center of the top plane?

    -The radius of the circle drawn in the center of the top plane is 20 mm.

  • What command is used to create a cylindrical surface for trimming?

    -The 'trim' command is used to create a cylindrical surface for trimming.

  • How many circles are created in the tutorial for extruding?

    -Two circles are created in the tutorial for extruding, one with a radius of 20 mm and another with a diameter of 30 mm.

  • What is the purpose of the 'stitch' command used towards the end of the tutorial?

    -The 'stitch' command is used to connect all the separate surfaces into a single body.

  • What additional step is suggested after completing the exercise?

    -After completing the exercise, the suggestion is to give some radius to the edges for a smoother finish.

Outlines

00:00

🛠️ Fusion 360 Surface Workspace Tutorial Overview

This paragraph introduces a tutorial video on creating a 3D model in Fusion 360's surface workspace. The video will guide viewers through the process of sketching, extruding, and creating holes in the surface workspace. The tutorial is designed as a practice exercise, starting with the front view and moving on to extrude and trim operations, with the final part involving hole creation. Viewers are directed to find a reference drawing in the description for assistance.

05:03

🔍 Detailed Steps in Fusion 360 Surface Modeling

The second paragraph delves into the specifics of the Fusion 360 modeling process. It starts with the creation of a sketch on the front plane, including dimensions and constraints for lines and arcs. The tutorial covers how to extrude the sketch into a 3D shape, trim excess material, and create additional features such as holes. The process involves using commands like 'extrude', 'trim', and 'stitch' to combine surfaces. The paragraph also mentions the use of symmetry and the importance of accurate dimensions, with a focus on the creation of a cylindrical surface and the subsequent trimming of an inner circle. The tutorial concludes with stitching all surfaces together to complete the model, and optionally, adding radii to the model for a refined look.

Mindmap

Keywords

💡Fusion 360

Fusion 360 is a 3D computer-aided design (CAD), computer-aided manufacturing (CAM), and engineering simulation software developed by Autodesk. It is used for creating and modifying 3D models and is central to the video's theme, as the tutorial focuses on demonstrating how to use its surface workspace to model a specific object. The script mentions 'Fusion 360' as the software where the modeling process takes place.

💡Surface Workspace

In Fusion 360, the 'Surface Workspace' is a specific environment where designers can create complex 3D surfaces. It is a key concept in the video, as the tutorial is focused on teaching viewers how to navigate and utilize this workspace to create a 3D body. The script refers to the 'Surface Workspace' as the area where the modeling tasks are performed.

💡Sketch

A 'Sketch' in CAD software like Fusion 360 is a 2D drawing used as a basis for creating 3D objects. The video script describes creating sketches as the initial step in the modeling process, which are then extruded to form 3D shapes. Sketches are essential for defining the contours and profiles that will be used to create the final 3D model.

💡Extrude

To 'Extrude' in CAD is the process of converting a 2D sketch into a 3D object by pushing it along a specified direction and distance. In the script, extrusion is used to create the main body of the object from the outer curve sketch, demonstrating a fundamental operation in 3D modeling.

💡Hole

In the context of the video, a 'Hole' refers to a void or opening created within a 3D model. The script mentions making holes in the last part of the video, which is a common task in CAD for adding details to a model that may be necessary for assembly or manufacturing.

💡Front View

'Front View' is a standard orientation in CAD software, representing the perspective when looking at an object from the front. The video script instructs viewers to start from the front view to create the initial sketch, which sets the foundation for the rest of the modeling process.

💡Dimension

In CAD, 'Dimension' refers to the numerical values that define the size and position of elements within a design. The script mentions giving dimensions to sketches, such as specifying lengths of lines and radii of arcs, which are critical for accurately creating the model's geometry.

💡Tangency

Tangency in a CAD context is a geometric constraint where two shapes touch at a single point along a curve. The script describes using tangency to connect an arc to a line, ensuring that the arc's curvature is smooth and continuous with the line's path.

💡Trim

To 'Trim' in CAD involves removing excess material or lines from a sketch or 3D model. The video script details using the trim command to refine the model by removing unwanted parts of the extruded shapes, which is a common step in achieving the final design.

💡Stitch

In Fusion 360, 'Stitch' is a command used to combine separate surface patches into a single, continuous surface. The script mentions stitching as the final step in the exercise to connect all the surfaces and complete the 3D body, which is crucial for creating a seamless model.

💡Radius

The 'Radius' is a measure of the distance from the center of a circle to its edge and is used in the script to define the size of arcs and circles within the model. It is an essential parameter in creating curved surfaces and ensuring that the model's features have the correct dimensions.

Highlights

Introduction to a tutorial on creating a body in Fusion 360 surface workspace.

Explanation of the first practice exercise of its type in the series.

Guidance on switching to the new workspace and creating a sketch on the front plane.

Instructions on finding the drawing link in the video description.

Demonstration of creating the outer curve and extruding it with given dimensions.

Details on extruding from a specific point with an extra distance of 16mm.

Drawing a rectangle and adding dimensions for the sketch.

Creating a circle of arc with a radius of 40mm and applying tangency constraints.

Trimming the excess lines to complete the sketch.

Extruding the sketch with a symmetric distance of 60mm.

Using the 'Shift + N' command to change the object color for better visualization.

Drawing a circle in the center of the top plane with a radius of 20mm.

Extruding the circle and trimming it from the profile to create a cylindrical surface.

Trimming the body to remove the inner circle and outer face.

Creating a new sketch on the front plane with specific dimensions.

Extruding and trimming the body to remove excess parts.

Stitching all surfaces together to complete the exercise.

Adding final touches by giving some radius to the edges.

Transcripts

play00:00

[Music]

play00:16

hey guys and welcome back to another

play00:18

video the spark plug so in this video

play00:19

tutorial I am going to show you how to

play00:21

make this body in fusion 360 surface

play00:25

workspace so this is going to be another

play00:27

practice exercise basically the first

play00:30

one of this type so we are going to work

play00:31

on the surface workspace so if you can

play00:35

look here this is the front view so we

play00:37

are going to make the front view then we

play00:39

are going to make some extrude then we

play00:41

are going to make so in the last part of

play00:43

the video now we will be making some

play00:45

holes like this so let's get started so

play00:48

just switch on to new workspace and

play00:52

don't forget to go to surface create a

play00:55

sketch on very front plane know you guys

play00:59

can find the link of this drawing in the

play01:02

description below so we will start by

play01:03

making this sketch so I am NOT making

play01:05

this art right now all I need to do is

play01:09

all I need to do is is to make this

play01:12

outer curve and then I am going to

play01:14

extrude it from this point to this point

play01:16

the extra distance is given on the right

play01:18

user 16 so I'm going to make this from

play01:21

so as it s can see register from this

play01:23

point to this point is 71 0.35 and this

play01:26

point to this point is 50 and it is

play01:28

connected by an art which is changing to

play01:30

both the line with a radius of 14 mm so

play01:33

I am going to draw these three lines

play01:35

first of all so what I'm going to do is

play01:38

I am going to draw a rectangle like this

play01:43

then press T for dimension give it

play01:47

dimension as written in seventy one

play01:49

point three five at 50mm so give this as

play01:54

seventy one point three five and this is

play01:58

going to be 50 now once turn I am going

play02:02

to draw this circle of arc of radius

play02:08

40mm so for that press C for circle and

play02:12

draw a circle of radius or diameter mm

play02:16

or radius 40 mm now once turn I am going

play02:20

to give it two detained in relation

play02:23

between this line and this line one head

play02:25

go to constrain and if tangency

play02:27

select this circle and this line again

play02:29

click on this circle and this line when

play02:32

the tangency is completed press T what

play02:35

trim the excess light which include this

play02:37

one this one this line this ad this once

play02:44

turn you may finish the sketch or we are

play02:48

left with this curve now I am going to

play02:50

extrude it and have a toll even earlier

play02:52

the x2 distance was 60 mm so what I am

play02:55

going to do is I am going to create

play02:56

extrude select this line and that this

play03:00

direction would be symmetric and the

play03:03

throughout distance would be 60 mm and

play03:07

press ENTER now once done press Shift +

play03:11

n to david color now once then choose

play03:15

back to isometric view now from the very

play03:18

front plane like this I am going to draw

play03:22

this circle right in the center of the

play03:25

top plane and with the radius of 20 mm

play03:28

so for that receiver set your circle and

play03:34

here draw our areas our circle of

play03:37

diameter mm no one Stern we are going to

play03:42

make the point in relation between this

play03:44

point and this line like this so once

play03:48

done you will finish the sketch now what

play03:54

I'm going to do is I'm going to extrude

play03:56

it extrude this circle like this and

play04:00

press ok

play04:01

now I am going to trim this circle from

play04:05

this profile so for that I am going to

play04:07

select the trim command now it will ask

play04:10

you about the trim tool so our tool is

play04:13

going to be this cylindrical surface now

play04:16

once the tool is selected now next thing

play04:19

we need to select is the part which will

play04:21

be trimmed so I I need to trim this body

play04:25

and I need to get rid of this inner

play04:27

circle so I am going to select this

play04:29

circle and press ok no one's done what I

play04:33

am going to do is if I just just before

play04:36

bodies you have to what

play04:38

this one and this one so now I am going

play04:42

to trim this also so forget press trim

play04:45

this now our trim tool will be in this

play04:48

and I am going to want to get rid of

play04:51

this outer face like this and you may

play04:54

press ok now once done what I'm going to

play04:58

do is I'm going to create a sketch on

play05:03

the front plane like this so for that

play05:07

for that we need to display back the

play05:09

first stay straight we have thrown like

play05:12

this so now I am going to make this

play05:15

circle so die of the circle is I will

play05:18

guess can see 30mm in the distance from

play05:20

this point to this point is 20 and the

play05:23

from top is like T so press C for circle

play05:27

and draw us and Calhoun kiya 20mm and

play05:31

pristine for dimension and from this

play05:37

point to this point the distance is 20

play05:40

mm and from this point to this point

play05:44

just as Katie Nolan

play05:46

once done finish this sketch and click

play05:51

on create click on extrude and you may

play05:56

exclude it symmetry key like this and

play06:00

you may place okay now I am going to

play06:03

trim this body now the strength and the

play06:10

select this one so I am going to get rid

play06:14

of this part and there something and you

play06:17

may just hide this body for me once

play06:20

now once turn I need to trim this excess

play06:23

part from it so for that go to the top

play06:27

clean +10 one line so our is 1 3 9 make

play06:33

it coincident with this point and you

play06:36

may finish the sketch now

play06:39

extrude this play absolute this line

play06:47

like this and again

play06:51

jquan trim and the trimming tool this

play06:54

time would fit this and I'm going to get

play06:56

rid of this part and press ok you may

play07:02

hide this surface now once completed you

play07:05

can hide the sketch also once we get I

play07:09

was completed I need to divide all the

play07:11

surfaces so for that go to modify go to

play07:14

stitch so they taught all the things you

play07:16

want to be connected like this and you

play07:19

will press ok once turn so this is how

play07:23

our exercise now this exercise that's

play07:26

completed you may also give some radius

play07:31

[Music]

play07:50

you

play07:51

[Music]

Rate This

5.0 / 5 (0 votes)

Related Tags
Fusion 3603D ModelingSurface WorkspaceTutorialDesignSketchingExtrusionStitchingTrimmingCAD Software