Membuat sketsa produk dengan tool Draw Pada Frankcam - Renan
Summary
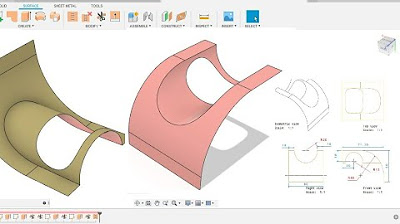
TLDRThe video provides a tutorial on how to create a sketch or part using design software. It explains five essential steps in the process, including determining dimensions, selecting units, and setting coordinates. The tutorial covers practical aspects of working with lines, coordinates, and basic shapes like circles, and demonstrates how to navigate the interface. The focus is on guiding users through the initial stages of design creation, emphasizing precision and tool selection to successfully create technical drawings.
Takeaways
- 😀 The speaker welcomes the audience and provides a brief introduction about continuing the learning from previous sessions.
- 😀 The process of creating a sketch or part in a CAD program involves five key steps, focusing on selecting units, dimensions, and positioning elements.
- 😀 Step 1 involves determining the size of the workpiece, including its length and width, and selecting material properties.
- 😀 The dimensions are set using a grid with an option to define the center or edge coordinates of the design (X, Y axis).
- 😀 The next step includes creating the sketch by selecting tools in the toolbar, such as the 'Line' tool to create a basic shape.
- 😀 Precision in selecting coordinates and moving the sketching plane is emphasized to ensure proper alignment and accuracy.
- 😀 After defining the starting point (0, 0), the user is guided to continue adding lines and defining measurements such as 30, 40, and 47 for specific points on the design.
- 😀 The speaker demonstrates how to use the 'Continuous' option for drawing connected lines and how to adjust the drawing to fit the desired shape.
- 😀 The creation of drill points in the design is explained, with the focus on setting correct coordinates for drilling locations (e.g., 30, 30).
- 😀 The speaker finishes the sketch by explaining how to create a circle with a 30-unit diameter, using the 'Circle' tool and specifying the center and radius.
- 😀 The speaker concludes the tutorial by summarizing the completed steps and encouraging further practice to improve skills.
Q & A
What is the first step in creating a sketch or part in this process?
-The first step is to determine the size and dimensions of the object, including its length and width. This helps in selecting the correct unit and setting the coordinates for the design.
How do you set the coordinates for the object in the design software?
-You can set the coordinates by selecting the unit for width and height, and then adjusting the coordinates (X, Y) to either the center or edges based on the object dimensions. For example, for a width of 100, the center would be at 50.
What should you do after setting the dimensions and coordinates?
-After setting the dimensions and coordinates, you need to save the file, preferably by naming it with a clear date and location to organize the project files.
What is the next step after saving the file?
-The next step is to start the sketching process. First, select the correct tool from the toolbar to begin drawing lines or shapes, depending on the design.
Which tool is recommended to start creating the sketch?
-The recommended tool to start creating the sketch is the 'Line' tool, which allows you to draw basic lines for the sketch.
What should be done if the grid or workspace area is not set correctly?
-If the workspace area is not set correctly, you should adjust it by selecting the appropriate view or coordinate system, such as the XZ or B17 view, to ensure the design aligns properly with the grid.
How do you create a continuous line in the design?
-To create a continuous line, select the 'Continuous' option in the toolbar, which allows you to extend the line without interruption.
How are points or coordinates set for creating specific shapes in the design?
-Points or coordinates for specific shapes can be set manually by typing in the coordinates (X, Y) or by using the center-radius method for circular shapes, where the center and radius are defined for the circle.
What is the procedure for creating a circle in this design process?
-To create a circle, select the 'Circle' tool and choose the 'Center-Radius' option. Then, set the coordinates for the center and define the radius of the circle based on the required diameter.
What does the process of selecting the correct tools and coordinates ensure in the design?
-Selecting the correct tools and coordinates ensures that the design is accurate, aligned with the correct dimensions, and ready for further steps such as drilling or manufacturing the part.
Outlines

This section is available to paid users only. Please upgrade to access this part.
Upgrade NowMindmap

This section is available to paid users only. Please upgrade to access this part.
Upgrade NowKeywords

This section is available to paid users only. Please upgrade to access this part.
Upgrade NowHighlights

This section is available to paid users only. Please upgrade to access this part.
Upgrade NowTranscripts

This section is available to paid users only. Please upgrade to access this part.
Upgrade NowBrowse More Related Video
Part Modeling - Create Revolve Features

How to make 2D Nuts into 3D in AutoCAD
Fusion 360 beginner's Exercise #8 - Fusion 360 tutorial
Illustrator Tutorial: Create a Vector Logo from a Rough Sketch
PT Cakrawala - Cara Input Daftar Pemasok Menggunakan Persiapan Mahir Aplikasi Accurate
Fusion 360 beginner's Exercise #9 - Fusion 360 tutorial
5.0 / 5 (0 votes)