Fusion 360 beginner's Exercise #10 - Fusion 360 tutorial
Summary
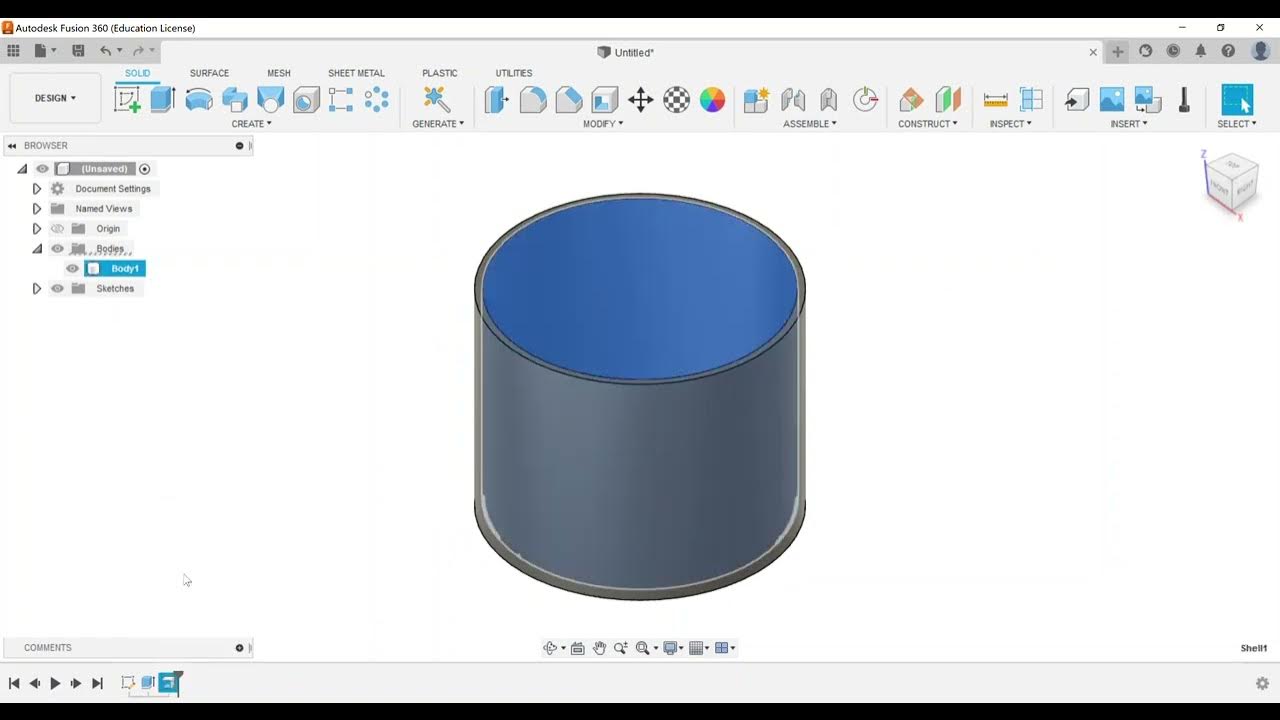
TLDRThis tutorial video from Spark Flux demonstrates the process of creating a 3D body in Fusion 360. The instructor guides viewers through sketching, extruding, and adding details like radius and thickness to the design. Key steps include creating a profile, extruding to specified distances, and adding a circular profile with precise measurements. The video concludes with adding fillets and rounding edges, offering a comprehensive guide for Fusion 360 users to create a polished assembly body.
Takeaways
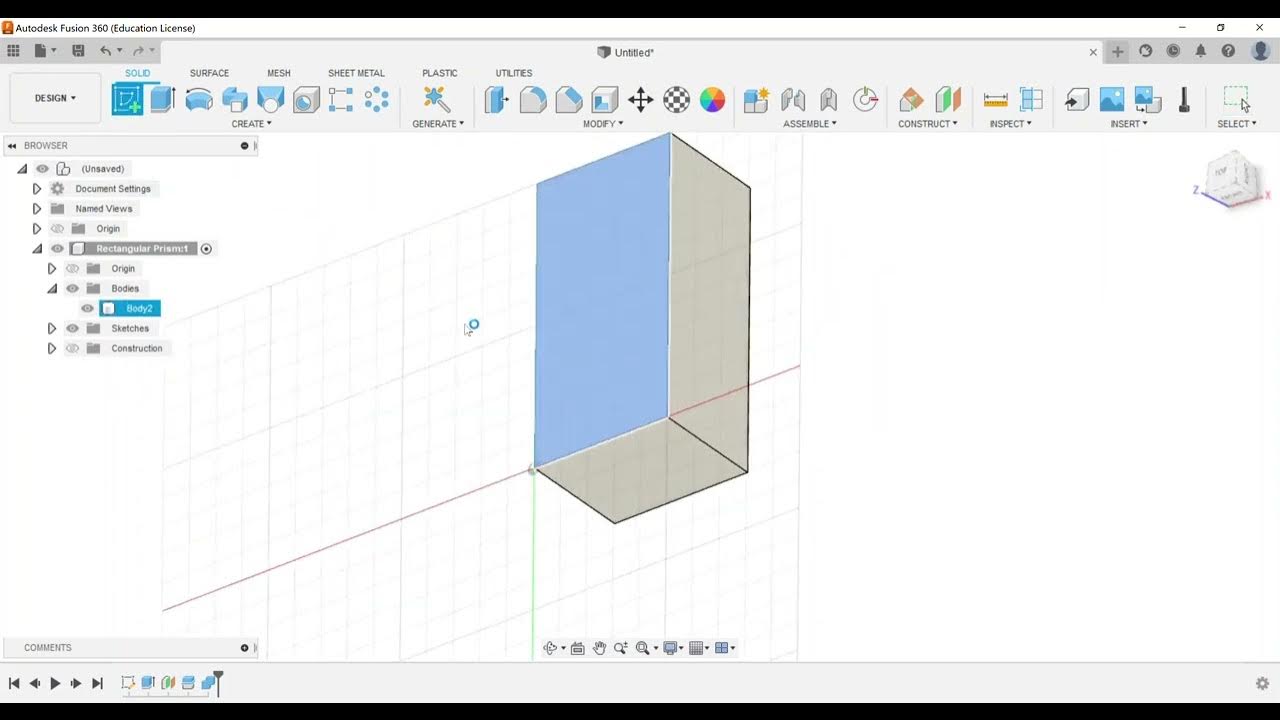
- 📚 The tutorial is focused on creating a body in Fusion 360, a 3D CAD, CAM, and CAE software.
- 🔗 A downloadable file is provided in the video description for viewers to follow along with the tutorial.
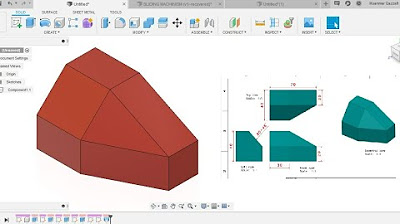
- 📐 The process begins with sketching in the front view, starting with a bottom rectangle of dimensions 64 by 20 units.
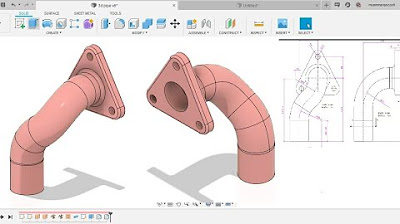
- 📏 Dimensions and angles are crucial, with specific measurements such as 156 units distance and 45-degree angles being mentioned.
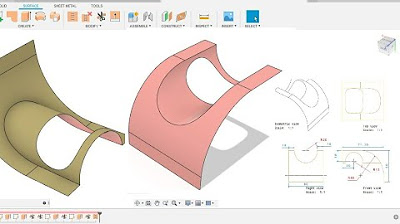
- ⭕ The tutorial includes creating a profile with a 15 unit radius and then offsetting it by 12 mm to form a rectangular profile.
- 🔩 Extrusion is a key step, with different parts of the design requiring extrusion to specific depths, like 96 mm for the bottom rectangle and 16 mm for the profile.
- 🔵 The creation of a circular profile involves drawing a circle with a 52 mm diameter and extruding it to a depth of 32 mm.
- 🕳 A hole is drilled through the circle with a 40 mm radius, but the final hole size is adjusted to 32 mm.
- 🔲 The tutorial also covers creating fillets with a 20 mm radius on specific lines of the design.
- 📏 Another profile is created in the front plane with tangent and coincident relations between circles, with final extrusion to a 10 mm thickness.
- 🛠️ The final step involves adding a 2 mm radius to all edges for a smooth finish.
Q & A
What is the main topic of the video tutorial?
-The main topic of the video tutorial is to demonstrate how to create a specific body design in Fusion 360, a 3D CAD, CAM, and CAE software.
How can viewers access the downloadable file mentioned in the video?
-Viewers can find the downloadable link to the file in the description below the video.
What is the first step in creating the body profile in Fusion 360 according to the tutorial?
-The first step is to select the sketch and go to the front plane, then start by making the bottom rectangle with dimensions 64 by 20 using a two-point rectangle tool.
What is the dimension of the bottom rectangle in the profile?
-The bottom rectangle has dimensions of 64 units in length and 20 units in width.
What is the angle between the line and the point in the profile sketch?
-The angle between the line and the point in the profile sketch is given as 45 degrees.
How is the radius of 15 units applied in the tutorial?
-The radius of 15 units is applied by selecting the two lines where the radius is needed and giving it a radius command in Fusion 360.
What is the thickness given for the profile after applying the radius?
-The thickness given for the profile after applying the radius is 12 mm.
What is the extrusion distance for the bottom rectangle and the profile in the tutorial?
-The extrusion distance for the bottom rectangle is 96 units, and for the profile, it is 16 units.
What is the depth of the outer layer in the circular profile as mentioned in the script?
-The depth of the outer layer in the circular profile is 50 mm.
How is the circular profile created in the tutorial?
-The circular profile is created by first drawing a circle with a radius of 52 mm from the center, then extruding it to a distance of 32 mm, and finally drilling a hole with a diameter of 40 mm.
What is the final step in creating the body according to the tutorial?
-The final step is to provide a radius of 2 mm to all the edge filets across the body, which can be done by selecting the edges and applying the fillet command in Fusion 360.
Outlines
🛠️ Fusion 360 Body Design Tutorial
In this tutorial, the instructor begins by introducing the project of creating a body in Fusion 360. The audience is directed to find a downloadable file in the video description. The process starts with creating a front view profile, using basic sketching commands like extrusion, radius, and trim to define the shape. The instructor provides detailed steps, including drawing a rectangle, applying dimensions and angles, and creating a final touch with radius and thickness adjustments. The extrusion process is explained with specific distances for the bottom rectangle and the profile, emphasizing the importance of symmetric extrusion. The tutorial also covers creating a circular profile with given dimensions and depth, and the subsequent steps to extrude and edit the sketch to achieve the desired form.
🔩 Advanced Sketching and Extrusion Techniques
This paragraph continues the Fusion 360 tutorial with advanced sketching techniques. The instructor demonstrates how to create a circular profile with specific dimensions, including the depth of the outer layer and distances from the center. After creating the profile, the extrusion process is shown, with the operation set to 'join' and the distance specified. The tutorial then moves on to creating a drill hole through the circle, adjusting the hole size, and using the fillet command to add a radius to the edges. The final steps involve creating a 'T'-like profile in the front plane, projecting lines for reference, and drawing circles with tangent and coincident relations. The sketch is closed, and the extrusion command is used to give the profile a thickness. The tutorial concludes with adding a 2mm radius to all edge supports, providing a comprehensive guide on complex sketching and extrusion in Fusion 360.
🎶 Closing and Engagement
The final paragraph of the script features background music and a closing statement from the instructor. There is no specific content provided in this paragraph, suggesting it might be a pause for music or a moment of silence before the video ends. The instructor thanks the viewers for watching and encourages them to comment, provide feedback, and look forward to upcoming videos. A reminder to share and subscribe to the channel is also included, highlighting the importance of viewer engagement and community building.
Mindmap
Keywords
💡Fusion 360
💡Extrusion
💡Profile
💡Radius
💡Offset
💡Sketch
💡Dimension
💡Trim
💡Fillet
💡Assembly
Highlights
Introduction to a tutorial on creating a body in Fusion 360 with a downloadable file link provided in the description.
Starting with the front view and using extrusion, commands, and radius to finalize the design.
Removing the radius from all views except the isometric for clarity.
Creating the bottom rectangle with dimensions 64 by 20 using the two-point rectangle tool.
Drawing a profile with specific distances and angles, including a 45-degree angle line.
Trimming lines to refine the sketch profile.
Adding a radius of 15 to the sketch.
Applying a thickness of 12 mm to the profile using the offset command.
Joining lines to close the sketch before extruding.
Extruding the bottom rectangle to a distance of 96 mm and the profile to 16 mm.
Creating a circular profile with a depth of 50 mm and a radius of 52 mm.
Extruding the circular profile to a distance of 32 mm.
Drilling a hole through the circle with a radius of 40 mm and adjusting it to 32 mm.
Adding fillets with a radius of 20 mm to the edges.
Creating an S-like profile in the front plane with a thickness of 10 mm.
Projecting lines and creating tangent and coincident relations for the circles in the sketch.
Ensuring the sketch is closed before applying the extrude command.
Applying a radius of 2 mm to all edge supports to finalize the design.
Encouraging viewers to comment, subscribe, and share for more tutorials.
Transcripts
[Music]
hey guys and welcome back to another
video of the spark flux in this video
tutorial I am going to show you how to
make this body in fusion 360 using this
to define you guys can find the
downloadable link to this file in the
description below for own body to check
that out so what I'm going to do is I'm
gonna making this front view then I am
going to make some extrusion some own
commands and some radius in the end to
make this final touch up remember the
radius of I too has been removed from
all the views except from the isometric
view to better understand Jennifer
mentioned so I will start by making this
profile so for that just go to select
sketch and go to friend plane now
I will start by making this bottom
rectangle of 64 by 20 so for that select
a two point rectangle draw rectangle
like this press d for dimension give
this a dimension of 60 and give this a
dimension of 20 like this once done I am
going to draw this profile like this so
as you guys can see the distance from
this point to this point is given 156
and also the angle between this line and
this point is given 45 degrees so what I
am going to do is I will draw our rough
line like this and press T for an
addition from this point to this line I
am going to give it Angela the dimension
of 45 degrees once done I am going to
select to this point and the bottom line
and the dimension as written here is 146
so him when you get to give this
dimension of 146 and press Enter
now what I am going to do is I am going
to exclude this line from this point
till the point enjoy
Presti for trim remove these two lines
like this once done I am going to make
the radius were here and the distance
for radius is given here it's our 15 so
I am going to select up select so let
these two line and give it to a radius
of 15 now
once done I'm going to give it a
thickness of 12 mm as you guys can see
this profile is offset by two algorithm
to make this rectangular profile here so
for that I am going to select this line
this radius and this line and I am going
to select offset now offset distance
direction will oppose it minus 12 and
you may press ENTER once done press L
for line and join these two line to make
the sketch closed once to end you may
finish the sketch now I am going to
extrude this to a certain distance so if
you just look at the right view the left
view you that the extruded distance of
the bottom rectangle is 96 and this
profile extrude and distance of this
profile is 16 so I am going through what
I'm going to do is I am going to extrude
the direction would be symmetric first I
am going to select the whatever angle so
this time I am going to select the whole
name and the whole length is going to be
96 and you make a select new component
and press ok once done just switch on
the sketch again again click on extrude
this time select this part and the
operation would be my the direction
would be symmetric and select the whole
length and the distance would be 16 like
this
now you may excite the sketch as we
don't need them now now if you just look
good closely on this circle this is a
circle and dimension of this circle is
given here the depth of the outer Dyer
is 50 mm and the distance from the
center the endpoint is given 20 mm and
that
strewth distances 32 mm so what I'm
going to do is I'm going to make up this
whole circular profile so for that I am
going to create a sketch on this plane
like this draw a circle from the very
center and the same that I have would be
52 as given here the die is 52 and the
distance from the outermost point is 33
so what I'm going to do is I am going to
give press T for dimension select this
point and this line and give it time
engine of 33 and we give a press Enter
now once turn I am going I am going to
extrude it up to a distance of 32 mm so
for that finish the sketch and click on
extrude and you may select the circle
like this and extrude it up to a
distance of 32 and the operation would
be joined and press ok now once turn
again click on this circle and let's see
for circle and draw off circle of radius
what P mm sorry are the Daiya 40 mm and
we are going to drill a hole through it
so for that just tricks to it and the
distance would be cut now once this
dirty now once did I need to select that
that the die adjust we have just drilled
the hole the guy outfits is going to be
32 not 40 ever so what I'm going to do
is I am going to right click on this
sketch and click on edit a sketch and
give it that die of 32 and you may
finish the sketch now one step now once
done click on the fill it command and
give these two lines up fill it and the
fill it radius would be 20 mm and you
may press the enter it will look like
something like this now the last step is
to make this s like profile in the front
plane right in the middle and the true
raishin the thickness of details is
given in the very left view strain mm
thick so what I'm going to do is again
click on create sketch and right in the
front plane I am going to create the
sketch for that so what I'm going to do
is press P for project and I am going to
project this line and this line and also
this one and that's okay
now once projected what I'm going to do
is I am going to make two circles like
here give it here
so this circle is going to be question
trick with the radius 1 and that center
of this circle is given here
so what I'm going to do is the first
circle is of radius 53 as you guys can
see here so I am going to make a circle
right from this point with a radius of
53 so 53mph e x 2.is 1:06 like this and
the other circle the other circle of
radius 55 so draw a circle somewhere
here of radius 55 55 into 2 that I R is
then I is 55 into 2 that is hundred at
10 now once turn I need to make the
tangent relation between these two
circles and the second thing is I am
going to make a coincident relation
between this point and this circle now
once done press T for trim to remove the
excess lines I am going to remove this
line not this one one thing I also need
to do with the sketch is not closed year
so I'm going to press P for project know
I need to draw a rough line like this
over here
resting for trim the stream this line no
no no this place control red said trim
we are going to trim this line then I am
going to trim this one yeah now the skit
is closed
I need this closed further now you have
finished the sketch now I think the
sketch is not closed yet
again just go back and click on the
sketch yeah our sketch is not closed
this is open so draw a line from here to
here so that our sketch is now closed
now you may finish the sketch remember
the thickness was given here 10 mm so
press extrude the command will be join
that actually symmetric whole length and
the distance would be 10 and press ok
now this is how our assembly our body
will look like after completion now the
only thing left is to provide these
radius of 2 mm all across the edge
support that is click on select select
this line this these edges like I am
doing here select all the edges you can
that are who is equal to you and press
it to and you may give the radius like
this so hope you guys will enjoy the
video please comment any query
insulations for my upcoming videos and
don't forget to share and subscribe my
channel thank you and have a nice day
[Music]
you
[Music]
関連動画をさらに表示
Fusion 360 beginner's Exercise #8 - Fusion 360 tutorial
Fusion 360 beginner's Exercise #7 - Fusion 360 tutorial
Fusion 360 beginner's Exercise #9 - Fusion 360 tutorial
Fusion 360 beginner's Exercise #1 - Fusion 360 tutorial
Fusion 360 beginner's Exercise #6 - Fusion 360 tutorial | Spark Plug |
Sculpt - Create a Form
5.0 / 5 (0 votes)