Konfigurasi MikroTik DHCP Client, DHCP Server dan Static
Summary
TLDRThis video script demonstrates the step-by-step process of setting up a MikroTik router using Winbox. The setup includes configuring port connections, setting DHCP clients and servers, and assigning static IPs for different devices. The tutorial guides through checking the network connections, configuring the firewall for internet access, and setting up internet connections for both PCs and laptops. It covers both dynamic IP assignments for some devices and static IP configurations for others, ensuring all devices can connect to the internet successfully. The tutorial concludes with a test of the internet connection for all devices.
Takeaways
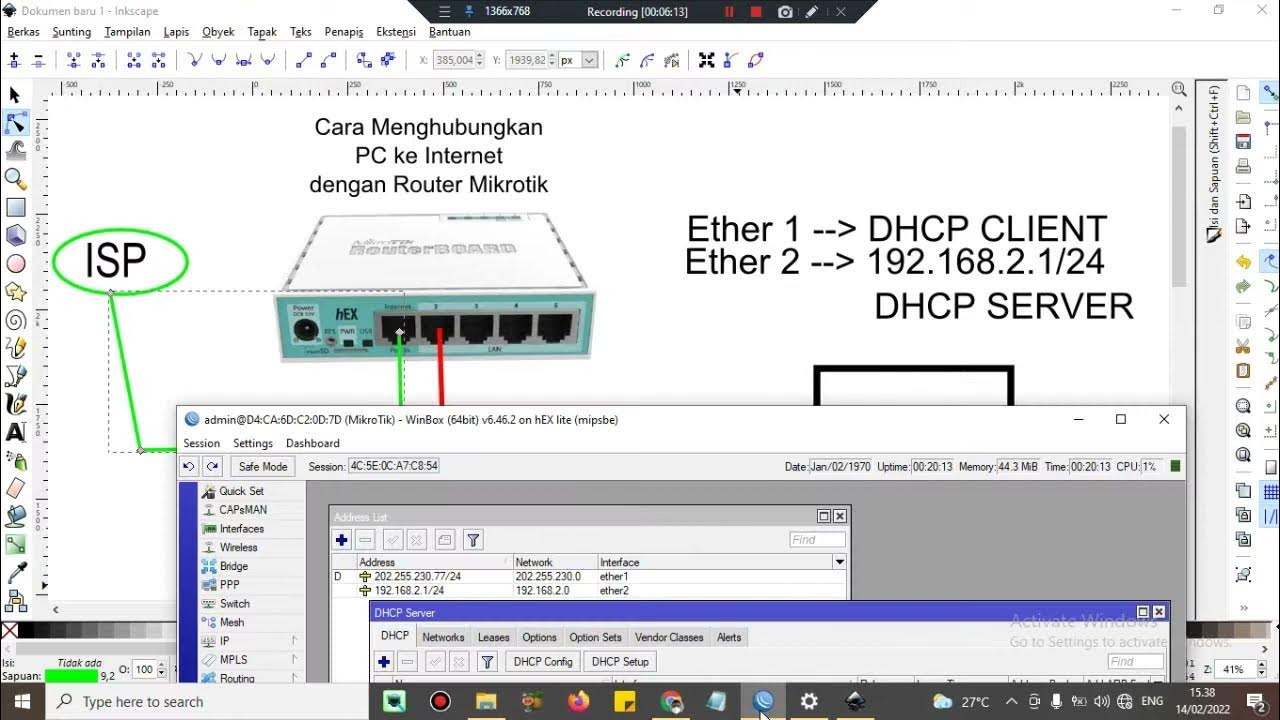
- 😀 MikroTik is connected to the modem via port 1 and serves as the DHCP client.
- 😀 Port 2 is connected to a PC with DHCP enabled for automatic IP assignment.
- 😀 Port 3 is connected to a laptop, where a static IP is assigned.
- 😀 The first step in configuring the MikroTik router is using the Winbox application to connect remotely.
- 😀 On port 1, the MikroTik router is set as a DHCP client to receive an IP address from the modem.
- 😀 The network on port 2 is set up as a DHCP server to assign IPs to devices connected to it.
- 😀 The static IP address for port 3 (LAN 2) is configured with an address of 100.100.100.1/24.
- 😀 The DHCP server is configured with IP ranges that will be distributed to clients (e.g., 100.100.100.2 to 100.100.100.254).
- 😀 The PC connected to port 2 receives an IP address from the DHCP server, which is verified by checking its IP configuration.
- 😀 To ensure internet connectivity, a firewall rule is added for the interface connected to the modem (Ethernet 1).
Q & A
What is the role of Port 1 (Ethernet 1) in the MikroTik setup?
-Port 1 (Ethernet 1) is connected to the modem and is configured as a DHCP client to receive an IP address from the modem.
What is the function of Port 2 (Ethernet 2) in this setup?
-Port 2 (Ethernet 2) is set up as a DHCP server, distributing IP addresses to devices connected to it, such as PC 1.
How is Port 3 (Ethernet 3) configured for the second PC?
-Port 3 (Ethernet 3) is configured with a static IP address (e.g., `200.200.200.1/24`) for the second PC to connect using a static IP.
What steps were followed to configure the DHCP client on Port 1?
-The DHCP client was enabled on Port 1 by opening the MikroTik Winbox application, selecting Ethernet 1, and adding a DHCP client configuration to it.
How do you check if the router is successfully connected to the internet?
-To check the internet connection, you can view the gateway IP (e.g., `192.168.1.1`) in the status window of Ethernet 1 and confirm the connection by pinging a website like `www.google.com`.
What is the IP address range that will be distributed by the DHCP server on Port 2?
-The DHCP server on Port 2 will distribute IP addresses in the range of `100.100.100.2` to `100.100.100.254`.
What should be done if the PC cannot connect to the internet after the DHCP configuration?
-If the PC cannot connect to the internet, check the firewall settings on the MikroTik router. Ensure that the correct ports, like Ethernet 1 (connected to the modem), are allowed to access the internet.
How is the DNS configured for devices connected to Port 2?
-The DNS for devices connected to Port 2 is set to the modem's IP address (`192.168.1.1`).
What is the IP address configuration for the second PC on Port 3?
-The second PC is assigned a static IP address (e.g., `200.200.200.3`), with the gateway set to `200.200.200.1` (the IP address of Port 3) and the DNS set to the modem's IP address (`192.168.1.1`).
Why is it necessary to configure a static IP on Port 3 for the second PC?
-A static IP on Port 3 allows for a fixed network address for the second PC, ensuring stable connectivity, especially when the DHCP server isn't used for that port.
Outlines

Esta sección está disponible solo para usuarios con suscripción. Por favor, mejora tu plan para acceder a esta parte.
Mejorar ahoraMindmap

Esta sección está disponible solo para usuarios con suscripción. Por favor, mejora tu plan para acceder a esta parte.
Mejorar ahoraKeywords

Esta sección está disponible solo para usuarios con suscripción. Por favor, mejora tu plan para acceder a esta parte.
Mejorar ahoraHighlights

Esta sección está disponible solo para usuarios con suscripción. Por favor, mejora tu plan para acceder a esta parte.
Mejorar ahoraTranscripts

Esta sección está disponible solo para usuarios con suscripción. Por favor, mejora tu plan para acceder a esta parte.
Mejorar ahoraVer Más Videos Relacionados

Koneksi Jaringan Lan Ke Internet Melalui Mikrotik Rb941 2Nd
CARA SETTING / KONFIGURASI DASAR MIKROTIK - MIKROTIK TUTORIAL [IND SUB] - Part 1
Cara setting Router Mikrotik agar komputer Client bisa terkoneksi internet dengan DHCP SERVER
Konfigurasi Hotspot Pada GNS3
SETTING DASAR JARINGAN DI MIKROTIK

Konfigurasi Bridge Hotspot dan PPPoE
5.0 / 5 (0 votes)
