Membuat Alat Kontrol Peralatan Listrik Jarak Jauh - ARDUINO PROJECT INDONESIA
Summary
TLDRIn this tutorial, the creator demonstrates how to control electrical devices using a 4-channel relay module and an Android phone via Bluetooth. The video guides viewers step-by-step, from wiring components like an Arduino Nano, Bluetooth HC-05 module, and relay module, to programming the Arduino. It explains how to configure the Arduino and set up a Bluetooth controller to operate devices such as fans or lights remotely. The tutorial emphasizes simplicity, safety precautions, and provides essential tips for beginners interested in home automation and electronics projects.
Takeaways
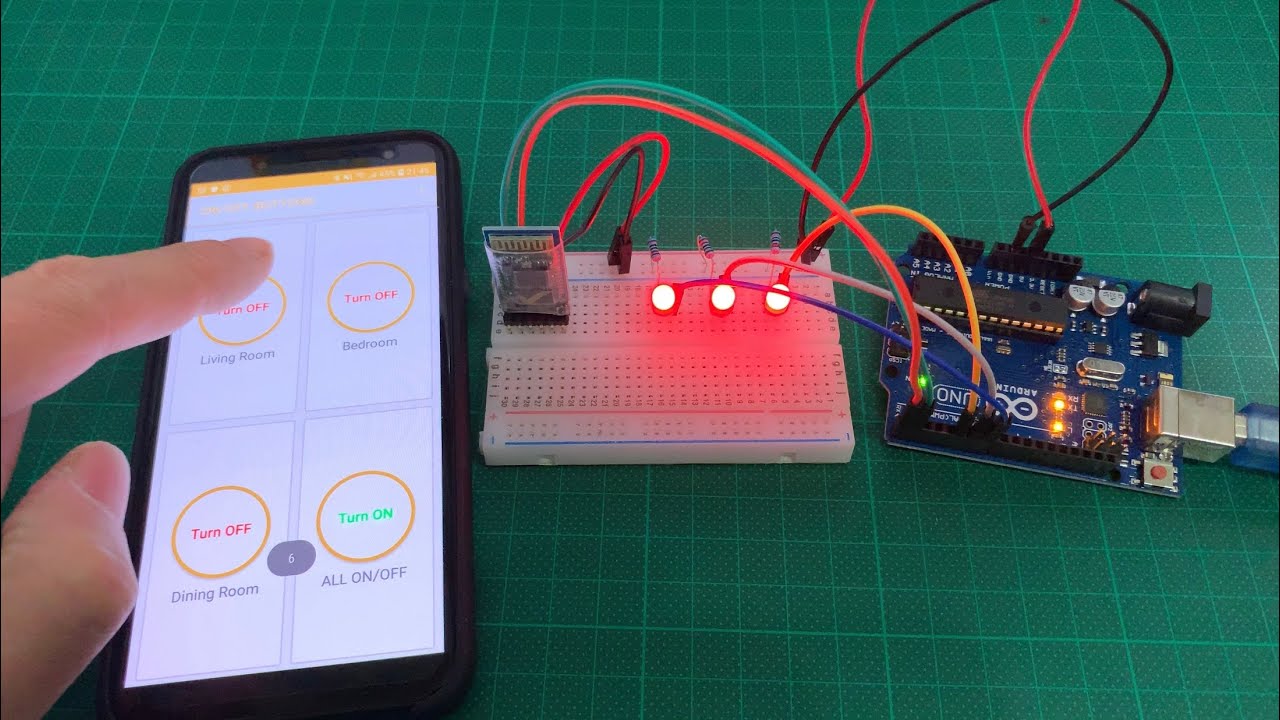
- 😀 The video introduces a tutorial on creating a multi-channel relay system controlled via an Android phone, allowing you to control electrical devices with voice commands or button presses.
- 😀 The relay module used in the tutorial is a 4-channel relay, which can control up to four devices simultaneously. Users can also use an 8-channel relay by adjusting the program.
- 😀 For safety, the tutorial explains that the maximum capacity for each relay is 2000 watts, considering a 10% safety margin from the 2200-watt capacity.
- 😀 The tutorial uses an Arduino Nano, but an Arduino Uno can also be used with slight adjustments in the pin configuration.
- 😀 The necessary components include an MB102 power module, Arduino Nano, HC-05 Bluetooth module, jumper wires, and a 4-channel relay module.
- 😀 The Bluetooth module (HC-05) is connected to the Arduino to enable wireless communication, with the correct wiring between TX and RX pins for proper data transmission.
- 😀 The program ensures the relay system functions by initially setting the pins to HIGH to avoid accidental activation of the relays and then using Bluetooth communication to turn them on/off based on specific commands.
- 😀 The program works by sending specific character values (1, 2, 3, etc.) to control the relays. Each command corresponds to a specific relay turning on or off.
- 😀 The tutorial provides a clear step-by-step guide for setting up the Arduino code and connecting it to the Android app for controlling the relays wirelessly.
- 😀 The video also discusses the importance of using an external power supply for the relay system, as the power from the Arduino itself may not be sufficient to operate the relays effectively.
Q & A
What is the main purpose of this tutorial?
-The main purpose of the tutorial is to show how to control multiple electrical devices using a 4-channel relay module, Arduino Nano, and Bluetooth, all controlled from an Android phone.
Which relay module is used in this tutorial?
-A 4-channel relay module is used in this tutorial, but it can be replaced with an 8-channel relay if more devices need to be controlled.
What are the safety considerations when using the relay module?
-The relay module can handle a maximum of 2200 watts (10A at 220V). To ensure safety, it is recommended to use up to 2000 watts to account for a 10% safety margin.
What Arduino board can be used for this project?
-The Arduino Nano is used in the tutorial, but the Arduino Uno can also be used with the same program, with slight adjustments to the pin connections.
How is the Bluetooth module connected to the Arduino?
-The Bluetooth module (HC-05) is connected to the Arduino via the RX and TX pins, with the TX of the Bluetooth module connected to the RX of the Arduino, and vice versa, for communication.
What is the significance of using the MB102 power module?
-The MB102 power module provides 5V to the Arduino and other components. It can be powered by an external adapter (9-12V) or a 9V battery. It also has voltage regulators to supply 5V or 3.3V as needed.
Why is the Arduino programmed to initially output HIGH on relay pins?
-The relay modules are active-low, meaning they turn on when the input pin is LOW. Setting the pins to HIGH initially ensures that the relays remain off when the system starts.
How is the app used to control the relays?
-The user installs the 'Arduino Bluetooth Controller' app on an Android phone. The app sends specific data (e.g., '1' to turn on Relay 1) to the Arduino over Bluetooth, which in turn triggers the corresponding relay.
What happens if the power supply is insufficient for the relay module?
-If the power supply is insufficient, the relays may not function correctly. For example, the relay indicator lights may turn on, but the relay itself won't activate. An external power supply is recommended to ensure proper relay operation.
Can the program be adjusted to control more than four relays?
-Yes, the program can be modified to control more than four relays. You would need to adjust the pin assignments and modify the program to include additional relay control logic, such as adding more relay pins and corresponding button controls in the app.
Outlines

Esta sección está disponible solo para usuarios con suscripción. Por favor, mejora tu plan para acceder a esta parte.
Mejorar ahoraMindmap

Esta sección está disponible solo para usuarios con suscripción. Por favor, mejora tu plan para acceder a esta parte.
Mejorar ahoraKeywords

Esta sección está disponible solo para usuarios con suscripción. Por favor, mejora tu plan para acceder a esta parte.
Mejorar ahoraHighlights

Esta sección está disponible solo para usuarios con suscripción. Por favor, mejora tu plan para acceder a esta parte.
Mejorar ahoraTranscripts

Esta sección está disponible solo para usuarios con suscripción. Por favor, mejora tu plan para acceder a esta parte.
Mejorar ahoraVer Más Videos Relacionados

Prototype Smarthome Berbasis Mikrokontroler Arduino Uno dan Android
Arduino UNO Smart Home Lighting Simulation w/LEDs, HC-05 Bluetooth Module + mBlock 3 [Tutorial]

Cara buat saklar Lampu sensor tepuk
ESP32 Bluetooth Car | Android + iPhone | DIY 🔥
ESP32 Home automation with Google Assistant Alexa & Manual Switches - Internet of Things 2021
Cara penggunaan dan pengoperasian relay dengan ARDUINO UNO
5.0 / 5 (0 votes)
