How to Partition an SSD in Windows 11/10? [ULTIMATE GUIDE]
Summary
TLDRThis expert guide from The Windows Club offers a step-by-step tutorial on how to partition an SSD in Windows 11, enhancing the device's performance and organization. The process involves shrinking the system partition to create unallocated space, which can then be used to create a new partition for specific data types like images, movies, or documents. This method not only aids in data recovery but also allows for the installation of a new operating system or the expansion of existing storage. The guide also covers how to delete and merge partitions back to their original volume, emphasizing the importance of data backup before making any changes. By following these instructions, users can efficiently manage their SSD's storage and optimize their Windows experience.
Takeaways
- 😀 You can partition an SSD in Windows 11 using Windows Settings to enhance organization and performance of your data.
- 😀 The partitioning process involves accessing Storage Management settings in the System Storage section of Windows Settings.
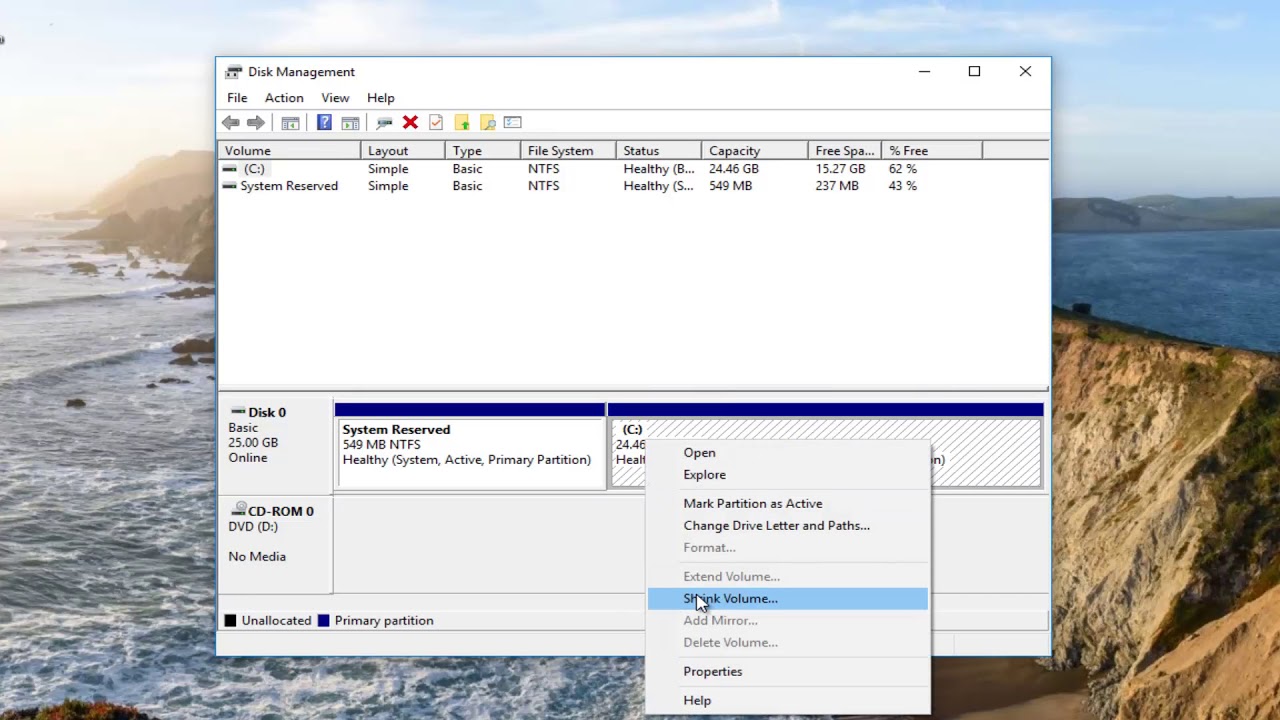
- 😀 Before creating a new partition, you need to shrink the existing system partition to free up space.
- 😀 Shrinking a partition is done by modifying its size in the Change Size window within the Disks & Volumes settings.
- 😀 After shrinking, unallocated space will be available for creating a new partition by selecting 'Create Simple Volume'.
- 😀 When creating a new partition, you can specify details such as Label, Drive Letter, File System, and Size in MB.
- 😀 Newly created partitions are visible in the Disk and Volumes list, where you can further adjust the label and drive letter.
- 😀 It's possible to delete a partition and merge it back to a previous volume, but a data backup is recommended before doing this.
- 😀 Deleting a partition involves selecting it and choosing the Delete option, then confirming the action.
- 😀 After deleting, you can adjust the size of the previous partition to its maximum via the Change Size option.
Q & A
What is the main purpose of partitioning an SSD in Windows 11?
-Partitioning an SSD in Windows 11 allows you to allocate space based on data types, distribute data across specific partitions, and potentially recover data more easily if the drive gets corrupted. It also enables you to move or install your Windows operating system to a specific partition or create space for a new OS.
Why is it important to use an SSD for computer performance?
-SSDs are known to speed up applications and boot times, which significantly improves the overall speed of your device.
How can you access Storage Management settings in Windows 11?
-You can access Storage Management settings by pressing the Win + I hotkeys on the keyboard, then clicking on System, then Storage, and navigating to Advanced Storage Settings.
What is the first step in partitioning an SSD via Windows Settings?
-The first step is to shrink the system partition by selecting it and clicking on the Change Size button, inputting the desired size, and waiting for Windows to finish resizing the partition.
How do you create a new partition for unallocated space?
-After shrinking the partition, go back to Disk Volumes settings, select Unallocated, click on the drop-down menu for Create Volume, choose Create Simple Volume, specify the Label, Drive Letter, File System, and Size in MB, and then press Format.
What are the steps to modify the label and drive letter of a new partition?
-Select the new partition and click on Properties. In the Properties window, you can select Change label or Change drive letter to make the desired modifications.
How can you delete and merge a partition back to the original volume?
-Select the new partition, click on Properties, scroll down, and hit the Delete button. Confirm by clicking on Delete Volume. Then, select the previous partition, go to Properties, Size, and press the Change Size button. Input the Max size in MB and press OK to apply the changes.
What precaution should you take before deleting a partition?
-Before deleting a partition, it is crucial to create a backup of your data to prevent any data loss.
Why might someone want to distribute data across different partitions?
-Distributing data across different partitions helps in organizing data more efficiently, such as separating images, movies, music, and documents into individual partitions. This also aids in data recovery in case of drive corruption.
What is the benefit of having a separate partition for the Windows operating system?
-Having a separate partition for the Windows operating system can help in maintaining system stability and performance, as well as simplifying the process of reinstalling or upgrading the OS without affecting personal files.
How can I follow more guides like this for Windows tech solutions?
-You can subscribe to The Windows Club for more expert guides and tech solutions related to Windows.
What is the recommended file system for a new partition on an SSD?
-The recommended file system for a new partition on an SSD would typically be NTFS for Windows systems, which offers good performance, reliability, and compatibility with a wide range of applications.
Can I partition an SSD that already has data on it?
-Yes, you can partition an SSD that already has data on it, but you need to ensure that you do not delete or overwrite any important data during the process. It's always best to back up your data before making any changes to your drive's partitions.
Outlines

Esta sección está disponible solo para usuarios con suscripción. Por favor, mejora tu plan para acceder a esta parte.
Mejorar ahoraMindmap

Esta sección está disponible solo para usuarios con suscripción. Por favor, mejora tu plan para acceder a esta parte.
Mejorar ahoraKeywords

Esta sección está disponible solo para usuarios con suscripción. Por favor, mejora tu plan para acceder a esta parte.
Mejorar ahoraHighlights

Esta sección está disponible solo para usuarios con suscripción. Por favor, mejora tu plan para acceder a esta parte.
Mejorar ahoraTranscripts

Esta sección está disponible solo para usuarios con suscripción. Por favor, mejora tu plan para acceder a esta parte.
Mejorar ahoraVer Más Videos Relacionados
Cara Install Windows 10 Dengan Flashdisk Step by Step 2022 LENGKAP!
Cara Install Windows 11 LENGKAP (Cara Download, Buat Bootable,Cara Install, Cara Partisi)
How to Install Windows 11 on a New PC - Complete Step-by-Step Guide
Windows 10 - How To Partition Hard Drives [Tutorial]

How to Disable Microsoft Defender Antivirus in Windows 11
CARA INSTALL WINDOWS 10 PRO 2021 - LENGKAP (Cara Download, Buat Bootable,Cara Install, Cara Partisi)
5.0 / 5 (0 votes)
