Cara buat lampu dekorasi bermotif bintang.
Summary
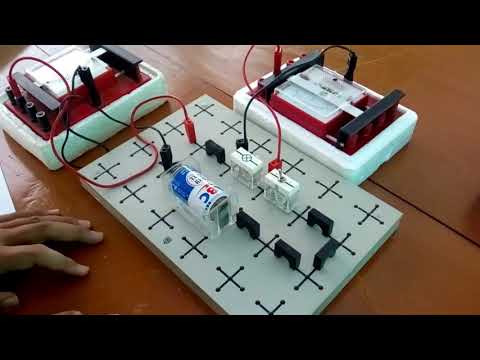
TLDRIn this educational video, young scientists are guided through an experiment to create a Starlight Lamp using parallel electrical circuits. The step-by-step process includes assembling components such as an LED lamp, wires, a switch, and a battery, followed by detailed instructions on how to connect and secure them to a circuit board. The project culminates in a functional light-up Starlight Lamp, demonstrating basic electrical concepts while engaging viewers in hands-on learning. By the end, viewers are encouraged to test and finalize their project by ensuring all parts are securely connected and the lamp is operational.
Takeaways
- 😀 Gather the necessary tools and materials for the experiment, including an LED lamp, screwdrivers, rubber switch cover, cables, battery holder, and wires.
- 😀 Attach the switch to the board by aligning it with the hole in the middle of the fence board.
- 😀 Insert the rubber cover on the black cable and connect it to the battery terminal, ensuring proper connections to the switch.
- 😀 Secure the cables in place and connect the two white cables to the terminal holes located next to the battery holder.
- 😀 Insert the LED lamp's short leg into the black cable hole and the long leg into the red cable hole on the board.
- 😀 Fold the LED lamp's legs sideways to keep it in place, ensuring proper contact with the terminals.
- 😀 Attach the switch firmly to the board using screws, and secure the surrounding fence boards to the circuit board for stability.
- 😀 Stick the film paper on the four sides of the star house boards, making sure it's positioned inside.
- 😀 Assemble the roof pieces of the star house and attach them to the top of the lamp housing, ensuring all parts are locked in place.
- 😀 Secure the star lamp house assembly to the circuit board, checking that all connections are firm and secure.
- 😀 Insert the batteries into the battery holder, press the switch to turn on the Starlight Lamp, and ensure everything is working properly.
Q & A
What is the main purpose of the experiment in the script?
-The main purpose of the experiment is to create a parallel electric circuit to light up an LED lamp, specifically the Starlight Lamp.
What are the materials needed for the experiment?
-The materials required include an LED light, screws, a screwdriver, rubber switch cover, wires, a circuit board, a battery, tape, a star-shaped house board, and a film paper.
How is the switch installed on the circuit board?
-The switch is installed by placing it in the hole located in the middle of the star-shaped fence board and securing it in place with screws.
What is the purpose of the rubber cover in the circuit setup?
-The rubber cover is used to secure the black wire in place, ensuring a stable connection between the battery holder and the switch.
How do you connect the wires to the switch?
-You connect the black wire to the battery holder terminal, insert one end into the switch, and attach the other black wire to the remaining switch terminal.
What is the correct way to connect the LED light to the circuit?
-The LED light should be connected by inserting the short leg into the black wire terminal hole and the long leg into the red wire terminal hole.
What should you do after inserting the LED into the circuit?
-After inserting the LED, bend its legs to the side and secure the switch and circuit components firmly by screwing them into place.
What additional steps are needed after assembling the circuit?
-After assembling the circuit, attach the house and roof boards to form the lamp structure and secure them with screws. Ensure all connections are stable.
How do you make sure the circuit is stable and secure?
-You can secure the circuit by tightening the screws at the designated points and using tape or cable ties to organize the wires, preventing any loose connections.
How do you power the Starlight lamp?
-You power the Starlight lamp by inserting two batteries into the battery holder and pressing the switch to turn on the light.
Outlines

Dieser Bereich ist nur für Premium-Benutzer verfügbar. Bitte führen Sie ein Upgrade durch, um auf diesen Abschnitt zuzugreifen.
Upgrade durchführenMindmap

Dieser Bereich ist nur für Premium-Benutzer verfügbar. Bitte führen Sie ein Upgrade durch, um auf diesen Abschnitt zuzugreifen.
Upgrade durchführenKeywords

Dieser Bereich ist nur für Premium-Benutzer verfügbar. Bitte führen Sie ein Upgrade durch, um auf diesen Abschnitt zuzugreifen.
Upgrade durchführenHighlights

Dieser Bereich ist nur für Premium-Benutzer verfügbar. Bitte führen Sie ein Upgrade durch, um auf diesen Abschnitt zuzugreifen.
Upgrade durchführenTranscripts

Dieser Bereich ist nur für Premium-Benutzer verfügbar. Bitte führen Sie ein Upgrade durch, um auf diesen Abschnitt zuzugreifen.
Upgrade durchführenWeitere ähnliche Videos ansehen

PERSAMAAN DAN PERBEDAAN RANGKAIAN SERI DAN PARALEL

Simulasi Rangkaian Seri dan Paralel

Cara membuat rangkaian seri dan paralel sederhana / tugas kelas 6 tema 3

Petunjuk Praktikum Membuat Rangkaian Listrik dan Pengukuran dengan Basicmeter
Pengukuran Kuat Arus dan Beda Potensial Listrik

Daya Pada Rangkaian RLC
5.0 / 5 (0 votes)
