CARA KONFIGURASI MIKROTIK AWAL (KONEKSI INTERNET)
Summary
TLDRThis instructional video script guides viewers through configuring a MikroTik router for internet connectivity. It begins with connecting the router to the internet and setting up Winbox. The tutorial then covers obtaining an IP address, configuring DHCP, and setting up port forwarding with NAT. The script emphasizes the importance of a clean configuration slate and concludes with a successful internet connection test, promising further lessons on firewall configuration in upcoming videos.
Takeaways
- 🌐 The video discusses setting up a MikroTik router for remote learning during the COVID-19 pandemic.
- 💻 The initial step is to connect the MikroTik router to the internet using Winbox software.
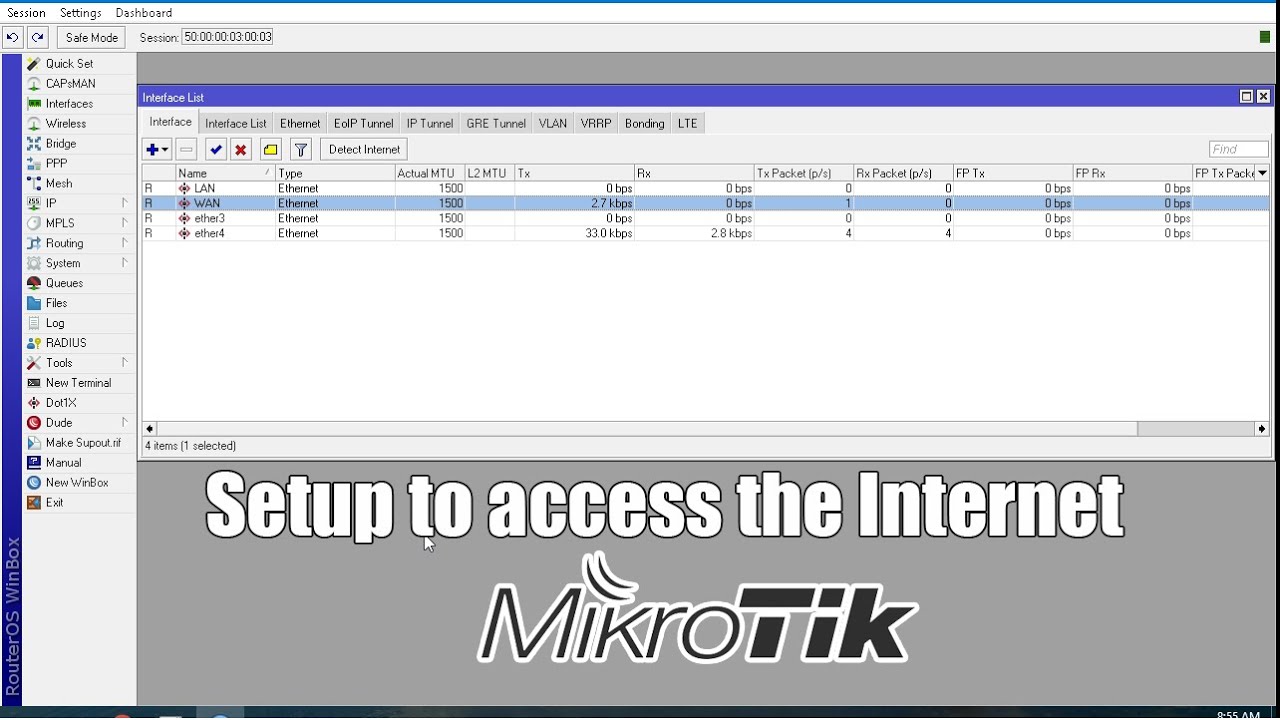
- 🔌 It's necessary to ensure the MikroTik's Ethernet port (ether2) is connected to a laptop or PC.
- 📡 The script guides viewers to obtain a MAC address and IP details automatically for the MikroTik device.
- 🔄 If needed, viewers are instructed to refresh or flash the MikroTik to display the IP address for login.
- 🔑 The default login credentials for MikroTik are 'admin' with no password.
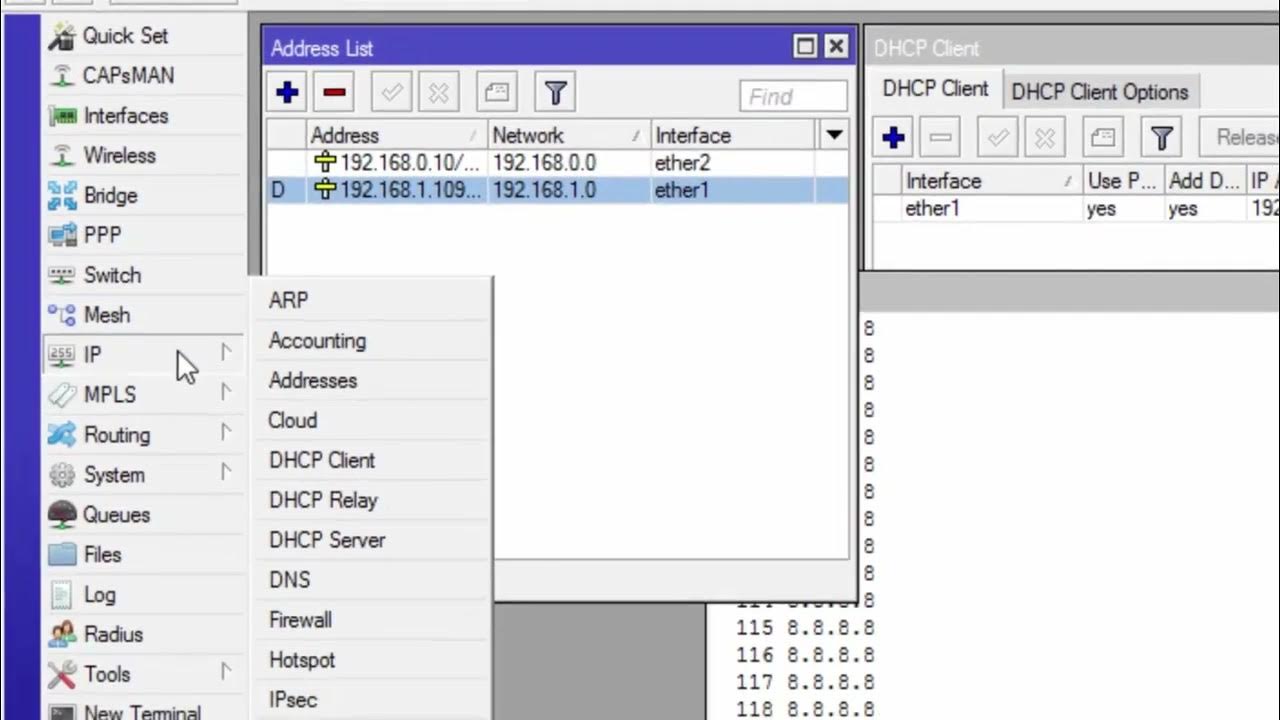
- 🛠️ The video instructs on creating an IP address for the connection from the MikroTik to the PC or laptop.
- 🌐 It explains how to configure the DHCP client on the MikroTik for automatic IP assignment to the connected devices.
- 🔒 The script includes setting up a firewall with NAT (Network Address Translation) to allow internet access.
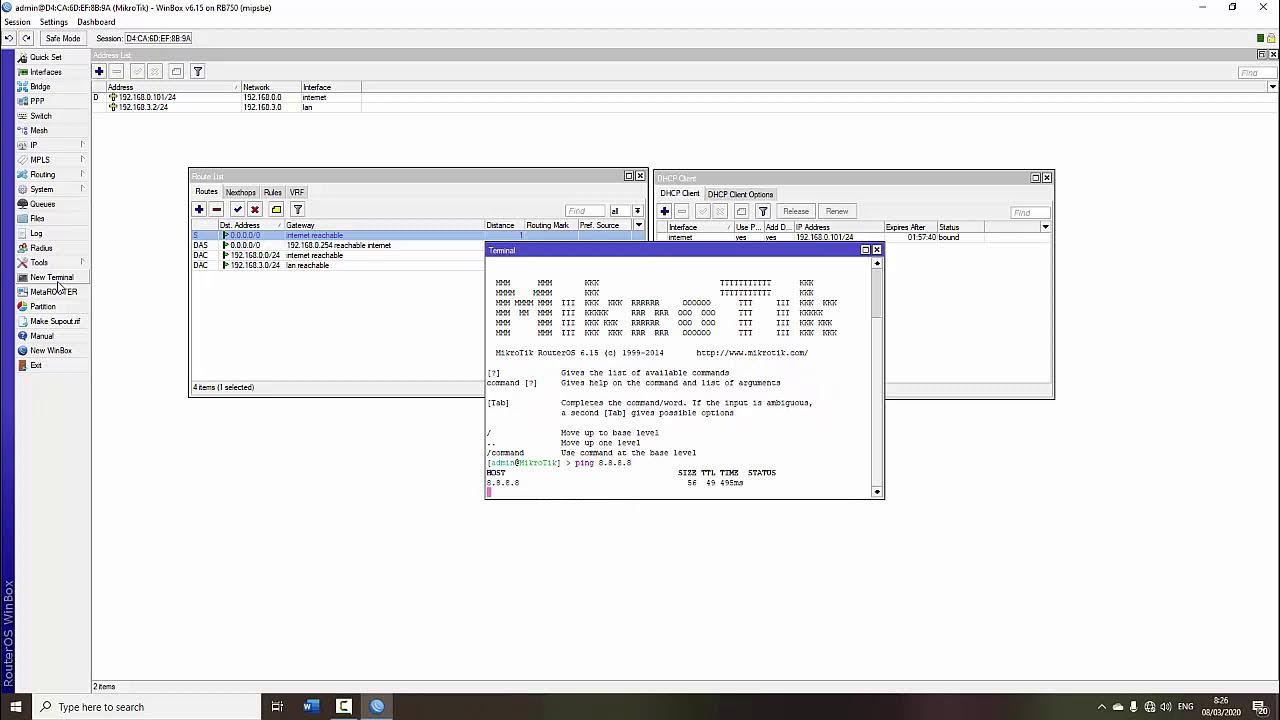
- 📡 The video demonstrates how to verify internet connectivity by pinging external sites like Google.
- 🔄 The final steps involve configuring the DHCP server on the MikroTik to assign IP addresses to connected devices automatically.
Q & A
What is the main topic of the video script?
-The main topic of the video script is configuring a MikroTik router for internet connectivity.
What is the first step mentioned in the script to connect a MikroTik to the internet?
-The first step is to open Winbox and ensure that the MikroTik router is connected to the internet source.
What is Winbox and why is it needed?
-Winbox is a software utility used to manage MikroTik RouterOS. It is needed to configure the MikroTik router.
How does one check if the MikroTik router has obtained an IP address?
-One can check if the MikroTik router has obtained an IP address by looking at the Network section where it should display the MAC address and IP details.
What is the default login for MikroTik RouterOS as mentioned in the script?
-The default login for MikroTik RouterOS is 'admin' with no password.
What does the script suggest doing if the MikroTik router is clean from configurations?
-If the MikroTik router is clean from configurations, the script suggests removing any existing configurations to start fresh.
What is the purpose of creating an IP address in the MikroTik configuration?
-Creating an IP address in the MikroTik configuration is done to set up the interface that will be used for internet connectivity.
How does one configure the DHCP client on the MikroTik router?
-One configures the DHCP client by adding a new DHCP client instance, selecting the interface connected to the internet source, and setting it to obtain IP automatically.
What is the function of the 'Masquerade' action in the MikroTik firewall configuration?
-The 'Masquerade' action in the MikroTik firewall configuration is used to change private IP addresses to public IP addresses, allowing devices to connect to the internet.
How does one set up the DHCP server in MikroTik according to the script?
-To set up the DHCP server, one goes to the IP menu, selects DHCP server, and then clicks on DHCP setup. The interface connected to the PC or laptop is chosen, and the setup is completed by following the prompts.
What is the final step to verify internet connectivity as described in the script?
-The final step to verify internet connectivity is to ping a public IP address from the command prompt on the connected laptop or PC.
Outlines
🌐 Connecting MikroTik to the Internet
The video script begins with a greeting and an acknowledgment of the ongoing COVID-19 pandemic. It then dives into a tutorial on setting up a MikroTik router for remote learning. The process starts with connecting the MikroTik to the internet using Winbox software. The script instructs viewers to ensure MikroTik is connected to the internet source and then to connect it to a laptop or PC. It guides through the steps of obtaining a MAC address and IP, logging in with default credentials (admin with no password), and checking for any existing configurations. The tutorial emphasizes creating a new IP address for the connection from the MikroTik to the PC or laptop, selecting the appropriate port, and setting up the DHCP client for automatic IP acquisition. It concludes with a step to ensure the MikroTik is clean from any prior configurations.
🛠️ Configuring DHCP and Testing Internet Connection
This section of the script continues the MikroTik setup by focusing on configuring the DHCP client and testing the internet connection. It explains how to set up the DHCP client for automatic IP configuration and contrasts this with manual IP settings. The script then guides viewers to test the internet connection by pinging a website. If the connection is successful, it proceeds to configure the NAT settings using the 'Masquerade' action, which allows the internal network to use a public IP address for internet access. The tutorial also covers setting up DNS and checking the connection status through the terminal. Finally, it demonstrates how to configure the DHCP server, ensuring that the setup is completed successfully and that devices can obtain IP addresses from the MikroTik router. The script ends with a test to confirm the successful internet connection on the connected devices.
🔒 Upcoming Firewall Configuration Tutorial
The final paragraph of the script sets the stage for the next video, which will focus on configuring the firewall settings of the MikroTik router. It reassures viewers that the current video was intended to be helpful and comprehensible, and it ends with a closing greeting, wishing viewers well and looking forward to meeting them in the next tutorial.
Mindmap
Keywords
💡Winbox
💡MAC address
💡DHCP
💡MikroTik
💡RouterOS
💡Firewall
💡NAT
💡Ethernet
💡IP Address
💡Configuration
💡Internet Connectivity
Highlights
Introduction to remote learning during the COVID-19 pandemic in Indonesia.
Starting with MikroTik configuration for connecting to the internet.
Requirement of Winbox to connect MikroTik to the internet.
Ensuring MikroTik is connected to an internet source and connected to a laptop or PC.
Automatic acquisition of MAC address and IP through the Network interface.
Refreshing the interface to display MegaPi or IP for login.
Default login credentials for MikroTik.
Connecting to MikroTik using the MAC address and clicking connect.
Appearance of a warning indicating a clean MikroTik board without configuration.
Removing configuration to ensure MikroTik is free from any settings.
Creating an IP address for the connection from MikroTik to the laptop or PC.
Setting up the IP address and DHCP for the internet source.
Automatic IP acquisition through DHCP client for the internet source.
Explanation of static IP settings versus dynamic DHCP client settings.
Testing internet connection by pinging Google.
Using Command Prompt to check for successful internet connection.
Setting up IP forwarding and NAT (Network Address Translation).
Explanation of the function of the Masquerade action in the firewall.
Finalizing the MikroTik configuration for internet connectivity.
Checking the terminal for a successful ping, indicating internet access.
Verifying internet connection through a browser and accessing Google Maps.
Confirmation of successful IP acquisition and internet functionality.
Anticipation of the next video focusing on MikroTik firewall configuration.
Closing remarks with a wish for the video's usefulness and understanding.
Transcripts
Halo assalamualaikum warahmatullahi
wabarakatuh semoga kalian di sana tutup
sehat-sehat aja ya walaupun dalam
kondisi virus Corona yang sedang merebak
ini pandemi di Indonesia dan seluruh
dunia kali ini kita masuk ke
pembelajaran jarak jauh semoga yang
walaupun jarak jauh tetap semangat kita
akan belajar tentang konfigurasi
mikrotik untuk yang pertama kita akan
menghubungkan mikrotik ke internet jadi
kita akan mencoba mengkoneksikan
mikrotik dengan internet sehingga bisa
atau laptop kita bisa terkoneksi
internet yang pertama kita butuhkan
adalah Winbox kita buka dulu inbox-nya
Hai pastikan Rutherford mikrotik kita
sudah terhubung dengan sumber internet
kemudian Eh pada ether2 nya sudah kita
koneksikan ke laptop atau PC kita nah
secara otomatis Nanti pada Network kita
akan mendapatkan MAC address Ip dan
Hai identitas seperti ini jika tidak
kita bisa refresh
kita bisa di flash untuk memunculkan
Mega dress atau IP yang akan kita
gunakan untuk login nah secara default
di sini loginnya adalah admin kemudian
passwordnya kosong seperti ini lalu kita
pilih Mac addressnya ini kemudian kita
klik connect
Ayo kita tunggu Nah setelah masuk
seperti ini selanjutnya
Hai akan muncul
Hai peringatan seperti ini pilih
Hai ini artinya bahwa Brother board
mikrotik kita bersih dari konfigurasi
untuk memastikan lagi kita bisa Klik
remove konfigurasi
hal ini berarti belum ada konfigurasi
atau settingan apa-apa pada mikrotik
kita langkah pertama yang harus kita
lakukan yaitu kita membuat IP kemudian
address
Ayo kita klik yang plus ini
Ayo kita buat IP untuk ether2 atau yang
terhubung dari router board mikrotik ke
laptop atau PC kita
Hai setiap Rutherford mikrotik
berbeda-beda tipe berbeda pula jumlah
untuk potnya untuk pot pertama biasanya
untuk internet atau sumber internet
kemudian pot 23 dan selanjutnya itu
untuk yang terhubung ke PC atau laptop
nah ini kita
di sesuaikan
Ayo kita menghubungkan yang dari
routerboard mikrotik ke laptop atau PC
itu di pot berapa atau eter berapa Kalau
saya disini menghubungkannya dieter dua
atau pr2 kita gua dulu aibnya
Hai misalnya titik 10 jangan lupa slash
atau prefixnya Sai tudia
ok
Hai Nah yang kedua kita setting IP
Hai DHCP
the
Ayo kita plus di sini
Ayo kita pilih untuk ether1 atau sumber
internet kita fzr1000
bye oke
Hai nah pastikan disini 1cm menjadi Bond
atau artinya sumber internet kita ether1
kita sudah berhasil mendapatkan IP atau
sudah berhasil terhubung nah disini
otomatis akan bertambah juga ipdr satu
sebenarnya ini bisa dua cara bisa statik
dan eh dinamis atau otomatis ya ini kita
pilih cara yang otomatis
Hai yaitu dengan DHCP client sehingga
ether1 akan otomatis mendapatkan IP
Hai kalau yang secara statis itu berarti
kita harus setting manual IP di laptop
atau PC kita kemudian kita juga harus
setting root
Hai atau rooting nya Nah untuk simplenya
kita pilih yang menggunakan DHCP client
Hai sampai langkah ini Seharusnya
Hai tutur buat kita sudah siap atau
sudah terkoneksi internet kita coba pink
08881 Google nah disini sudah mendapat
balasan yaitu terkoneksi internet
Oh begono
hai hai
Hai lebih
hai hai
Hai Nah kita cek pada command promt di
laptop atau PC kita di sini kita ping ke
888 masih Erto atau Request time out
Hai Padahal di Rutherford ini sudah
berhasil tersambung ke internet itu
disebabkan karena laptop atau PC kita
belum mendapatkan IP Nah untuk
mendapatkannya kita harus setting ke IP
file Word
yo yo
Hai kemudian kita pilih Nad
Ayo kita plus kan disini
Hai c-nya src-nat kemudian out interface
ini bisa kita tambahkan yaitu ether1
atau sumber internet kita
Hai out-nya inisal jaringan keluarnya
itu dari ether1 sumber internet dari
ether1 kemudian kita ke action
Ayo kita pilih Masquerade
Hai nah Apa fungsi firewall Nat action
mesquret ini ini berguna untuk membuat
atau merubah ibpl Rifat menjadi IP
public sehingga
Hai office atau laptop kita bisa
terhubung ke jaringan dan mendapatkan
Epi bulan kita play ok
Hai guys ini sudah
Hai ada
hai rulenya
Hai kemudian kita juga bisa setting IP
DNS DNS kemudian kita klik low remote
request kita checklist okay oke Langkah
terakhir yaitu kita akan setting DHCP
server kita ke menu IP kemudian DHCP
server kita pilih DHCP set-up kita klik
DHCP set up
Hai untuk interface kita pilih haters
Hai atau yang terhubung ke laptop atau
PC kita ya kata2ne ini tinggal
next-generation tinggal kita next next
saja next next
Hai sampai ada peringatan set-up has
completed successfully kita oke nah
sampai di sini settingan kita sudah
selesai kita tinggal cek denyut terminal
Ayo kita ping sudah berhasil kemudian
kita cek juga ke command promt yang ada
pada laptop atau PC kita
Ayo kita coba ping juga ke 888
Hai nah disini sudah ada
Hai tersambung ke internet Coba kita cek
ke browser ya
Ayo kita buka Google Map
hai oke laptop atau PC kita sudah
berhasil terhubung ke internet
Oh berarti sudah berhasil mendapatkan IP
sudah bisa internetan nah ini tahap
pertama untuk konfigurasi mikrotik kita
hubungkan dulu laptop kita ke internet
pastikan sudah memiliki koneksi internet
hai oke di next video kita akan setting
tentang konfigurasi Firewall nya kita
ketemu lagi di video Selanjutnya ya
semoga video kali ini bermanfaat dan
bisa dipahami kita yg dulu
assalamualaikum warahmatullahi
wabarakatuh
Weitere ähnliche Videos ansehen
Konfigurasi DHCP Server dan DHCP Client pada Router Mikrotik RB 951Ui-2HnD
Cara setting Router Mikrotik agar komputer Client bisa terkoneksi internet dengan DHCP SERVER
Cara Konfigurasi VoIP Pada Cisco Packet Tracer Terbaru || Command Line Interface CLI
How to create wifi hotspot on linux
MENCARI KESALAHAN KONFIGURASI DASAR - MIKROTIK TUTORIAL [ENG SUB]
Aktivitas Belajar 2.2
5.0 / 5 (0 votes)