Konfigurasi Routing OSPF 3 Router Mikrotik
Summary
TLDRThis video tutorial guides viewers through the process of configuring dynamic routing with OSPF on three Mikrotik routers. The setup involves connecting routers with different IP address segments, using OSPF to enable communication between devices across varying subnets. The tutorial covers step-by-step instructions for configuring the IP addresses, routing, NAT, DHCP, and OSPF on each Mikrotik router, ensuring seamless connectivity between all PCs. The video also demonstrates the final testing phase, verifying successful inter-device communication and internet access, making it ideal for network enthusiasts and professionals interested in advanced routing setups.
Takeaways
- 😀 The video provides a tutorial on how to set up dynamic routing using OSPF across three MikroTik routers.
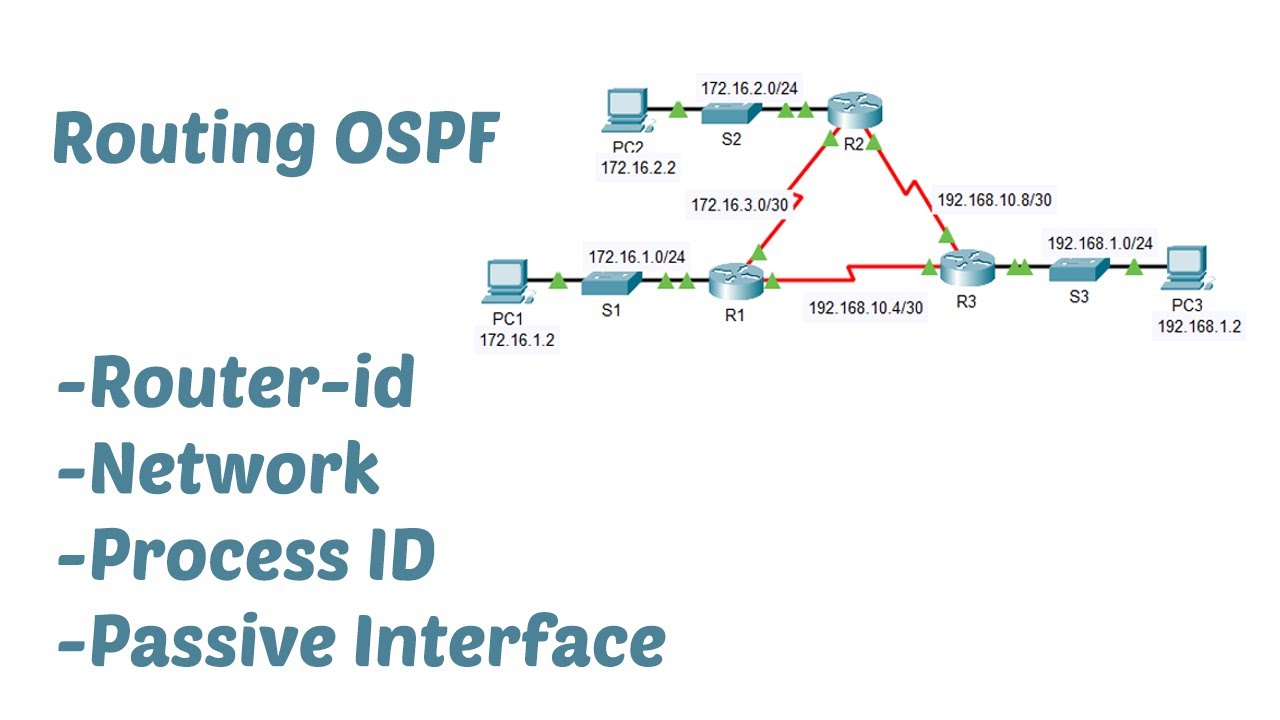
- 😀 The network topology involves three MikroTik routers connected with different IP segments, allowing communication between different PCs despite the segment differences.
- 😀 Each MikroTik router is configured with a unique IP address in the 192.168.128.0/22 range, and they are connected to different segments like 10.100.100.0/24 and 172.16.1.0/24.
- 😀 OSPF routing is enabled on the routers to allow dynamic routing across different network segments, ensuring that devices can communicate with each other.
- 😀 DHCP server setup is performed on the routers to automatically assign IP addresses to the connected PCs.
- 😀 NAT (Masquerade) is configured on each router to allow PCs to access the internet despite being on different network segments.
- 😀 The tutorial includes step-by-step instructions for configuring IP addresses, DHCP, OSPF, and firewall NAT settings on MikroTik routers.
- 😀 The video demonstrates how to use Winbox to configure MikroTik routers, providing a visual guide for each configuration step.
- 😀 Testing is done at the end by pinging the PCs across different routers to ensure that all devices are connected and can communicate with each other.
- 😀 The final result is that all PCs, despite being on different IP segments, are able to connect to each other and the internet using dynamic routing with OSPF.
Q & A
What is the main purpose of the video tutorial?
-The main purpose of the video tutorial is to demonstrate how to configure dynamic routing using OSPF (Open Shortest Path First) on three MikroTik routers, ensuring connectivity between devices in different IP segments.
What network topology is used in the tutorial?
-The network topology consists of three MikroTik routers connected via different IP segments: 192.168.128.0/22, 10.100.100.0/24, and 172.16.1.0/24. Each router is connected to PCs or switches in their respective segments.
How are the routers connected to the internet?
-Router 1 is connected to the internet using a DHCP client, which allows it to obtain an IP address automatically from the ISP.
What is the purpose of bridging interfaces on MikroTik Router 2?
-The purpose of bridging interfaces on Router 2 is to combine Ethernet interfaces 1 and 2, allowing traffic between the connected routers and PCs without requiring a separate switch.
How is OSPF configured on the MikroTik routers?
-OSPF is configured by adding the network segments to the OSPF routing table. For each router, the corresponding network addresses are added in the OSPF settings, ensuring that the routers exchange routing information and can reach each other's network.
Why is NAT (Masquerade) used in the configuration?
-NAT, specifically Masquerade, is used to enable devices on the internal network (connected to the MikroTik routers) to access the internet by translating their private IP addresses into the public IP address of the router.
What is the function of the DHCP server in this setup?
-The DHCP server is used to automatically assign IP addresses to devices connected to the MikroTik routers, making it easier for devices such as PCs to connect without manually setting IP addresses.
How do you ensure that all devices in different segments can communicate?
-By configuring OSPF on the MikroTik routers, dynamic routing is enabled, allowing the routers to automatically learn and update routing tables to ensure that devices in different segments can communicate with each other.
What troubleshooting step is taken to verify that the devices can communicate across segments?
-The connectivity between devices is verified by pinging from one PC to another across different routers. If the ping replies successfully, the configuration is working as expected.
How does the OSPF routing protocol benefit the network setup?
-OSPF allows the routers to dynamically update their routing tables, automatically adjusting to network changes. This is crucial for larger networks, as it simplifies the management of routes without manual intervention.
Outlines

This section is available to paid users only. Please upgrade to access this part.
Upgrade NowMindmap

This section is available to paid users only. Please upgrade to access this part.
Upgrade NowKeywords

This section is available to paid users only. Please upgrade to access this part.
Upgrade NowHighlights

This section is available to paid users only. Please upgrade to access this part.
Upgrade NowTranscripts

This section is available to paid users only. Please upgrade to access this part.
Upgrade NowBrowse More Related Video

OSPF Introduction - MIKROTIK TUTORIAL [ENG SUB]

Implementasi Konfigurasi Mikrotik Routing Dynamic (OSPF over BGP)
Konfigurasi Routing OSPF dengan mudah menggunakan Cisco Packet Tracer
Pembahasan Soal Uji Kompetensi Keahlian TKJ Paket 2 Tahun 2025

Discussion of UKK TKJ Package 2 Questions for 2025 - 2 Router Dynamic Routing OSPF Mikrotik R8941...

Konfigurasi Routing Dinamis di Cisco Packet Tracer #5 BGP (Border Gateway Protocol)
5.0 / 5 (0 votes)