PHOTOSHOP TRICK #01 : POTRAIT TEXT PHOTO (Bahasa Indonesia)

Robynson Manisa
5 Jun 202203:13

Summary

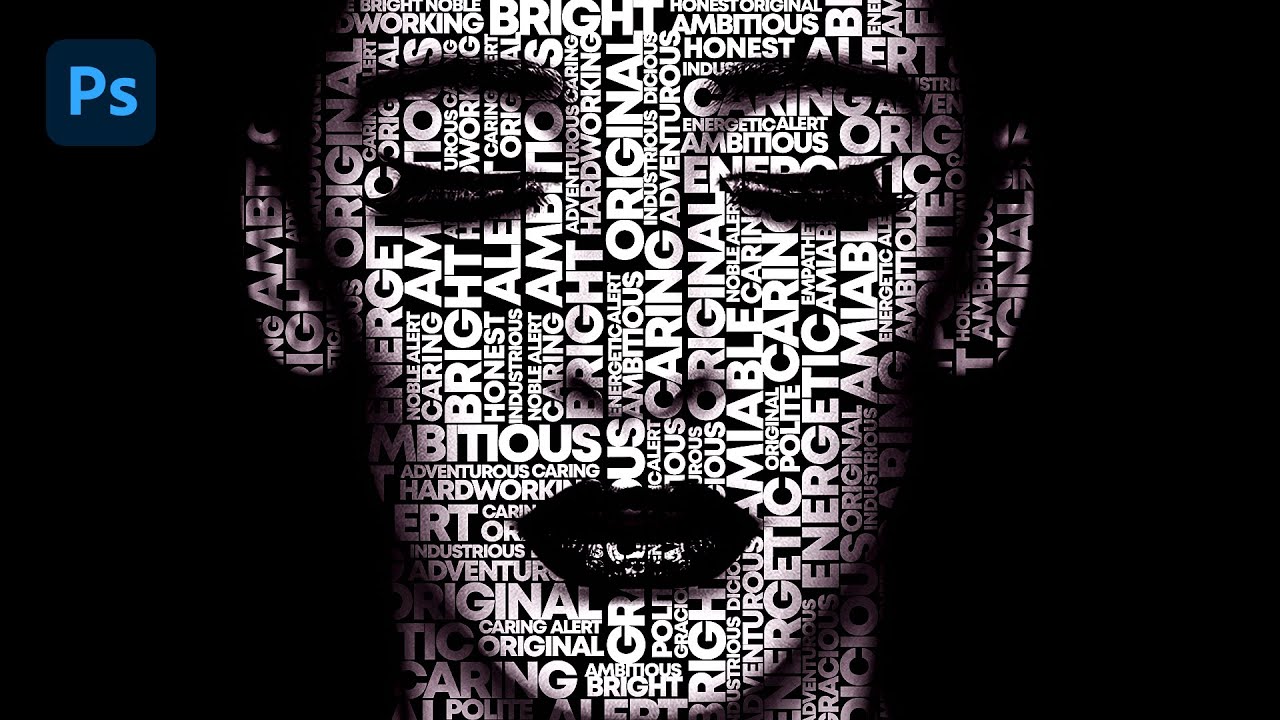
TLDRThis tutorial offers a straightforward guide on creating text portraits on photos using Adobe Photoshop. It begins with preparing a displacement map and saving it in Photoshop format. The script advises selecting text areas and inputting text, recommending smaller fonts for a refined look. It then details the process of converting the text to a Smart Object, applying a displacement filter with specific values, and using a dark layer as a base. Finally, it suggests saving the result in PNG format for optimal quality.

Takeaways

  • 🖼️ The tutorial is about creating text portraits on a photo using Adobe Photoshop.
  • 🌐 The process requires a single photo with the desired shape and size.
  • 📸 It's optimal if the photo has a plain background for better text integration.
  • 🗂️ A displacement map is prepared by saving the photo in Photoshop format.
  • 📝 The text is selected and inputted, with a recommendation to use a small font size for a more relaxed look.
  • 🔄 The text is converted into a Smart Object for further manipulation.
  • 🔧 The 'Filter' and 'Distort' options are used to apply the displacement effect with a value of 5.
  • 🎨 The displacement map makes the text follow the pattern of the photo.
  • 🖌️ A dark layer is added as a base to enhance the text's visibility.
  • 🔗 The photo layer is clipped to the text layer using a clipping mask.
  • 💾 The final result is saved in PNG format for high-quality output.

Q & A

  • What is the main topic of the video script?

    -The main topic of the video script is explaining a method to create a text portrait on a photo using Adobe Photoshop.

  • What is the first step mentioned in the script for creating a text portrait?

    -The first step is to prepare a displacement map by saving the file in Photoshop with a specific format that will give a pattern to the text.

  • What is the significance of having a background in the photo for the text portrait?

    -Having a background in the photo is more optimal as it allows the text pattern to follow the photo's pattern more effectively.

  • What does the script suggest for the selection of text in the portrait?

    -The script suggests selecting the area of the photo where the text will be applied.

  • Why does the script recommend using a small font size for the text?

    -Using a small font size is recommended to make the text portrait appear more relaxed and natural.

  • What is the purpose of converting the text to a Smart Object in Photoshop as per the script?

    -Converting the text to a Smart Object allows for non-destructive editing and easier manipulation of the text within the portrait.

  • What filter is used in the script to apply the displacement effect to the text?

    -The script uses the 'Distort' filter with the 'Displacement' option to apply the effect.

  • What values are suggested for the displacement filter in the script?

    -The script suggests using a value of 5 for both the horizontal and vertical displacement.

  • How does the script suggest applying the text pattern to the photo?

    -The script suggests applying the text pattern by dragging the layer of the text pattern onto the photo and using a clipping mask.

  • What is the recommended file format for saving the final text portrait photo for high quality?

    -The script recommends saving the final text portrait photo in PNG format for high quality.

  • What is the final outcome described in the script after completing the text portrait process?

    -The final outcome is a photo with a text portrait that follows the pattern of the photo's background, creating a visually appealing and integrated effect.

Outlines

00:00

🎨 Creating Text Portraits in Photoshop

This paragraph introduces a tutorial on how to create a text portrait on a photo using Adobe Photoshop. The process starts with preparing a displacement map and saving it in Photoshop format. The tutorial emphasizes the importance of selecting a photo with the right shape and size, preferably with a plain background. It guides the user to select the text area, input the text, and use a small font size for a more realistic look. The text is then converted into a Smart Object and distorted using the displacement filter with specific values to make the text follow the photo's pattern. The tutorial concludes with instructions on adding a dark layer as a base and using a clipping mask for a high-quality result, suggesting to save the final photo in PNG format.

Mindmap

Keywords

💡Adobe Photoshop

Adobe Photoshop is a widely used software for digital image manipulation and editing. It is a powerful tool that allows users to create and enhance photographs, illustrations, and 3D artwork. In the context of the video, it is used to demonstrate how to create text portraits on a photo, indicating that the software's capabilities are central to the tutorial's theme.

💡Photo

A photo, short for photograph, is an image created by capturing light on a light-sensitive surface, usually through a camera lens. In the video script, a photo is the primary medium on which the text portrait is created, emphasizing the importance of selecting a suitable photo for the text effect.

💡Displacement Map

A displacement map is a bitmap image that defines the displacement of a surface in 3D graphics or digital image editing. It is used to create a more realistic or textured effect. In the video, a displacement map is prepared to give the text a more dynamic appearance by making it follow the pattern of the photo.

💡Text

Text in digital editing refers to the written words or characters that can be added to an image or a document. The script mentions selecting a part of the photo to add text, indicating that the text is a key element in creating the final portrait effect on the photo.

💡Google

Google, as mentioned in the script, is likely referring to the use of Google Fonts or searching for text online. It suggests that the tutorial might involve sourcing text from the internet, possibly for copyright-free use or for a specific style that complements the photo.

💡Font

A font is a particular design of typeface, which is used for displaying text. The script advises using a small-sized font for the text to appear more relaxed. This detail is crucial for the aesthetic outcome of the text portrait, as font choice can significantly impact the visual appeal.

💡Smart Object

In Adobe Photoshop, a Smart Object is a scalable layer that retains its original content and allows for non-destructive editing. The script instructs to convert the text to a Smart Object, which allows for further manipulations like distortion without losing quality.

💡Filter

A filter in image editing is a tool that applies a particular effect to an image or a layer. The video script mentions using the 'distort' filter to apply the displacement effect to the text, which is a crucial step in making the text conform to the photo's surface.

💡Displacement

Displacement in the context of the video refers to the process of altering the position or shape of an object (in this case, text) based on another image (the displacement map). It is used to create a 3D-like effect where the text appears to follow the contours of the photo.

💡Clipping Mask

A clipping mask in Photoshop is used to reveal the content of the layer below it. The script mentions using a clipping mask to ensure that the photo and the text layer are properly aligned, which is essential for a seamless integration of the text into the photo.

💡PNG Format

PNG, or Portable Network Graphics, is a file format used for storing images with support for lossless data compression. The script suggests saving the final result in PNG format to maintain the quality of the photo, which is important for preserving the details of the text portrait.

Highlights

Introduction to creating text portraits on a photo using Adobe Photoshop.

Only one photo is needed for this process.

Ensure the photo is of the desired shape and size.

Photos with a plain background work best for this technique.

Prepare a displacement map by saving the file in Photoshop format.

Select 'Text' to add text to the photo.

Choose the area of the photo to be covered with text.

Enter the text, using a source like Google for inspiration.

Recommend using a small font size for a more relaxed appearance.

Convert the text layer to a Smart Object.

Navigate to the 'Filter' menu and select 'Distort', then 'Displacement'.

Set the displacement values to 5 for both horizontal and vertical.

Apply the displacement to make the text follow the photo's pattern.

Add a dark color layer as a base for the photo.

Drag the photo layer above and apply a Clipping Mask for a seamless result.

Save the final result in PNG format for high quality.

Final result presentation.

Transcripts

play00:00

halo halo teman-teman pernah gak kalian

play00:02

melihat foto seperti ini kali ini saya

play00:05

akan menjelaskan cara mudah membuat

play00:06

potret teks pada sebuah foto menggunakan

play00:08

Adobe Photoshop

play00:11

[Musik]

play00:22

yang kita butuhkan hanyalah satu buah

play00:25

foto

play00:27

[Musik]

play00:30

pastikan bentuk dan ukuran foto sudah

play00:32

sesuai dengan yang diinginkan

play00:36

[Musik]

play00:39

akan lebih maksimal jika foto tersebut

play00:41

memiliki latar belakang

play00:50

pertama kita siapkan displacement map

play00:53

pergi ke file

play00:55

pilih save

play01:00

format Photoshop ini akan memberikan

play01:02

pola pada teksnya Nanti

play01:06

[Musik]

play01:10

sakitnya pilih text

play01:16

[Musik]

play01:20

select bagian yang akan diberi teks

play01:22

masukkan teksnya

play01:24

[Musik]

play01:26

di sini saya menggunakan teks dari

play01:28

Google

play01:29

[Musik]

play01:43

sih sarankan menggunakan font yang

play01:46

berukuran kecil agar hasilnya tampak

play01:48

lebih rileks

play01:49

[Musik]

play01:52

convert Smart object

play01:55

[Musik]

play02:00

Hai untuk

play02:01

[Musik]

play02:03

pergi ke filter

play02:06

pilih distort pilih displasemen isi

play02:09

nilainya masing-masing dengan nilai 5

play02:12

[Musik]

play02:15

Silahkan pilih flash main-main sudah

play02:18

kita siapkan tadi maka pola tulisannya

play02:20

akan mengikuti pola foto yang ada

play02:23

jangan lupa berikan Le berwarna gelap

play02:26

sebagai leher dasar dari foto

play02:29

drag layer foto ke atas

play02:32

pria clipping Mask

play02:40

untuk hasil foto dengan kualitas yang

play02:42

bagus ya serangkai disimpan dengan

play02:44

format PNG ini

play02:49

[Musik]

play03:00

Hai Dan inilah hasilnya

play03:02

[Musik]

Rate This

5.0 / 5 (0 votes)

الوسوم ذات الصلة
Photoshop TutorialText PortraitDisplacement MapCreative DesignPhoto EditingAdobe TutorialGraphic DesignText EffectDesign TipsPhotoshop Skills
هل تحتاج إلى تلخيص باللغة الإنجليزية؟