Modul 2 Menyisipkan Gambar
Summary
TLDRIn this tutorial, the host, Suci Permata Dewi, guides viewers on how to insert images into a video using the CapCut app on a PC. She covers the process from importing images to adjusting their duration to match the educational content being presented. The video aims to enhance learning materials by integrating images of computer hardware components, such as the CPU, keyboard, mouse, monitor, and printer, to align with the lesson's narrative. The host encourages viewers to practice the skill independently and looks forward to their next educational material.
Takeaways
- ๐ The video is a tutorial on how to insert images into a video using the CapCut app on a PC.
- ๐ผ๏ธ The previous lesson covered changing video backgrounds, and this session focuses on adding images to enhance educational content.
- ๐ The images are intended to complement the teaching material and the narration provided by the instructor or presenter in the video.
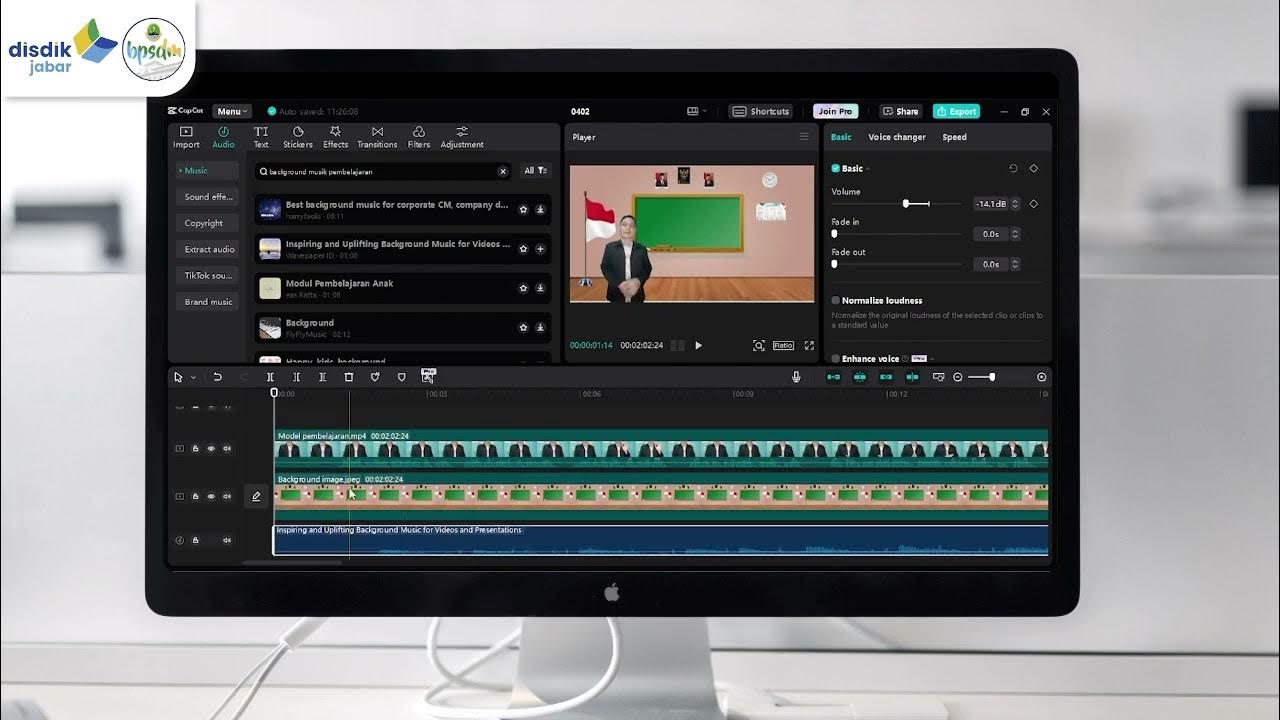
- ๐ The first step in the process is to import the images into the CapCut application by clicking 'import' and opening the file where the image is saved.
- ๐ Users are encouraged to add multiple images one by one or all at once, and then drag them onto the timeline according to the duration of the educational video.
- ๐ฏ The tutorial emphasizes the importance of adjusting the size and duration of the images so they do not obstruct the presenter and fit the content's flow.
- ๐ป The script includes an example of discussing computer hardware, explaining the components of a computer unit, including input devices, the central processing unit (CPU), and output devices.
- ๐ฅ๏ธ Specific computer hardware components like the keyboard, mouse, CPU, monitor, and printer are mentioned, with instructions on how to insert and adjust their images within the video.
- ๐ The process involves resizing images to ensure they are not too large and do not cover the presenter, maintaining a balance between visual aids and clear presentation.
- โฑ๏ธ The timing of when to insert each image is crucial, and the tutorial suggests adjusting the duration and placement of images to match the narration and content delivery.
- ๐ The goal is to seamlessly integrate images with the teaching material to create an effective learning experience for the audience.
- ๐ The tutorial concludes by emphasizing the simplicity of inserting images in CapCut and encourages viewers to apply what they've learned in their next projects.
Q & A
What is the main topic of discussion in this video script?
-The main topic of the video script is how to insert images into a video using the CapCut application on a PC for educational purposes.
What application is mentioned for editing videos in the script?
-The application mentioned for video editing is CapCut.
What was the previous lesson's focus on video editing?
-The previous lesson focused on changing the background of a video.
What is the purpose of inserting images into the video as discussed in the script?
-The purpose of inserting images is to enhance the learning experience by making the images relevant to the content being taught by the instructor or presenter in the video.
How does one start inserting an image into the video according to the script?
-One starts by clicking 'import' and then opening the file where the image is saved.
What is the importance of adjusting the duration of the images in the video?
-Adjusting the duration ensures that the images are displayed for an appropriate length of time, matching the content being delivered in the video.
What is the subject of the current meeting mentioned in the script?
-The subject of the current meeting is about computer hardware.
What are the three main components of a computer unit as described in the script?
-The three main components of a computer unit are input devices, the central processing unit (CPU), and output devices.
What examples of input devices are given in the script?
-The examples of input devices given are a keyboard and a mouse.
What is the CPU and what role does it play in a computer?
-The CPU, or Central Processing Unit, is the main processor of a computer and is responsible for executing instructions and processing data.
What are the output devices mentioned in the script and how should they be handled in the video?
-The output devices mentioned are a monitor and a printer. They should be inserted into the video and adjusted in size and duration so as not to obstruct the presenter.
What is the final step or recommendation for using images in the video according to the script?
-The final recommendation is to ensure that the images are well-integrated into the timeline, matching the teaching material, and to try it out until it is perfect.
Outlines
๐ Introduction to Inserting Images in Video Tutorials
This paragraph introduces a tutorial session with Suci Permata, Dewi, from SMAN 1 Cikakak, Sukabumi, where the focus is on how to integrate images into a video using the CapCut application on a PC. It mentions a previous session where participants learned to change video backgrounds. The speaker encourages independent practice and then proceeds to explain the first step of the tutorial, which involves importing images into the video timeline based on the duration of the educational video. The speaker checks in with the audience to ensure they are following along and healthy, before continuing with the tutorial.
๐ฅ๏ธ Discussing Computer Hardware Components in Video Editing
In this paragraph, the tutorial continues with the speaker discussing the integration of computer hardware components images into the video. The speaker guides the audience through the process of adding images of a CPU, keyboard, mouse, monitor, and printer, ensuring they are appropriately sized and not obstructing the presenter. The aim is to synchronize the images with the educational content being delivered. The paragraph concludes with the speaker reminding the audience of the importance of adjusting the duration of the images to match the educational material and ends the session with a motivational note and a sign-off in the spirit of the West Java Education Department's commitment to quality education.
Mindmap
Keywords
๐กSalam
๐กSMAN 1 Cikakak
๐กCapkat
๐กBackground
๐กVideo Pembelajaran
๐กTimeline
๐กDurasi
๐กPerangkat Keras
๐กInput
๐กPemroses
๐กOutput
Highlights
Introduction to the session with greetings and a reminder of the previous lesson on changing video backgrounds.
The objective of the session is to learn how to insert images into a video for educational purposes using Capcut on a PC.
A call to action for participants to recall if they have tried changing backgrounds independently and to thank them for their enthusiasm in learning.
Instructions on how to insert an image into the educational video by clicking 'import' and opening the file where the image is saved.
Guidance on how to add multiple images to the video, either one by one or all at once.
A demonstration on dragging the images to the timeline based on the duration of the educational video.
A check-in with the audience to ensure everyone is following along and feeling well.
The importance of adjusting the size of the images so they do not obstruct the speaker in the video.
A detailed explanation of the computer hardware components, including input devices like a keyboard and mouse.
Demonstration of how to adjust the duration of the images to match the content being presented.
The role of the CPU as the central processing unit and its importance in computer processing.
Instructions on inserting and adjusting the size of the monitor and printer images to fit the video's educational content.
Emphasis on the practical application of the monitor and printer as common hardware devices used in daily activities.
A conclusion to the session with a reminder that the goal is to synchronize the images with the educational material being presented.
Encouragement for participants to try inserting images into the Capcut application and a sign-off with well-wishes for the next material.
A closing with a formal sign-off in the name of the West Java Education Department, wishing for the best education.
Transcripts
[Musik]
asalamualaikum warahmatullahi
wabarakatuh salam sejahtera dan bahagia
untuk kita semua selamat berjumpa di
Sista Praja bersama saya Suci Permata
Dewi dari SMAN 1 Cikakak Kabupaten
Sukabumi yang Pada kesempatan kali ini
kita akan membahas
tentang bagaimana cara menyisipkan
gambar menggunakan aplikasi capkat di PC
pada pertemuan sebelumnya kita sudah
dapat mengganti background video dengan
background yang baru masih ingatkah
Bapak Ibu Adakah yang sudah mencobanya
lagi secara
mandiri Terima kasih Bapak Ibu sudah
bersemangat belajar mempraktikkannya
secara mandiri nah pada pertemuan ini
kita akan mencoba menyisipkan gambar ke
dalam video yang nantinya akan dijadikan
video
pembelajaran harapannya gambar yang
disisipkan nanti akan sesuai dengan apa
yang akan disampaikan oleh guru atau
narasumber dalam video untuk lebih
jelasnya Mari kita simak tayangan video
berikut Bapak Ibu Langkah pertama untuk
menyisipkan gambar yang kita akan tempel
pada video pembelajaran dengan cara
mengklik impimport kemudian buka file di
mana gambar tersebut Bapak Ibu simpan
nah ini sudah nambah gambarnya kemudian
kita tambahkan gambar yang lain boleh
satu persatu ataupun sekaligus
gambarnya sudah masuk kita akan drag ke
timeline
berdasarkan durasi dari video
pembelajaran yang kita
tayangkan kita coba untuk mendrag ya
Gimana kabarnya Sehat semua kan Ya
mudah-mudahan nah kita coba lagi tarik
lagi kita akan masukkan gambarnya di
pada menit ke berapa pertemuan kali ini
ee kita akan mebahas tentang perangkat
keras komputer Tapi sebelumnya silakan
Lihat tayangan gambar berikut ini Nah
Lihat tayangan gambar berikut ini kita
masukkan ini gambarnya besar ya
menghalangi narasumbernya kita coba
perkecil Nah di
sini Kita sesuaikan lagi apakah sudah
pas durasinya atau belum berikut ini
kira-kira Gambar apakah
[Musik]
itu balik lagi boleh kira-kira Gambar
apakah
itu Ya betul itu adalah gambar satu unit
komputer
nah seperti yang eh kita ketahui bahwa
eh satu unit komputer itu terdiri dari
perangkat keras input perangkat keras
alat pemroses dan perangkat keras output
Nah apa saja yang ada di dalam perangkat
keras input nah yang ada dalam perangkat
keras input seperti contoh gambar ini
yaitu Nah kita pause dulu kemudian kita
masukkan gambar yang kita
butuhkan
ada keyboard kemudian kita perkecil
lagi sini ya
oke kemudian
kita masukkan Mouse juga di
sini Kita perkecil juga gambar mous-nya
nanti Kita sesuaikan
durasinya kita coba lagi ya sesuai atau
tidak keyboard ya
berikutnya nah ininya sampai sini kita
atur durasinya kemudianousnya kita tarik
di sini Mouse itu merupakan salah satu
atau beberapa contoh perangkat input
komputer nah yang termasuk ke dalam
perangkat atau alat pemroses komputer
komputer yaitu
nah alat pemroses komputer kita tarik di
sini atau drag cpu-nya dan kita kecilkan
gambarnyaah di sini ya
kita lihat gambarnya yaitu CPU nah CPU
merupakan Sentral prosesor unit
un kita coba lagi ya Bapak Ibu Apakah
sudah sesuai antara suara dengan gambar
kita lihat gambarnya yaitu CPU nah CPU
merupakan Sentral prosesor unit unit
pemroses utama dan yang termasuk dalam
perangkat kas output diantaranya kita
lihat Nah kita pause lagi kemudian kita
akan masukkan
gambar ada monitor dan printer kita
kecilkan lagi gambar
monitornya kemudian juga gambar
printernya juga kita edit lagi agar
tidak menghalangi narasumber tentunya
dan kita coba durasinya kita paskan ya
ada monitor atau sesuaikan dan ada
printer Nah berarti kan monitornya
sampai sini Kita sesuaikan kemudian
printernya kita
tarik kita tarik lagi diulang lagi Kita
sesuaikan ada
monitor dan ada printer Nah itu adalah
beberapa perangkat kurang tarik nah
tidak apa-apa Bapak Ibu sesuaikan
berkali-kali sampai dengan s ada monitor
dan ada printer Nah itu adalah beberapa
perangkat keras yang paling sering kita
gunakan di dalam aktivitas kita sehari
Nah Bapak Ibu e kita sudah selesai
menyisipkan gambar ke timeline yang
tujuannya disesuaikan dengan materi
pembelajaran yang akan kita sampaikan
kepada peserta didik atau Audi Bagaimana
Bapak Ibu mudah bukan cara menyisipkan
gambar di aplikasi capkat ditunggu ya
karyanya Selamat mencoba sampai jumpa
pada materi selanjutnya salam
implementasi Disdik Jabar terdidik
terbaik
wasalamualaikum warahmatullahi
wabarakatuh
5.0 / 5 (0 votes)