How to Share Files, Folders and Drives Over A Network
Summary
TLDRThis video tutorial guides viewers through the process of sharing files, folders, and drives across a local network between different PCs. It covers setting up shared folders, enabling file sharing settings, and configuring network discovery on both Windows 11 and Windows 10 machines. The video also explains how to map network drives for easy access and sharing, including renaming network drives for clarity. The step-by-step instructions make it simple to transfer documents and other files between computers on the same network, making this an essential guide for efficient local file sharing.
Takeaways
- 💻 The video explains how to share files, folders, and drives between computers over a local network.
- 📁 Start by creating a folder on PC1, placing any file inside it, and preparing it for sharing.
- ⚙️ Adjust Windows network settings to ensure devices are discoverable and on the same private network.
- 🌐 In 'Network & Internet' settings, set the network type to 'Private' for all computers involved.
- 🛠️ In Control Panel > Network and Sharing Center, turn on Network Discovery and File and Printer Sharing.
- 🔐 Disable password-protected sharing to make access between computers easier and avoid permission issues.
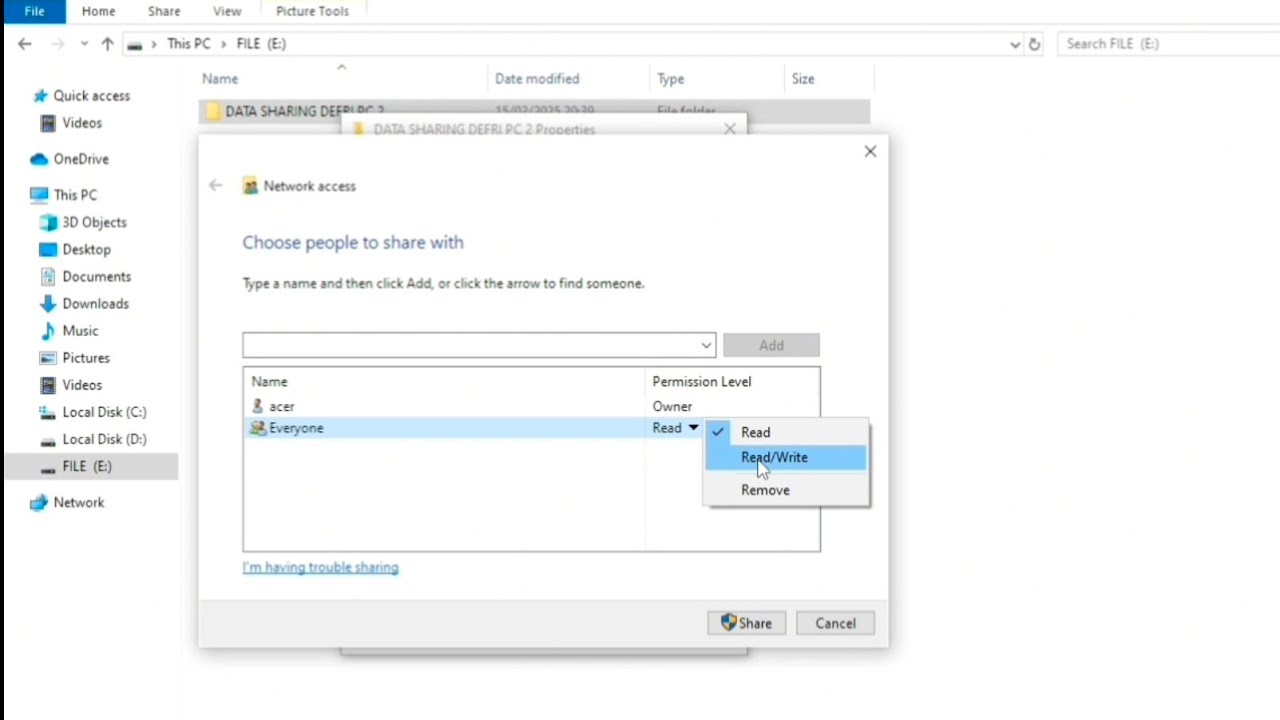
- 👥 Right-click the folder to be shared, go to 'Give access to' > 'Specific people,' and add 'Everyone' with read or read/write permissions.
- 📨 Copy or email the shared folder link to other users on the network for quick access.
- 💾 On another PC, connect to the shared folder using File Explorer by entering the network path (\\PCName\SharedFolder).
- 🔗 Create a mapped network drive for easier and persistent access to the shared folder, assigning it a custom name for clarity.
- 🖥️ The process works across different Windows versions (Windows 7, 10, 11) as long as network and sharing settings match.
- 🎯 Renaming mapped drives helps keep shared resources organized, especially when multiple PCs are connected.
- 🙌 The tutorial concludes with reassurance that these steps make file sharing simple and efficient across a local network.
Q & A
What is the main goal of the tutorial?
-The main goal of the tutorial is to demonstrate how to share files, folders, and drives between computers over a local network.
What is the first step in setting up file sharing?
-The first step is to create a folder on PC1 and add a file inside it. This file will be shared across the local network.
How do you ensure that file sharing is enabled on all the computers in the network?
-To ensure file sharing is enabled, go to the network settings and select the appropriate network connection (Ethernet or Wi-Fi), making sure it is set to 'Private' and that network discovery and file sharing options are turned on.
What should you do in Control Panel to enable file sharing?
-In Control Panel, navigate to 'Network and Sharing Center', then click on 'Change advanced sharing settings'. Enable network discovery and file and printer sharing, and disable password protection sharing to avoid complications.
What is the purpose of turning off password protection sharing?
-Turning off password protection sharing simplifies access, allowing other computers on the network to connect without needing credentials.
How do you share a folder on Windows 11?
-Right-click the folder you want to share, select 'Show more options', and choose 'Give access to'. Select 'Specific people', add 'Everyone' to the list, and set the permission level (read-only or read and write).
What does 'Read and Write' permission allow in file sharing?
-The 'Read and Write' permission allows users to not only view and copy files from the shared folder but also add or modify files within it.
How do you connect to the shared folder from another PC?
-To connect to the shared folder, open File Explorer, select 'This PC', then enter the network path (\PC1) in the address bar. You should see the shared folder and be able to access the files.
What is a mapped network drive, and why is it useful?
-A mapped network drive is a shortcut that assigns a drive letter to a network folder, making it easier to access the shared content without needing to type the network path every time.
How do you map a network drive in Windows?
-To map a network drive, go to 'This PC', click on 'Computer', then select 'Map network drive'. Enter the network folder path, choose a drive letter, and ensure the 'Reconnect at sign-in' option is selected before clicking 'Finish'.
Can you rename mapped network drives for clarity?
-Yes, you can rename mapped network drives to something more recognizable, like 'PC1 Windows 11', to easily identify which computer or shared folder the drive corresponds to.
How can you quickly access shared folders across the network?
-After mapping the network drive, you can access it directly from File Explorer, making it quicker to transfer files without navigating through network paths each time.
Outlines

This section is available to paid users only. Please upgrade to access this part.
Upgrade NowMindmap

This section is available to paid users only. Please upgrade to access this part.
Upgrade NowKeywords

This section is available to paid users only. Please upgrade to access this part.
Upgrade NowHighlights

This section is available to paid users only. Please upgrade to access this part.
Upgrade NowTranscripts

This section is available to paid users only. Please upgrade to access this part.
Upgrade NowBrowse More Related Video
Cara sharing data di windows 10
CARA SETTING LAN UNTUK MENGHUBUNGKAN ANTAR KOMPUTER (PC Networking)

Kelompok 1 Desain Manajemen Jaringan Komputer
Uji Kompetensi Keahlian TKJ Paket 4 - Cara Sharing File Menggunakan Kabel UTP (Peer to Peer)
CSS NC 2 COC 2 - Network Configuration - Folder Sharing (TAGALOG) Computer Systems Servicing
How to Configure Static Routing 2 Router Base CLI in Cisco Packet Tracer
5.0 / 5 (0 votes)