Cisco Packet Tracer | Everything You Need to Know
Summary
TLDRThis video tutorial introduces Cisco Packet Tracer, a valuable network simulation tool designed for building and visualizing computer networks. It guides viewers through the process of downloading, installing, and setting up the tool, which is essential for those studying for the Cisco CCNA exam. The tutorial covers key features, device configuration, and the simulation mode, demonstrating how to construct a basic network and observe protocol messages in action, all within a free and user-friendly platform.
Takeaways
- 😀 Cisco Packet Tracer is a valuable network simulation tool designed by Cisco for building and designing computer networks.
- 📚 It's an essential study tool for those preparing for the Cisco CCNA certification and is completely free to use.
- 💻 To get started with Packet Tracer, you need to download and install it from the Cisco Networking Academy website (netacad.com).
- 🔑 You may need to create a Cisco Networking Academy account or log in if you already have one to access the download.
- 📚 Enrolling in the 'Intro to Packet Tracer' course is necessary to download the software, but you don't need to complete the course.
- 🔗 After enrolling, you'll receive an email to activate your account, which involves setting a password and providing additional information.
- 📥 The software supports various operating systems including Windows, Ubuntu, and Mac OS, and the installation process is straightforward.
- 🔌 Packet Tracer includes a variety of networking devices such as routers, switches, hubs, and IoT devices, as well as connection types like straight through and crossover cables.
- 🖥️ The workspace in Packet Tracer allows you to build network topologies in both logical and physical views.
- 🛠️ Configuration of devices within Packet Tracer can be done through a GUI interface, and more advanced configurations can be done using the CLI tab.
- 🔎 Simulation mode is a standout feature that visually represents messages being sent across the network, aiding in the understanding of network protocols.
Q & A
What is Cisco Packet Tracer and why is it valuable for network studies?
-Cisco Packet Tracer is a network simulation tool designed by Cisco that allows users to build and design their own computer networks, play with networking technologies and protocols visually. It's valuable because it's an incredible study tool, especially vital for those taking the Cisco CCNA, and it's free.
How can I access Cisco Packet Tracer for educational purposes?
-To access Cisco Packet Tracer, you need to visit the Cisco Networking Academy website at netacad.com. You can either log in if you already have an account or sign up for a new account to enroll in the 'Intro to Packet Tracer' course, which will allow you to download the software.
What are the steps to download and install Cisco Packet Tracer?
-After enrolling in the 'Intro to Packet Tracer' course on the Cisco Networking Academy website, navigate to 'Resources' and then 'Download Packet Tracer'. Choose the appropriate installation file for your operating system, download it, and follow the installation prompts, which typically involve clicking 'Next' through the setup process.
What are the different device categories available in Cisco Packet Tracer?
-The device categories in Cisco Packet Tracer include Networking Devices (routers, switches, hubs, etc.), End Devices (PCs, laptops, IoT devices), Components (boards, LEDs, buttons), and Connections (various types of cables and connectors).
How can I build a network topology in Cisco Packet Tracer?
-To build a network topology, select the desired devices from the device menu and drag them onto the workspace. Then, use the connections menu to link the devices together with the appropriate type of cable. The 'auto' option can assist in selecting the correct cable if you're unsure.
What are the two views available in the Packet Tracer workspace?
-The two views available in the Packet Tracer workspace are the Logical View, which is used for most of the time spent building network topologies, and the Physical View, which provides a realistic visual representation of how networks look and connect together.
What is the purpose of the Simulation Mode in Cisco Packet Tracer?
-Simulation Mode in Cisco Packet Tracer allows users to visually see messages being sent across the network. It's a great tool for learning how protocols work and behave, helping to solidify understanding of network technologies.
How can I configure the settings of a device in Cisco Packet Tracer?
-To configure a device, single-click on it to open a new window with various tabs, including the Config tab for device settings and the Desktop tab for features like IP configuration. Note that some changes may require the device to be powered down first.
What is the CLI tab in Cisco Packet Tracer and why is it important?
-The CLI (Command Line Interface) tab is where users interact with and configure network devices in Cisco Packet Tracer. It's important because it's the primary method for setting up and managing network devices, which is a key aspect of learning network administration.
How can I use the simulation mode to observe ICMP messages in Cisco Packet Tracer?
-Enable Simulation Mode from the bottom right of the screen. Then, deselect all event types and select 'ICMP' from the Edit Filters menu. After that, perform an action like a ping from one PC to another, and you'll be able to see and interact with the ICMP messages being sent.
Outlines

This section is available to paid users only. Please upgrade to access this part.
Upgrade NowMindmap

This section is available to paid users only. Please upgrade to access this part.
Upgrade NowKeywords

This section is available to paid users only. Please upgrade to access this part.
Upgrade NowHighlights

This section is available to paid users only. Please upgrade to access this part.
Upgrade NowTranscripts

This section is available to paid users only. Please upgrade to access this part.
Upgrade NowBrowse More Related Video

Jaringan Komputer Sederhana | Tutorial Belajar Online Lengkap CISCO CCNA 200-301 Part 5

Apa itu IP Address? | Tutorial Belajar Online Lengkap CISCO CCNA 200-301 Part 3

Download dan Instal Cisco Packet Tracer | Tutorial Belajar Online Lengkap CISCO CCNA 200-301 Part 4
MATERI (NETWORK FUNDAMENTAL) || CISCO || IT || NETWORK ENGINEER ||
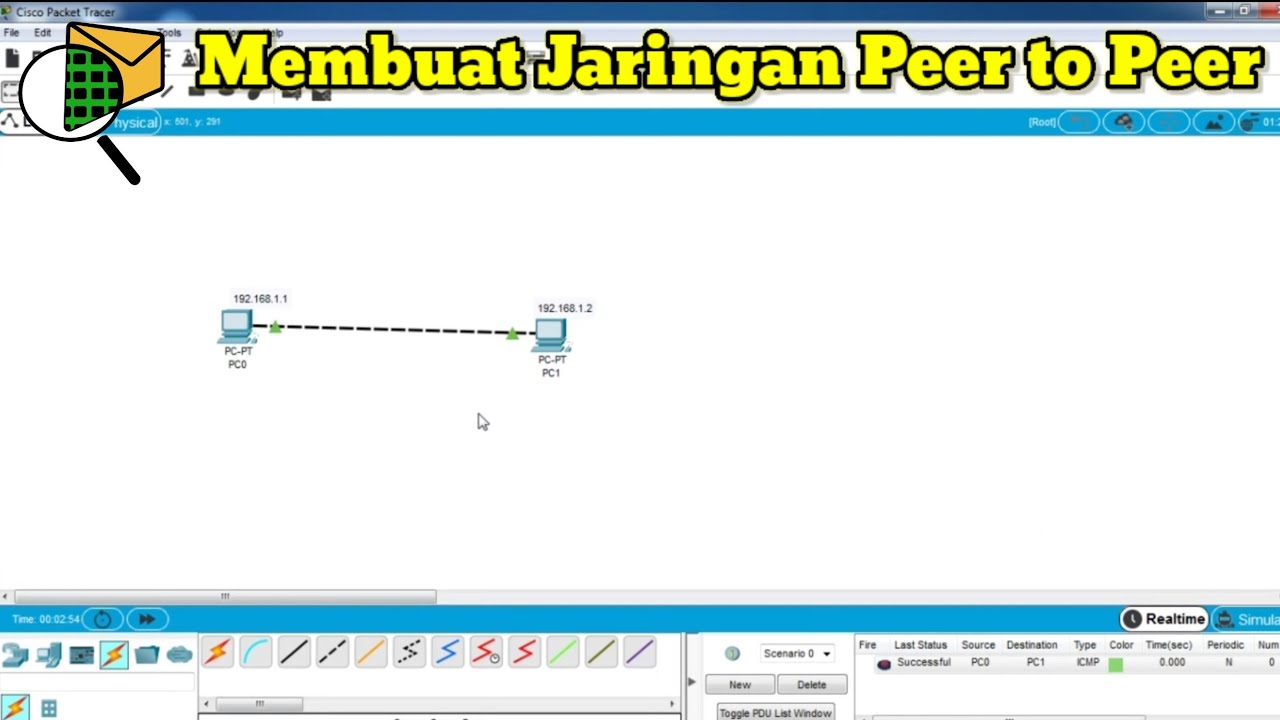
Cara Membuat Jaringan Peer To Peer di Cisco Packet Tracer
Belajar Jaringan Komputer - Intro | Network Fundamental Learning Series #1
5.0 / 5 (0 votes)