Cara Membuat Design BRUTALISM STYLE! - Photoshop Tutorial
Summary
TLDRThis tutorial teaches how to create a brutalism-style design in Photoshop, focusing on isolating and enhancing parts of an image, such as a car, using threshold effects. The process includes applying textures, adjusting colors, adding text with stroke effects, and incorporating logos. The video also covers layer management, from grouping and duplicating to color modifications, offering a comprehensive guide for creating bold, visually impactful designs. The step-by-step method empowers users to explore their creativity and refine their design skills using Photoshop's powerful features.
Takeaways
- 😀 Set up your Photoshop document with A4 dimensions, 300 DPI, and CMYK color mode for print designs.
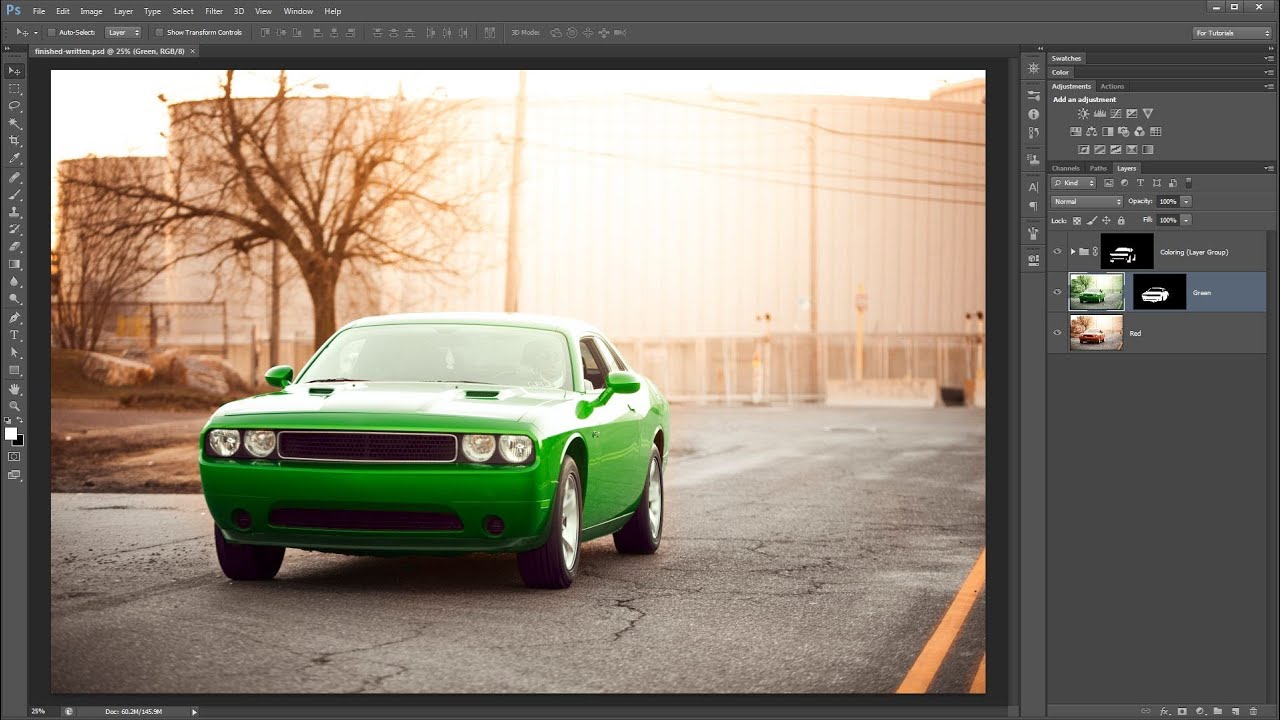
- 😀 Use the Pen Tool (shortcut P) to create a transparent background for the car image, isolating it from the surroundings.
- 😀 Apply the Threshold effect to create high-contrast layers for different parts of the image (e.g., car grill, body, and glass).
- 😀 Duplicate layers to add the Threshold effect to different parts of the image, such as the car's grill, body, and glass.
- 😀 Merge the selected layers to simplify the design and eliminate any unwanted areas with the Eraser tool (shortcut E).
- 😀 Add text to your design using the Text Tool (shortcut T), and customize the font, size, and position.
- 😀 Apply a stroke effect to the text to give it more emphasis and control its position and size.
- 😀 Utilize the Brush Tool (shortcut B) to add textures like spray effects for more depth and randomness in your design.
- 😀 Use layer grouping and duplication to manage design elements and keep a backup for later adjustments.
- 😀 Adjust the color of the design by using the Color Overlay option, changing the white areas to a blue color for a final touch.
- 😀 Experiment with the design by adding logos and additional text elements, then position them appropriately in the composition.
Q & A
What is the main design style used in this tutorial?
-The main design style used in this tutorial is Brutalism, which emphasizes bold, raw, and unpolished design elements.
Why does the tutorial recommend using a 300 DPI resolution and CMYK color mode?
-The tutorial recommends using 300 DPI and CMYK color mode because the design will be printed, and these settings ensure optimal print quality and color accuracy.
What is the purpose of using the 'Threshold' effect in this design?
-The 'Threshold' effect is used to convert images into high-contrast, black-and-white versions, which helps create a graphic and stylized effect that fits the Brutalism theme.
How are the different layers of the design combined?
-The layers are combined by selecting all relevant layers, right-clicking, and choosing 'Merge Layers' to consolidate them into a single layer for a cleaner composition.
What tools and shortcuts are recommended for selecting and editing parts of the image?
-The 'Pen Tool' (P) is used for creating paths and selections, and the 'Brush Tool' (B) is used for applying textures. The 'Ctrl + C' and 'Ctrl + V' shortcuts are also used for copying and pasting parts of the image.
What is the significance of using a transparent background in this tutorial?
-Using a transparent background allows for greater flexibility in editing, as it isolates the subject (in this case, the car) and helps integrate it into the overall design seamlessly.
What is the purpose of adding a stroke to the text in the design?
-Adding a stroke to the text enhances its visibility and makes it stand out against the background, aligning with the bold, graphic nature of Brutalism.
Why is the 'Eraser Tool' used in the design process?
-The 'Eraser Tool' is used to remove unwanted parts of the design, especially in areas where there are overlapping elements or to clean up the edges for a more polished look.
How is the texture effect achieved in the design?
-The texture effect is created by using a spray paint brush (Brush Tool) with selected brush types (such as Brush #17, #13, or #05) and applying random, white paint to different areas of the design.
What steps are involved in changing the color of the final design?
-To change the color, the merged layer is selected, and a color overlay is applied through the Layer Style settings. The area to be colored is selected, and the desired color (e.g., blue) is chosen.
Outlines

This section is available to paid users only. Please upgrade to access this part.
Upgrade NowMindmap

This section is available to paid users only. Please upgrade to access this part.
Upgrade NowKeywords

This section is available to paid users only. Please upgrade to access this part.
Upgrade NowHighlights

This section is available to paid users only. Please upgrade to access this part.
Upgrade NowTranscripts

This section is available to paid users only. Please upgrade to access this part.
Upgrade NowBrowse More Related Video

Cara Membuat Desain Feed Instagram Dengan Canva | CARA MEMBUAT PUZZLE FEED di canva | TUTORIAL CANVA

How To Make REALISTIC A.I. T-Shirt Mockups In Minutes

SIMPLE INK BLEED EFFECT TUTORIAL | ADOBE PHOTOSHOP
Compositing for Product Photography | Photoshop Photo Editing Challenge
Learn to Mask in 2 Minutes! - Photoshop Tutorial
Cara Membuat Poster - Tutorial Photoshop Indonesia
5.0 / 5 (0 votes)