Autocad tutorial 2D gambar mesin #13
Summary
TLDRIn this AutoCAD tutorial, the presenter walks through creating a detailed drawing, starting with basic shapes like lines and circles, and advancing to more complex elements like dashed lines and radius adjustments. The tutorial demonstrates key AutoCAD techniques, such as using the offset tool, splitting angles, and trimming shapes for precision. The video emphasizes understanding AutoCAD's commands, like 'circle', 'center', and 'trim', to effectively manipulate objects. Viewers are encouraged to practice and share the video, with a reminder to subscribe for future content. This video is designed to help users master essential AutoCAD skills for improved design efficiency.
Takeaways
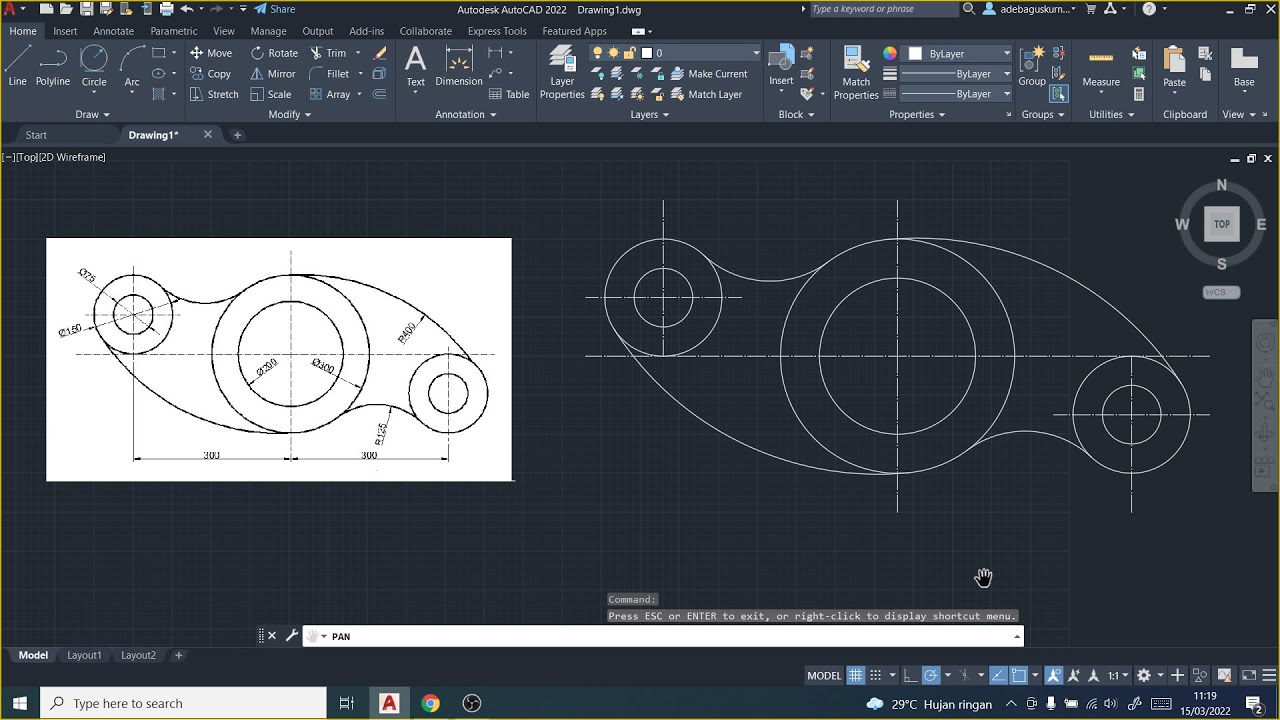
- 😀 The tutorial is focused on teaching AutoCAD drawing, specifically creating geometric objects.
- 😀 The presenter emphasizes starting with the simplest parts of the drawing to make the process easier.
- 😀 The first step involves offsetting lines to create the basic structure for the drawing.
- 😀 The presenter uses AutoCAD’s 'offset' function to copy a line downwards by a specified distance.
- 😀 Next, a dashed line is created to aid in connecting and adjusting the geometry.
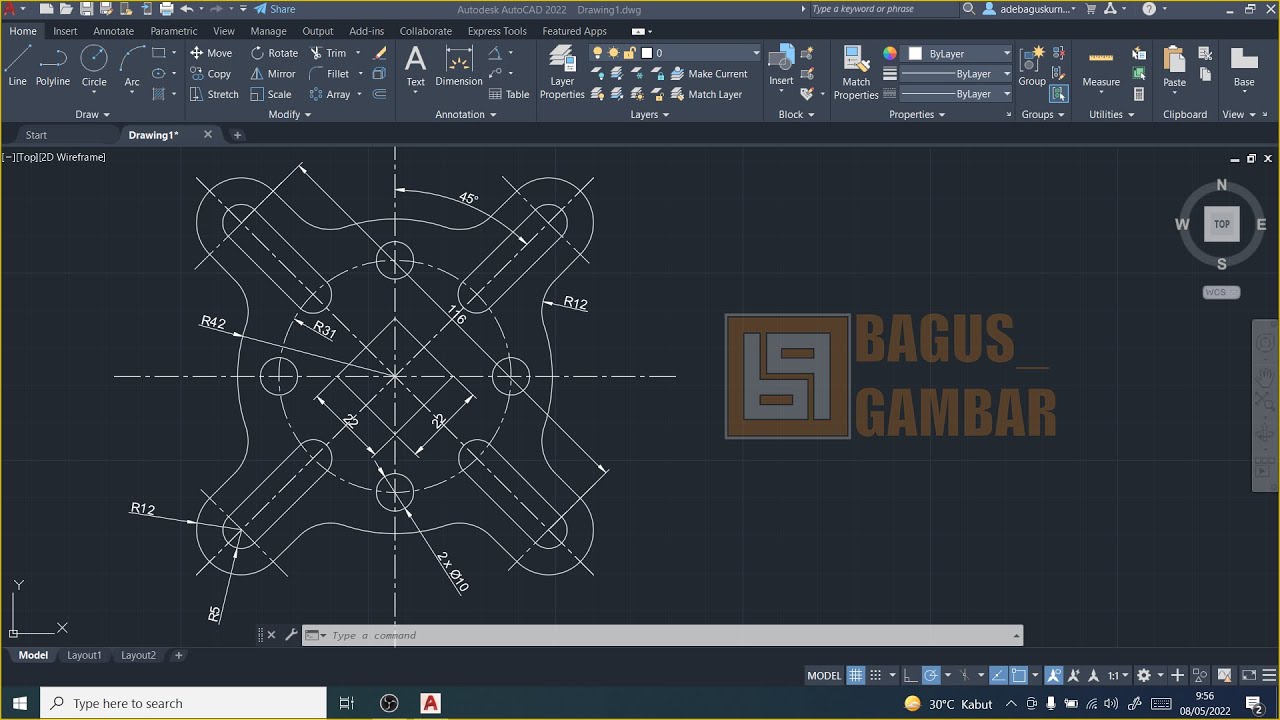
- 😀 A key focus is on breaking down complex shapes using AutoCAD’s geometric tools, such as angles and circles.
- 😀 The tutorial covers how to divide angles in AutoCAD, specifically dividing a 45° angle into two equal parts (22.5°).
- 😀 The presenter explains the importance of understanding rotation direction in AutoCAD, specifically clockwise and counterclockwise directions for angles.
- 😀 A circle is drawn with a specified radius and trimmed to fit the desired geometry.
- 😀 After creating the basic shape, the presenter demonstrates extending and trimming lines to finalize the drawing.
- 😀 The tutorial shows how to change line styles, including creating dashed lines, by adjusting the properties and line types in AutoCAD.
- 😀 The presenter encourages sharing the video if helpful and supporting the channel for more tutorials.
Q & A
What is the main topic of the video?
-The main topic of the video is teaching viewers how to use AutoCAD to draw specific objects, focusing on creating lines and shapes with specific angles and dimensions.
What is the first step in the drawing process?
-The first step in the drawing process is to identify which part of the drawing is the easiest to start with. In this case, the simplest part is a shape labeled 'G2,' which already has its dimensions.
How do you begin creating a line with a specific measurement in AutoCAD?
-To create a line with a specific measurement, you first draw a line with the required length. Then, the line is offset to the desired position.
What is the purpose of creating a construction line in AutoCAD?
-A construction line is used as a temporary guideline to help position or align other objects in the drawing. It aids in creating accurate shapes and angles.
How do you handle drawing an object at a 45-degree angle in AutoCAD?
-To draw an object at a 45-degree angle, the angle is divided into two parts (22.5 degrees each), and the appropriate rotation command is used to position the lines.
What is the significance of using positive and negative values for angles in AutoCAD?
-In AutoCAD, positive values are used for clockwise rotation, while negative values are used for counterclockwise rotation. This helps in aligning objects accurately based on the desired direction.
How do you create a circle that connects two lines at a 45-degree angle?
-To create a circle that connects two lines at a 45-degree angle, you first draw the circle using the 'Circle' command with a specified radius, ensuring the circle intersects the lines at the correct location.
What should be done if the circle needs to be precisely aligned with the drawing?
-To align the circle precisely, use the 'Move' command to adjust its position, ensuring it connects with the lines accurately.
What steps are involved in trimming unwanted parts from the drawing?
-To trim unwanted parts, use the 'Trim' command. This allows you to remove the sections of lines or shapes that are not needed, keeping the drawing clean and accurate.
How do you change the line style to a dashed line in AutoCAD?
-To change a line to a dashed style, you select the line, right-click, and go to 'Properties.' Then, you choose the desired dashed line type and adjust the scale if necessary to ensure the dash pattern displays correctly.
Outlines

This section is available to paid users only. Please upgrade to access this part.
Upgrade NowMindmap

This section is available to paid users only. Please upgrade to access this part.
Upgrade NowKeywords

This section is available to paid users only. Please upgrade to access this part.
Upgrade NowHighlights

This section is available to paid users only. Please upgrade to access this part.
Upgrade NowTranscripts

This section is available to paid users only. Please upgrade to access this part.
Upgrade NowBrowse More Related Video
Tutorial AutoCad Pemula | Gambar Teknik 2D 1
Tutorial AutoCad Pemula | Gambar Teknik 2D 10

CARA MEMBUAT RODA GIGI DENGAN GAMPANG❕| BELAJAR AUTOCAD PART 3

TUTORiAL MEMBUAT PiSTON, BELAJAR BERSAMA - AUTOCAD 2017

How to make 2D Nuts into 3D in AutoCAD
How to draw PVC Valve in AutoCAD 3D. #autocad_hindi_tutorial #autocaddrawing
5.0 / 5 (0 votes)