CARA MEMBUAT RODA GIGI DENGAN GAMPANG❕| BELAJAR AUTOCAD PART 3
Summary
TLDRIn this AutoCAD tutorial, Agung Permana walks viewers through creating a gear wheel using basic commands. He covers essential techniques like drawing circles, applying auxiliary lines, mirroring for symmetry, and using fillets to smooth edges. The tutorial also demonstrates how to arrange gear teeth using the array command and adjust dimensions to achieve an accurate design. Throughout the process, the presenter provides tips and guidance for beginners looking to improve their AutoCAD skills, culminating in a completed gear design that can be further modified for more complex projects.
Takeaways
- 😀 Basic AutoCAD commands were reviewed to prepare for creating a gear design.
- 😀 The user demonstrates the creation of a gear using circles with specific diameters (600mm, 1100mm, 1500mm).
- 😀 Guide lines are used to ensure proper alignment for gear components.
- 😀 Mirror command is utilized to replicate half of the design for symmetry.
- 😀 Fillet command is used to smooth sharp corners, making the gear design more realistic.
- 😀 The trim command helps remove excess elements and refine the design.
- 😀 Polar array command is used to evenly distribute gear teeth around the central circle.
- 😀 The explode command is applied to break complex objects into simpler components for easier manipulation.
- 😀 Guide lines and small adjustments, like setting specific radius sizes, ensure accuracy in the gear design.
- 😀 Final gear design is completed with necessary adjustments, including smoothing and arranging components for visual appeal.
Q & A
What is the main objective of this AutoCAD tutorial?
-The main objective of this tutorial is to guide viewers in creating a gear design in AutoCAD by applying basic commands and techniques.
Which AutoCAD command is used to draw circles for the gear design?
-The 'Circle' command (C) is used to draw circles with specific diameters for the gear design.
What diameter values are initially used for the gear circles?
-The initial diameter values used are 600mm and 1100mm for the outer and inner circles of the gear, respectively.
Why is the 'Mirror' command used in the tutorial?
-The 'Mirror' command is used to create a symmetrical design by reflecting one half of the gear to complete the shape.
How does the 'Fillet' command help in the gear design process?
-The 'Fillet' command is used to smooth the sharp corners of the gear, giving it a rounded radius to match the typical design of gear teeth.
What does the 'Array' command do in this context?
-The 'Array' command is used to create multiple copies of the gear teeth in a circular pattern, ensuring an even distribution around the gear.
What is the purpose of using 'Trim' in the gear design?
-The 'Trim' command is used to remove excess lines or parts of the drawing that are no longer needed after other operations, cleaning up the design.
Why is the 'Explode' command necessary in the tutorial?
-The 'Explode' command is necessary to break grouped objects into individual components, allowing for more detailed and separate editing of the elements.
How does the video ensure that the gear teeth are properly positioned?
-The video ensures proper positioning of the gear teeth by using the 'Array' command with precise polar coordinates, allowing for a consistent number of teeth around the circle.
What is the final adjustment made to the gear design?
-The final adjustment involves deleting unnecessary guide lines and performing a last array to position smaller holes between the gear teeth, enhancing the design's functionality and appearance.
Outlines

This section is available to paid users only. Please upgrade to access this part.
Upgrade NowMindmap

This section is available to paid users only. Please upgrade to access this part.
Upgrade NowKeywords

This section is available to paid users only. Please upgrade to access this part.
Upgrade NowHighlights

This section is available to paid users only. Please upgrade to access this part.
Upgrade NowTranscripts

This section is available to paid users only. Please upgrade to access this part.
Upgrade Now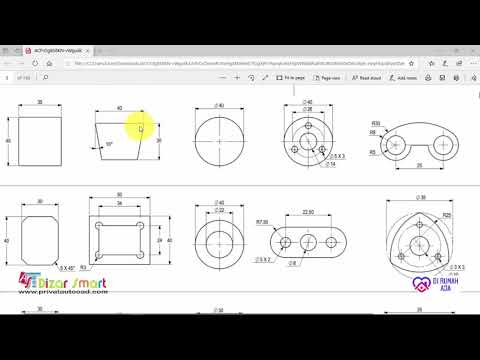


5.0 / 5 (0 votes)