Adding JWT Authentication & Authorization in ASP.NET Core
Summary
TLDRIn this tutorial, Nick demonstrates how to integrate JSON Web Token (JWT) authentication and authorization into an ASP.NET Core application. He showcases the process using a sample movies API, explaining the importance of distinguishing between authentication and authorization. Nick guides viewers through adding the necessary NuGet package, configuring token validation parameters, and securing endpoints with the [Authorize] attribute. He also covers creating policies for role-based access control, using claims for authorization, and enhancing the developer experience with Swagger support for JWT.
Takeaways
- ๐ Nick introduces a tutorial on integrating JSON Web Token (JWT) authentication and authorization in an ASP.NET Core application.
- ๐ The video focuses on the implementation of JWT, assuming viewers already understand the concept of JWTs and 'jot'.
- ๐ Nick references other in-depth videos on JWTs and suggests checking the description for more resources.
- ๐ฌ The demonstration uses a sample 'Movies API' to illustrate the process of adding JWT support.
- ๐ ๏ธ To begin, Nick shows how to add the 'Microsoft.AspNetCore.Authentication.Bearer' NuGet package for JWT support.
- ๐ Configuration involves setting up authentication and authorization services, and using the 'AddBearer' method to configure token validation parameters.
- ๐ It's important to validate the token's issuer, audience, expiration, and signature to ensure its validity and security.
- ๐ก For security, keys used for token generation and validation should be stored securely, not hard-coded in settings.
- ๐ The order of middleware matters: authentication should come before authorization in the pipeline.
- ๐ซ Without proper authentication, unauthorized access to the API would be unrestricted, which is demonstrated with the Movies API.
- ๐ Nick discusses two approaches for allowing public access to certain actions: using the 'AllowAnonymous' attribute or removing the 'Authorize' attribute from specific actions.
- ๐ฎโโ๏ธ Authorization policies can be created based on claims within the JWT to restrict access, such as allowing only admins to delete movies.
- ๐ ๏ธ Custom attributes like 'RequiresClaimAttribute' can be used for fine-grained control over claims-based authorization.
- ๐ The video also covers how to integrate JWT authentication with Swagger, ensuring that endpoints can be tested with proper authentication.
Q & A
What is the main topic of the video by Nick?
-The main topic of the video is how to add JSON Web Token (JWT) authentication and authorization support in an ASP.NET Core application.
Why is Nick not explaining what a JSON Web Token is in this video?
-Nick is not explaining what a JSON Web Token is because he already has a separate video on that topic, and he wants to focus on the implementation in ASP.NET Core specifically.
What is the purpose of the 'Movies API' shown in the video?
-The 'Movies API' is used as an example to demonstrate how to implement JWT authentication and authorization in an ASP.NET Core application.
What does Nick demonstrate with the 'Movies API' before adding JWT support?
-Nick demonstrates creating, listing, updating, and deleting movies in the API, showing that initially, there is no authentication or authorization required to perform these actions.
What NuGet package does Nick recommend to add JWT support?
-Nick recommends adding the 'Microsoft.AspNetCore.Authentication.JwtBearer' NuGet package to implement JWT support.
What is the difference between authentication and authorization as explained in the video?
-Authentication is the process of verifying that someone is who they claim to be, while authorization is the process of verifying that someone has access to what they claim to have access to.
How does Nick suggest storing the JWT secret key for security purposes?
-Nick suggests storing the JWT secret key securely in a service designed to store tokens, such as Azure Key Vault or AWS Secrets Manager, rather than hardcoding it in the settings.
What are the minimum token validation parameters that Nick mentions should be specified?
-The minimum token validation parameters mentioned are validating the issuer, audience, ensuring the token is not expired, and validating the signature.
How does Nick demonstrate passing a JWT to authenticate a request?
-Nick demonstrates passing a JWT by setting the 'Authorization' header in Postman with the value 'Bearer ' followed by the actual token.
What are the two approaches Nick discusses for allowing anonymous access to certain actions in the API?
-The two approaches are using the 'AllowAnonymous' attribute on specific actions to override the controller-based behavior, or removing the 'Authorize' attribute from the controller and applying it individually to actions that require it.
How does Nick explain creating a policy for role-based authorization?
-Nick explains creating a policy by using the 'AddPolicy' method in the 'AuthorizationOptions', defining a name for the policy, and specifying the required claim name and value using a 'PolicyBuilder'.
What is the alternative method to policies for claim-based authorization that Nick presents?
-The alternative method is creating a custom attribute called 'RequiresClaimAttribute' that can be used to validate claims directly on actions or controllers without defining a policy.
How does Nick address adding Swagger support for JWT authentication?
-Nick explains creating a 'Swagger' directory with specific configuration files to define security schemes and requirements, and then registering these configurations in the 'Program.cs' to enable JWT authentication in Swagger UI.
Outlines
๐ Introduction to JWT Authentication in ASP.NET Core
Nick introduces a tutorial on integrating JSON Web Token (JWT) authentication and authorization in an ASP.NET Core application. He mentions that he won't explain what JWT is, as it's already covered in another video, and focuses on the implementation. He presents a Movies API example, demonstrating its current functionality without any authentication or authorization. He then outlines the steps to add JWT support starting with the addition of a NuGet package and configuring authentication and authorization services.
๐ Configuring JWT Authentication and Authorization
The paragraph explains the process of configuring JWT authentication and authorization in an ASP.NET Core application. It details the need to validate the issuer, audience, and token expiration, as well as the importance of validating the token's signature. Nick also discusses storing the secret key securely and not hardcoding it in the settings. He then moves on to demonstrate how to pass a JWT to authenticate and access the API, showing how to create a token using a helper identity API and how to include it in the authorization header in Postman.
๐ ๏ธ Implementing Authorization Policies and Custom Attributes
Nick demonstrates how to implement authorization policies and custom attributes for fine-grained access control in the application. He creates an 'Identity Data' class to hold constants for claims and policies, and then registers a policy requiring a specific claim value. He applies this policy to the 'Delete' action to restrict it to admin users only. Additionally, he introduces an alternative approach using a custom attribute called 'RequiresClaimAttribute' to validate claims without using policies. This attribute can be applied to controller actions to enforce authorization rules.
๐ Enabling Swagger Support for JWT Authentication
The final paragraph covers how to add Swagger support for JWT authentication. Nick explains creating a 'Swagger' directory with specific configuration files to define and register security schemes for Swagger UI. This setup allows users to authenticate using JWT tokens directly within the Swagger UI, providing a seamless experience for testing and interacting with the API endpoints. He concludes the tutorial by running the API and successfully demonstrating the Swagger UI's capability to accept JWT tokens for authentication.
Mindmap
Keywords
๐กJson Web Token (JWT)
๐กASP.NET Core
๐กAuthentication
๐กAuthorization
๐กNuGet Package
๐กBearer Token
๐กClaims
๐กPolicy-Based Authorization
๐กCustom Attribute
๐กSwagger
๐กMinimal APIs
Highlights
Introduction to adding JSON Web Token (JWT) authentication and authorization in ASP.NET Core applications.
Assumption that viewers are already familiar with JWT, focusing on its implementation in ASP.NET Core.
Demonstration of a Movies API without authentication or authorization.
Explanation of the process to add JWT support using the NuGet package Microsoft.AspNetCore.Authentication.JwtBearer.
Clarification of the difference between authentication and authorization in the context of JWT.
Configuration steps for JWT validation parameters such as issuer, audience, and token expiration.
Security best practices for storing JWT signing keys, recommending Azure Key Vault or AWS Secrets Manager.
Implementation of authentication and authorization middleware in the ASP.NET Core pipeline.
Use of the Authorize attribute to protect endpoints and require user authentication.
Creating JWT with custom claims using a helper Identity API.
Passing JWT in the Authorization header using the Bearer schema in HTTP requests.
Differentiating between allowing anonymous access and applying authorization policies on actions.
Creating and applying custom authorization policies based on JWT claims for fine-grained access control.
Using the RequiresClaim attribute for claim-based authorization without policies.
Support for JWT in minimal APIs with extension methods for authorization.
Enabling Swagger support for JWT authentication to facilitate API documentation and testing.
Final thoughts and encouragement for viewers to explore further in REST API courses for in-depth knowledge.
Acknowledgment of Patreon supporters and a call to action for likes, subscriptions, and notifications for future content.
Transcripts
hello everybody I'm Nick and in this
video I'm going to show you how you can
add the Json web token authentication
and authorization support in your ASP
core application if you like that with
content and you want to see more make
sure you subscribe ring the sub
notification Bell and for more training
check out Nick chapsters.com okay so let
me show what I have here and actually I
want to point out that I'm not going to
be explaining what the Json web token is
or a jot because I already have a video
on that which you can check in the
description below but there's also tons
of other videos going really in depth
with the topic it is a generic topic
it's not specific to a Sprint core and I
want to focus on the implementation
itself and show you how you can use it
in a very nice way let me show what I
have here I have this movies API and
that's what we're going to be dealing
with directly in this video and I'm
going to run it to show you what this
API can do so API is running I'm going
to go to postman and we can list all the
movies in the system now unfortunately
we don't really have any so what I'm
going to do is I'm going to create a new
movie I'm going to create the famous
comedy Nick the Greek both the way back
in 2010 so that is now create it in the
system I can list it in that previous
endpoint as you can see or I can get it
using an ID now oh I made a bit of a
mistake it's actually released in 2023
and it's also an action movie not just a
comedy so I can update it and in the end
I can simply just delete it now this API
does not have any form of authentication
authorization I don't need to be someone
or validate that I am someone to be able
to call it so my controller looks just
like this I have an API controller
attribute around implementing the
controller base and that's how my
endpoints look now don't worry that I'm
using controllers I'm also going to
cover minimal apis in a second later in
the video so how do I add Json web token
support well it all starts with a nuget
package I'm going to go to nuget
packages and I'm going to add the
microsoft.aspoon.authentication dot dot
Bearer and yes I know it's pronounced
just for some reason it's a w but
whatever and configuration thankfully is
actually pretty simple it could be way
way worse so the first thing you need to
do is add actually say Services dot add
authentication authentication comes
before authorization and just to quickly
recap for the avoidance of any doubt
authentication is the process of
verifying that someone is who they say
they are while authorization in the
process of verifying that someone has
access to what they say they have access
to or just saying what they have access
to so a lot we have these nuget package
I can use the jot Bearer defaults and I
can use the default authentication
scheme here but another approach if you
want to just update all the defaults is
to do something like this you can set
the default indication scheme the
default challenge scheme and the default
scheme all at once and now with that
nuget package we also get this add dot
Bearer method which adds the support we
need so in here we're going to configure
what we want to validate for our jot and
just to quickly recap what a jot looks
like here I have a job generated from
one of my own service we're going to be
taking a look at that in a second and
first we have the header which contains
the type of the token and also the
algorithm used to generate the signature
then we have a bunch of standard claims
and custom ones so Json web token ID is
a standard one same with subject and all
of these ones over here and then we have
a few custom ones email user ID admin
and trusted member which I created and
then you have an issue and an audience
the issuer is who create the token and
audience is who is this token intended
for so think of I don't know Google
authentication creating a token for you
to use in Google Slides maybe you don't
have access to Google Docs with that
thing so that token can only be used in
Google Slides even though it was
generated by Google and it is a valid
token and then in the end both the
header and the payload are actually
Basics before URL encoded separate with
a DOT and then there has to generate the
signature hashing is not the only
mechanism by the way to do this you can
have public key cryptography as well and
other approaches but this is by far the
most common so a few things you want to
validate is the issuer the audience and
also that the token is not expired on
top of that we want to validate the
signature that it is a valid one we can
validate all lot by configuring the
token validation parameters value we can
create a new type over here and what I'm
going to do before I paste what goes
here is actually add some settings so
for the purposes of this video I'm going
to keep this here however you would not
store the key here you would store it
securely in a service specific design to
store tokens like Azure key Vault or WS
Secrets manager if you want to know how
you can do this with AWS secret manager
I actually have a video on that topic
but you should never have it in the
settings like this not only is it not
secure but if you want to rotate that
token as the application is running this
limits you significantly you have to
redeploy and then you have to keep track
of multiple Keys it becomes very tricky
but for this video I'm just gonna leave
it here just so you can wrap the code
from the description and use it for your
own purposes so now with these things
set I'm gonna just show you all the
parameters we have to specify here and
these are sort of the minimum ones you
need so we have the valid issuer which
will pass down for configuration valid
audience or as well then the issue your
signing key and that is a new symmetric
key in this case which we get from the
settings again like I said you really
want to load this from somewhere that is
designed to store and load these things
and then we say that we want to validate
the issuer the audience the lifetime of
the token so that it is in effect
because you can actually future issue
one but also that it is not expired so
all of these things have to be specified
as true and also that you have to
validate the issue or signing key
because that's ultimately what makes the
jot so powerful the fact that it is this
stateless construct that all you need to
do is validate the signature and then
the rest is valid and true because if
the signature is valid then the rest of
the thing must be because for the hash
to be valid the payload and the header
have to also be valid so this is
everything we need and then the next
thing we need is the ad authorization
call so I'm going to add it as it is
Bare Bones nothing in it and then I'm
going to go all the way down to the
middleware area and after the https
redirection and before all the map
controllers I'm going to say use
authentication and then app.use
authorization now remember that sequence
in middleware actually matters so
authentication happens first
authorization second then event
controllers meaning that everything
above it are not part of authentication
authorization so be very careful now
actually in terms of authentication that
is it obviously if I just leave my
controller as it is and I go and I run
it nothing really will happen I will
still be able to get all my movies in
the database now I have nothing of
course but nothing really blocks me from
getting them but if I now go in the
controller and I say that authorize the
users trying to access this controller
and I try to run it again then I'm going
to get a 401 unauthorized because
nothing can authenticate me authorize me
to see if I can actually use this API so
how do we pass a Json web token to
validate that we can actually access it
well first we create it and I have a
helper identity API here that knows how
to create a token it uses the same key
which again you don't want to store here
as a constant like Jesus just store it
somewhere securely and we're going to
create a token that lasts for eight
hours this is way too long usually for
Json web tokens they're way more
short-lived and then recreated and if
you want to see a video on refreshing
tokens leave a comment down below as
well but then this is the process I can
follow to generate a Json web token with
all of my custom claims over here you
can just grab this and use it for your
own purposes now in reality you will be
using something like identity server or
OCTA or author zero or some service
dedicated to creating these types of
things in specific flows but because
what these Services automatically
generate is a Json web token we're just
gonna focus on the implementation side
of things we're not going to focus on
the creation side of things so we're
just going to use this helper service
I'm just going to run it and go back to
postman and I'm just going to say that
hey this is me this is my user id create
a token and now I have a token to use it
so I'm going to stop this API and run
the movies API remember we cannot access
this because we're not authenticated but
to say that hey it's Nick can I please
access this all I'm going to do is go to
the headers and specify the
authorization header but it's not just
pasting the token you actually have to
say Bearer space and then the token it's
just the way of passing down a bearer
token and now if I have that I can go
ahead and I can get the item so I am
authenticated and in this case
authorized as well because we don't
really check for anything if the
signature was different if in the end I
have a zero not an O then I'm going to
get an unauthorized because the
signature is invalid if this thing was
expired then I would get unauthorized as
well but in this case I have a good
token so nothing really breaks
everything just works now let's talk
about the very important thing what if I
want my create update and delete to be
authenticate then authorized but my get
doesn't really matter I want everyone to
be able to access it you have two
approaches here you can either say allow
Anonymous here and this allow Anonymous
attribute will override the overarching
in controller-based Behavior or we can
just take the authorize from the
controller and we can paste it on each
individual thing we want authorize you
can ultimately choose which one you want
to use in general having it on a pair
action basis is actually more used
mainly because it allows you to specify
different things on the action itself
and this is actually where authorization
comes in or the process of validating
that someone can do what they claim to
do for example I want everyone who's
authenticated to create and update a
movie but I want only admins or
administrators to delete a movie how do
I do that well it's a few ways but the
simplest one is by using a claim so in
that Json web talk and if you remember
what I said in a custom claim is that an
admin is false now usually when someone
is not something you wouldn't have it in
the token you will just not have the
claim at all the absence of a claim
means that that user is not something
but if I just run this API again and I
regenerate this token and I say that yes
this is actually an admin then I have a
token of someone who is an admin and can
delete on top of create and update now
how do we Implement that well what we're
going to do is create an identity holder
over here and I'm just going to create a
new class called identity data or
identity constants or whatever you
really want to name it now first I'm
going to add the constant that is the
claim in my Json web token and also I'm
going to add a name to a policy in this
case that is the admin user policy now
these things are different the claim is
a Json web token concern the policy is
an application concern I can Define my
own policies based on claims or other
things to create a policy all I'm going
to do is go all the way up here to add
authorization and I'm going to say
authorization options and say options
dot add policy and I can create my own
policy using a name so I'm going to say
identity data equals admin user policy
name and then what do I want I want a
policy using this policy Builder that
requires a claim and the claim I want is
in identity data dot admin user claim
name and the value I want for this
policy is true so now I have my policy
registered it's not used anywhere by
default we just have it now in the
system and we can go ahead and just copy
this and we can say that you know what
create an update doesn't really need
anything I'll go all the way to delete
over here and say that actually I want
this policy to be identity data dot
admin user policy to delete and move in
the system so I'm going to run this and
I'm going to use the previous token I
have that has admin as follows so if I
try to create a movie using that all
token the non-admin token then I can and
I get my movie but if I go to delete
over here to delete that movie without
being an admin what I'm going to get is
403 or Biden not for one unauthorized
forbidden you're forbidden to make this
action and that is because I just don't
match the profile that the policy
requires me to have which is having the
claim as true now if I go and I use this
new token over here which is an admin
then I can go here replace this send and
now it is deleted and it no longer
exists in the system and that is it now
you can go even deeper and have multiple
policies and mix and match on different
things in customer sessions but this is
the most basic way of making a policy
however Some people prefer to validate
based on a single claim without using a
policy and one of the preferred ways is
to actually create a custom attribute
which validates claims what I'm going to
do is create a new attribute called
requires claim attribute over here and
I'm going to have that be an attribute
used on classes or methods and it's
going to extend application and
Implement I authorization filter if you
needed an async version of this there's
I async authorization filter we don't
need async in this case so I'm just
gonna use this and all you get is an on
authorization method now this is not
usable with minimal apis because of how
the filtering works there however for
controllers this does work if you want
to have the equivalent of this in
minimal ABS you have to use a minimal
apis endpoint filter and now here all we
need to pass down is a claims name and
the claims value that we expect and then
all we need to say in all authorization
is hey if this user doesn't have this
claim with this value then say forbid or
unauthorized depending on how the flow
works in your application the reason why
I say that is because in this example
over here what we're going to say is
actually authorize first and then
requires claim second and all we need
here is actually the identity data dot
admin user claim name and the value
needs to be true and if we do that I'm
going to put a breakpoint in the
attribute and then go ahead and debug
the application and again the same way
as before I'm going to revert to the all
token in fact first I'm going to
generate a movie so the movie is created
take that ID and then try to delete that
movie with the valid token and let's see
what happens oh request comes in here we
have the context we have everything and
then the claim name is admin and the
value we expect is true is that true
well let's see claims principle over
here and then we have all the claims and
one of them is admin true so it will be
validated so it will have it it will
step out of it and the action will in
fact happen okay if we use the old token
and we try to do the exact same thing
then we come in here but the user claim
as you can see in the claims is actually
false so it's gonna fall in here say
forbidden and then return 403 Forbidden
because we are authenticated but not
authorized that's another way you can
get clever and have a handy approach in
claim-based authorization and you can
take this in any direction you want
really now if you were to be using
minimal apis all of those things are
actually still valid the difference
would be that yes you can for example
say map post and let's have a movies
endpoint over here and return results
dot OK for example now you can pass down
and authorized attribute over here and
all of that will still work or requires
claim like that is just valid C sharp
however in minimal apis we actually
prefer the extension method approach so
we're going to say require authorization
and you can create your own extension
for the claims and everything but you
can pass down like a policy over here
you can see all the parameters you can
pass down multiple policy names as well
but in this case if I just say identity
data dot admin user policy name this
will be the same thing as having the
attribute with the policy name now the
last thing you might be interested is
actually Swagger support because if I
just go ahead and I run this API as it
stands I can go in Swagger and even
though I can see all my endpoints I
can't see a way to actually authenticate
with the token so how do I do that well
it's actually quite simple all I'm going
to do is create a new directory called
Swagger and I'm going to bring two files
in here the first one is called
configure Swagger option so we're gonna
contain all the swag related options in
here and this will need to implement the
iconfigure options and then have the
Swagger gen options file in here
implemented and we have the configure
method in here and I'm not going to buy
you with typing all of this but
ultimately what you need is a security
definition and we say that this is a
better token specify that is located in
the header authorization HTTP jot better
everything is here same with the ad
security requirement and really that is
it from that front and then once you
have that you actually need to register
it in the program.cs so all the way up
here we're gonna go here and register
the iconfigure options interface with
its implementation and once that's in
place all I'm going to do is just run it
and now if we go back to Swagger as you
can see I have this authorized button
which I can click and provide the Json
web token so I'm gonna go all the way
back here copy just the token you don't
need anything else and just paste it
here authorize and if I go to create a
movie for example and say tried out
paste it and then execute no problem it
all worked it was created if I wasn't if
I just say padlock and log out and I try
to do this again I'm going to get a 401
hey you cannot do this so now we also
have Swagger support this is it for all
the basics you can take it in any
direction you want from this point on I
do go way more in depth in my rest API
calls on every single one of those
Avenues however you are now in the right
track and you can take it everywhere you
want from that point well that's all I
have for you for this video thank you
very much for watching special thanks to
my patreons for making videos possible
if you want to support usually going to
find the link description down below
leave a like if you like this video
subscribe more content like this in the
Bell as well and I'll see you the next
video keep coding
Browse More Related Video
Oauth2 JWT Interview Questions and Answers | Grant types, Scope, Access Token, Claims | Code Decode
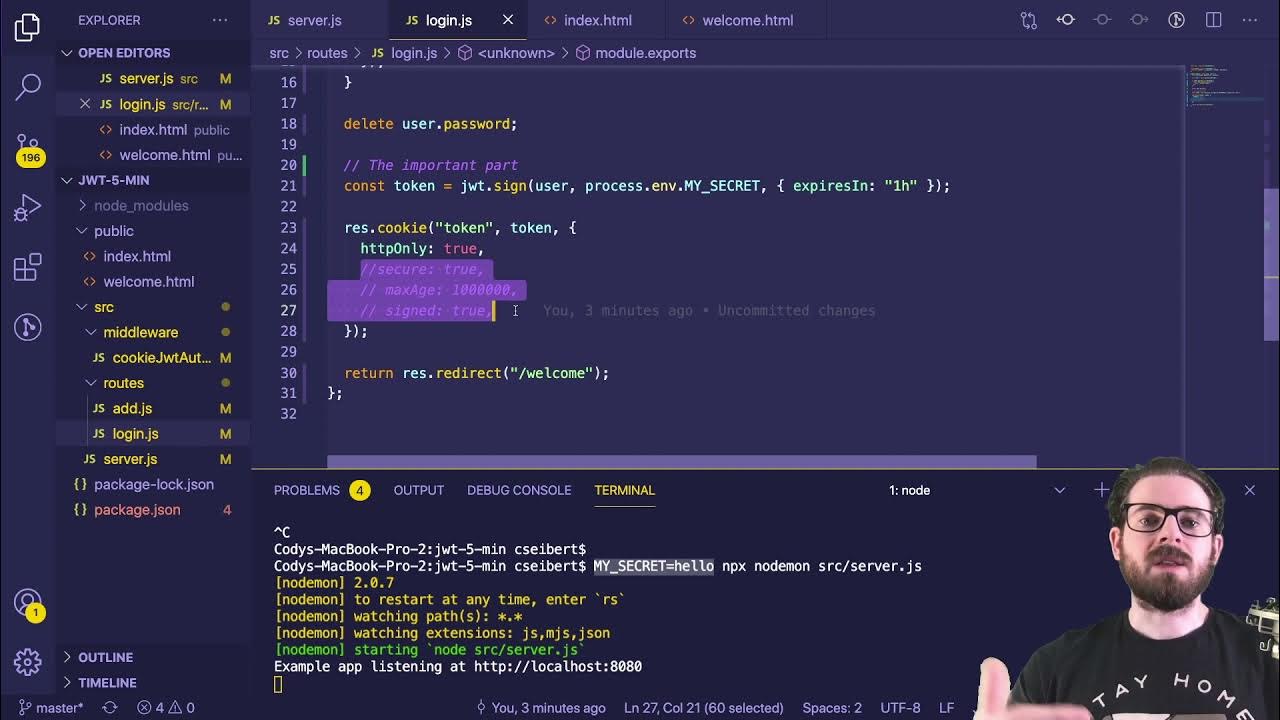
Learn JWT in 10 Minutes with Express, Node, and Cookie Parser
What is Json Web Token? JWT Token Explained
NestJs REST API with MongoDB #4 - Authentication, Login/Sign Up, assign JWT and more
Authentication, Authorization, and Accounting - CompTIA Security+ SY0-701 - 1.2
Building a Multi-tenant SaaS solution on AWS
5.0 / 5 (0 votes)