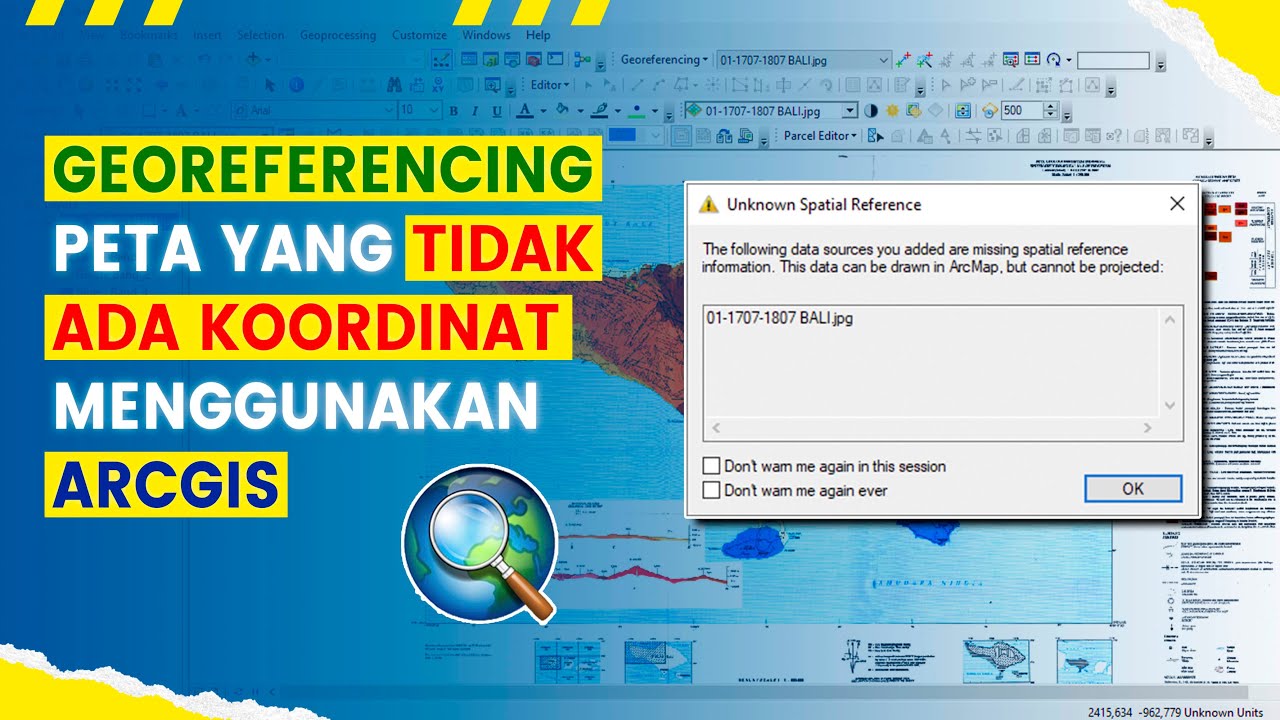
Registrasi Ulang Peta JPEG di ArcGis
Summary
TLDRIn this tutorial, the presenter walks viewers through the step-by-step process of georeferencing a JPEG map using ArcGIS. The guide covers essential actions like setting the coordinate system, inputting control points for georeferencing, and rectifying the map to align it with geographical coordinates. By the end of the tutorial, users will learn how to effectively register a map for digitization or other applications, ensuring it aligns with actual locations in ArcGIS. The video emphasizes practical skills for map preparation and encourages viewers to subscribe for more tutorials.
Takeaways
- 😀 Make sure the map has grid coordinates before starting the georeferencing process.
- 😀 In ArcGIS, adjust the project’s coordinate system to match the map’s coordinate system (e.g., UTM WGS 84).
- 😀 Enable the Georeferencing tool in ArcGIS before working with the map.
- 😀 Set the coordinate system to degrees, minutes, and seconds (DMS) for georeferencing.
- 😀 Georeferencing requires identifying four corner points on the map for accurate alignment.
- 😀 Start by marking the top-left corner of the map with the correct coordinates.
- 😀 Repeat the process for the top-right, bottom-left, and bottom-right corners of the map.
- 😀 Always ensure that the correct hemisphere (e.g., South for latitude) is selected when inputting coordinates.
- 😀 After inputting all reference points, use the *Rectify* tool to save the corrected map in TIFF format.
- 😀 The rectified map can be loaded into ArcGIS for further analysis or digitizing tasks.
- 😀 Once rectified, the map's coordinates should update dynamically, ensuring it aligns with other geographic data.
Q & A
What is the main purpose of the tutorial?
-The tutorial explains how to perform the registration process of a JPEG map (referred to as georeferencing) for use in digitizing or remapping purposes.
What should be prepared before starting the registration process?
-You should have a JPEG map with grid coordinates ready for registration, as the map will be referenced to match real-world coordinates.
What software is used in this tutorial?
-The tutorial uses ArcGIS for the georeferencing process.
Which coordinate system is used in this tutorial?
-The tutorial uses the UTM (Universal Transverse Mercator) WGS 84 coordinate system with Zone 50S for georeferencing.
What are the requirements for the map to be registered successfully?
-The map must have a coordinate grid and should be prepared with correct coordinate points to align with the real-world location during registration.
How many points are used for georeferencing, and why?
-Four points are used for georeferencing the map, specifically the four corners of the map, to ensure accurate alignment with the real-world coordinates.
How are the coordinates entered during the registration process?
-Coordinates are entered using the DMS (Degrees, Minutes, Seconds) format, and for each point, the longitude and latitude values are inputted along with the proper directional indicators (East for longitude, South for latitude).
What happens after the four points are entered for registration?
-Once the four points are entered, the user proceeds with the rectify process to finalize the registration and save the map in a georeferenced TIFF format.
What is the significance of the 'rectify' process?
-The 'rectify' process aligns the map to the correct geographical coordinates, transforming it into a georeferenced image that can be used for further analysis and digitization.
Can the georeferenced map be used in other applications after registration?
-Yes, the georeferenced map can be used in other GIS applications like ArcGIS for tasks like digitization or further analysis, as it is now aligned with the correct real-world coordinates.
Outlines

This section is available to paid users only. Please upgrade to access this part.
Upgrade NowMindmap

This section is available to paid users only. Please upgrade to access this part.
Upgrade NowKeywords

This section is available to paid users only. Please upgrade to access this part.
Upgrade NowHighlights

This section is available to paid users only. Please upgrade to access this part.
Upgrade NowTranscripts

This section is available to paid users only. Please upgrade to access this part.
Upgrade NowBrowse More Related Video


5.0 / 5 (0 votes)