2.9.2 Lab - Basic Switch and End Device Configuration

Christian Augusto Romero Goyzueta
14 Dec 201924:26

Summary

TLDRThis instructional script outlines the process of configuring a basic network switch setup. It covers connecting devices, assigning static IP addresses, and establishing communication between two switches using either a crossover or straight-through cable. The script also details configuring switch settings via console access, setting hostnames, disabling DNS lookups, and securing access with passwords. It concludes with verifying connectivity and interface statuses.

Takeaways

  • 🔌 Switches do not have a power switch; they power on automatically when the power cord is plugged in.
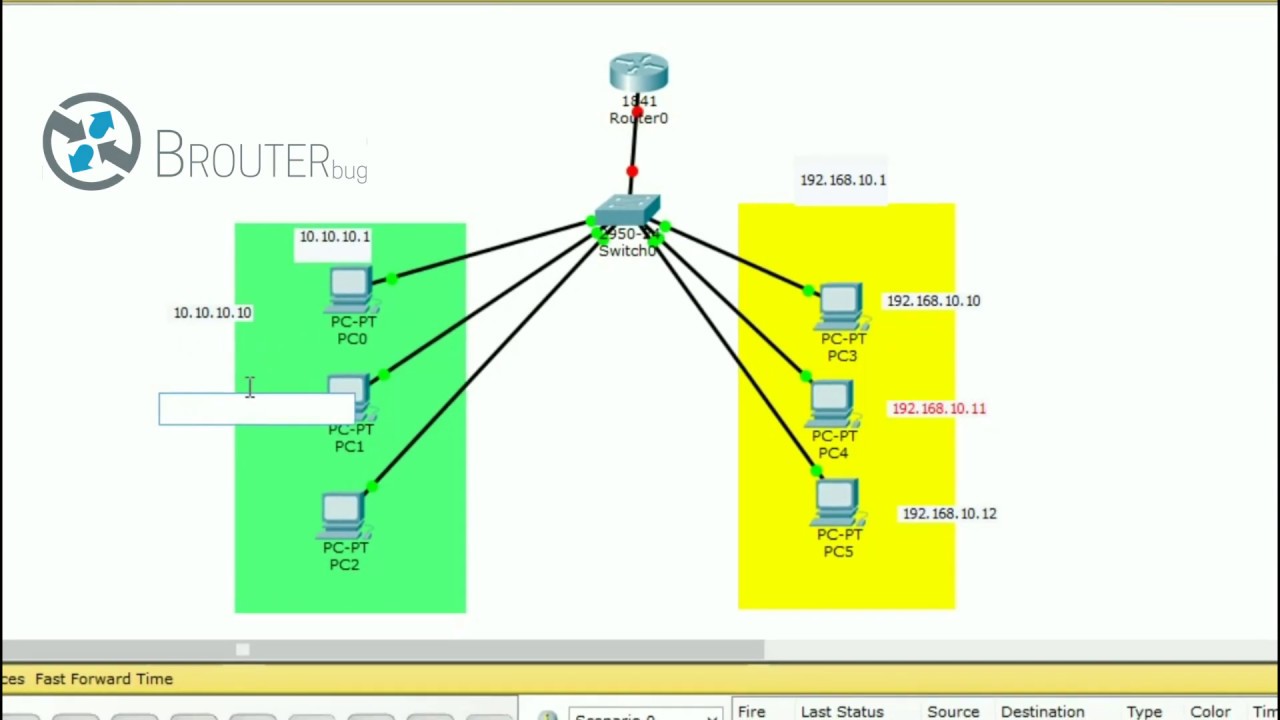
  • 🖥️ Use straight-through cables to connect PCs to switches and either straight-through or crossover cables between switches.
  • 💻 PCs should be configured with static IP addresses using the addressing table (e.g., PCA: 192.168.1.10, PCB: 192.168.1.11).
  • 📝 Verify PC connectivity and settings with commands like `ipconfig` and `ping` to test between PCA and PCB.
  • 🔐 Configure basic switch settings, including setting a hostname, disabling DNS lookups, and setting passwords (enable secret and line console passwords).
  • 🔧 Use VLAN1 for basic switch interface configuration with an assigned IP address and ensure the interface is up.
  • 🚫 Configure a message of the day banner to warn about unauthorized access using delimiters to encapsulate the message.
  • 💾 Save the running configuration to the startup configuration using the `copy running-config startup-config` command.
  • 📊 Use commands like `show running-config`, `show version`, and `show ip interface brief` to verify switch configurations, interface statuses, and iOS versions.
  • 🖥️ Test connectivity between switches and PCs, checking for potential issues like wrong IP addresses, media disconnections, or firewall settings.

Q & A

  • What type of cable should be used to connect two PCs in this setup?

    -A straight-through cable should be used to connect the two PCs, PCA and PCB, to the switch.

  • How should you configure the IP addresses for PCA and PCB?

    -PCA should be configured with the IP address 192.168.1.10, subnet mask 255.255.255.0, and no default gateway or DNS. PCB should be configured with the IP address 192.168.1.11 and the same subnet mask.

  • How do you verify the IP settings and connectivity between the PCs?

    -You can verify the IP settings by using the 'ipconfig /all' command on each PC. Then, you can use the 'ping' command from PCA to ping PCB's IP address (192.168.1.11) and check for successful replies.

  • What is the process to configure a switch using the console cable?

    -Connect the console cable from PCA’s RS-232 port to the switch’s console port. Then, open a terminal on PCA and set the baud rate to 9600 with no parity. Enter global configuration mode on the switch by using 'enable' and 'configure terminal' commands.

  • What steps are necessary to prevent unwanted DNS lookups on the switch?

    -To prevent unwanted DNS lookups, you can disable DNS by entering the 'no ip domain-lookup' command in global configuration mode.

  • What commands are used to set up the passwords for switch security?

    -To set a password for privileged access, use the 'enable secret class' command. For the console line, use 'line console 0', then set the password with 'password Cisco' and enable login with 'login'.

  • How do you configure an IP address for the switch’s VLAN1 interface?

    -Enter interface configuration mode for VLAN1 using 'interface vlan 1'. Assign an IP address using 'ip address 192.168.1.1 255.255.255.0' and enable the interface with 'no shutdown'.

  • How can you configure a banner to warn unauthorized access to the switch?

    -To configure a banner, use the 'banner motd' command in global configuration mode. You can specify a custom message such as 'Unauthorized access is strictly prohibited'.

  • How do you save the switch’s configuration to ensure it persists after a reboot?

    -To save the configuration, use the 'copy running-config startup-config' command. This copies the current configuration into non-volatile memory (NVRAM).

  • What command shows the current configuration and status of the switch’s interfaces?

    -You can use the 'show running-config' command to display the current switch configuration and the 'show ip interface brief' command to see the status of all interfaces, including whether they are up or down.

Outlines

00:00

🔌 Basic Network Setup

This paragraph explains the basic setup of a network using switches and a crossover cable. It details the process of connecting devices and configuring static IP addresses on PCs. The switches are powered on by plugging in the power cord, and there's no power switch on them. The PCs are configured with static IP addresses using an addressing table, and the connectivity is verified using commands like 'ipconfig' or 'ipconfig /all'. The summary also touches on the use of straight-through cables for certain connections and the importance of correct cable types for network setup.

05:02

🛠️ Configuring Switch Settings

The second paragraph focuses on configuring the switch settings using a console cable connected to the switch's RS-232 port. It walks through the process of entering global configuration mode, setting the switch's hostname, and disabling DNS lookups to enhance security. The paragraph also covers setting up passwords for different levels of access, such as the enable secret for privileged access and the login password for console access. Additionally, it explains how to configure an interface with an IP address and subnet mask, and how to enable the interface and set a login banner to warn against unauthorized access.

10:03

📜 Saving and Reviewing Configuration

This section describes how to save the switch configuration and review it. It explains the process of exiting global configuration mode and using the 'copy running-config startup-config' command to save the current settings. The paragraph also details how to display the current configuration using 'show running-config' and how to view the IOS version and other switch information using 'show version'. Furthermore, it covers how to check the status of connected interfaces with 'show IP interface brief' and how to access the switch in user exec mode and global configuration mode.

15:05

🔄 Configuring Another Switch

The fourth paragraph continues the network setup by configuring a second switch. It covers similar steps as the first switch, including setting the hostname, disabling DNS lookups, and configuring passwords. It also explains how to configure an interface with an IP address and subnet mask, enable the interface, and set a banner message. The summary includes the process of saving the configuration and exiting from global configuration mode. Additionally, it mentions how to display the current configuration and check the status of connected interfaces.

20:18

🖥️ Verifying Network Connectivity

The final paragraph discusses the process of verifying network connectivity between switches and PCs. It explains how to check the status of connections and what factors can prevent a connection, such as wrong IP addresses, media disconnections, switch forwarding issues, administratively down ports, or firewalls on PCs. The paragraph also covers how to use commands to verify connectivity and suggests disabling firewalls on Windows PCs to allow pings. The summary emphasizes the importance of correct configuration and troubleshooting steps to ensure network connectivity.

Mindmap

Keywords

💡Switch

A network switch is a device that connects devices within a network and uses packet switching to forward data to the destination device. In the video, the switch is a central component in connecting PCs and configuring the network. It does not have a power switch and powers on when plugged in, playing a crucial role in facilitating communication between devices.

💡IP Address

An IP address is a unique identifier assigned to each device on a network, allowing it to communicate with other devices. In the video, IP addresses like '192.168.1.1' for PCA and '192.168.1.2' for PCB are configured to ensure proper network connectivity and communication between the PCs.

💡VLAN1

VLAN1 is the default virtual local area network (VLAN) on many switches, used to manage and segregate network traffic. In the video, the interface VLAN1 is assigned an IP address to enable communication on the network. This configuration is critical for ensuring that devices can communicate across the switch.

💡Subnet Mask

A subnet mask divides an IP address into network and host portions, determining how many devices can be addressed in the network. The subnet mask '255.255.255.0' used in the video defines a local network for both PCA and PCB, allowing them to communicate within the same subnet.

💡Crossover Cable

A crossover cable is a type of Ethernet cable used to connect two devices directly, such as switches or PCs, without a router. In the video, it is mentioned as an option for connecting two switches, emphasizing its role in network setup when direct communication is required.

💡Console Cable

A console cable is used to connect a computer to the console port of a switch or router for management and configuration purposes. In the video, the console cable is used to connect from PCA to the switch to access the switch's console and perform configuration tasks, such as setting IP addresses and passwords.

💡Enable Secret

The enable secret is a password that provides privileged access to a network device, such as a switch. It is encrypted for security. In the video, 'class' is set as the enable secret password to secure privileged access to the switch’s configuration, ensuring that only authorized users can modify settings.

💡Banner Message of the Day

A banner message of the day (MOTD) is a warning or informational message that appears when someone accesses a network device. In the video, a banner is configured to display 'Unauthorized access is prohibited' to warn anyone attempting to access the switch without permission.

💡Show Running Config

The 'show running-config' command displays the current active configuration on a network device, such as a switch. In the video, this command is used to review the switch's settings, including its hostname, IP configuration, and passwords, ensuring that the correct configurations are applied.

💡Ping

Ping is a network diagnostic tool used to test connectivity between devices by sending ICMP echo request packets. In the video, ping is used to verify communication between PCA and PCB after IP configuration, with successful replies confirming that the network is functioning correctly.

Highlights

Setting up basic switch and anti-base configuration using a straight-through cable between switches and crossover cable between PCs.

Powering on the switches automatically as soon as the power cord is plugged in; no power switch needed.

Configuring static IP addresses on PCA and PCB with specific IPs: PCA (11.1.10) and PCB (11.1.11), with subnet masks for both.

Verification of IP settings using 'ipconfig' and ping command to test connectivity between PCA and PCB.

Console access to switches using RS-232 ports on PCA, with terminal settings of 9600 bits per second and no parity.

Entering global configuration mode in switches using 'enable' command and setting hostname (S1 for switch 1).

Disabling unwanted DNS lookups on the switch using 'no ip domain-lookup' command.

Setting privileged access and control passwords using 'enable secret' and 'line console 0' commands.

Configuring VLAN1 interface with IP address 192.168.1.1 and enabling it using 'no shutdown' command.

Setting a banner message for unauthorized access warnings using 'banner motd' command.

Saving the configuration using 'copy running-config startup-config' command to save changes permanently.

Displaying current configuration using 'show running-config' to verify hostname, interface settings, and passwords.

Displaying the switch's iOS version and connected interfaces using 'show version' and 'show ip interface brief' commands.

Switch 2 configuration follows a similar process, including setting hostname (S2) and configuring VLAN1 interface with IP 192.168.1.2.

Successful ping tests between PCA and switches, as well as between PCA and PCB, indicating proper connectivity.

Transcripts

play00:05

basic switch and anti base configuration

play00:08

this topology turn a nice fixed a switch

play00:30

as to PC PC a - a this will be now PCA -

play00:48

faceted six use a straight through cable

play00:54

for Saturn add to the Saturday at six

play00:58

and from PCB facet on earth to pass

play01:03

eternal 18 and between the switches you

play01:07

can use a crossover cable or stray

play01:11

through any I would use a stray through

play01:17

further the not want to fuss at the not

play01:20

work

play01:33

this is the addressing terrible power on

play01:38

the devices the switches do not have a

play01:43

power switch

play01:44

they will power on as soon as you plug

play01:47

in the power cord okay

play02:01

switches do not have a power switch

play02:07

connect the two switches okay first the

play02:16

red wire connected to facetted add one

play02:19

on the other side okay lights green

play02:39

indicates that the switches have been

play02:41

connected correctly connect pcs

play02:56

great so indicated busier he has been

play03:05

connected currently also PCB configure

play03:17

PC cause static IP addresses on PCs okay

play03:23

use the addressing table PCA and PCB PCA

play03:32

duck stop IP configuration one one that

play03:39

Tang subnet mask 24 255 255 255 0 now

play03:51

the forget way no DNS PCB 11 1.11 and

play04:01

discipline mask then verify PC settings

play04:09

and connectivity okay for example on PC

play04:14

a

play04:15

IP config the IP address and subnet mask

play04:20

or ipconfig/all space the /all IP

play04:28

addressing subnet mask same way PCB IP

play04:35

config space slash all 11 pink from PCI

play04:49

to PCB the IP address of PCB is xi 1 xi

play04:57

ok success pockets and for receiveth for

play05:02

lost 0 reply from 11

play05:07

very nice configure amplify basic switch

play05:13

settings consult into the switch okay

play05:21

use the console cable to connect from

play05:25

pca rs-232 port to as well console and

play05:34

ports go to PCA and enter to terminal

play05:40

beats per second

play05:44

9600 data with a parody non-stop it's

play05:47

one flow pattern on okay this is the

play05:50

switch enter enter global configuration

play06:02

mode okay before that use the enable

play06:08

comment to access privilege exit mount

play06:14

now you can see this now enter global

play06:18

configuration mode with the configure

play06:21

terminal commands give the switch name

play06:28

according the address in table the

play06:31

switch is s1 house name as one okay now

play06:41

you can see the host name here s1

play06:46

prevent unwanted DNS lookups to prevent

play06:50

the switch from attempting to transfer

play06:52

currently entered comments disable the

play06:58

main name System DNS lookup now I peed

play07:04

my lookup and the local passwords class

play07:10

was the privileged access password and

play07:12

cisco has the password for control axis

play07:18

they enable secret class okay this is

play07:23

the password class for the enable

play07:28

comments enter enter to line console 0

play07:38

there is only one line and set the

play07:43

password Cisco and login to enable the

play07:49

the password and you can see you are on

play07:59

line configuration mode so you can exit

play08:04

from from line configuration mode to

play08:09

global configuration mode configure and

play08:18

enable the switch portal interface

play08:20

according to the addressing table okay

play08:24

use this when I - as you see a 1-1 with

play08:27

discipline mask

play08:29

interface on interface vlan1 interface

play08:35

belong one IP others 182 and 60 a 1-1

play08:41

and subnet mask 24 or 255 255 255 0 ok

play08:50

but this interface should be enabled no

play08:58

no ok interface belong one change stay

play09:04

to up line protocol on interface belong

play09:07

one change stay - up enter a login

play09:15

message of the day banner to warn about

play09:18

unauthorized access

play09:22

now as the message of the day

play09:25

banner should be configured to warn

play09:28

anyone accessing the switch the

play09:31

notarized access will not be tolerated

play09:38

okay for example when you enter

play09:44

interface belong one you access to the

play09:47

interface configuration world so you can

play09:54

enter the you can configure the banner

play09:58

here or not problem but I prefer to exit

play10:03

from interface configuration world with

play10:07

the exit common and now you are on

play10:10

global configuration mode then set the

play10:17

banner banner message of the day you can

play10:21

use this for example this characters the

play10:27

banner message of the day common

play10:28

requires the use of telemeters to

play10:31

identify the canal the content of the

play10:35

banner message the delimiting character

play10:38

can be any character as long as it does

play10:42

not occur in the message for this reason

play10:47

symbols are often used okay here the

play10:53

message for example point out to rice

play11:09

axis is strictly prohibited

play11:18

okay this is the common enter this is

play11:26

the message

play11:29

the the limiters here and here now save

play11:42

the configuration go to privilege exit

play11:48

mode exit when you are on privilege exit

play11:54

mount use the following command copy

play11:58

running-config star up coffee use the

play12:07

copy command to save the running

play12:09

configuration to the startup file no

play12:12

volatile random access memory mb ram

play12:21

okay from the ROM to the MB ROM from the

play12:27

running config to the asteroid confi

play12:30

enter enter to configure ok

play12:37

this display the current configuration

play12:40

the current configuration is place it on

play12:43

the running config so you can show the

play12:48

running config show running config ok

play12:54

look at this the hostname the enable

play12:57

secret this is class password but is

play13:01

encrypted might be the main look are the

play13:05

interfaces the interface belong one with

play13:08

IP address and subnet mask the banner

play13:11

the password for line consult and

play13:15

logging ok I will repeat the command

play13:22

show running config and you can see more

play13:25

here and press the the spacebar to

play13:31

advanced paging space space space space

play13:35

space bar

play13:42

now display the iOS version and other

play13:45

useful switch information they show

play13:49

version 4 to show that ok this is the

play13:54

version for the bootloader but the

play13:58

version for the image is not present on

play14:04

Pocket racer but I can I can show flash

play14:08

content so this is my iOS image and the

play14:13

person is 12.2 on show version commands

play14:22

the version is is here 12.2 ok for the

play14:28

switch for the Tony nice which display

play14:36

the status of the connected interfaces

play14:39

use privilege exit mount use the

play14:44

following command show IP interface

play14:46

brief you can see all interfaces

play14:51

including the switch button interface

play14:54

belong one configure switch to ok

play15:05

repeat all but four switch to console

play15:12

into the switch from rs-232 port on the

play15:18

PC to the console port on the switch go

play15:22

to PCB and terminal ok this is switch to

play15:31

other in able to access the this is the

play15:39

user except mode enabled to access the

play15:45

high polish accent marks and third

play15:51

global configuration mode with the

play15:52

configure terminal commands now you are

play15:59

on global configuration mode set the

play16:04

hostname hostname as to prevent unwanted

play16:12

DNS lookups no IP to make the cop you

play16:19

can use - or space any of the any of

play16:25

those options the passwords enable

play16:33

secret class this is the password for

play16:36

the enable comment and for the line

play16:40

console 0 password is Cisco line console

play16:44

0 password Cisco login login to enable

play16:54

this password configure the switch

play17:01

filter interface ok that's it ok to exit

play17:08

from line configuration mode to the

play17:11

global configuration mode the IP address

play17:18

on million-one is 1.2 interface vlan1 IP

play17:26

others 192 168 1 the 2 subnet mask 255

play17:31

255 255 0 enable the interface with the

play17:36

nation' down comment the banner ok exit

play17:47

from interface configuration mode and

play17:53

banner message of the day choose any

play17:56

character like this on now to arise it

play18:04

access is prohibited other save the

play18:17

configurations they exit from global

play18:21

configuration mode that's it and now you

play18:25

are tribal - exit mult and copy from RAM

play18:32

that is the running config

play18:37

- MB RAM that is star up coffee enter

play18:42

enter display the current configuration

play18:48

and privilege exit mode shall running

play18:54

coffee space spacebar spacebar the

play19:03

interface burner possible on console

play19:12

display that iOS version show version

play19:17

turn that to status of the connected

play19:24

interfaces show IP interface brief ok

play19:30

remember the show comments are place it

play19:39

privilege exit mount under now you can

play19:45

see all all interfaces and switch

play19:50

beautiful interface ok record the

play19:56

interface status for the following

play19:58

interfaces ok this is switch to and look

play20:03

at this belong wrong up up ok status up

play20:18

protocol up okay on switch to force it

play20:25

another one up and up okay this is the

play20:34

connection to another switch the

play20:39

connection to pc+ not a teen status up

play20:43

protocol up another port like faceted

play20:48

six status down protocol down go to as

play20:54

one from PCI this console okay the

play21:03

connection to PC faceted six status up

play21:07

protocol up the connection to the

play21:10

another switch status up protocol up

play21:13

switch built on interface up up for

play21:18

settlement 18 that is not connected

play21:23

start to stop protocol down from PCC

play21:28

pink as well and as to no PCC but I will

play21:39

use PCA to be if s1 and s2 this is the

play21:48

terminal the connected to the console of

play21:52

as well close this go to command prompt

play21:56

okay this is PCA I become fixed to

play22:00

verify one that Sam would take to switch

play22:05

s1 that is one that one

play22:14

success also switch to that is 1.2 okay

play22:29

the pink from BCI to a swamp success PCA

play22:33

to s to success finally from PC a pink

play22:38

PCB PCB is that close this that is the

play22:47

console to switch to command prompt I be

play22:54

gone three this 1.11 go to PC a1 b2 1.11

play23:03

success why some fuss settlement boards

play23:10

on the switches are up and others are

play23:12

done the faceted ports are up when

play23:19

tables are connected to the ports unless

play23:23

they were manually done by the

play23:25

administrator

play23:26

otherwise the ports would be down what

play23:31

could prevent a pin from being sent

play23:33

between the PCs wrong IP address media

play23:41

disconnected switch forward off or ports

play23:44

administratively down or firewall on the

play23:49

PC okay remember unreal up disable the

play23:56

firewall on Windows PCs to permit the

play24:00

pink thank you

Rate This

5.0 / 5 (0 votes)

Related Tags
Network SetupSwitch ConfigurationVLAN SettingsIP AddressingPC ConnectivityNetwork SecurityConsole AccessCisco CommandsFirewall SettingsSwitch Ports