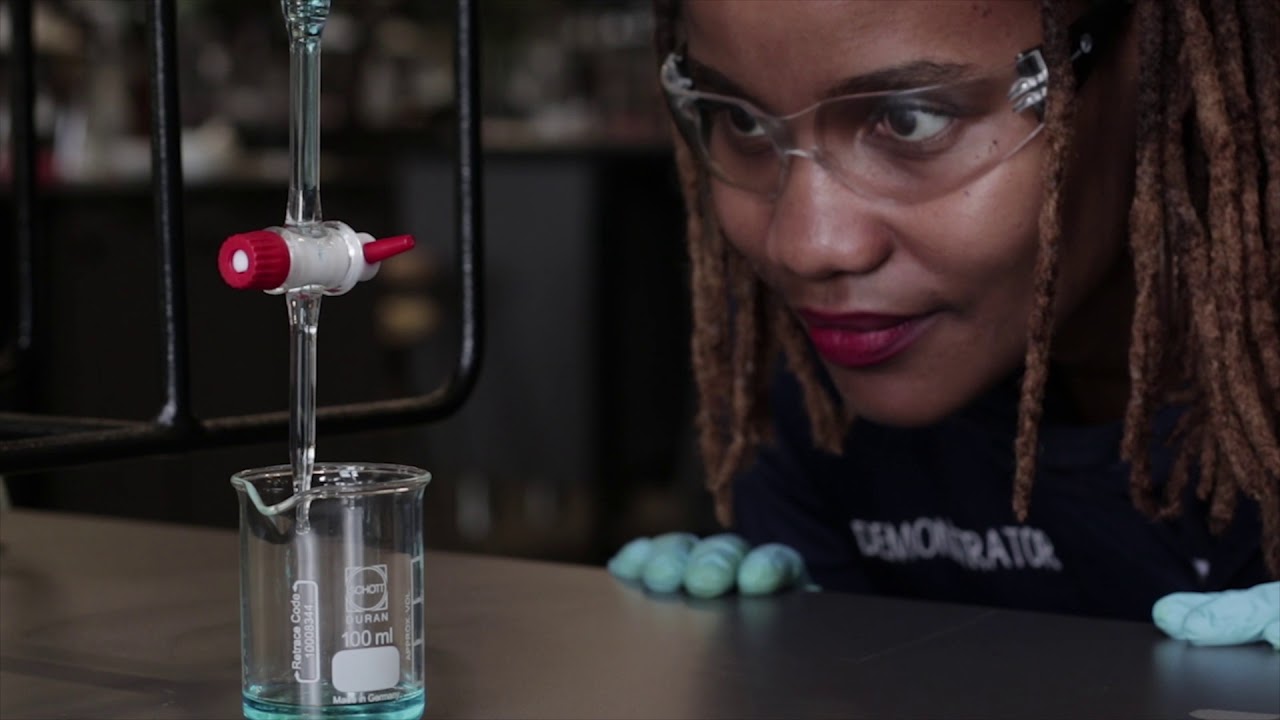
Proper use of a buret for a titration procedure

Gary Mabbott
13 Mar 201605:56

Summary

TLDRThis video offers a detailed guide on using a buret for titration experiments. It emphasizes the importance of cleaning the buret, filling it with titrant solution, and performing the titration with precision. The video demonstrates how to accurately read the meniscus, use a reading card for better visibility, and estimate the endpoint by observing color changes with phenolphthalein as an indicator. It also advises on conducting multiple trials for consistency and accuracy in recording data.

Takeaways

  • πŸ” Always ensure your buret is clean before starting a titration experiment.
  • πŸ’§ Rinse the buret with deionized water to avoid contamination.
  • 🧼 Use detergent and water with a long-handled brush to clean the buret if water beads are observed.
  • 🏺 Pour deionized water into the buret using a beaker, not directly from the faucet.
  • πŸ“Œ Securely attach the buret to a stand with a clamp to prevent movement during titration.
  • πŸ§ͺ Use sodium hydroxide as a titrant and phenolphthalein as an indicator for titrating acetic acid.
  • πŸ’§ Rinelyou the buret with the titrant solution multiple times before starting the titration.
  • 🌑️ Check the initial liquid level in the buret and ensure it's below the zero mark.
  • πŸ“ Use a reading card to accurately estimate the meniscus position on the buret scale.
  • πŸ“ Record the initial and final readings of the buret to the nearest hundredth of a milliliter.
  • πŸ”¬ Practice estimating the meniscus position to improve accuracy and consistency in titration results.

Q & A

  • What is the first step to prepare a buret for titration?

    -The first step is to ensure that the buret is clean and rinse the inside with deionized water.

  • How do you know if the buret is clean after rinsing?

    -If the water sheets down the side of the glass evenly without holding droplets of water, then the buret is considered clean.

  • What should you do if the buret holds droplets of water after rinsing?

    -If the buret holds droplets of water, it should be cleaned with detergent and water using long-handled brushes.

  • How should you rinse the buret after using detergent?

    -Rinse the buret thoroughly first with tap water and then with deionized water.

  • What is the recommended method to fill the buret with solution?

    -Use a beaker to pour the solution into the top of the buret instead of holding the opening under the faucet.

  • Why is it important to secure the buret with a clamp?

    -Securing the buret with a clamp ensures it is firmly in place and prevents it from moving during the titration process.

  • What is the purpose of rinsing the buret with the titrant solution before titration?

    -Rinsing the buret with the titrant solution ensures that any residual water does not dilute the titrant, affecting the accuracy of the titration.

  • Why is it necessary to coax any bubbles out of the tip of the buret?

    -Bubbles in the tip can cause an inaccurate reading and affect the delivery of the titrant, thus it's important to remove them for precise titration.

  • What is the purpose of using a reading card when measuring the volume in the buret?

    -A reading card helps to clearly see the meniscus against the white background, providing a more accurate reading of the volume.

  • How should you position your eyes when reading the meniscus?

    -Your eyes should be positioned in the same plane as the tangent drawn to the bottom of the meniscus for an accurate reading.

  • What is the significance of recording the initial reading in each titration?

    -Recording the initial reading is crucial for determining the volume of titrant used and calculating the concentration of the analyte.

  • How can you estimate the endpoint of the titration?

    -You can estimate the endpoint by conducting a preliminary trial to find the approximate endpoint, then conducting subsequent trials more carefully from a point close to the end.

  • What is the Troop endpoint and how is it determined?

    -The Troop endpoint is the first faint color that remains after 15 seconds of stirring, indicating the end of the titration.

Outlines

00:00

πŸ§ͺ Proper Buret Usage for Titration

This paragraph outlines the correct procedure for using a buret in a titration experiment. It emphasizes the importance of cleaning the buret with deionized water and detergent, using a brush to scrub the interior. The buret should be filled with a beaker rather than directly from a faucet, and secured with a clamp. The paragraph details the process of titrating acetic acid with sodium hydroxide using phenolphthalein as an indicator. It advises on how to fill the buret, remove air bubbles, and start the titration. The importance of accurate readings and the use of a reading card for precise meniscus observation is highlighted. The goal is to achieve consistent and accurate data to the nearest hundredth of a milliliter.

05:02

🎨 Capturing Color Change in Titration

The second paragraph focuses on the technique for accurately capturing the color change during the endpoint of a titration. It suggests running the first trial quickly to estimate the endpoint and then conducting subsequent trials more carefully. The paragraph provides a method for observing the color change by slowly opening the stopcock and using a wash bottle to rinse the droplet into the reaction flask. It clarifies that adding small amounts of water does not affect the endpoint appearance and defines the Troop endpoint as the first faint color that persists after 15 seconds of stirring. The paragraph concludes with instructions to carefully read and record the ending volume to the nearest hundredth of a milliliter.

Mindmap

Keywords

πŸ’‘Buret

A buret is a piece of laboratory glassware that is used to dispense liquids in a controlled and precise manner. It is typically used in titration experiments to measure volumes of solutions accurately. In the video, the buret is central to the procedure, as it is used to add a solution drop by drop to another solution until a chemical reaction is complete, indicated by a color change.

πŸ’‘Deionized Water

Deionized water is water that has had most or all of its impurities and ions removed, making it highly pure. In the context of the video, deionized water is used to rinse the buret before use to ensure that any residual contaminants do not affect the titration results.

πŸ’‘Titration

Titration is a common laboratory procedure used to find the concentration of an unknown solution by reacting it with a solution of known concentration. The video script describes a titration experiment where sodium hydroxide is used to titrate acetic acid, and the endpoint is indicated by a color change.

πŸ’‘Phenolphthalein

Phenolphthalein is a pH indicator used in titration to signal the endpoint of the reaction. It is colorless in acidic solutions and turns pink in basic solutions. In the video, phenolphthalein is used to indicate when the titration of acetic acid with sodium hydroxide is complete.

πŸ’‘Stopcock

A stopcock is a valve used to control the flow of liquid through the buret. It is crucial in titration for adding the titrant at a controlled rate. The video mentions ensuring the stopcock is closed before adding the titrant and using it to introduce liquid into the bottom of the buret.

πŸ’‘Meniscus

The meniscus is the curved surface of a liquid in a container, resulting from surface tension. In the video, the meniscus is used to read the volume of liquid in the buret, with the script providing instructions on how to estimate its position accurately.

πŸ’‘Reading Card

A reading card is a tool used to improve the accuracy of readings in a buret by providing a contrasting background against the meniscus. The script describes using a reading card to get a clear outline of the meniscus against a white background, which helps in reading the volume more accurately.

πŸ’‘Endpoint

The endpoint of a titration is the point at which the reaction between the two solutions is complete. The video script explains that the endpoint is signaled by a color change that persists for 15 seconds after stirring, indicating that no more titrant is needed.

πŸ’‘Titration Flask

A titration flask is a container used to hold the solution being titrated. In the video, the titration flask is placed under the buret to ensure that the titrant is added directly to the solution being tested, minimizing the chance of losing any drops.

πŸ’‘Waste Beaker

A waste beaker is used to collect waste liquid, such as rinse water from the buret. The script mentions pouring rinse water from the buret into a waste beaker to prevent contamination of the titration solution.

πŸ’‘Dust Cap

A dust cap is a protective cover used to keep the opening of the buret clean from dust and other contaminants. The video script suggests adding a dust cap after the initial filling of the buret to prevent any foreign particles from entering and affecting the titration.

Highlights

Ensure that the buret is clean before starting the titration experiment.

Rinse the buret with deionized water to ensure even flow.

Clean the buret with detergent and water if water droplets hold on the glass.

Use long-handled brushes to clean the inside of the buret.

Rinse the buret thoroughly with tap water followed by deionized water.

Pour deionized water into the buret using a beaker instead of holding it under the faucet.

Securely attach and lock the buret into place with a clamp.

Use sodium hydroxide to titrate acetic acid with phenolphthalein as the color indicator.

Ensure the stopcock is closed before pouring the titrant solution into the buret.

Rinse the buret with the titrant solution multiple times before starting the titration.

Pour the liquid out into a waste beaker to prepare for titration.

Refill the buret for titration and coax any bubbles out of the tip.

Position a beaker to catch waste solution below the buret tip.

Estimate the meniscus position on the graduated scale for accurate readings.

Use a reading card to help determine the meniscus position.

Ensure consistent positioning of the reading card and eyes for accurate readings.

Estimate the meniscus position to the nearest hundredth of a milliliter.

Record the initial reading of each titration for consistency.

Transfer the sample to the titration flask carefully to avoid losing drops.

Run multiple trials with the same sample for consistent results.

Use a technique to capture the color change within a fraction of a drop at the endpoint.

The endpoint is the first faint color that remains after 15 seconds of stirring.

Record the ending volume to the nearest hundredth of a milliliter in the laboratory notebook.

Transcripts

play00:00

this video will cover the proper use of

play00:02

a buret look elsewhere for specific

play00:05

information about the chemistry of your

play00:08

particular type of titration experiment

play00:10

before you begin ensure that your buret

play00:13

is clean rinse the inside with some

play00:15

deionized water the water should sheep

play00:18

down the side of the glass evenly if the

play00:20

glass holds droplets of water as shown

play00:22

here then clean the buret with detergent

play00:25

and water use the long handled brushes

play00:28

that extend the full length of the

play00:29

Barrette put some detergent and water on

play00:32

the brush and scrub the inside

play00:35

rinse the buret thoroughly first with

play00:38

tap water and then with deionized water

play00:40

use a beaker to pour into the top of the

play00:43

buret rather than trying to hold the

play00:45

opening of the buret under the faucet

play00:48

attach a buret clamp firmly to the stand

play00:51

and lock the buret into place

play00:55

in this demonstration we will be using

play00:57

sodium hydroxide to titrate a solution

play00:59

of acetic acid using phenolphthalein as

play01:02

a color indicator of the endpoint of the

play01:05

titration

play01:14

be sure that the stopcock is closed and

play01:17

then pour the titrant solution slowly

play01:19

into the open end

play01:22

rinse the buret with five to ten

play01:25

milliliter portions

play01:27

two or three more times

play01:30

rotate the buret slowly as you pour the

play01:34

liquid out into a waste beaker

play01:39

now refill the briaret for the titration

play01:42

place a beaker for catching waste

play01:44

solution below the buret tip use several

play01:46

quick twists of the stopcock valve to

play01:49

introduce liquid into the bottom of the

play01:51

bread and coax any bubbles out of the

play01:53

tip

play01:56

if necessary bring the liquid level back

play01:58

near the top you don't have to start

play02:00

exactly at the zero Mark the meniscus

play02:03

must however begin somewhere below the

play02:05

line associated with zero if you've used

play02:08

a funnel to pour into the buret then

play02:10

remove it now so it does not drip into

play02:12

the buret after you've started your

play02:14

titration that would lead to an error

play02:17

you may also want to add a dust cap

play02:21

estimate where the bottom of the

play02:23

meniscus is on the graduated scale you

play02:26

may find it helpful to use a reading

play02:28

card a reading card is merely a colored

play02:30

rectangle on a white background by

play02:33

bringing the rectangle up just below the

play02:34

meniscus colored light is reflected off

play02:36

the curved surface to give a distinct

play02:38

outline against the white background if

play02:41

you use this method be careful about

play02:42

keeping the rectangle at a consistent

play02:45

distance from the bottom of the meniscus

play02:47

each time you read the meniscus may

play02:49

appear to move as the rectangle moves

play02:51

equally important is positioning your

play02:53

eyes so that it is it's in the same

play02:56

plane as the tangent drawn to the bottom

play02:59

of the meniscus here the position of the

play03:01

meniscus is between the zero and the one

play03:03

milliliter Mark the shorter lines that

play03:06

do not go all the way around the buret

play03:07

are associated with intervals of 0.1

play03:10

milliliter

play03:12

in this case the meniscus appears to be

play03:14

between the seventh and the eighth marks

play03:17

so its position is at least 0.7

play03:20

milliliters we can estimate the fraction

play03:23

of the gap between the nearest lines

play03:25

spanned by the bottom of the meniscus

play03:28

here it appears to be a little bit less

play03:30

than halfway perhaps 40 percent of the

play03:33

interval in that case we estimate this

play03:35

position of this meniscus at the start

play03:37

of this titration to be about

play03:40

0.74 milliliters

play03:42

this last digit is a guess but with a

play03:45

little practice you can learn to be very

play03:46

consistent and obtain reproducible and

play03:48

accurate data to the nearest hundredth

play03:50

of a milliliter

play03:52

that should be your goal in your work

play03:54

today be sure to record your initial

play03:56

reading in each of your titrations

play03:59

we're ready now to transfer the sample

play04:02

to our titration flask in this

play04:04

demonstration we are using acetic acid

play04:07

as a sample

play04:16

we count the number of drops of

play04:18

indicator that are added so that our

play04:19

results will be as consistent as

play04:21

possible from run to run we place the

play04:24

titration flask under the buret point so

play04:27

that the buret is slightly below the rim

play04:30

of the flask this minimizes the chance

play04:32

for losing an errant drop

play04:35

we begin adding titrant if we have a

play04:37

good idea roughly where the end of the

play04:39

titration will occur then we can save

play04:41

some time by running the titrant into

play04:43

the flask to within a milliliter of two

play04:45

of the expected endpoint it is common

play04:48

practice to run multiple trials with

play04:49

portions of the same sample so it is

play04:52

good strategy to run one trial very

play04:54

quickly really to find out where the

play04:55

approximate endpoint is

play04:57

the next few trials can be done

play04:59

carefully from a point very close to the

play05:01

end

play05:02

the first trial does not need to be

play05:04

averaged with the more carefully

play05:05

obtained data close to the endpoint the

play05:08

color disperses more gradually

play05:10

here is a technique for capturing the

play05:12

color change to within a fraction of a

play05:14

drop of the end point open the stopcock

play05:16

very slowly only part way allow a

play05:18

droplet to grow about half its full size

play05:21

then use the wash bottle to rinse the

play05:23

drop down into the reaction flask

play05:26

adding small amounts of water does not

play05:28

change the appearance of the end point

play05:32

The Troop endpoint is in this case the

play05:35

first faint color that remains after 15

play05:38

seconds of stirring

play05:47

finally carefully read the ending volume

play05:50

and record it to the nearest hundredth

play05:52

of a milliliter in your laboratory

play05:54

notebook

Rate This
β˜…
β˜…
β˜…
β˜…
β˜…

5.0 / 5 (0 votes)

Related Tags
Chemistry LabTitration GuideBuret CleaningAcetic AcidSodium HydroxideIndicator UseLab TechniqueColor EndpointDeionized WaterLab SafetyTitrant Transfer