Cara Membuat Database dan Tabel MySQL pada phpMyAdmin

Ladang Tutorial
13 Aug 202008:41

Summary

TLDRThis tutorial video guides viewers on creating a database and tables in MySQL using PHPMyAdmin. It demonstrates starting Apache and MySQL services, creating a database named 'koperasi', and then adding a table called 'anggota' with columns for ID, name, gender, registration date, and address. The video explains setting up auto-increment for the ID column and entering data into the table. It also covers editing and deleting data, and concludes with an invitation for viewers to subscribe, comment, and share for more informative content.

Takeaways

  • ๐Ÿ˜€ The tutorial is about creating a database and table in MySQL using PHPMyAdmin.
  • ๐Ÿ”ง In previous tutorials, databases and tables were created using MySQL command line queries.
  • ๐Ÿ’ป The first step is to start Apache and MySQL services and then access PHPMyAdmin.
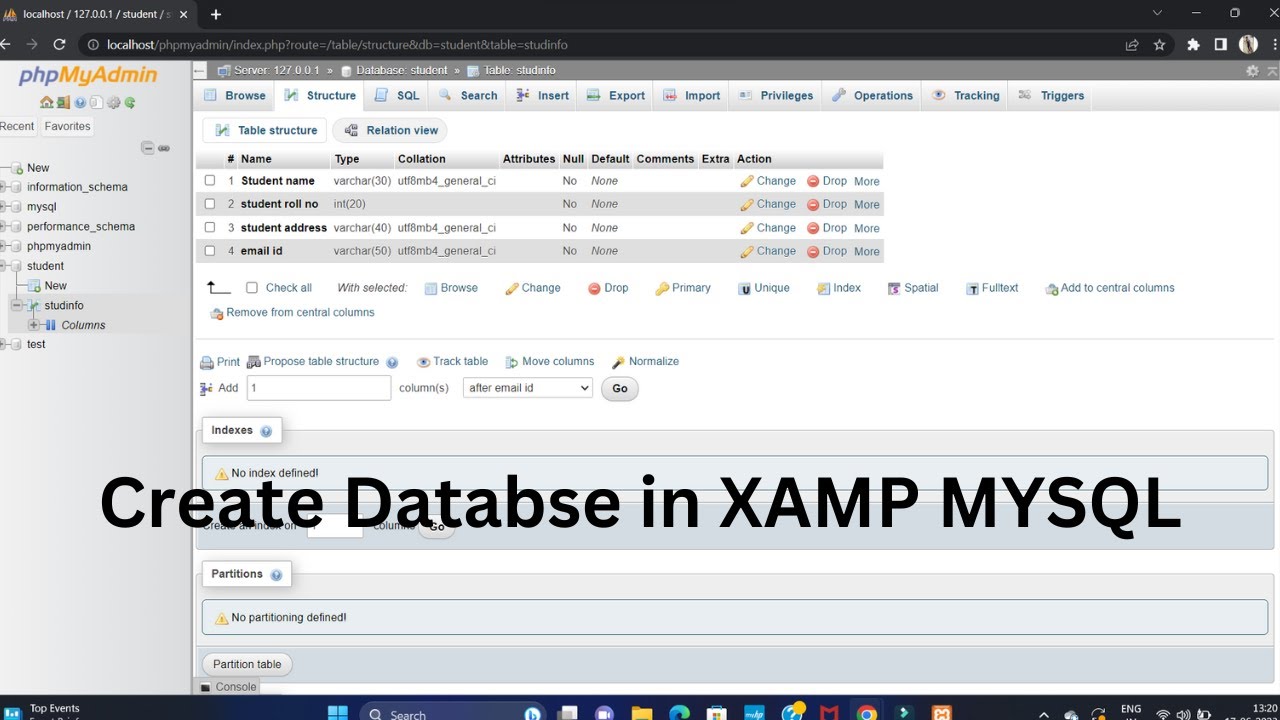
  • ๐Ÿ“ To create a database, click on 'Databases' and enter a name, such as 'koperasi'.
  • ๐Ÿ“‹ After creating the database, it will appear on the sidebar, and then you can create a table named 'anggota'.
  • ๐Ÿ”ข Define the number of columns for the table and click 'Go' to create the table in the 'koperasi' database.
  • ๐Ÿ—‚๏ธ Set up the columns with appropriate data types and properties, such as 'ID anggota' as an auto-incrementing integer.
  • ๐Ÿ”„ Demonstrates how to insert data into the 'anggota' table, including handling auto-incremented IDs.
  • โœ๏ธ Shows how to edit existing data in the table through PHPMyAdmin by clicking 'Edit'.
  • ๐Ÿ—‘๏ธ Explains the process of deleting data from the table using the 'Delete' option and a delete query.
  • ๐Ÿ”” Encourages viewers to subscribe, like, comment, and share the video for more informative content.

Q & A

  • What is the main topic of the tutorial video?

    -The main topic of the tutorial video is how to create a database and tables in MySQL using PHPMyAdmin.

  • What was covered in the previous tutorial mentioned in the script?

    -In the previous tutorial, the focus was on creating a database and tables in MySQL using command line queries (CMD).

  • What is the first step to create a database in PHPMyAdmin as per the script?

    -The first step to create a database in PHPMyAdmin is to start Apache and MySQL services and then click on 'databases' in the MySQL section.

  • How is the database name entered in PHPMyAdmin according to the script?

    -The database name is entered by clicking on 'databases' and then typing the desired name, such as 'koperasi', into the provided field.

  • What is the purpose of the 'autoincrement' feature when creating a table in MySQL?

    -The 'autoincrement' feature in MySQL is used to automatically assign a unique ID to each new record in the table based on the order of insertion.

  • What data types are suggested for the 'nama_anggota' and 'jenis_kelamin' columns in the script?

    -The 'nama_anggota' column is suggested to use the 'VARCHAR' data type, and the 'jenis_kelamin' column is recommended to use the 'ENUM' data type with values 'laki-laki' and 'perempuan'.

  • How can one insert data into the 'anggota' table as described in the script?

    -To insert data into the 'anggota' table, one should click 'add new', fill in the fields with the appropriate data such as 'nama_anggota', 'jenis_kelamin', 'tanggal_daftar', and 'alamat', and then click 'Go' to submit the data.

  • What happens to the 'ID_anggota' field when new data is inserted into the 'anggota' table?

    -The 'ID_anggota' field is set to auto-increment, so it will automatically assign the next number in sequence when new data is inserted.

  • How can one edit an existing record in the 'anggota' table using PHPMyAdmin?

    -To edit an existing record in the 'anggota' table, one should click 'edit' next to the record, make the desired changes, and then click 'Go' to update the record.

  • What is the process to delete a record from the 'anggota' table as per the script?

    -To delete a record from the 'anggota' table, one should click 'delete', and then confirm the deletion in the query prompt that appears, which is a 'DELETE FROM anggota WHERE anggota_id = X' statement.

  • What is the final step the script suggests to ensure ongoing updates from the channel?

    -The final step suggested in the script is to subscribe to the channel, activate the bell notification, and keep an eye on the latest updates.

Outlines

00:00

๐Ÿ’ป Introduction to Creating a Database and Table in MySQL with PHPMyAdmin

This paragraph introduces a tutorial on how to create a database and table in MySQL using PHPMyAdmin. The tutorial is a follow-up to a previous one where databases and tables were created using MySQL command line queries. The host encourages viewers to start their Apache and MySQL services and then navigate to PHPMyAdmin. The initial view of PHPMyAdmin is described, and viewers are guided through the process of creating a new database named 'koperasi'. Subsequently, they are instructed to create a table named 'anggota', specifying the number of columns and filling in the column names and data types, including setting up an auto-increment feature for the ID column. The tutorial also covers adding data to the 'anggota' table and the different data types used, such as integer, varchar, and enum for gender.

05:01

๐Ÿ“ Adding, Editing, and Deleting Data in MySQL Table Using PHPMyAdmin

The second paragraph continues the tutorial by demonstrating how to add data to the 'anggota' table. The host shows how to input data for new members, including their names, gender, registration date, and address. It explains the auto-increment feature, which automatically assigns member IDs. The paragraph also covers how to edit existing data, such as changing a member's name, andๆ‰น้‡็ผ–่พ‘ๆ•ฐๆฎ. The process of deleting data from the table is also explained, including the SQL query that is generated when a delete operation is performed. The host concludes the tutorial by inviting viewers to comment, share, and subscribe for more updates, and offers assistance for any queries or difficulties through comments or direct messages on Instagram.

Mindmap

Keywords

๐Ÿ’กMySQL

MySQL is an open-source relational database management system (RDBMS) based on SQL. It is widely used for developing and managing databases in web applications. In the video, MySQL is the primary database system being discussed, where the tutorial focuses on creating databases and tables using PHPMyAdmin, a web-based tool for managing MySQL databases.

๐Ÿ’กPHPMyAdmin

PHPMyAdmin is a web-based tool written in PHP, intended to handle the administration of MySQL over the web. It allows users to manage databases, create and edit tables, and perform other administrative tasks. In the video, PHPMyAdmin is used to demonstrate how to create a database and tables within MySQL, highlighting its user-friendly interface for database management.

๐Ÿ’กDatabase

A database is an organized collection of data, typically stored and accessed electronically using a computer system. In the context of the video, creating a database in MySQL is the first step in setting up a data management system, where the script mentions creating a 'koperasi' database as an example.

๐Ÿ’กTable

A table in a database is a collection of related data held in a structured format. It consists of rows (records) and columns (fields). The video script describes the process of creating a 'members' table within the 'koperasi' database, illustrating the fundamental concept of organizing data in a relational database.

๐Ÿ’กColumn

In the context of databases, a column represents a set of data values of a specific data type. Each column has a name and a data type. The script mentions creating columns such as 'ID member', 'name member', 'gender', 'registration date', and 'address', which are part of the 'members' table structure.

๐Ÿ’กAutoincrement

Autoincrement is a property of a column in a database table that automatically increments the value of the column with each new record. This is used for primary keys to ensure unique identifiers for each row. The video explains enabling autoincrement for the 'ID member' column to automatically assign unique IDs to new members.

๐Ÿ’กData Type

Data types define the type of data that can be stored in a database column. They determine the valid data that can be entered into a column. The script discusses various data types such as 'integer', 'varchar', 'numeric', and 'text', which are used to define the columns in the 'members' table.

๐Ÿ’กPrimary Key

A primary key is a unique identifier for each record in a database table. It is a column or a set of columns that provide a unique row identifier. In the video, 'ID member' is set as the primary key for the 'members' table, ensuring that each member can be uniquely identified.

๐Ÿ’กInsert Data

Inserting data refers to the process of adding new records into a database table. The video demonstrates how to insert data into the 'members' table, showing the step-by-step process of filling in the details for new members.

๐Ÿ’กEdit Data

Editing data in a database involves modifying existing records. The script explains how to edit data in the 'members' table using PHPMyAdmin, where one can change details such as member names or other attributes.

๐Ÿ’กDelete Data

Deleting data from a database involves removing records. The video script describes the process of deleting data from the 'members' table, where a specific member's record can be removed using a delete query in PHPMyAdmin.

Highlights

Introduction to creating a database and table in MySQL using PHPMyAdmin.

Instructions to start Apache and MySQL services before beginning.

Accessing PHPMyAdmin and the initial interface upon opening.

Step-by-step guide to creating a new database in PHPMyAdmin.

Naming the database and the appearance of the new database in the sidebar.

Process of creating a table within the newly created database.

Entering the number of columns and sending the request to create the table.

Entering column names such as 'ID Anggota' and setting it as an auto-incrementing Primary Key.

Setting up column types and lengths, including 'varchar' for names and 'numeric' for gender.

Using 'ENUM' data type for gender with options 'laki-laki' and 'perempuan'.

Adding date and address columns with appropriate data types.

Saving the table structure and viewing the final table setup.

Demonstration of how to insert data into the 'anggota' table.

Explanation of auto-increment functionality and its effect on data entry.

Editing existing data in the table through PHPMyAdmin.

Updating multiple records at once by selecting all and applying changes.

Deleting data from the table and the SQL query involved in the process.

Encouragement for viewers to like, comment, share, and subscribe for more tutorials.

Invitation for viewers to ask questions or provide feedback in the comments or via direct message.

Closing remarks and anticipation for the next video tutorial.

Transcripts

play00:00

akhir-akhir banget kupu-kupu Halo teman

play00:09

teman selamat datang kembali di channel

play00:11

YouTube ladang tutorial pada tutorial

play00:14

kali ini kita akan membahas tentang

play00:15

bagaimana cara membuat database dan

play00:18

tabel pada Mei SQL dengan menggunakan

play00:21

PHP myadmin di tutorial sebelumnya kita

play00:24

sudah mencoba membuat database dan tabel

play00:27

pada MySQL dengan menggunakan query CMD

play00:30

kali ini kita akan membuat database dan

play00:32

tabel langsung di PHP myadmin nya OK

play00:36

langsung saja langkah pertama

play00:38

teman-teman hidupkan suaminya terlebih

play00:39

dahulu

play00:42

hai hai

play00:44

Hi Ho

play00:46

hai hai

play00:50

Hai setelah suaminya terbuka teman-teman

play00:53

langsung saja start Apache dan MySQL nya

play00:59

Hai setelah Apache dan MySQL nya sudah

play01:02

jalan teman-teman langsung klik saja

play01:04

admin di bagian my SQL

play01:12

Hai nah ini adalah tampilan awal PHP

play01:14

myadmin ketika baru dibuka

play01:17

hai lalu Bagaimana cara membuat

play01:19

databasenya tinggal teman-teman klik

play01:21

saja di basis data ini

play01:26

Hai Setelah itu kita masukkan nama basis

play01:28

datanya atau nama databasenya sini kita

play01:31

masukkan saja misalkan koperasi

play01:36

Hai seperti ini langsung teman-teman

play01:39

kulit saja buat Nah setelah teman-teman

play01:45

berhasil membuat database Maka akan

play01:48

muncul database nya di sebelah sini

play01:52

koperasi Setelah itu kita membuat

play01:55

tabelnya kita kasih nama tabelnya

play01:59

misalkan anggota seperti ini lalu kita

play02:04

isi jumlah kolomnya

play02:06

Hai asalkan jumlah kolomnya

play02:09

Hai seperti ini lalu klik kirim untuk

play02:13

membuat tabel anggota pada database

play02:15

koperasi

play02:21

Hai Nah setelah itu kita masukkan data

play02:23

nama kolomnya misalkan disini saya

play02:27

Hai yang pertama ID anggota kita kasih

play02:32

tipe datanya integer saja Lalu kita

play02:36

aktifkan autoincrement nya ketika

play02:40

autoincrement ini diaktifkan fungsinya

play02:43

adalah memberikan ide anggota secara

play02:47

otomatis berdasarkan urutan nanti kita

play02:50

akan praktekkan Bagaimana fungsi dari

play02:53

autoincrement ini ketika sedang

play02:55

memasukkan data pada tabel anggota

play02:59

Hai Setelah itu kita kasih nama anggota

play03:03

tipe datanya kita kasih saja varchar

play03:06

misalkan lalu panjangnya atau nilainya

play03:11

halo halo di sini kita kasih saja

play03:15

jengkel atau jenis kelamin jenis kelamin

play03:19

kita menggunakan tipe data numeric

play03:23

hai ketika teman-teman menggunakan tipe

play03:25

data enumerasi kita isi saja di sini

play03:29

Hai pagi

play03:34

halo halo di sini perempuan

play03:37

halo halo klik kirim nanti akan otomatis

play03:41

seperti ini pete laki-laki petik koma

play03:45

detik perempuan

play03:50

Hai Setelah itu kita kasih

play03:54

ini tanggal daftar misalkan tipe datanya

play03:59

Dead

play04:00

hai lalu yang terakhir alamat tak kasih

play04:04

tipe data

play04:06

a text

play04:08

Hai setelah teman-teman mengisi nama

play04:12

kolomnya tinggal teman-teman klik saja

play04:14

simpan

play04:15

hai hai

play04:21

Hai nah ini adalah tampilan dari tabel

play04:24

anggota dan isinya ide anggota sebagai

play04:28

Primary Key autoincrement

play04:29

[Musik]

play04:31

hai lalu nama anggota jenis kelamin

play04:34

tanggal daftar dan alamat

play04:39

the lounge

play04:41

Hai Nah setelah tabelnya terbuat

play04:43

selanjutnya kita akan coba memasukkan

play04:47

data pada tabel anggota

play04:51

Hai Nah untuk memasukkan datanya tinggal

play04:53

teman-teman klik saja tambahkan ini

play04:56

hai hai

play04:58

Hai Asalkan kita isi nama anggotanya

play05:01

Arsya jenis kelaminnya laki-laki

play05:04

tanggalnya daftar

play05:07

Hai selcany Jawa Tengah

play05:11

Hai seperti ini

play05:14

hai lalu yang kedua misalkan Avin

play05:19

Hai perempuan ini kita isi misalkan

play05:25

Hai Jawa Timur

play05:27

Hai Nah ide anggota ini dikosongkan

play05:30

tidak papa ya teman-teman karena tadi

play05:33

kita sudah setting auto increment jadi

play05:35

ketika kita memasukkan dua data ini maka

play05:38

akan otomatis Arca ini ide anggotanya

play05:41

satu dana Vinka ide anggotanya dua

play05:44

langsung kita klik saja Kirim ke

play05:48

hai hai

play05:50

Ayo kita ceklik jelajahi untuk melihat

play05:53

datanya Nah ini ya teman-teman datanya

play05:57

ide anggotanya akan otomatis menjadi

play06:00

satu lalu bawahnya menjadi dua misalkan

play06:03

kita Tambah data lagi maka ide

play06:05

anggotanya akan otomatis menjadi angka 3

play06:07

dan seterusnya selanjutnya Lalu

play06:11

bagaimana cara mengedit data yang sudah

play06:14

ditambahkan melalui phpmyadmin tinggal

play06:17

teman-teman klik saja ubah ini

play06:20

hai hai

play06:21

the lounge

play06:23

Hai kalau misalkan di sini namanya

play06:26

berubah menjadi pemimpin katria langsung

play06:30

klik saja Kirim ke

play06:33

Hai nah disini akan otomatis namanya

play06:36

berubah menjadi Alvin katreeya Lalu

play06:38

bagaimana ketika ingin mengubah datanya

play06:41

dalam skala banyak tinggal teman-teman

play06:43

klik saja Pilih semua ini

play06:47

hai lalu teman-teman klik ubah nanti

play06:51

semua data terceklis dan kita dapat

play06:54

mengubahnya jalan ini kita kasih nama

play06:56

harusnya Yoga tak kembalikan saja Alvin

play07:01

k langsung kita kirim lagi nah data dari

play07:07

nama anggotanya berubah menjadi Arca

play07:09

Yoga dan Maafin Kakak Lalu bagaimana

play07:12

cara menghapus data yang sudah

play07:15

ditambahkan tinggal teman-teman klik

play07:18

saja hapus ini

play07:21

Hai nah ketika teman-teman akan

play07:23

menghapus datanya akan muncul query

play07:25

delete from anggota where anggota id2

play07:29

ini adalah query menghapus data yang ide

play07:33

anggotanya

play07:35

Hai langsung kita klik saja OK

play07:39

Hai nah dataaaa Vinka sudah terhapus

play07:43

hai oke teman-teman sekian dulu video

play07:46

tutorial cara membuat database dan

play07:48

membuat tabel serta memasukkan data pada

play07:51

MySQL di phpmyadmin dari saya semoga

play07:56

video ini bermanfaat apabila teman-teman

play07:59

suka dengan video ini silahkan klik

play08:01

komen dan share serta bagi teman-teman

play08:03

yang belum subscribe silahkan klik

play08:05

subscribe dan jangan lupa juga aktifkan

play08:07

loncengnya di fikasinya agar teman-teman

play08:10

dapat selalu update informasi terbaru

play08:12

yang ada di channel ini Apabila

play08:15

teman-teman masih bingung atau belum

play08:17

berhasil atau Ada yang ingin ditanyakan

play08:19

Silahkan tulis saja di kolom komentar

play08:21

atau DM saja Instagram at ladang

play08:24

tutorial Terima kasih sudah menyaksikan

play08:26

sampai jumpa di video video selanjutnya

play08:30

[Musik]

Rate This
โ˜…
โ˜…
โ˜…
โ˜…
โ˜…

5.0 / 5 (0 votes)

Related Tags
MySQLphpMyAdminDatabaseWeb DevelopmentTutorialSQLProgrammingBeginnerPHPTech Tips