Modeling Your First 3D Object: Creating a Low Poly Tree

MCL
18 Aug 202413:45

Summary

TLDRThis tutorial guides viewers through creating a low-poly tree model in a 3D software. It covers the basics of object creation, using a cylinder for the trunk, extruding and scaling to form branches, and adding leaves with an Icosphere. The instructor also demonstrates how to apply materials and colors to different parts of the tree, enhancing its visual appeal. The video concludes with an invitation for viewers to practice the techniques taught.

Takeaways

  • πŸ“ The tutorial focuses on creating a low-poly tree in a 3D modeling software.
  • πŸ—‘οΈ It begins by deleting existing objects and resetting the cursor to the center for a fresh start.
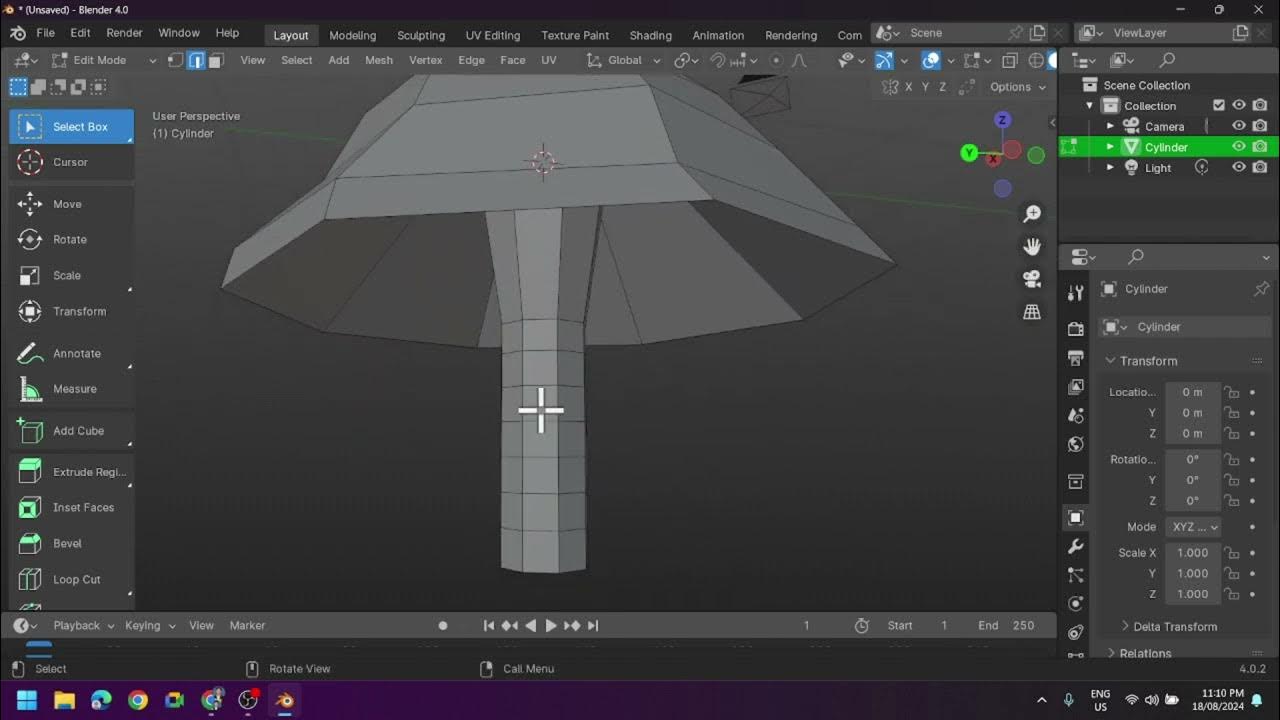
  • 🌳 The trunk of the tree is modeled using a cylinder, which is then adjusted for a low-poly look by reducing vertices.
  • βœ‚οΈ The 'Loop Cut and Slide' tool is utilized to create branches by making horizontal cuts on the elongated top of the cylinder.
  • πŸ“ The branches are extruded and scaled to achieve the desired shape and size.
  • 🎨 The tutorial introduces the concept of adding materials and colors to different parts of the tree, such as leaves and the trunk.
  • πŸ‚ Leaves are created using an Icosphere object, scaled and positioned to represent the tree's foliage.
  • πŸ–ŒοΈ The 'Shading' menu is used to apply different materials and colors to various parts of the tree for a realistic appearance.
  • πŸ”„ The process involves duplicating objects and adjusting their scale to create multiple branches and leaves.
  • πŸ”§ The properties of the materials, such as roughness, are adjusted to give a more natural and less shiny look to the tree's trunk.
  • πŸ‘¨β€πŸ« The tutorial concludes with an invitation for viewers to practice what they've learned and a promise of a continuation in the next tutorial.

Q & A

  • What is the main goal of the tutorial?

    -The main goal of the tutorial is to create a low-poly tree model and apply color to it.

  • What are the initial steps taken to start creating the low-poly tree?

    -The initial steps include deleting the current object, selecting all, and then adding a new object, specifically a cylinder to be used as the tree trunk.

  • Why is it important to adjust the number of vertices when creating a low-poly model?

    -Adjusting the number of vertices is important to maintain the low-poly aesthetic, which involves fewer details and a simpler polygon structure.

  • How is the cylinder used to form the trunk of the tree?

    -The cylinder is elongated and scaled to form the trunk by using the move and scale tools in the 3D modeling software.

  • What is the purpose of using the Loop Cut and Slide tool in this tutorial?

    -The Loop Cut and Slide tool is used to create additional areas on the cylinder where branches will be added to the tree.

  • How many loop cuts are suggested to add for the branches?

    -The tutorial suggests adding around 11 to 13 loop cuts for the branches.

  • What is the next step after creating the trunk and branches?

    -The next step is to add leaves to the tree by introducing shading and materials to give the tree a more realistic appearance.

  • How are the leaves added to the tree in the tutorial?

    -The leaves are added by creating a sphere object, scaling it, and positioning it at the top of the tree trunk to represent the foliage.

  • What is the significance of the shading and materials section in the tutorial?

    -The shading and materials section is crucial for applying color and texture to different parts of the tree, such as the leaves and the trunk, to enhance the visual appeal.

  • How does the tutorial suggest applying color to the tree model?

    -The tutorial suggests using the material slots in the shading section to apply different colors to the leaves, small leaves, and the trunk of the tree.

  • What is the final step mentioned in the tutorial?

    -The final step is to give the participants time to apply what they've learned and practice creating their own low-poly trees.

Outlines

00:00

🌳 Creating a Low Poly Tree Trunk

The first paragraph of the tutorial focuses on initiating the creation of a low poly tree. It begins by instructing the user to delete the current object and select all using the 'A' key, then delete again to clear the workspace. The user is then guided to add a new object, specifically a cylinder, which will serve as the tree trunk. The tutorial emphasizes the importance of adjusting the properties of the cylinder to decrease the number of vertices for a low poly effect. The user is instructed to enter edit mode, select the top face of the cylinder, and use the move and scale tools to elongate and shape the trunk accordingly. The paragraph concludes with the introduction of a loop cut to prepare for adding branches.

05:01

🌿 Adding and Shaping Tree Branches

In the second paragraph, the tutorial continues with the process of creating tree branches. The user is directed to exit the loop cut mode and switch to the front view of the object. The tutorial then explains how to select a portion of the cylinder and use the extrude tool to create branches. The branches are shaped by scaling and moving them to achieve a realistic appearance. The paragraph also covers the process of duplicating and resizing branches to add more detail to the tree. The focus is on creating a simple yet effective low poly representation of a tree with branches.

10:03

🎨 Applying Colors and Materials to the Tree

The final paragraph of the tutorial shifts the focus to applying colors and materials to the low poly tree. The user is introduced to the shading section in the software's menu, where materials can be added and customized. The tutorial demonstrates how to add new material slots for different parts of the tree, such as the leaves and the trunk. It guides the user through selecting appropriate colors and adjusting the roughness to achieve a non-shiny appearance for the tree's bark. The tutorial concludes by thanking the viewer for watching and encouraging them to practice the techniques learned in the tutorial.

Mindmap

Keywords

πŸ’‘Extrude

Extrude is a modeling technique used in 3D graphics software to create a new surface by extending a selected face or edge along a certain direction. In the context of the video, extrude is used to elongate the tree trunk and create branches, giving the model depth and form.

πŸ’‘Inset

Inset refers to the process of creating a recess or indentation in a 3D model. It is used to add detail and depth to the model by pushing faces inward. In the video, inset might be implied during the editing of the tree trunk to create a more complex shape.

πŸ’‘Bevel

Bevel is a technique that rounds off the sharp edges of a 3D model, creating a smooth transition between faces. Although not explicitly mentioned in the script, beveling could be part of the process to refine the tree's branches and trunk for a more natural look.

πŸ’‘Loop Cut

Loop Cut is a tool used to add edge loops to a 3D model, which helps in creating more detailed geometry. In the script, Loop Cut is utilized to create multiple cuts on the tree trunk to facilitate the addition of branches.

πŸ’‘Low Poly

Low Poly is a 3D modeling style characterized by a minimal number of polygons, creating a geometric and stylized appearance. The video's main theme revolves around creating a low-poly tree, which is evident from the script's focus on reducing vertices for a simplified model.

πŸ’‘Cylinder

A cylinder is a 3D shape with straight parallel sides and a circular or oval cross-section. In the script, a cylinder is chosen as the base for the tree trunk, demonstrating the use of basic shapes to start more complex models.

πŸ’‘Vertices

Vertices are the points where the edges of a 3D model meet. The script mentions decreasing the number of vertices to achieve a low-poly look, which is a key aspect of the low-poly design philosophy.

πŸ’‘Edit Mode

Edit Mode is a state in 3D modeling software where users can manipulate the individual components of a model, such as vertices, edges, and faces. The script frequently refers to going into Edit Mode to select and modify parts of the tree model.

πŸ’‘Scale

Scale in 3D modeling refers to resizing a model or part of a model. The script describes scaling the top face of the cylinder to create the tree trunk and scaling branches and leaves to fit the tree's proportions.

πŸ’‘Material

Material in 3D modeling defines the surface properties of an object, such as color, texture, and reflectivity. The script discusses applying materials to different parts of the tree, like the leaves and trunk, to give them a realistic appearance.

πŸ’‘Shading

Shading is the process of giving depth and dimension to a 3D model through the simulation of light and shadow. The script mentions shading in the context of applying colors and adjusting material properties to enhance the visual appeal of the low-poly tree.

Highlights

Introduction of extrude, inset, bevel, and loop cut tools in the last tutorial.

Objective to create a low-poly tree with color in this tutorial.

Instructions on deleting objects and selecting all using 'A' key.

Switching to Object Mode and resetting the cursor to the center.

Adding a cylinder object to serve as the tree trunk.

Explanation of the properties tab and adjusting vertex count for a low-poly look.

Entering Edit Mode to select and manipulate the cylinder's faces.

Using the Move Tool to elongate the base of the cylinder.

Scaling the selected faces to shape the top of the tree trunk.

Challenge of adding branches without extruding due to the cylinder's shape.

Utilization of Loop Cut and Slide for creating branch areas.

Adding multiple cuts horizontally for branch formation.

Extruding and scaling to create branch shapes.

Adding leaves to the tree using an Icosphere object.

Scaling and positioning the Icosphere to represent leaves.

Duplicating and adjusting the scale of leaves for variation.

Introduction to the Shading menu for applying colors to the tree.

Adding material slots for different parts of the tree.

Applying colors and adjusting roughness for a realistic trunk appearance.

Completion of the low-poly tree with color, inviting viewers to practice.

Closing remarks and anticipation for the next tutorial.

Transcripts

play00:00

so in the last uh tutorial uh I

play00:03

introduced uh extrude inset bevel and

play00:07

loop cut so let's now try to create a uh

play00:12

low po tree so let's uh create a low

play00:17

poly tree and uh we will uh put also uh

play00:23

a color no to our uh low poitry so let's

play00:29

now uh Delete this one Let's uh select

play00:32

all this by clicking a and then delete

play00:36

and then delete so in our object mode

play00:40

Let's go back to our object mode Let's

play00:43

Also let's also select or go back in the

play00:48

middle of our cursor you can see here so

play00:52

and then let's now add a object an

play00:57

object so our goal here is to create a

play01:00

three so let us uh add an object inside

play01:06

this uh add and then mesh you will

play01:09

notice here

play01:10

the

play01:12

uh uh a

play01:14

cylinder we can use a cylinder as our

play01:17

trunk of the tree

play01:21

so uh as you notice upon adding this uh

play01:25

cylinder you will have this properties

play01:28

so it is important to know that uh after

play01:33

adding an object you will have this

play01:36

property so you need to change uh it if

play01:42

you wish to uh decrease or increase the

play01:47

number of the

play01:49

vertices so since this is a low poly we

play01:52

can decrease this uh

play01:56

vertices uh let's uh make it uh a

play02:01

and then let's spit

play02:03

enter so now this is uh this will be

play02:08

our uh trunk so let's now go to uh edit

play02:14

mode to uh

play02:18

select

play02:20

uh to select the face of our

play02:26

um

play02:28

cylinder to base of our cylinder so

play02:32

let's go to edit mode Let's Go edit mode

play02:37

and then using this uh let's go to

play02:41

select box first and then select the

play02:45

select phas and then select this top

play02:48

face of our cylinder our goal here is to

play02:52

our goal here is to

play02:57

uh expand or

play03:00

our goal here is to uh elongate this uh

play03:05

object so let's uh use this move tool

play03:08

and then you can simply drag it okay as

play03:12

you can see here and uh let's also

play03:17

change the scale of this top um uh view

play03:22

the selected faces so let's go to scale

play03:26

and I we want to uh scale this equally

play03:30

so let's uh use the uh Circle okay let's

play03:35

hold this and then let's

play03:39

change okay so this will be

play03:43

our uh trunk now let's add a

play03:47

branches uh but if you notice uh we have

play03:51

a problem here we it canot uh use the

play03:55

extrude to have another uh area here

play04:00

uh to uh to be our branches

play04:04

so uh to do that let's use Loop cut so

play04:09

if you remember we can cut uh our object

play04:14

no so Loop and slide so let's click this

play04:18

Loop cut and if you notice you can uh uh

play04:24

cut this uh in the middle or uh

play04:28

vertically no so you can this is our uh

play04:33

our goal here is to have a multiple cut

play04:37

here so a horizontal cut so click this

play04:41

and then you will notice that uh upon

play04:44

clicking this you will have this Loop

play04:46

cut and slide properties so let's add uh

play04:51

maybe um 13

play04:54

or uh 12 or 11 maybe so let's uh uh it's

play05:01

okay uh it's enough number okay so let's

play05:04

now select or go back to select to avoid

play05:09

uh you remember if you remember

play05:12

uh we are here in the loop cut so as you

play05:16

can see if I hover my mouse or cursor in

play05:20

this object you will notice that

play05:24

uh we can uh we are under this Loop cut

play05:29

so let's go back to select to avoid that

play05:33

now we have this um so we are now here

play05:37

in the uh front view of our object by

play05:40

clicking the y

play05:43

axis okay and uh our goal here is to

play05:47

select this portion so under the edit

play05:50

mode you can select this face and then

play05:54

let's uh Zoom okay so let's uh select

play05:57

this uh two

play06:00

uh phases by holding the shift key so

play06:04

that we can select this and then uh

play06:07

under our uh tools uh let's uh select

play06:12

extrude as you can see here we have now

play06:16

this uh plus sign it are ready to

play06:20

extrude our object so let's uh change

play06:24

the view and let's uh drag this and let

play06:29

as you can see we have this

play06:31

simple uh uh object like branches so our

play06:38

goal here now is to uh scale this let's

play06:42

scale this let's uh make it pointy and

play06:47

then let's move

play06:49

also

play06:52

um like this one okay and you can also

play06:57

add another or can extrude again using

play07:01

this one and again scale to scale this

play07:07

uh equally using this

play07:10

uh

play07:12

um using that uh Circle and then let's

play07:17

uh move

play07:18

again

play07:20

us okay so as you can see we have now

play07:25

this uh trunk with a uh

play07:30

branches okay the next thing that uh we

play07:35

need to do is uh to put here in our

play07:40

object a Lea or yeah the leaf of our

play07:46

tree so uh let's go to the top view to

play07:50

see the top view of

play07:52

our uh object Let's uh change the view

play07:57

by dragging using this one

play08:00

dragging this and using the cursor I

play08:03

will now put here the cursor on the top

play08:06

of our object so if you go again to the

play08:12

uh um front view you will notice that

play08:16

the cursor is under or on the top of our

play08:20

object so don't forget to select the

play08:23

select box or selection tool so now we

play08:26

can now add a object but before that

play08:30

let's uh go back to our object mode no

play08:35

and then add an object so under add and

play08:40

then let's um add uh iOS spere no as our

play08:46

three Libs so as you can see it's uh

play08:50

very small you can scale it right away

play08:53

uh equally using

play08:55

this

play08:58

uh using the uh

play09:01

Circle so you can scale it like this one

play09:05

and then let's

play09:07

move so that it will

play09:10

put here like this one okay so now uh

play09:15

let's also uh select this object and uh

play09:21

duplicate this so you can uh duplicate

play09:25

this uh right click and you can see

play09:28

duplicate

play09:30

object and then as you can see we have

play09:33

the duplicate of our object and let's uh

play09:39

scale it

play09:41

no smaller one okay and then let's uh

play09:46

move our object let's use

play09:49

this okay this

play09:52

one to move our object

play10:03

okay so that's it that's our uh low poly

play10:09

uh

play10:11

three so now to give uh some color uh to

play10:16

this uh I will uh introduce

play10:19

the um shading so on the top of

play10:24

our um menu we have this shading so

play10:28

let's go to this a

play10:30

shading so let's click the shading and

play10:35

as you can see here on this

play10:42

uh

play10:43

okay so as you can see here now in the

play10:47

under the shading we can have the uh

play10:51

material uh section so by default you

play10:55

have this material okay we can also have

play10:59

have a slot here so you can add a slot

play11:02

by clicking this plus sign and you can

play11:05

delete by uh or removing a slot by uh

play11:10

clicking this minus sign so here we can

play11:13

now apply uh some colors in our uh

play11:18

object for the individual object we have

play11:22

so under our uh shading we can have this

play11:26

drop down uh box for this slot so you

play11:30

can simply click the add button here to

play11:34

add new material slot so let's click uh

play11:38

or let's add two slot a slot number one

play11:43

uh let's uh make this for

play11:47

uh

play11:50

for our Leaf so you can see

play11:54

here uh we have

play11:57

also uh

play12:03

for the

play12:05

other let's select this

play12:08

also the next uh iOS spare we have this

play12:12

is small leaves so let's select new

play12:17

let's add also

play12:20

this

play12:21

um color or you can simply

play12:26

uh use or

play12:30

uh copy the color and then

play12:34

the last is the cylinder or the trunk we

play12:38

have so you can simply add new slot here

play12:42

and add new and for the cylinder we can

play12:47

apply

play12:49

here the

play12:51

brown so we can um put uh the roughness

play12:56

here we can change to two

play13:00

uh so that it will uh remove

play13:04

the uh

play13:06

shiny so as you can see we have now this

play13:11

uh low poitry and we have the

play13:15

color so thank you very much for uh

play13:20

watching uh again I will give you time

play13:23

to um apply all the uh things

play13:29

or I will give you now the time to apply

play13:33

all the things you you've learned in

play13:36

this tutorial thank you and see you for

play13:40

uh the next uh tutorial

Rate This
β˜…
β˜…
β˜…
β˜…
β˜…

5.0 / 5 (0 votes)

Related Tags
Blender TutorialLow-Poly Modeling3D ModelingExtrude ToolInset BevelLoop CutTree Creation3D DesignTexture ShadingCylinder Usage