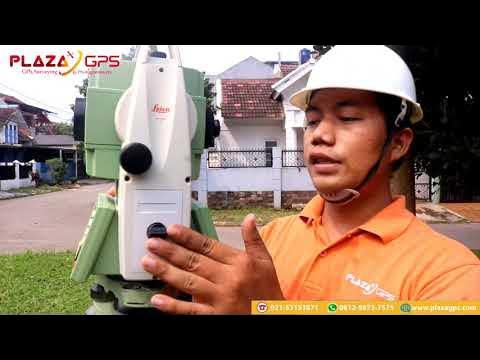
[TUTORIAL 1] DASAR MENGGUNAKAN TOTAL STATION TOPCON GM-101 SERIES | ANAK TEKNIK

Anak Teknik
16 Dec 202116:07

Summary

TLDRThis video tutorial explains how to use a total station for surveying tasks. Starting with unboxing the equipment, the video walks through turning on the device, setting up without a tripod, and configuring the instrument for precise measurements. It demonstrates setting up jobs, inputting coordinates, and adjusting settings such as azimuth and height. The presenter emphasizes accuracy during fieldwork, offering a step-by-step guide for topographic measurements. The video also highlights configuring various data modes like angle, distance, and coordinate data, ensuring users can capture accurate survey results efficiently.

Takeaways

  • 🔌 The first step in using the Total Station is to power it on by pressing the power button on the bottom right corner.
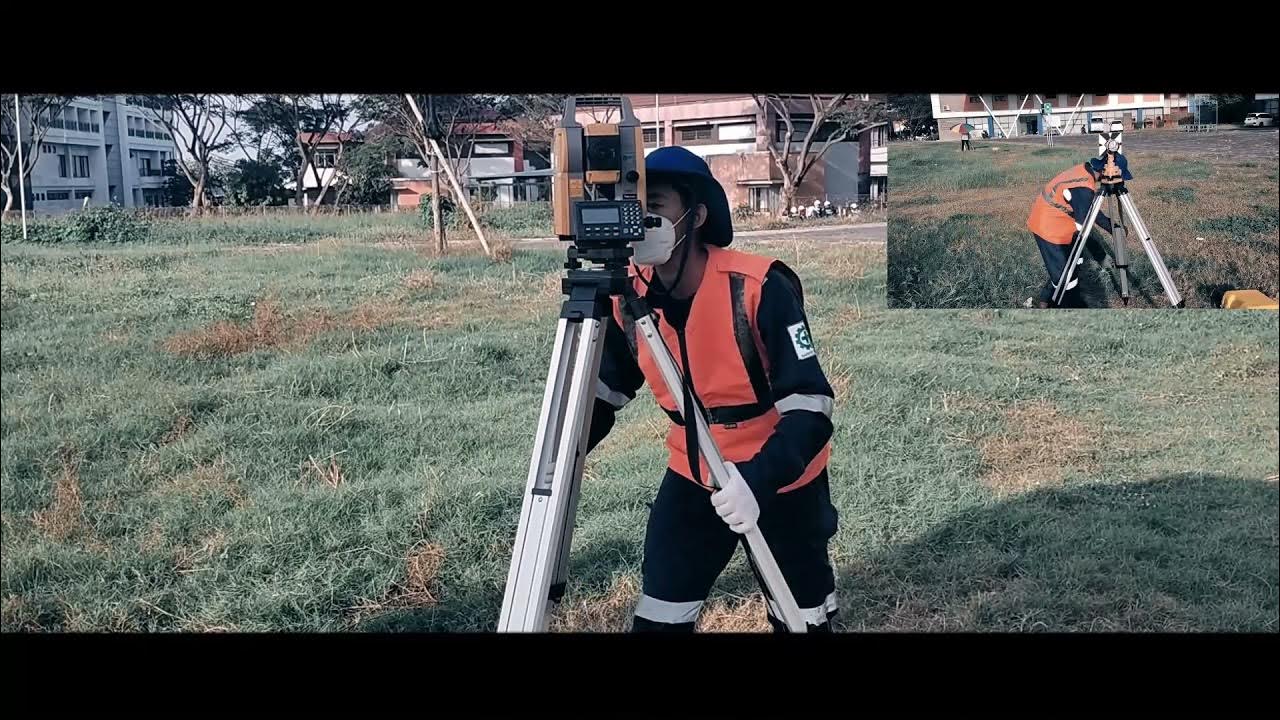
  • 🛠️ If using a tripod, it's crucial to adjust the tripod and the Total Station's leveling bubble to ensure accurate measurements.
  • 🎯 The device's crosshair must be positioned precisely, with a recommended precision of less than one second for accurate readings.
  • 📋 In the field, make sure to maintain high accuracy, ideally achieving zero or minimal error for data collection.
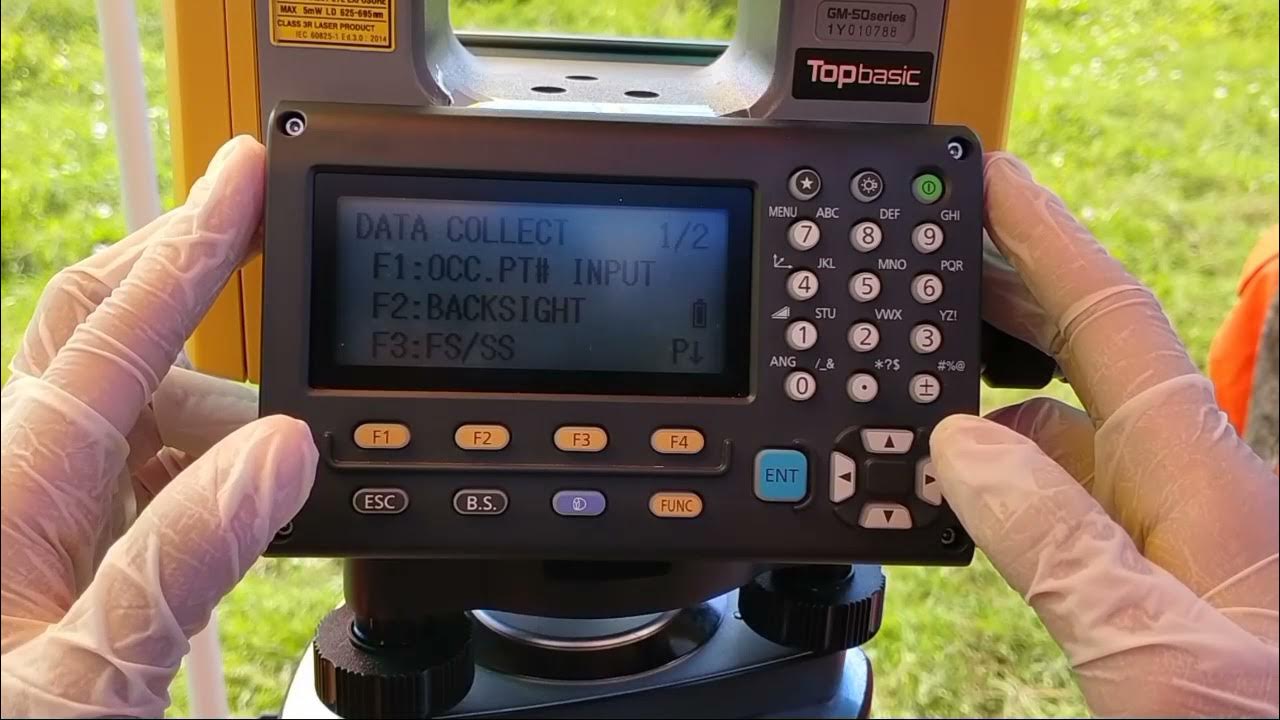
  • 🔍 The configuration menu allows the user to set various options like observation conditions, distance measurement modes, and angles.
  • 💾 Data can be downloaded using the USB menu, and job data can be managed under the configuration settings.
  • 📐 Users can set observation modes like vertical distance and height of the instrument, which can be tailored based on the task.
  • 📝 To start a job, users need to create or select a job from the available list and input required details like coordinates and instrument height.
  • 🌍 The device can work with both local and global coordinates, allowing flexibility depending on the project requirements.
  • 🧭 The Total Station can measure angles and distances based on either known coordinates or azimuths, which can be aligned using a compass for directional accuracy.

Q & A

  • What is the first step when using the total station device?

    -The first step is to power on the device by pressing the power button located on the right side of the device.

  • Why is using a tripod recommended when operating the total station?

    -Using a tripod ensures the device is stable and allows for accurate leveling, which is essential for precise measurements. It helps avoid any shaking or movement during the survey.

  • How do you adjust the leveling of the total station?

    -To adjust the leveling, you can use the screws on the base of the device to position the leveling bubble in the center of the circle on the screen.

  • What does the 'Escape' button do during the setup process?

    -The 'Escape' button is used to exit the current screen or setting and return to the main menu where you can adjust settings like cutting adjustments or start observations.

  • How can you ensure precise angle settings during measurements?

    -For precise angle settings, it is recommended to aim for a reading below one second of accuracy. The device should be calibrated carefully, especially when using a tripod.

  • What is the purpose of the 'Observation Condition' settings?

    -The 'Observation Condition' settings allow the user to configure parameters like angle, distance, reflector settings, and atmospheric conditions for more accurate measurements.

  • How can you create or select a new job for data collection?

    -To create or select a job, navigate to the 'Job Selection' menu, choose 'New Job,' name the job, and set the necessary parameters, such as coordinates and scaling.

  • What is the role of the 'F4' button during configuration?

    -The 'F4' button is used to enter configuration settings, such as adjusting observation conditions, configuring the device, and preparing it for data collection.

  • How do you input the coordinates when setting up the device for measurements?

    -Coordinates can be entered manually if known, or local coordinates can be used, such as 1000, 1000, and 100 for the X, Y, and Z values if no external data is available.

  • How do you set up the orientation of the total station for topographic measurements?

    -To set up the orientation, point the device in the direction of true north using a compass, and adjust the horizontal angle to zero using the fine adjustment screws.

Outlines

00:00

🔧 Introduction to Total Station Usage

The presenter introduces the Total Station device, recapping the previous unboxing session. They proceed to explain the steps to turn on the device and emphasize that, since the demonstration is on a table, no tripod setup is necessary. For field use, they suggest using a tripod and ensuring the device is properly balanced. The presenter demonstrates how to position the instrument for accurate readings, adjust the settings using the Escape button, and fine-tune the digital settings for maximum accuracy.

05:01

📋 Configuring and Setting up the Total Station

The presenter continues by detailing how to configure the Total Station. They navigate through the device's menu options to adjust observation conditions, including angles and atmospheric settings. The presenter emphasizes the importance of setting the device correctly for stable measurements, especially when using a tripod. The process of creating a 'job' in the device's data system is explained, allowing users to organize their work and save specific measurements for future reference.

10:02

🛠️ Measurement and Job Setup

This section explains the process of setting up and naming jobs within the Total Station system. The presenter shows how to input data, such as job selection, operator details, and coordinate settings. They also demonstrate how to configure the device for various types of measurements, including selecting the method for distance calculation and using local coordinates when official coordinates aren't available. Additionally, the importance of accurate instrument height measurement is discussed, especially when using a tripod.

15:04

📐 Starting the Measurement Process

The final paragraph describes the process of initiating topographical measurements using the Total Station. The presenter explains how to aim the device using a compass for directional accuracy and demonstrates setting angles and azimuths for precise readings. They also highlight how to input azimuth data and store it for future reference. Finally, the presenter reviews the different measurement options available, including angle, GIS data, and coordinate data, depending on the user's specific needs.

Mindmap

Keywords

💡Total Station

A total station is a device used in surveying and construction that combines an electronic theodolite with an electronic distance meter. In the video, it is introduced as the main tool being discussed, with the presenter explaining how to set it up and use it for measurements in various environments.

💡Tripod

A tripod is a three-legged stand used to stabilize surveying instruments like the total station. The video mentions that when using the total station on a tripod, it's crucial to adjust the legs to ensure the instrument is stable and level for accurate readings.

💡Niveling

Niveling refers to the process of adjusting a surveying instrument to make sure it is level. The presenter talks about using the tripod to ensure that the total station is properly niveling, so that measurements are accurate.

💡Cut Adjustment

Cut adjustment refers to fine-tuning the position of the total station to ensure precise x and y coordinates for measurements. In the video, the presenter demonstrates how to adjust the settings using the control panel to achieve accurate results.

💡Observation Mode

Observation mode is a setting in the total station used to measure angles, distances, and coordinates. The video shows how to navigate to this mode to begin taking measurements and configure the total station for specific tasks.

💡Vertical Distance

Vertical distance refers to the height difference between two points measured by the total station. In the video, the presenter explains how this measurement is part of the total station's capabilities, particularly when determining the height of objects in a survey.

💡Atmospheric Correction

Atmospheric correction refers to adjustments made to the total station's measurements to account for environmental factors such as temperature and pressure. The presenter touches on this aspect while configuring the total station's settings to ensure accurate readings.

💡Coordinate System

The coordinate system is a reference system used to represent the location of points measured by the total station. The presenter explains how to set up the coordinate system, using either local or predefined coordinates, to ensure the data collected is useful for mapping or construction.

💡Azimuth

Azimuth is the angular measurement in a spherical coordinate system, often used to denote direction in surveying. The presenter uses this term while describing how to align the total station with the North, ensuring accurate directional readings.

💡Job Creation

Job creation refers to setting up a new project or survey within the total station's software. The video demonstrates how to name a job, assign coordinates, and input other necessary parameters, so the measurements taken can be organized under a specific job title.

Highlights

Introduction to the use of Total Station equipment and its key components.

Demonstration of how to power on the Total Station and key button placements, like the power button on the bottom right.

Explaining the importance of adjusting the tripod and leveling the device for accurate measurement.

Step-by-step guide on setting the device's X and Y axis for accurate measurements.

Instructions on how to configure the device to the most precise measurement possible, ideally under one second of error.

Emphasis on ensuring the tripod is stable for precise data collection.

Detailed setup of observation mode, including accessing menus for configuration and observational conditions.

Explanation of setting up the job configuration, including selecting or creating new jobs for each measurement session.

How to input or adjust coordinate systems based on existing job data or new measurements.

Tutorial on how to name jobs and input relevant data, such as using specific codes for job details.

Guide to start the actual topography measurement process, selecting options like offset or staking.

Inputting reference points or local coordinates when standing in place to take measurements.

Instruction on measuring the instrument’s height from the ground when using a tripod.

Using tools like a compass to align the device with the north for azimuth measurements.

Final steps in taking precise angle and coordinate measurements and saving data for download later.

Transcripts

play00:00

halo halo anak teknik kita berjumpa lagi

play00:03

setelah kita kemarin mengandung boxing

play00:06

alat total station kali ini kita akan

play00:10

membahas tentang bagaimana cara

play00:14

penggunaan alat tersebut

play00:19

[Musik]

play00:26

ini dia di depan kita sudah ada alatnya

play00:30

protection sesuai yang kita Unboxing

play00:32

kemarin

play00:33

yang pertama kita Nyalakan

play00:37

alatnya terlebih dahulu nah di sisi

play00:40

pojok kanan sini ada tombol power kita

play00:44

tekan saja untuk menyalakannya

play00:47

karena kita disini di atas meja Jadi

play00:50

kita tidak perlu mengatur tripod ya

play00:52

kalau menggunakan tripod terlebih dahulu

play00:55

teman-teman untuk mengatur nipunya yang

play00:59

ada di bagi ini terjadinya

play01:01

teman-temannya kita putar terlebih

play01:04

dahulu Kalau ada menggunakan tripod

play01:06

teman-teman harus mengatur tripodnya

play01:09

agar Vivo yang ada di sini ini berada di

play01:12

pusat lingkarannya

play01:14

kalaupun tidak ini nanti saya akan

play01:17

mencoba mengaturnya di atas meja ini

play01:21

pertama kalau belum muncul untuk

play01:23

pengaturannya kita pencet tombol Escape

play01:28

nah ini kita

play01:31

muncul tampilan untuk mengatur cutnya

play01:34

nah disini sudah digital ada x&y nya nih

play01:39

saya putar dulu saya posisikan

play01:42

sini

play01:46

di sini kita setting agar untuk type

play01:50

c-nya itu

play01:52

seteliti mungkin nah disini disarankan

play01:54

itu di bawah Satu detik lalu bisa jadi

play01:59

jus dan untuk ketika menggunakan tripod

play02:02

untuk

play02:04

Hai itu tripodnya bener-bener berdiri

play02:07

secara statik atau untuk bener kuat

play02:09

tidak bergoyang

play02:10

nah Sini

play02:13

Sudah ketelitiannya sudah hampir

play02:16

berakhir teliti tapi ini biar cepet aja

play02:19

langsung saya oke ya Tapi ketika nanti

play02:22

di lapangan teman-teman manggil data

play02:24

diusahakan untuk

play02:26

seakurat mungkin kalau bisa sampai satu

play02:29

detik atau nol detik ini langsung kita

play02:31

tekan yang menu Oke di F1

play02:37

setelah selesai mensetting teman-teman

play02:41

juga harus mensetting untuk alatnya

play02:45

sendiri Nah untuk tadikan kemenuh

play02:48

observasi langsung observasi untuk

play02:51

Hai menu ke pengaturan konfigurasi

play02:54

semen pencet Escape saja nanti akan ke

play02:57

menu yang ada di sini ada observasi USB

play03:01

USB untuk mendownload datanya Sedangkan

play03:04

ini untuk pengaturan datanya atau

play03:06

membuat job sedang ini untuk pengaturan

play03:08

konfigurasi nya atau pengaturan alatnya

play03:10

sendiri nah disini Saya akan mengatur

play03:13

konfigurasinya terlebih dahulu tinggal

play03:16

tekan F4

play03:17

di sini banyak observasi condition

play03:21

disini saya mengatur pegang observasi

play03:24

kondisinya tinggal tekan enter nah

play03:28

disini ada pilihan Angel this reflektor

play03:31

atmosfer dan yang lain-lainnya misalkan

play03:34

saya pilih yang ditinggalnya nah sini

play03:38

Tinggal

play03:39

teman-teman atur sesuai kebutuhannya ya

play03:41

Escape saja

play03:44

Kemudian untuk yang di stannya nah

play03:47

disini ada beberapa

play03:51

Hai menu yang harus diatur nah disini

play03:54

untuk yang awal ketika alat ini

play03:55

digunakan biasanya untuk mode dieselnya

play03:58

itu untuk pengambilan datanya itu

play04:01

menggunakan

play04:06

vener Nah untuk penggunaan venerin nanti

play04:09

ketika pengambilan data itu tidak

play04:11

langsung

play04:15

muncul datanya jadi nanti akan berubah

play04:18

berubah untuk memastikannya agar

play04:21

langsung ke repot atau

play04:23

pasti datanya saya menggunakan pen

play04:26

average Kemudian untuk this modenya di

play04:31

sini ada vertikal distance Slug Justin

play04:34

sama headstand nah saya menggunakannya

play04:37

headstand kemudian temen juga bisa hadis

play04:40

tanya Dari mana grounding atau great

play04:43

sini saya menggunakan ground mungkin

play04:46

yang lainnya saya baikan

play04:49

ya baikan Hai

play04:53

koordinatnya Seperti apa nsz atau enz

play04:57

berserah sini saya nsz kemudian ketika

play05:00

sudah langsung

play05:02

skip saja ke

play05:05

foundation atmosfer Saya abaikan ketika

play05:09

sudah langsung di skep

play05:13

Kemudian untuk membuat job-nya untuk

play05:17

membuat joknya

play05:19

tinggal pilih yang menu data pucat yang

play05:24

f33 kemudian pilih Jobs kemudian enter

play05:29

kemudian pilih job selection

play05:33

disini

play05:35

ketika ingin memilih joknya

play05:38

temen-temen pilih dulu job selection

play05:41

kemudian pilih list dengan di sini ada

play05:43

beberapa job

play05:45

sampai job

play05:49

banyak ya bedanya tinggal teman-temanmu

play05:51

yang mana misalkan disini Saya mau

play05:54

menggunakan

play05:56

job 1 ngantuk tandanya job yang sudah

play06:00

digunakan itu yang ada tanda bintangnya

play06:02

ya teman-temannya daunnya ketika sudah

play06:05

tinggal tekan enter

play06:07

kemudian koordinator joknya

play06:11

ini bisa disamakan Bisa Beda ketika beda

play06:16

itu ketika

play06:20

data

play06:22

pengukuran sebelumnya itu berkaitan

play06:24

dengan pengukuran kita kali ini tetapi

play06:28

disini saya menggunakan koordinat job

play06:30

yang sama yaitu job satu

play06:34

tinggal tekan enter Dah kalau sudah

play06:37

tinggal Escape untuk mengubah

play06:41

Hai

play06:42

penamaan joknya temen-temen bisa melihat

play06:46

pemilik job detail cepet l tinggal enter

play06:49

nah atau mau mari name nama joknya

play06:53

disini untuk pengaturannya misalkan saya

play06:57

pengukuran coba gitu aja ya Coba tinggal

play07:10

coba-coba

play07:12

kemudian saya mau memilih yang

play07:15

numerik untuk pemilihan mereknya untuk

play07:18

mengubahnya tinggal tekan yang Shift

play07:21

shift

play07:22

ada huruf kecil kemudian ada mereknya

play07:26

Disini yang akan terlihat perubahannya

play07:28

tinggal coba satu

play07:30

ketika sudah skillnya

play07:33

mau diatur juga bisa teman-teman nah

play07:37

cuman sayap menggunakan skillnya satu

play07:39

banding satu ya telah saya selesai

play07:42

penamaan joknya tekan oke

play07:45

ke oke sudah tinggal Escape

play07:52

kita akan melakukan pengukuran nah

play07:54

Disini saya akan melakukan pengukuran

play07:58

topografi ya misalkan topografi kita mau

play08:01

mengukur lebar style koordinat

play08:05

dinding itu ya dinding dari spandex

play08:08

semoga

play08:11

tinggal milih yang menu observasi atau

play08:15

F1 kita klik F1

play08:19

sini ada beberapa pilihan untuk

play08:22

observasinya ada MLM offset toko Exo

play08:25

disini saya untuk kali ini kita akan

play08:28

menggunakan menutup untuk video-video

play08:30

selanjutnya penggunaan-penggunaan

play08:32

menu-menu MLM atau offset atau steking

play08:35

hot nanti di video berikutnya itu kali

play08:39

ini kita akan menggunakan menutup o-toko

play08:41

Hai tekan F3 nah disini ada pilihannya

play08:44

untuk

play08:46

awal kita harus

play08:49

memasukkan data tempat berdiri alat

play08:52

sempat berdialog kita pilih yang menu

play08:55

Opay atau untuk yang biasanya untuk di

play08:58

seri-seri sebelumnya bisa menggunakan

play09:00

kunci CVT nya disini menunya Popeye

play09:04

tinggal kita menu enter start di sini

play09:09

nsz nya

play09:11

semisal temen-temen tempat berdiri

play09:13

alatnya itu sudah ada koordinator bisa

play09:15

dimaksudkan koordinatnya cuman disini

play09:18

saya belum ada qarinah jadi saya

play09:20

menggunakan koordinat lokal saya tulis

play09:23

1000 1000dc hanya itu 100 penulisannya

play09:27

tinggal pencet aja asalkan 1001

play09:31

sudah kalau sudah tinggal bawah

play09:34

tinggal dilanjutkan kemudian patok-patok

play09:37

nya di sini saya berinama coba 1cd

play09:41

transjek

play09:43

bgv1

play09:47

ini high instrumennya ketinggian

play09:50

instrumennya berapa Nah ketika

play09:53

teman-teman menggunakan tripod nanti

play09:56

dari bawah tripod diukur menggunakan

play09:58

meteran sampai ke

play10:02

tanda ini tanda ini itu untuk nilainya

play10:06

berapa dari Atok sampai ke alat hingga

play10:09

alatnya

play10:16

disini Saya tidak melakukan pengukuran

play10:19

misalkan saja disini tingginya satu

play10:23

meter atau 1 meter ya dari sini ke bawah

play10:27

misalkan 1 meter hingga tuh atau 1,5

play10:31

misalkan cuma 51.5

play10:34

Kemudian untuk

play10:36

Hai kodenya kodenya Seperti apa misalkan

play10:39

kodenya itu saya samakan aja

play10:43

cb1000cc

play10:52

B13 sudah langsung aja

play10:55

berikutnya yaitu ada operator

play10:57

Operatornya siapa misalkan Budi sini

play11:01

tinggal nulis Budi

play11:10

dan Budi kalau sudah semuanya diatur

play11:13

tinggal klik ok atau F4

play11:18

untuk selanjutnya kita

play11:21

masukkan baik set

play11:24

mixed

play11:26

eksenter di sini ada pilihan Angel atau

play11:30

koordinat semisal basketnya atau acuan

play11:33

teman-teman ada acuan koordinat nuskan

play11:36

koordinat karena disini Belum ada saya

play11:40

menggunakan Angle atau azimuth arah

play11:43

utara enggak Tinggal ketik enter nah

play11:46

disini

play11:47

sisa rhr nya Sae 30 karena jemputnya kan

play11:52

orang dari arah utara

play11:54

06 Dian

play12:02

kemudian arahnya kita Arahkan ke arah

play12:07

utara Nah untuk menunjukkan arah

play12:10

utaranya saya menggunakan bantuan copas

play12:14

Kompas ya sini Kompas saya Arahkan

play12:19

sini ya karena di sana Selatan ya

play12:25

putar Jangan lupa untuk posisinya ya ini

play12:31

untuk yang kita membidik disini untuk

play12:34

yang lensanya jangan Hai kebalik

play12:52

ya di sini ada bantuannya jemputnya

play12:55

kalau bisa sampai presisi ke arah utara

play12:58

atau arah

play13:01

[Musik]

play13:07

000 kan Anggap saja ini sudah

play13:11

arah mendekati arah nol ketika sudah

play13:15

mendekati arah nol

play13:18

kunci

play13:20

pemutar kasar horizontalnya hinggap

play13:25

diputar kekanan agar arah utaranya tidak

play13:28

berubah

play13:29

dah

play13:31

kemudian

play13:33

tik Nani pilih

play13:36

lebih tinggal F1

play13:39

disini juga akan muncul

play13:41

menu yang harus diinput dan Disini yang

play13:45

perlu teman-teman sih akhirnya

play13:47

nol karena kita mengacu pada Horizon

play13:51

azimuth arah utara kemudian pt-nya jus

play13:55

akan ini

play13:57

batoknya itu

play13:58

yang

play14:01

unik ya di sini saya menamainya agar

play14:05

nanti ketika mendownload data itu kita

play14:07

tahu ini arah utaranya saya beri angka

play14:10

9999

play14:12

Kemudian untuk kodenya Saya isikan sulit

play14:17

azimuth imut-imut

play14:36

Hai untuk memasukkan ke datalis tinggal

play14:39

pilih

play14:41

ed1 untuk Ketika nanti teman-teman

play14:44

mengukur ditempat lain tinggal menu

play14:47

pilih di menulisnya misalkan list ya

play14:50

sini saya tambahkan dulu

play14:52

ad1re ini sudah keriput Ketika nanti

play14:54

temen-temen pengukuran di tempat lain

play14:56

tinggal pilih yang list dan disini ada

play14:58

pilihannya

play15:00

karena tadi sudah beli azimuth tinggal

play15:03

enter aja azimuth azimuth ya karena tadi

play15:06

sudah saya ketik kan terus azimuth sini

play15:10

saya hapus aja

play15:15

langsung oke tempat oke

play15:20

Ini sudah siap untuk melakukan

play15:22

pengukuran

play15:23

teman-teman bisa ada beberapa pilihan ke

play15:26

pengukurannya ada Angle data Gis data

play15:29

koordinat data

play15:32

descendant koordinat tinggal

play15:36

sesuai dengan kebutuhannya tapi disini

play15:38

Saya memilih untuk ya Dis + koordinat

play15:41

atau jarak dan koordinat tinggal klik m

play15:47

[Musik]

play16:03

ini ini

play16:05

[Musik]

Rate This

5.0 / 5 (0 votes)

Связанные теги
Total StationSurveying ToolsMeasurement GuideTool SetupTripod UsageData ConfigurationTopography SurveyInstrument CalibrationCoordination SetupSurveying Techniques
Вам нужно краткое изложение на английском?