Cara Setting Access Point TP-Link TL-WA701ND || Konfigurasi Dasar Wireless Access Point WAP
Summary
TLDRIn this tutorial, the speaker demonstrates how to set up and configure a TP-Link wireless access point. Starting with unboxing and connecting the device, the video walks through configuring the IP address and username, testing network connections, and setting up the access point via a web browser. The speaker customizes the SSID and password, explains the importance of DHCP settings, and shows how to test the wireless network on both a laptop and mobile phone. The tutorial concludes with a successful connection to the internet, offering viewers a step-by-step guide to setting up their own wireless access point.
Takeaways
- 😀 The video provides a tutorial on how to set up and configure a TP-Link wireless access point.
- 😀 The first step involves unpacking the device and connecting the power adapter, ensuring the power light turns on.
- 😀 Connect an Ethernet (UTP) cable from the access point to a computer or laptop for configuration.
- 😀 The default IP address for the TP-Link device is 192.168.0.254, and the username and password for login are both 'admin'.
- 😀 On the laptop, ensure that the local area connection is enabled, and wireless is disabled before configuring.
- 😀 To verify connectivity, use the command prompt (CMD) to ping the access point's IP address (192.168.0.254).
- 😀 Open a browser (Google Chrome) and enter the access point's IP address in the address bar to access the setup page.
- 😀 During setup, change the SSID (network name) to a preferred name, like 'TKJ2', and set a password, such as '12345678'.
- 😀 Leave the DHCP setting as it is, and configure the IP address based on your network's requirements.
- 😀 After configuration, disconnect the laptop's Ethernet cable, connect the internet cable to the access point, and check the wireless connection by disabling and enabling the network adapter on the laptop.
- 😀 Finally, test the new Wi-Fi connection on both the laptop and a smartphone to ensure successful connectivity to the internet.
Q & A
What is the first step to setting up the TP-Link wireless access point?
-The first step is to unpack the access point and connect the power adapter to it, making sure the power light indicator turns on.
What is the default IP address and login credentials for the TP-Link access point?
-The default IP address is 192.168.0.254, and the default username and password are both 'admin'.
How do you check if the local area connection is enabled on your laptop?
-You need to ensure that the local area connection is enabled in the network settings and that the wireless connection is turned off.
What command is used to check the connection to the access point from the laptop?
-The command used is 'ping 192.168.0.254' to check if the laptop is successfully connected to the access point.
What should you do after confirming the connection with the access point?
-After confirming the connection, open a web browser (e.g., Google Chrome) and type in the IP address (192.168.0.254) to access the access point's configuration page.
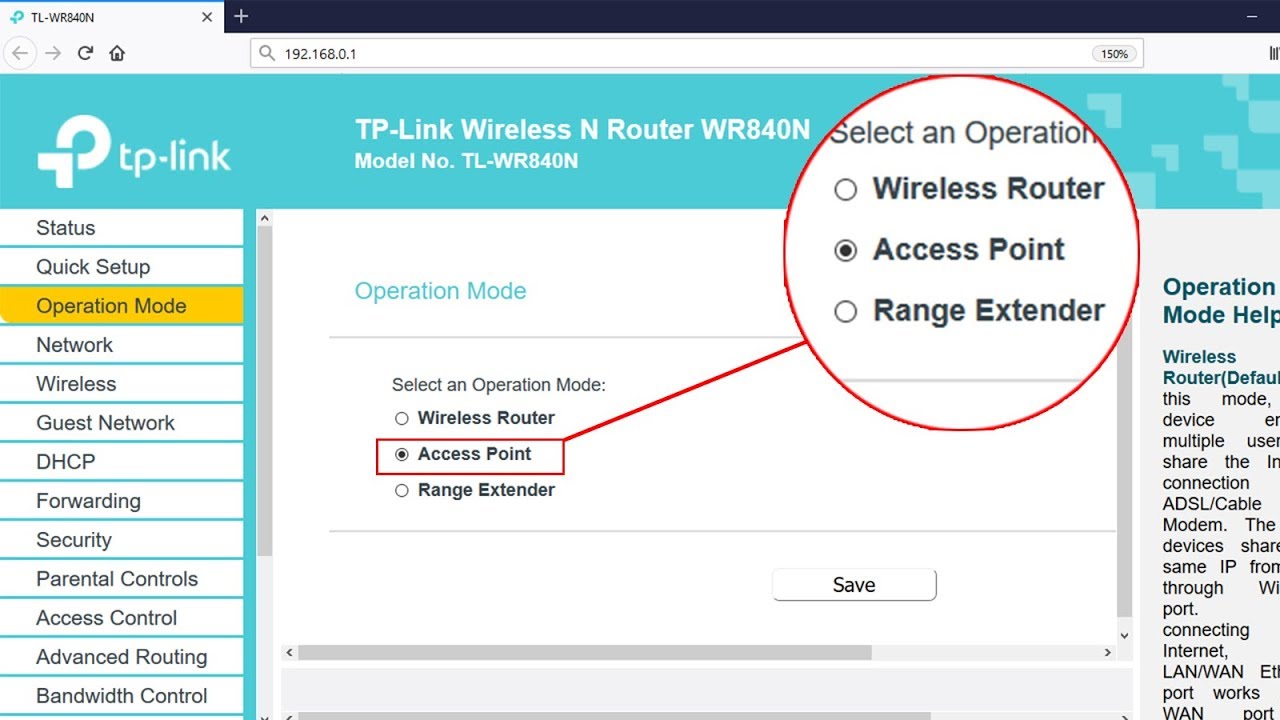
What configuration option should be selected when setting up the TP-Link device?
-Select 'Access Point' as the configuration option, as this is the desired mode for the setup.
How do you change the SSID of the access point?
-To change the SSID, go to the setup page, locate the SSID field, and modify it according to your preference, such as 'TKJ2' or 'TKJ-Go'.
What is the recommended password setup for the access point in the tutorial?
-The tutorial suggests setting the password to '12345678', but users are encouraged to choose their own secure password.
How do you configure the IP address for the access point?
-The IP address of the access point should be set to match the network's IP configuration to ensure proper internet connectivity.
What is the next step after completing the configuration on the laptop?
-After completing the configuration, disconnect the UTP cable from the laptop, plug in the internet cable, and ensure that both wireless and LAN connections are active.
How do you test the wireless connection after setup?
-To test the wireless connection, disable the local area connection on the laptop, enable the wireless connection, and then connect to the SSID you set (e.g., 'TKJ-GO'). After connecting, verify internet access by browsing websites like Google or Detik.com.
Outlines

このセクションは有料ユーザー限定です。 アクセスするには、アップグレードをお願いします。
今すぐアップグレードMindmap

このセクションは有料ユーザー限定です。 アクセスするには、アップグレードをお願いします。
今すぐアップグレードKeywords

このセクションは有料ユーザー限定です。 アクセスするには、アップグレードをお願いします。
今すぐアップグレードHighlights

このセクションは有料ユーザー限定です。 アクセスするには、アップグレードをお願いします。
今すぐアップグレードTranscripts

このセクションは有料ユーザー限定です。 アクセスするには、アップグレードをお願いします。
今すぐアップグレード関連動画をさらに表示

Cara Konfigurasi TP-LINK TL-WR840N Lengkap & Mudah | Tutorial Pemula Sampai Mahir

Mudahnya Instalasi Jaringan Nirkabel (Tanpa Kabel) Menggunakan Router TP-LINK!🌐🔧
Setup ACCESS POINT mode on TP-LINK TL-WR840N | NETVN

Membuat Wifi Voucheran Tanpa Mikrotik Dengan Tp-Link EAP 110 Omada

Setting Pakai HP: TP-Link WR840N (ID) Mode AP Hotspot Voucher
Konfigurasi Access Point Cisco di Packet Tracer
5.0 / 5 (0 votes)
