Monitoring Suhu Dan Kelembaban Menggunakan ESP32 + DHT22 Dengan Protokol MQTT
Summary
TLDRThis video tutorial guides viewers through creating an IoT project using an ESP32 microcontroller and a DHT22 sensor to monitor temperature and humidity. It covers the setup of hardware connections, installation of necessary libraries in Arduino IDE, programming steps, and configuration of MQTT for data publishing. The video also demonstrates how to use the MQTT Dash app on Android for real-time monitoring of the environmental data, concluding with a live test of the system.
Takeaways
- đ· The video demonstrates setting up an IoT project using an ESP32 and a DHT22 sensor to monitor temperature and humidity, displaying the data on an MQTT dashboard.
- đ The ESP32 microcontroller is chosen for its built-in Wi-Fi module, facilitating easy internet connectivity for the project.
- đĄïž The DHT22 sensor is selected over the DHT11 for its higher accuracy in measuring temperature and humidity.
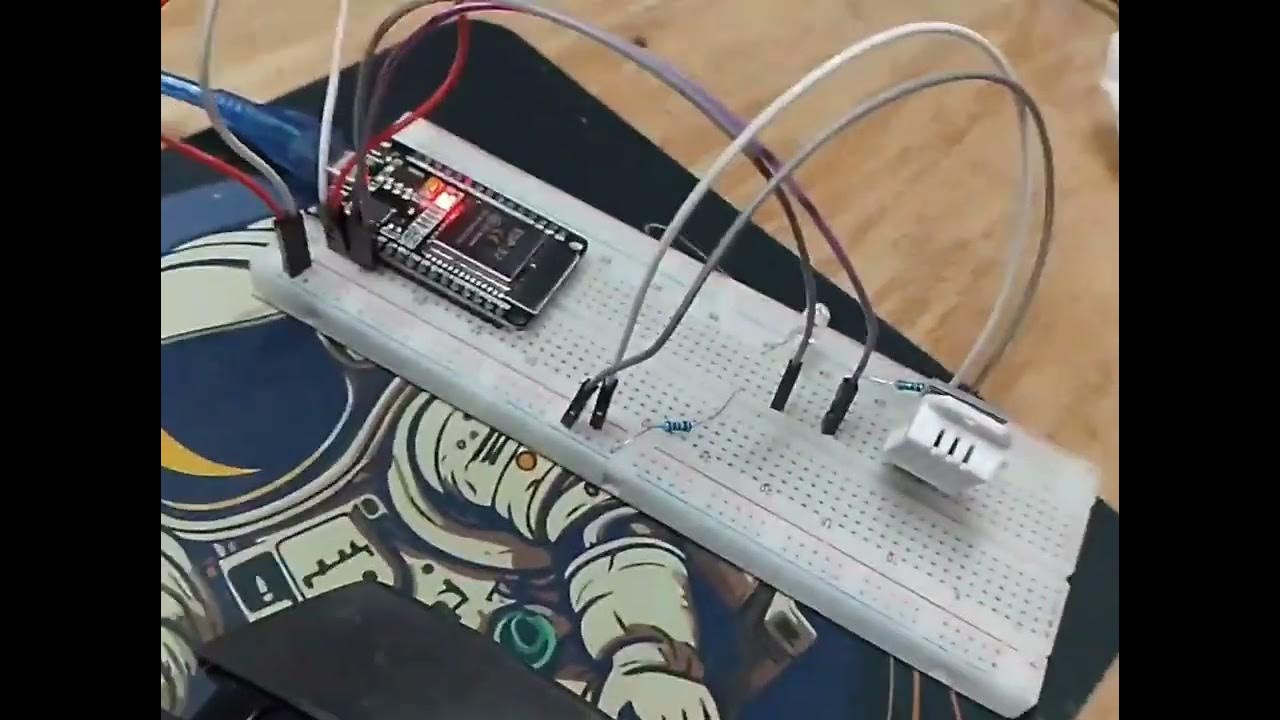
- đ§ Two breadboards are used in the setup to accommodate the ESP32, which would otherwise occupy all available pins on a single breadboard.
- đ The DHT22 is connected to the ESP32 using jumper cables, with the VCC pin to VIN, the OUT pin to a digital pin (D32), and the GND pin to the ESP32's ground.
- đ The Arduino IDE is used for programming the ESP32, requiring the installation of the PubSubClient and DHT.h libraries for MQTT communication and sensor data reading.
- đ The script includes setting up Wi-Fi credentials and MQTT broker details within the Arduino code, using a free MQTT broker like broker.hivemq.com.
- đ The MQTT topic for publishing data is defined in the code, with a unique identifier to prevent data collision, especially when using a free broker.
- đ The 'void Loop' function in the Arduino code is responsible for obtaining data from the DHT22 and publishing it to the MQTT broker.
- đČ The video mentions using an Android app, such as MQTT Dash, to monitor and display the temperature and humidity data published by the ESP32.
- đ ïž The video is sponsored by PCBY, a PCB manufacturing service offering low-cost prototyping, and also provides services like CNC, 3D printing, and laser cutting.
Q & A
What is the main purpose of the project described in the video?
-The main purpose of the project is to create an Internet of Things (IoT) device that monitors temperature and humidity using an ESP32 microcontroller and a DHT22 sensor, and publishes the data to an MQTT broker.
Why is the ESP32 microcontroller a suitable choice for this project?
-The ESP32 microcontroller is suitable because it includes built-in Wi-Fi connectivity, making it easier to connect the device to the internet for data transmission.
What are the alternatives to the DHT22 sensor mentioned in the script?
-The script mentions the DHT11 as an alternative to the DHT22, but the DHT22 is chosen for its higher accuracy in measuring temperature and humidity.
Why are two breadboards used in the project setup?
-Two breadboards are used because a single ESP32 module occupies all available pins on one breadboard, preventing the use of additional pins on the same side.
What is the function of the USB cable in the project setup?
-The USB cable is used for programming the ESP32 microcontroller, connecting it to a computer or laptop for code upload and debugging.
Which libraries are required to be installed for the project's Arduino programming?
-The required libraries for the project are 'PubSubClient' for MQTT communication and 'DHT.h' for reading data from the DHT22 sensor.
What is the significance of the MQTT broker in the project?
-The MQTT broker is essential for the project as it acts as an intermediary for the ESP32 to publish temperature and humidity data to a topic, which can then be subscribed to and monitored.
How can one subscribe to the data published by the ESP32 in the script?
-One can subscribe to the data by using an MQTT client, such as the MQTT Dash app on Android, and setting up a subscription to the specific topic that the ESP32 publishes to.
What is the recommended MQTT broker for a free service as mentioned in the script?
-The script recommends using 'broker.hivemq.com' as a free MQTT broker service for the project.
How does the video guide the user to test the project setup on the hardware?
-The video instructs the user to upload the program to the ESP32, set up the MQTT Dash app on an Android device to monitor the data, and then test the hardware by observing the temperature and humidity readings on the app.
What is the importance of having a unique topic for the MQTT messages?
-Having a unique topic is important to avoid data conflicts, especially when using a free MQTT broker, as a common topic might be used by multiple users, leading to mixed data streams.
Outlines
đĄïž IoT Weather Monitoring Project Setup
This paragraph introduces an IoT project that involves monitoring temperature and humidity using an ESP32 microcontroller and a DHT22 sensor. The project is about setting up an MQTT-based system to display the readings on an MQTT dashboard. The video explains the components required, including an ESP32 for Wi-Fi connectivity and the DHT22 for higher accuracy compared to the DHT11. It also covers the physical setup with breadboards and jumper cables, and mentions the need for a USB cable for programming. The paragraph concludes with a brief introduction to the software setup, including the installation of necessary libraries in the Arduino IDE.
đ ïž Programming and Configuring the IoT Device
The second paragraph delves into the programming aspect of the project. It describes the process of writing code for the ESP32 using the Arduino IDE, including the setup of Wi-Fi and MQTT connections. The video script outlines the creation of an ESP client object for connecting to Wi-Fi and the use of functions to publish temperature and humidity data to a unique MQTT topic to avoid data conflicts. It also covers the setup of the MQTT dashboard on an Android device using the MQTT Dash app, explaining how to create a new project, add widgets for temperature and humidity, and configure the subscription to the correct MQTT topics. The paragraph ends with a test of the hardware setup, showing the MQTT dashboard displaying the sensor readings.
đ Testing and Final Thoughts on the IoT Project
The final paragraph discusses the testing phase of the IoT project. It mentions observing the sensor readings on the MQTT dashboard and suggests warming up the sensor to see the temperature rise in real-time. The paragraph also includes a call to action for viewers to support the channel by liking, sharing, commenting, and subscribing. The video concludes with a sign-off, thanking viewers for watching and expressing anticipation for the next video.
Mindmap
Keywords
đĄESP32
đĄDHT22
đĄMQTT
đĄBreadboard
đĄJumper Cable
đĄArduino IDE
đĄLibrary
đĄWiFi
đĄMQTT Broker
đĄMQTT Dashboard (MQTT Dash)
đĄPrototype
Highlights
The project demonstrates how to monitor temperature and humidity using MQTT with an ESP32 and DHT22.
ESP32 is chosen for its built-in Wi-Fi module, simplifying internet connectivity.
DHT22 is selected over DHT11 for its higher accuracy in sensing temperature and humidity.
The tutorial explains the use of two breadboards to accommodate the ESP32 and DHT22 sensors.
The video covers the physical assembly of the ESP32 and DHT22 using jumper cables.
A USB cable is used for programming the ESP32 microcontroller.
The video is sponsored by PCByy, offering affordable PCB prototyping services.
Arduino IDE is used for programming the ESP32 with necessary libraries such as PubSubClient and DHT.h.
Instructions on how to install the required libraries for the project are provided.
The tutorial includes setting up Wi-Fi credentials and MQTT broker details in the code.
The code defines the pins used for connecting the DHT22 sensor to the ESP32.
The video explains the use of dual-core functionality of the ESP32 for efficient programming.
The MQTT topic for publishing temperature and humidity data is configured to be unique to avoid data conflicts.
The tutorial guides through the process of uploading the program to the ESP32.
The video shows how to set up MQTT Dash on Android for monitoring the temperature and humidity data.
MQTT Dash is used to create a new project and add widgets for displaying temperature and humidity readings.
The video concludes with a live demonstration of the setup, showing real-time temperature and humidity monitoring.
The importance of a tight sensor connection for accurate readings is emphasized.
The video encourages viewers to like, share, comment, and subscribe for more similar content.
Transcripts
Nah sekarang kita bisa lihat suhu dan
kelembaban sudah tampil di mqtt das-nya
dan ini untuk hardware-nya ada sp32 dan
dht22 seperti
ini halo semuanya balik lagi di channel
YouTube Project di video kali ini kita
akan membuat Project Internet ofting
menggunakan sp32 dan dht22 seperti ini
Project kali ini kita akan pantau suhu
dan kelembaban menggunakan protokol
mqtit nanti kita bisa coba mengunakan M2
dust seperti yang ada di video awal tadi
dan bagaimana caranya kita langsung aja
lanjut ke tutorial
[Musik]
Oke berikut adalah bahan-bahan yang
dipakainya yang pertama untuk
microcontroller kita menggunakan esp32
esp32 ini merupakan microcontroller yang
sudah include untuk modul wi-fi jadi
untuk konektivitas internet akan jadi
lebih mudah kemudian untuk sensornya
sendiri kita menggunakan dht22
alternatif lain teman-teman bisa
menggunakan dht 11 yang warnanya biru di
sini saya menggunakan dht22 Karena untuk
tingkat akurasinya yang lebih tinggi
dibanding dht 11 Kemudian untuk
perakitan kita bisa menggunakan
braidbard seperti ini dan ada kabel
jampper juga maelt to mil di sini Kenapa
saya menggunakan dua buah breadbard
Karena untuk asp32 sendiri jika kita
pasang di satu breadbot saja dia memakan
semua PIN yang tersedia jadi kita enggak
bisa pakai lagi pin-pin yang ada di
sebelahnya seperti
ini maka dari itu kita harus gabungkan
dua bidboard seperti ini caranya tinggal
pasang aja seperti
ini dan kita bisa pasang esp32-nya di
bagian tengah seperti ini nanti untuk
PIN sebelahnya atas dan bawah bisa kita
gunakan untuk keperluan jumper
menggunakan kabel jumper ke dht 2-2-nya
selanjutnya ada kabel USB seperti ini
fungsi kabel USB ini nanti kita pakai
untuk
[Musik]
pemrograman berikut untuk perakitannya
kita bisa pasangkan esp32-nya di bagian
tengah seperti
[Musik]
ini selanjutnya kita bisa pasang dht
22-nya di sini bisa kita perhatikan ada
PIN Plus out dan
Min
[Musik]
untuk PIN plus-nya kita bisa hubungkan
ke Vin yang ada di sp32 seperti
ini Kemudian untuk out-nya kita bisa
hubungkan di PIN digital 32 atau d32
seperti
ini dan yang terakhir untuk PIN min-nya
kita bisa hubungkan di PIN gnd yang ada
di
esp32 selanjutnya kita bisa hubungkan
esp32-nya ke kabel
USB dan ujung satunya kita bisa
hubungkan ke komputer atau
laptop kita lanjut ke langkah
selanjutnya sebelum kita lanjut video
kali ini disponsori oleh pcbyy pcby
merupakan pabrik percetakan PCB di China
dengan hanya 5 dolar saja kalian sudah
bisa pesan 10 keping PCB Prototype
dengan spesifikasi yang sangat
berkualitas selain PCB pcby y juga
menyediakan jasa CNC 3D printing dan
laser cutting Jadi tunggu apa lagi
buruan cetak PCB kamu di pcbyy
selanjutnya kita bisa langsung masuk ke
pemrograman Arduino ide-nya di sini
untuk programnya sendiri Kita harus
menginstal beberapa library yang pertama
ada pub sub client pub sub client ini
berfungsi untuk menghubungkan esp32 kita
ke broker
mqtt-nya dan dht.h dht.h ini seperti
namanya berfungsi untuk membaca data
dari sensor
dht-nya untuk menginstalnya teman-teman
bisa masuk ke bagian sketch kemudian
include library dan pilih manage library
di sini teman-teman bisa ketikkan aja
pubsub client seperti itu nanti tinggal
didownload kemudian di bagian sini kita
bisa Masukkan nama Wifi yang akan kita
pakai dan password
wifi-nya selanjutnya di bagian mqtt
broker kita bisa isikan dengan address
atau Broker mqtt yang kita pakai untuk
broker mqtt gratisan biasanya saya
menggunakan
broker.hmq.com karena ini broker
gratisan jadi untuk username dan
password-nya bisa kita kosokkan seperti
ini kemudian portnya kita pakai
1883 di sini ada definisi Pin dan jenis
dht yang kita pakai dan ada variabel
yang berfungsi untuk menampung data suhu
dan data
kelembabannya kemudian kita buat objek
untuk ESP client supaya nanti bisa
dihubungkan ke
wifi selanjutnya kita buat juga untuk
function supaya bisa menggunakan e
fungsi dual core dari
esp32-nya serial begin 115200 di sini
fungsinya untuk thebaging program dengan
kecepatan baudrad
115200 kemudian ada setup Wii setup Wii
sendiri di sini kita bisa lihat di
bagian Network untuk menghubungkan
device kita ke jaringan wi-fi yang
sebelumnya kita tulis di variabel SSID
dan
password kemudian tentukan di Core 1 di
Core 0 maaf untuk menjalankan fungsi
mqtt untuk mqtt ini sendiri di sini kita
hanya gunakan untuk publish karena
keperluan Project kali ini hanya untuk
publish data publish data temperatur dan
publish data kelembaban di topik
esp32/ temperatur Idrus 24 ya ini bisa
diatur Yang penting unik aja ya
teman-teman karena kita menggunakan SP
karena kita menggunakan broker gratisan
Jadi kalau topik yang kita pakai namanya
itu umum bisa jadi nanti datanya bentrok
kemudian kita juga lakukan hal yang sama
di bagian publish
untuk
kelembabannya nah di void Loop sendiri
kita pakai untuk mendapatkan data dari
dht di sini data dari dht-nya kita
masukkan di variabel temperatur dan
variabel
humidity selanjutnya kita bisa langsung
upload aja pilih ke bagian tools
kemudianardnya
pilih322 jika tem-teman belum ada bisa
download di bagian board Manager yang
ada di sini atau bisa ikutin video kita
sebelumnya yang membahas tentang
sp32 kemudian di bagian portnya kita
bisa pilih di port yang e sesuai ya di
sini untuk as32 saya portnya masuk di
port com 5 selanjutnya kita bisa
langsung klik upload aja di
sini oke sekarang proses upload-nya
sudah selesai kita bisa lanjut untuk
setting mqtt-nya di mqtt das yang ada di
Android selanjutnya kita bisa download m
Das untuk memonitoring data suhu dan
kelembabannya di Play Store kita bisa
Klik aja MQ d dan kita pilih yang ini ya
di sini berhubung saya sudah m-download
jadi saya tinggal klik Open aja atau
buka kemudian buat proek baru dengan
cara Klik tombol plus yang ada di pojok
kanan atas ini
masukin namanya contoh
esp32 monitoring
dht22 Kemudian untuk addressnya sendiri
Kita bisa sesuaikan dengan Broker yang
tadi kita tentukan di Arduino id-nya di
sini kita menggunakan
broker.vmq.com kemudian portnya
1883 username dan passwordnya kita bisa
kosongkan aja karena ini broker
klik
save selanjutnya kita buka Project Yang
tadi kita
buat tambahin widget dengan cara Klik
tombol plus yang ada di atas
ini pilih
teks kemudian masukkan namanya contoh di
sini suhu kemudian TOPIK untuk
subscribe-nya kita bisa sesuaikan dengan
topik publish Yang tadi kita tentukan di
ardinonya contoh di sini
sp32
Idrus
24 kemudian buat
lagi teks masukin namanya
kem Baban kemudian TOPIK untuk
subscribe-nya
esp32/ Yung Idrus 24 kemudian klik save
sekarang sudah selesai untuk mqtt
das-nya oke sekarang udah keesetting
semua kita bisa testing langsung di
hardware-nya seperti ini ini ada sp32
sama sensor suhu dan kelembabannya di
sini Kemudian untuk di handphone-nya
kita bisa buka MV das yang tadi kita
setting ada di monitoring SPT kedua dan
dht
22 seperti ini sekarang untuk suhu dan
kelembabannya sudah
[Musik]
tampil kita bisa coba Panaskan unau
sensornya menggunakan korek ya
[Musik]
oke di sini ada nan nan sedikit kalau
nan itu artinya biasanya untuk sensornya
e longgar ya untuk
konektivitasnya Nah bisa kita lihat naik
seperti
itu
37 ya sampai 38 dan
39 Oke mungkin itu aja video kita pada
kesempatan kali ini buat teman-teman
yang suka dengan konten seperti ini
bantu channel ini dengan cara di-like
di-share dikomen dan di-subscribe terima
kasih yang sudah menonton sampai jumpa
lagi di video selanjutnya
bye
Voir Plus de Vidéos Connexes
5.0 / 5 (0 votes)