How to Inpaint in Stable Diffusion A1111, A Detailed Guide with Inpainting Techniques to level up!
Summary
TLDRIn this video, Keyboard Alchemist demonstrates advanced inpainting techniques using Stable Diffusion. He shows how to add elements like a parrot on a girl's shoulder and transform her arm into a cyborg arm. The tutorial covers installing and using the Photopia extension, refining inpainted images, and leveraging Lora models for specific effects. Detailed steps, parameter settings, and troubleshooting tips are provided to ensure successful image manipulation. Viewers are encouraged to leave comments for future tutorial ideas and to like and subscribe for more content.
Takeaways
- 😀 You can inpaint new objects, like a parrot on a girl's shoulder, using stable diffusion techniques.
- 🦜 To install Photopia, go to extensions, click on install from URL, paste the Photopia GitHub link, and install.
- 🖼️ Use the Photopia extension in automatic1111 for photo editing similar to Photoshop.
- 🔧 After installing Photopia, keep your extensions up to date by checking for updates and restarting the UI.
- 💻 To edit an image in Photopia, import it from PNG info into image-to-image, regenerate it with low denoising strength, and send it to Photopia.
- ✂️ In Photopia, use the magnet selection tool to cut out the background of the object you want to inpaint, like a parrot.
- 🎨 Use inpainting techniques to add new elements to an image, ensuring the mask covers the area with some padding for context.
- 📈 Adjust denoising strength values to ensure the new object blends well with the original image without distortions.
- 🎩 You can also inpaint completely new elements, like a pirate hat, by using fill mode and higher denoising strength values.
- 🤖 To inpaint specific parts, like changing an arm to a robotic arm, download and use a LoRA model, adjusting parameters like denoising strength and sampling steps to achieve the desired result.
Q & A
What is the purpose of the video?
-The purpose of the video is to show viewers how to use inpainting techniques in Stable Diffusion to achieve various creative effects, such as adding a parrot to a girl's shoulder or changing a girl's arm into a cyborg arm.
What tool does the creator recommend for photo editing within the web UI?
-The creator recommends using the extension 'photopia,' which is similar to Photoshop and allows for image editing directly within the web UI.
How do you install the photopia extension?
-To install the photopia extension, go to extensions, click on the install from URL tab, copy the photopia GitHub link, paste it into the first field, click install, and wait for the installation to finish.
What are the key settings for inpainting a parrot on a girl's shoulder?
-Key settings for inpainting a parrot include setting masked content to 'original,' using the whole picture setting for inpaint area, and adjusting the denoising strength to a suitable level to merge the parrot seamlessly into the image.
How can you improve the inpainting results for a specific area?
-To improve inpainting results, you can use the XYZ plot script to test a range of denoising strength values and pick the best one, ensuring the new element integrates well without distorting the rest of the image.
What method does the creator use to add a pirate hat to the girl?
-The creator uses the inpaint sketch method, drawing a rough shape of the pirate hat with a mouse, and setting the masked content to 'fill' with a higher denoising strength to generate the hat.
What is a 'lora' and how is it used in the video?
-A 'lora' (low rank adaptation) is a training method to fine-tune a stable diffusion checkpoint for generating specific styles or objects. In the video, it is used to inpaint a robotic arm by downloading a 'real mechanical Parts lora' and applying it to the image.
How can you add a preview image to a lora for better organization?
-To add a preview image to a lora, save an image representative of the lora in the stable diffusion lora folder, renaming it with the same name as the lora file but with a '.preview.png' extension, and refresh the web UI to see the preview.
What settings are important for inpainting a robotic arm using a lora?
-Important settings for inpainting a robotic arm using a lora include setting masked content to 'fill,' inpaint area to 'whole picture,' resize mode to 'resize and fill,' and using a higher denoising strength for better integration.
How can you fix inconsistencies in an image after multiple inpainting steps?
-You can fix inconsistencies in an image by using latent upscaling in the image to image interface, which helps correct minor issues and ensure elements like skin tones are consistent across the image.
Outlines

Cette section est réservée aux utilisateurs payants. Améliorez votre compte pour accéder à cette section.
Améliorer maintenantMindmap

Cette section est réservée aux utilisateurs payants. Améliorez votre compte pour accéder à cette section.
Améliorer maintenantKeywords

Cette section est réservée aux utilisateurs payants. Améliorez votre compte pour accéder à cette section.
Améliorer maintenantHighlights

Cette section est réservée aux utilisateurs payants. Améliorez votre compte pour accéder à cette section.
Améliorer maintenantTranscripts

Cette section est réservée aux utilisateurs payants. Améliorez votre compte pour accéder à cette section.
Améliorer maintenantVoir Plus de Vidéos Connexes

Create Unlimited Logos with AI (For FREE)
HOW much 💵💰💵 did Stable Diffusion COST to Train?
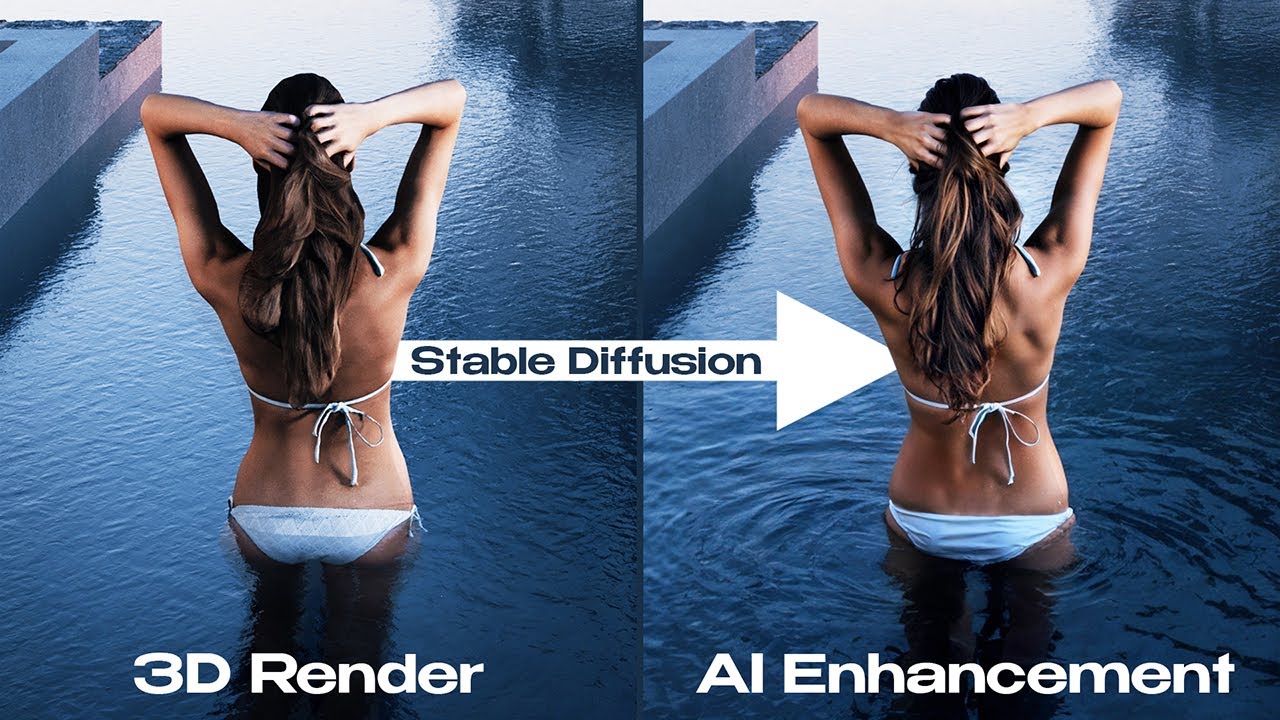
Take Your Images to the Next Level with Stable Diffusion!

Civitai Beginners Guide To AI Art // #1 Core Concepts
NEW Best AI Video Generator? Stable Video Diffusion vs Pika vs Runway ML
The Easiest Stable Diffusion With Quality. Fooocus Tutorial.
5.0 / 5 (0 votes)
