How to Make Flappy Bird in Scratch (Part 1) Player Art and Physics
Summary
TLDRIn this first part of a Scratch Flappy Bird tutorial, the creator walks viewers through the process of creating the bird sprite, coding basic physics for gravity, and adding a flapping mechanic. The tutorial includes steps for designing a pipe sprite and setting up its movement, followed by adjusting the game elements to improve gameplay. The video also covers how to add a blue sky background and explains how to handle collision detection for when the bird touches pipes or edges. The tutorial concludes with a preview of future updates, encouraging viewers to stay tuned for more.
Takeaways
- 😀 Create a new Scratch project and delete the Scratch Cat sprite to start from scratch.
- 😀 Design the bird sprite by drawing a yellow circle, adding a beak, eye, and wing using the costume editor.
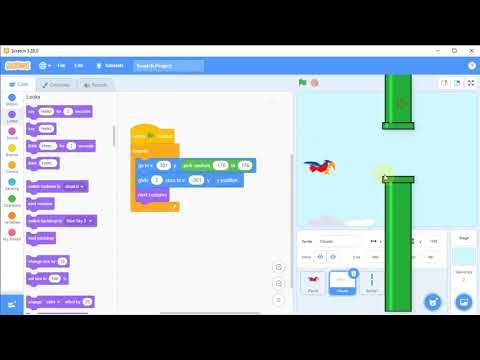
- 😀 Use the 'when green flag clicked' block to set the bird's initial position at X -150 and Y 0.
- 😀 Create a 'gravity' variable and use it to simulate downward movement for the bird using a forever loop.
- 😀 Implement the bird's flapping mechanics with a space key or mouse click, setting gravity to zero and changing it by -10.
- 😀 Add a pipe sprite and draw a long rectangle for the pipe using a green color, then adjust the size and design.
- 😀 Set the bird's size to 80 initially, then scale it down to 60% and 70% for proper fitting through pipes.
- 😀 Make sure pipes move smoothly off-screen by creating clones and using a 'repeat until' loop to move them at a controlled speed.
- 😀 Use a random Y position for pipes to make the game more challenging by positioning them at different heights.
- 😀 Implement game-ending conditions: if the bird touches the pipe or the edge of the screen, stop the game.
- 😀 Set a nice blue sky background and mention future features like scrolling backgrounds, scoring, and text engines.
Q & A
Why is the bird sprite's size adjusted multiple times during the tutorial?
-The bird's size is adjusted to ensure it fits well within the game's environment, allowing it to pass through the pipes easily. The size was initially set to 80, then changed to 60%, and later fine-tuned to 70% to balance gameplay mechanics.
What role does the 'gravity' variable play in this game?
-The 'gravity' variable controls the bird's falling speed. It starts at zero and increases by 1 in each iteration of the forever loop, making the bird fall. The bird's Y position is updated based on this gravity value, simulating realistic downward movement.
How does the flapping mechanic work in the game?
-The flapping mechanic is triggered when the space bar is pressed or the mouse is clicked. When activated, the gravity is set to zero and a strong negative gravity value (-10) is applied, causing the bird to move upward. A 'wait until' block ensures the bird can only flap once per input.
Why are the pipes made into clones in the game?
-Cloning the pipes allows for infinite scrolling in the game. The clones are created after a delay, and each one moves across the screen. Once a clone moves off-screen, it is deleted, keeping the game running smoothly and avoiding performance issues.
What is the purpose of setting the pipe's Y-position to a random value?
-Setting the Y-position of the pipes to a random value between -80 and 80 ensures that each pipe appears at different heights. This adds variety and challenge to the game, making it more engaging for the player.
Why is there a transparent rectangle over the pipe sprite?
-The transparent rectangle over the pipe sprite helps bypass a Scratch limitation by allowing the pipes to move smoothly off the screen without being cut off by the stage boundaries. This ensures that the pipes can scroll seamlessly.
What effect does the 'stop all' block have in the game?
-'Stop all' halts the entire game when the bird touches a pipe or the edge of the screen. This is the game-over mechanic, ensuring the game stops when a collision is detected.
How do the pipes move across the screen in the game?
-The pipes are moved leftward in a forever loop, where their X-position is repeatedly decreased by 3 units. This gives the illusion of the pipes moving across the screen toward the bird, creating the core gameplay mechanic of avoiding obstacles.
Why is the bird's size set to 70% at the end of the tutorial?
-The bird's size is set to 70% to provide the best balance between being small enough to fit through the pipes but large enough to be visible and identifiable to the player. This final adjustment ensures the bird is the right size for the gameplay.
What features are mentioned as upcoming in future tutorial parts?
-Future parts of the tutorial will focus on adding more advanced features like scrolling backgrounds, scoring systems, and a text engine for displaying the score. These features will enhance the gameplay experience and make the game more complete.
Outlines

Cette section est réservée aux utilisateurs payants. Améliorez votre compte pour accéder à cette section.
Améliorer maintenantMindmap

Cette section est réservée aux utilisateurs payants. Améliorez votre compte pour accéder à cette section.
Améliorer maintenantKeywords

Cette section est réservée aux utilisateurs payants. Améliorez votre compte pour accéder à cette section.
Améliorer maintenantHighlights

Cette section est réservée aux utilisateurs payants. Améliorez votre compte pour accéder à cette section.
Améliorer maintenantTranscripts

Cette section est réservée aux utilisateurs payants. Améliorez votre compte pour accéder à cette section.
Améliorer maintenantVoir Plus de Vidéos Connexes
Tutorial Membuat Game Flappy Bird di Scratch, #3 Kelas 5 SD

Flappy Bird Game di Scratch Mapel Informatika
Scratch - Membuat Game Flappy Bird
CREATE a Flappy Bird Game in Unity with CLEAN CODE Like a PRO!

How to Make a 2D Platformer in Godot (Beginner Tutorial)
07. Scratch - Drawing and Animating a Sprite
5.0 / 5 (0 votes)
