🔥 3D VISUAL!! || Automatic Crossbar System Simulation Using HC-SR04 + A4988!
Summary
TLDRIn this video, Alvian demonstrates how to create an automated gate barrier using a NeyMA 17 stepper motor and an ultrasonic sensor. He explains the step-by-step process of setting up the components using an Arduino Uno, including wiring the stepper motor driver, ultrasonic sensor, and necessary external power supply. The program is written without libraries, focusing on reading sensor data to control the gate’s movement. When an object is detected within a specific range, the barrier opens, and when the object moves away, the barrier closes. Alvian also shares details about the university's electrical engineering program and encourages viewers to subscribe to the channel.
Takeaways
- 😀 Introduction to creating an automatic gate using NeyMA stepper motor 17 and ultrasonic sensor.
- 😀 Mention of the Teknik Elektro department at Universitas Sadalan and the opportunity to join teams like robotics and electric vehicle teams.
- 😀 Encouragement to like, comment, and subscribe to the channel for more content.
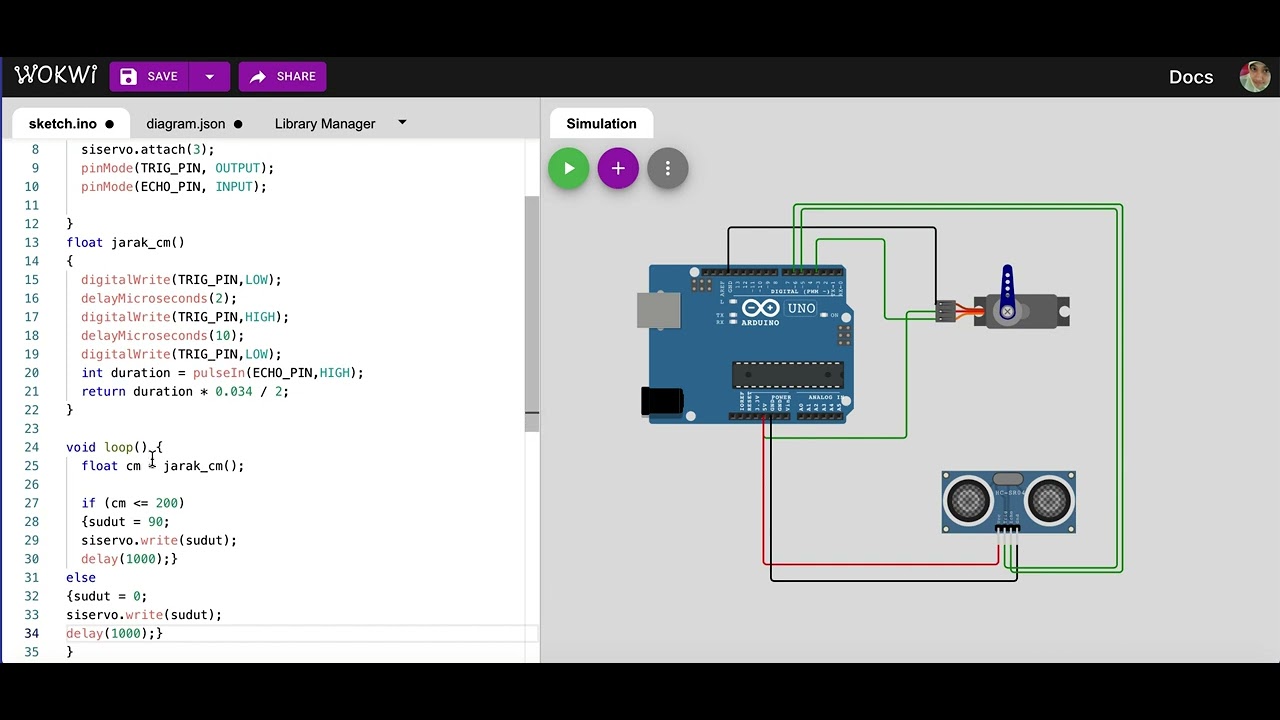
- 😀 The tutorial uses a simulation from WWI to design the automatic gate system with the necessary components.
- 😀 Key components involved: Arduino Uno, stepper motor, A4988 driver, and ultrasonic sensor (HCSR04).
- 😀 External 12V power is required to drive the stepper motor.
- 😀 Wiring details are carefully explained for the motor driver, sensor, and Arduino, with specific pin connections.
- 😀 The program does not use any external libraries and is written entirely with custom code.
- 😀 The program reads the distance from the ultrasonic sensor and moves the stepper motor based on the object’s proximity.
- 😀 When the detected object is within 150 cm, the stepper motor moves the gate open. If the object moves away, the gate closes.
- 😀 A 3D visual explanation is provided to show how the system works with the stepper motor controlling the gate opening and closing based on sensor feedback.
Q & A
What is the main goal of the tutorial in the video?
-The main goal of the tutorial is to demonstrate how to create an automatic gate barrier using a stepper motor, an ultrasonic sensor, and an Arduino. The tutorial walks through the wiring, programming, and simulation of the system.
Which components are used in the automatic gate project?
-The project uses a bipolar stepper motor, an A4988 stepper motor driver, an HCSR04 ultrasonic sensor, and a 12V external power supply for the motor driver.
What is the significance of using a stepper motor in this project?
-The stepper motor is used to control the movement of the gate barrier. It enables precise control over the opening and closing of the gate based on the detected distance from the ultrasonic sensor.
Why is the HCSR04 ultrasonic sensor used in this project?
-The HCSR04 ultrasonic sensor is used to detect the distance between the gate and any object (such as a vehicle). If the distance is less than 150 cm, it triggers the stepper motor to open the gate; otherwise, the gate remains closed.
How does the program calculate the distance using the ultrasonic sensor?
-The program calculates the distance by measuring the time it takes for the ultrasonic pulse to travel to an object and back. The duration is then multiplied by 0.034 and divided by 2 to convert the duration into a distance in centimeters.
What happens when the detected distance is less than 150 cm?
-When the detected distance is less than 150 cm, the stepper motor is instructed to rotate in a clockwise direction, opening the gate. The motor will continue to move until it reaches a specified position, typically 5,000 steps.
What occurs when the distance exceeds 150 cm?
-When the distance exceeds 150 cm, it indicates that there is no object in front of the gate, and the program changes the motor direction. The motor will rotate counterclockwise to close the gate and return to its starting position.
Why is the program written without using libraries?
-The program is written without libraries to provide a more hands-on approach for learning. This allows viewers to understand how each part of the system works at a lower level, without relying on external libraries.
How does the simulation help in understanding the project?
-The simulation allows the user to visualize the operation of the gate system, test different distance values, and see how the motor reacts in real time. This makes it easier to understand the functionality before building the physical system.
What is the purpose of the serial monitor in the simulation?
-The serial monitor displays the distance readings from the ultrasonic sensor in real time. It helps the user monitor the sensor’s performance and see the exact value that determines whether the gate will open or close.
Outlines

Cette section est réservée aux utilisateurs payants. Améliorez votre compte pour accéder à cette section.
Améliorer maintenantMindmap

Cette section est réservée aux utilisateurs payants. Améliorez votre compte pour accéder à cette section.
Améliorer maintenantKeywords

Cette section est réservée aux utilisateurs payants. Améliorez votre compte pour accéder à cette section.
Améliorer maintenantHighlights

Cette section est réservée aux utilisateurs payants. Améliorez votre compte pour accéder à cette section.
Améliorer maintenantTranscripts

Cette section est réservée aux utilisateurs payants. Améliorez votre compte pour accéder à cette section.
Améliorer maintenantVoir Plus de Vidéos Connexes

Project Membuat Palang pintu otomatis Jalan tol

IoT Smart Gate Design for Smart Home | Arduino, Ultrasonic Sensor, Servo

SIMULASI PALANG KERETA API OTOMATIS MENGGUNAKAN ARDUINO UNO DENGAN SIMULATOR WOKWI
Simulasi kontrol gerakan servo dengan sensor ultrasonik | mikrokontroler arduino di wokwi.com

[ Projek Y EE 014 ] Diy Automatic Dustbin || Arduino Nano || Ultrasonic Sensor || Servo Motor

handsanitizer otomatis menggunakan arduino UNO R3 CH340. baca deskripsi ya
5.0 / 5 (0 votes)
