Google Drive Options - Hindi

Spoken-Tutorial IIT Bombay
8 Oct 201516:35

Summary

TLDRThis spoken tutorial introduces Google Drive options, guiding users through various features such as creating documents, spreadsheets, and presentations, uploading and sharing files and folders, and using other functionalities like adding stars, making copies, and deleting items. It also covers file organization through folders, sharing documents with different permission levels, and viewing revision history. The tutorial emphasizes the importance of managing files efficiently within Google Drive, offering practical tips for collaborating with others using shared documents and Google Drive tools.

Takeaways

  • 📁 The tutorial covers creating documents, spreadsheets, and presentations in Google Drive.
  • 🌐 To access Google Drive, you need an active internet connection and a web browser, with Firefox being used in this tutorial.
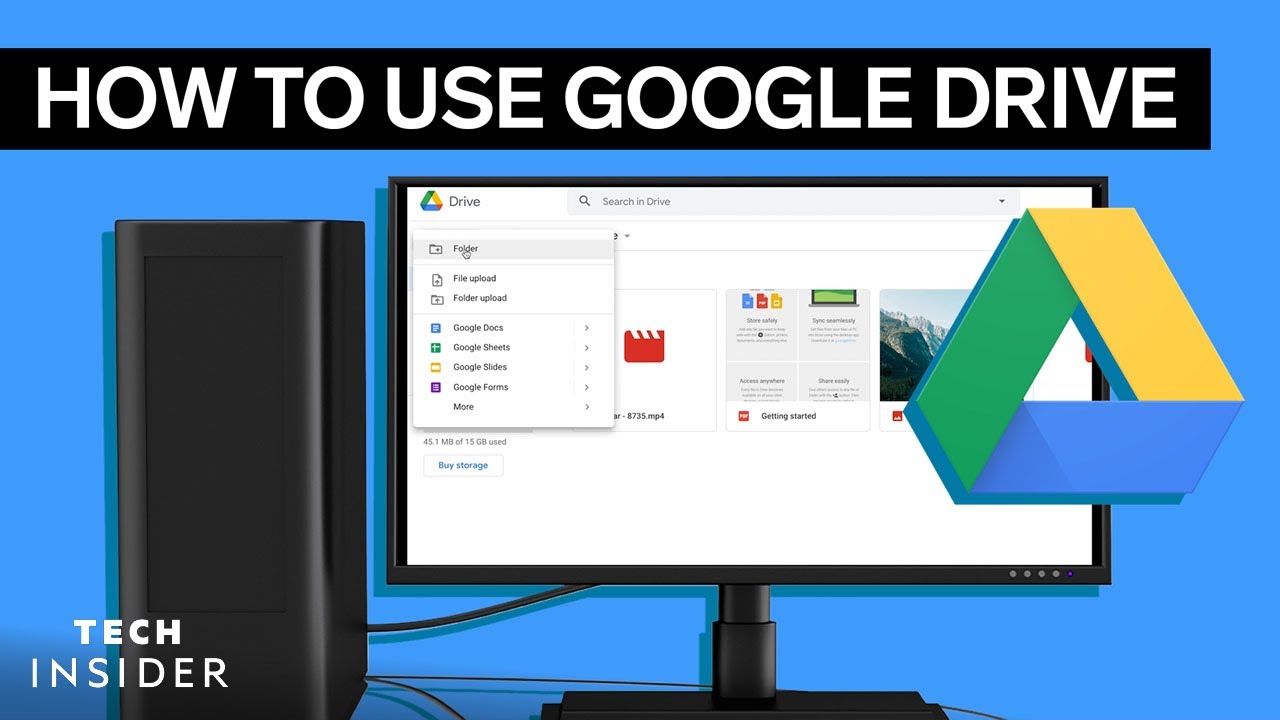
  • 🗂️ The 'New' button in Google Drive lets you create folders, upload files, and create Google Docs, Sheets, and Slides.
  • 📄 Files uploaded or created are stored in 'My Drive,' which is visible in the central area of the screen.
  • 🔄 The 'Shared with Me' menu shows files shared by others, though it is empty if no files are shared yet.
  • 🚮 Deleted files are temporarily stored in the Trash for 30 days, after which they can be permanently deleted.
  • ⭐ Important files can be marked with a star to make them easily accessible in the 'Starred' menu.
  • 🔗 You can share Google Drive files with others by providing their email, with options like 'Can Edit,' 'Can Comment,' or 'Can View' for access permissions.
  • ✏️ Revisions made by multiple users in a shared document can be tracked using the 'See Revision History' option.
  • 🖇️ Files in Google Drive can also be shared using a shareable link, allowing anyone with the link to view the document.

Q & A

  • What are the key features available in Google Drive as mentioned in the tutorial?

    -The tutorial covers creating documents, spreadsheets, and presentations, uploading and sharing files and folders, and using various menu options like 'New', 'My Drive', 'Shared with Me', 'Recent', 'Starred', and 'Trash'.

  • What prerequisites are required to use Google Drive effectively as mentioned in the script?

    -The user needs an active internet connection and any web browser. In the tutorial, Firefox is used as an example.

  • How can you organize files within Google Drive?

    -Files can be organized by creating folders using the 'New' button, and they can be moved into folders by dragging and dropping them. You can also star important files for easier access.

  • How do you create a new document in Google Drive?

    -Click on the 'New' button, select 'Google Docs', and a new document will open in a new tab. You can rename the document and start typing content.

  • What sharing options are available when sharing a document with other users?

    -When sharing a document, you can choose between 'Can Edit', 'Can Comment', and 'Can View' modes, which allow the recipient to either edit, comment, or only view the document.

  • How can you manage revisions made by different users in a shared document?

    -Google Docs tracks revisions made by different users. Each user's changes are shown in a unique color. You can accept or reject suggestions, and view revision history to see changes.

  • How do you share a document via a shareable link in Google Drive?

    -Click the 'Share' button, then 'Get shareable link'. You can copy the link and share it with others. By default, the link allows users to view the document, but you can adjust permissions.

  • How can you restore or permanently delete files in Google Drive?

    -Deleted files go to the 'Trash' menu and remain there for 30 days. You can either restore them or permanently delete them by selecting 'Empty Trash'.

  • What is the process to upload a file to Google Drive?

    -Click the 'New' button, select 'File Upload', choose the file from your computer, and upload it. The file will appear in the central panel once the upload is complete.

  • How can you make a copy of a file in Google Drive?

    -Right-click on the file and select 'Make a Copy'. A duplicate of the file will be created and stored in the same location.

Outlines

00:00

🚀 Introduction to Google Drive Options

This paragraph introduces the tutorial on Google Drive options, highlighting the basic features users will learn, such as creating documents, spreadsheets, and presentations. It also discusses uploading files and folders, and sharing options. The user is informed about the necessary prerequisites: a working internet connection and a web browser (Firefox in this case). The paragraph walks through accessing Google Drive, showing the interface with menus, icons, and files, explaining the contents of the default 'My Drive' menu, and the basic file organization within it.

05:03

📁 Creating and Uploading Files and Folders in Google Drive

This paragraph explains how to create folders and upload files in Google Drive. It describes how folders can be used for organizing files and gives step-by-step instructions for creating a folder, naming it, and uploading files. Additionally, it outlines how to move files into folders by dragging and dropping, and how the sidebar menus in Google Drive function, including the 'My Drive' dropdown, which reveals subfolders. It also introduces creating Google Docs, Sheets, and Slides directly from within Drive.

10:06

📝 Creating and Editing Google Docs

This paragraph walks through the process of creating a new Google Doc within Drive. It details how to rename the document, type content, and use basic formatting options similar to other office suites. The auto-save functionality is emphasized, along with the ability to track revisions and view changes made by other collaborators. It introduces revision history, showing how to view document edits made by multiple users, each marked in different colors.

15:06

🔗 Sharing and Collaborating on Google Documents

The paragraph focuses on sharing Google Docs with other users. It explains the three permission modes (Can Edit, Can Comment, and Can View), and how to add multiple email addresses for collaboration. The use of the 'Add a note' feature for sharing additional information with collaborators is mentioned. Furthermore, it outlines the process of accepting or rejecting suggestions made by others, managing comments, and resolving comment threads. Revision history is also revisited to highlight how changes by different users are tracked.

Mindmap

Keywords

💡Google Drive

Google Drive is an online storage service where users can save files, create documents, spreadsheets, and presentations, and share these with others. The video provides an overview of how to use Google Drive's features, including creating new files, uploading content, and sharing it with other users.

💡My Drive

My Drive is a central folder within Google Drive that stores all of the user's personal files and folders. The tutorial explains how to view files in My Drive, organize them into folders, and manage uploaded content, demonstrating its significance as a personal storage space.

💡Shared with Me

Shared with Me is a section in Google Drive that displays files and folders shared by others with the user. In the video, this feature is explained as a way to access documents that collaborators have granted access to, although the example mentions that no files have yet been shared with the user.

💡File Upload

File Upload refers to the process of adding files from a local device to Google Drive. The video shows how users can select and upload individual files or entire folders, allowing them to store data in the cloud and access it from anywhere with an internet connection.

💡Folder Creation

Folder Creation is the process of making new directories in Google Drive to organize files. The tutorial demonstrates how to create a folder and name it appropriately, emphasizing the importance of organizing files for easy access and efficient workspace management.

💡Starred

Starred is a feature in Google Drive that allows users to mark important files for quick access. The video explains how to add a star to a file by right-clicking it, and then view it in the 'Starred' section, which functions as a shortcut for frequently used documents.

💡Revision History

Revision History is a Google Drive feature that tracks changes made to a document by different users. In the tutorial, this is demonstrated through the ability to see edits made by collaborators in different colors and accept or reject suggestions, offering a detailed view of a document's editing history.

💡Shareable Link

A Shareable Link is a feature that allows users to share access to a Google Drive document by generating a URL. The video shows how this link can be shared with others, enabling them to view or edit the document, depending on the permissions set by the owner.

💡Google Docs

Google Docs is a word processing application available through Google Drive that allows users to create, edit, and share text documents. The video walks through the process of creating a new Google Doc, editing its content, and renaming the file, highlighting its similarity to traditional office software.

💡Permission Settings

Permission Settings in Google Drive allow document owners to control how others interact with shared files. The tutorial explains the three levels of access: 'Can Edit', 'Can Comment', and 'Can View', demonstrating how these settings allow for collaborative work with varying degrees of control.

Highlights

Introduction to Google Drive options and how to create documents, spreadsheets, and presentations.

Explains the importance of having a working internet connection and web browser (Firefox in this case).

Steps to access Google Drive, including the location of key menus like 'My Drive', 'Shared with me', 'Recent', 'Starred', and 'Trash'.

Demonstration of uploading files and folders to Google Drive and how uploaded files appear in the center panel.

Introduction to organizing files with folders, and how creating folders in Google Drive helps better manage content.

Step-by-step guide to adding stars to important files and how starred files appear in the 'Starred' menu.

How to create a copy of a file and delete it, with the file moving to the 'Trash' where it can be permanently removed after 30 days.

Demonstration of creating new documents, spreadsheets, and presentations in Google Drive using the 'New' button.

How to rename a document by clicking on the untitled text and changing it to a meaningful name.

Explanation of Google Docs' auto-save feature and how to reopen and edit files directly from 'My Drive'.

Guide to sharing a document with others using the 'Share' button, including setting different permissions (can edit, can comment, can view).

Explains the difference between editing permissions: 'can edit' for making changes, 'can comment' for suggestions, and 'can view' for read-only access.

How to track changes in Google Docs using revision history, where edits are highlighted by different colors for each user.

How to manage and accept or reject suggestions made by collaborators in a shared document.

Instructions on how to create and share a document link with 'Anyone with the link can view' permission, allowing easy sharing without needing specific email addresses.

Transcripts

play00:00

ग ड्राइव ऑप्शंस के स्पोकन ट्यूटोरियल में

play00:03

आपका स्वागत है इस ट्यूटोरियल में हम ग

play00:07

ड्राइव में उपलब्ध निम्न विकल्पों के बारे

play00:09

में सीखेंगे जैसे एक डॉक्यूमेंट एक

play00:13

स्प्रेडशीट और एक प्रेजेंटेशन बनाना

play00:16

फाइल्स और फोल्डर्स अपलोड करना और शेयरिंग

play00:20

विकल्प इस ट्यूटोरियल के लिए आपको एक

play00:23

कार्यकारी इंटरनेट कनेक्शन और किसी भी वेब

play00:26

ब्राउजर की जरूरत होगी मैं firefox.exe

play00:29

वेब ब्राउजर प्रयोग

play00:31

करूंगी पूर्व आवश्यकता में आपको

play00:53

gmail-id आइकन देख सकते हैं जब हम इसके

play00:56

ऊपर माउस लेकर जाते हैं हेल्प टेक्स्ट कह

play00:59

ता है एप्स इस पर क्लिक करें यह हमें कुछ

play01:28

googleapis.com व्यवस्थित भी कर सकते हैं

play01:31

इस ट्यूटोरियल में हम विशेष रूप से ड्राइव

play01:34

के बारे में सीखेंगे अतः अब मैं ड्राइव पर

play01:37

क्लिक करती हूं यह नई टैब में ग ड्राइव

play01:41

पेज खोलेगा पेज में सबसे ऊपर हम एक सर्च

play01:45

बार देख सकते हैं बाई तरफ कुछ मेन्यूस

play01:49

है और ऊपरी दाई तरफ कुछ आइकंस

play01:53

हैं केंद्र में हम दो फाइल्स देख सकते हैं

play01:58

पहला वाला google3 म ने अकाउंट बनाते समय

play02:01

हमारे साथ शेयर किया था दूसरी वाली वो

play02:05

फाइल है जो हमने अपने आप पहले ही अपलोड की

play02:09

थी अब बाए तरफ मेन्यूस पर एक नजर डालते

play02:13

हैं हमारे पास निम्न मेन्यूस हैं न्यू माय

play02:16

ड्राइव शेयर्ड विद मी ग फोटोज रिसेंट

play02:22

स्टार्ट और

play02:25

ट्रैश डिफॉल्ट रूप से माय ड्राइव मेन्यू

play02:28

जनित किया जाएगा और इसकी विषय वस्तु

play02:31

केंद्र में दिखाई देगी सारी फाइल्स और

play02:34

फोल्डर्स केंद्र के क्षेत्र में दिखाई

play02:36

देंगे अतः हम वह पीडीएफ और जिप फाइल देख

play02:40

सकते हैं जो यहां हमने पिछले ट्यूटोरियल

play02:43

में अपलोड कर दी

play02:45

थी वह फाइल्स जो हमने बनाई और अपलोड की है

play02:49

वह भी माय ड्राइव में संचित की जाएगी अगला

play02:53

मेन्यू शेयर्ड विद मी है मैं इस पर क्लिक

play02:55

करती हूं यदि कोई मेरे साथ एक फाइल या

play02:59

डॉक्यूमेंट शेयर करता है तो यह इस मेन्यू

play03:02

में दिखाई देगा अभी तक किसी ने भी मेरे

play03:05

साथ कोई फाइल शेयर नहीं की है इसलिए यह

play03:08

खाली है हाल ही में

play03:10

google's को ड्राइव में एक्सेस करने के

play03:13

लिए एक शॉर्टकट लिंक बनाया है हम इस

play03:15

ट्यूटोरियल के लिए इस विकल्प को छोड़

play03:17

देंगे रिसेंट मेन्यू उन फाइल्स या

play03:20

डॉक्यूमेंट की सूची दिखाएगा जो हाल ही में

play03:23

खोले गए थे यह माय ड्राइव और शेयर्ड विद

play03:26

मी दोनों विषय वस्तुएं

play03:28

दिखाएगा अतः यहां हम पीडीएफ और जप फाइल्स

play03:33

देख सकते हैं क्योंकि हमने यह पहले ही खोल

play03:35

लिया था स्टार्ट अगर हमने किसी फाइल या

play03:38

डॉक्यूमेंट को इंपॉर्टेंट मार्क किया है

play03:41

तो फाइल इस मेन्यू में दिखाई देगी अब माय

play03:45

ड्राइव मेन्यू पर वापस जाते हैं और अपनी

play03:48

पीडीएफ फाइल पर राइट क्लिक करते हैं अब ऐड

play03:51

स्टार विकल्प चुनते हैं आगे स्टार्ट पर

play03:56

क्लिक करते हैं यहां हमारी फाइल है अब मैं

play04:00

इस फाइल की एक कॉपी बनाती हूं अतः एक बार

play04:03

फिर फाइल पर राइट क्लिक करें और मेक अ

play04:07

कॉपी विकल्प चुने अब हमारे पास दो फाइल्स

play04:11

हैं उनमें से एक को मिटाएं फाइल चुने और

play04:16

कीबोर्ड पर डिलीट की दबाएं मिटाई हुई

play04:20

फाइल्स से डॉक्यूमेंट ट्रैश मेनू में

play04:22

दिखाई देंगी यद्यपि मिटाया जाना अस्थाई है

play04:27

हम ट्रैश मेन्यू से एमटी ट्रैश विकल्प को

play04:30

चुनकर सारी फाइल्स को पूर्ण रूप से मिटा

play04:33

सकते

play04:34

हैं ट्रैश मेन्यू में सारी फाइल्स स्वता

play04:37

ही 30 दिन बाद

play04:59

है अब माय ड्राइव पर वापस आते हैं माय

play05:02

ड्राइव विकल्प में हम केंद्र के क्षेत्र

play05:05

में राइट क्लिक कर सकते हैं अंततः ऊपर माय

play05:10

ड्राइव ड्रॉप डाउन मेन्यू पर क्लिक करें

play05:13

अब न्यू विकल्प के साथ खोज करते हैं न्यू

play05:17

बटन पर क्लिक करें यह निम्न विकल्प

play05:20

दिखाएगा फोल्डर फाइल अपलोड ग डॉक्स शीट्स

play05:25

स्लाइड्स और अन्य हम एक-एक करके प्रत्येक

play05:29

विकल्प देखेंगे हम फोल्डर विकल्प प्रयोग

play05:32

करके एक फोल्डर बना सकते हैं इस पर क्लिक

play05:35

करें तुरंत ही यह नाम पूछता है आप फोल्डर

play05:40

का नाम पोकन ट्यूटोरियल देते

play05:42

हैं और क्रिएट बटन पर क्लिक करते

play05:46

हैं डिफॉल्ट रूप से यह फोल्डर माय ड्राइव

play05:50

में दिखेगा हम इसे यहां केंद्र में देख

play05:53

सकते

play05:54

हैं फोल्डर्स हमारी फाइल्स को बेहतर तरह

play05:58

से व्यवस्थित करने में मद मदद करते हैं

play06:00

अतः हम अलग-अलग फोल्डर जैसे पर्सनल वर्क

play06:04

आदि बना सकते हैं किसी भी फाइल को अपलोड

play06:08

करने के लिए पहले न्यू बटन पर फिर फाइल

play06:11

अपलोड पर क्लिक करें यह फाइल ब्राउजर

play06:14

विंडो खोलेगा उस फाइल को ब्राउज करें और

play06:17

चुने जो आप अपलोड करना चाहते हैं मैं

play06:20

डेस्कटॉप से

play06:29

देख सकते हैं यह फाइल के साइज और इंटरनेट

play06:32

की स्पीड के आधार पर कुछ समय ले सकता है

play06:35

एक बार पूरा होने के बाद अपलोड की हुई

play06:38

फाइल केंद्र में दिखाई देगी अब नीचे वाली

play06:41

प्रोग्रेस विंडो को बंद करें उसी तरह हम

play06:45

फोल्डर अपलोड विकल्प प्रयोग करके ड्राइव

play06:48

पर एक फोल्डर अपलोड कर सकते हैं यह

play06:52

विशेषता केवल कुछ ब्राउजर्स में ही उपलब्ध

play06:55

हो सकती है उदाहरण के लिए

play06:59

कोई फाइल को स्पोकन ट्यूटोरियल फोल्डर में

play07:01

कैसे मूव कर सकते हैं केवल इस तरह से फाइल

play07:05

को फोल्डर में खींचे और छोड़े अब बाई तरफ

play07:09

माय ड्राइव विकल्प को पास से

play07:12

देखें ध्यान दें कि इसके बाई तरफ एक छोटा

play07:16

सा त्रिभुज है इस पर क्लिक करना माय

play07:19

ड्राइव में सब फोल्डर दिखाएगा देखें यहां

play07:22

हमारा फोल्डर स्पोकन ट्यूटोरियल है और

play07:25

यहां इसके अंदर फाइल एक्सवा जड डीटी है

play07:30

हमारे दैनिक कार्य के लिए हम डॉक्यूमेंट

play07:33

स्प्रेडशीट और प्रेजेंटेशंस प्रयोग करते

play07:35

हैं क्या ड्राइव में उन्हें बनाना और

play07:38

व्यवस्थित करना संभव है हां यह संभव है

play07:44

google2 स्प्रेडशीट्स और प्रेजेंटेशंस बना

play07:48

सकते हैं अतः हमारे पास डॉक्यूमेंट बनाने

play07:51

के लिए

play07:59

ड है उदाहरण के लिए मैं केवल दिखाऊंगी कि

play08:03

ग डॉक्स प्रयोग करके एक उदाहरण कैसे बनता

play08:06

है एक नया डॉक्यूमेंट बनाने के लिए न्यू

play08:10

बटन पर क्लिक करें और ग डॉक्स विकल्प चुने

play08:13

यह नई टैब में एक खाली डॉक्यूमेंट

play08:17

खोलेगा हम देख सकते हैं कि मेन्यूस और

play08:20

टेक्स्ट फॉर्मेटिंग विकल्प अन्य ऑफिस सूट

play08:24

की तरह ही है ऊपर ध्यान दें कि डॉक्यूमेंट

play08:27

का शीर्षक अनटाइटल्ड

play08:29

डॉक्यूमेंट है यह एडिट होने वाला शीर्षक

play08:32

है शीर्षक को दोबारा नाम देने के लिए

play08:35

टेक्स्ट पर क्लिक करें रिनेम डॉक्यूमेंट

play08:38

विंडो खुलती है यहां हम अपने डॉक्यूमेंट

play08:42

के लिए एक उचित शीर्षक टाइप कर सकते हैं

play08:45

मैं टाइप करूंगी माय फर्स्ट ग

play08:48

डॉक और ओके पर क्लिक

play08:51

करूंगी शीर्षक में बदलाव पर ध्यान दें आगे

play08:56

मैं यहां कुछ कंटेंट टाइप करती हूं मानी

play08:59

वेलकम टू

play09:29

अतः हम तारीख में टुडे और उस समय के साथ

play09:33

केवल एक यूजर रेबेका रेमंड देख सकते हैं

play09:36

अगर

play09:40

google3 प्रत्येक यूजर के द्वारा किए गए

play09:43

सारे बदलावों को सूचीबद्ध करेगा प्रत्येक

play09:46

यूजर को एक अद्वितीय रंग देकर हम इस

play09:48

ट्यूटोरियल में यह विशेषता थोड़ी देर बाद

play09:51

देखेंगे रिवीजन हिस्ट्री को बंद करें अब

play09:55

मैं इस टैप को बंद करती हूं

play09:59

अपने आप ही सेव हो जाएगा एक बार फिर हम

play10:02

माय ड्राइव में हैं और हम यहां अपनी फाइल

play10:05

देख सकते हैं इसे दोबारा खोलने के लिए इस

play10:08

पर डबल क्लिक करें अब वेलकम टू

play10:25

google3 पर क्लिक करें हम डेट टाइम स्प और

play10:29

यूजर की जानकारी के साथ फाइल के सारे

play10:32

रिवीजन देख सकते

play10:34

हैं अगर विविध रिवीजन नहीं दिखते तो नीचे

play10:38

शो मोर डिटेल रिवीजन बटन पर क्लिक करें

play10:43

ऊपर नवीनतम रिवीजन के साथ रिवीजन

play10:46

क्रमानुसार व्यवस्थित किए गए हैं प्रत्येक

play10:50

रिवीजन पर क्लिक करें और समझे कि यह

play10:52

विशेषता कैसे कार्य करती है अब मैं यह

play10:55

डॉक्यूमेंट दो अन्य यूजर्स के साथ शेयर

play10:58

करती हूं इसके लिए ऊपरी दाई तरफ शेयर बटन

play11:01

पर क्लिक करें शेयर विद अदर्स डायलॉग

play11:04

बॉक्स दिखता है पीपल टेक्स्ट बॉक्स में

play11:08

हमें उन लोगों की ईमेल आईडी प्रवेश करनी

play11:10

है जिनके साथ हम यह डॉक्यूमेंट शेयर करना

play11:13

चाहते हैं अतः मैं टाइप करूंगी

play11:17

0808 आ

play11:19

बकी

play11:21

gmail.com ध्यान दें कि ऑटोफिल विशेषता

play11:24

यहां उन ईमेल आईडी के लिए उपलब्ध है जिनको

play11:28

हमने पहले ईमेल्स भेजे थे तीन मोड्स होते

play11:31

हैं जिनमें हम अन्य यूजर्स के साथ

play11:34

डॉक्यूमेंट शेयर कर सकते हैं इन तीन मोड्स

play11:36

को देखने के लिए यहां इस बटन पर क्लिक

play11:39

करें कैन एडिट कैन कमेंट कैन व्यू कैन

play11:43

एडिट विकल्प अन्य यूजर्स को डॉक्यूमेंट

play11:46

में बदलाव करने की अनुमति देता

play11:49

है कैन कमेंट विकल्प अन्य यूजर्स को

play11:52

बदलावों का सुझाव देने की अनुमति देता है

play11:55

कैन व्यू विकल्प अन्य यूजर्स को केवल

play11:58

देखने की की अनुमति देता है यह कोई बदलाव

play12:01

नहीं ला सकता और ना ही बदलाव का सुझाव दे

play12:03

सकता है अब

play12:05

0808 आई एम बैकी को कैन एडिट विकल्प देते

play12:09

हैं मैं एलिब ऑफि @ gmail.com को भी जोड़ी

play12:15

दो ईमेल आईडी के बीच एक कॉमा लगाना याद

play12:19

रखें जैसे ही हम उस ईमेल आईडी को प्रवेश

play12:22

करते हैं विंडो में एक बदलाव होता है हमें

play12:25

ऐड अ नोट टेक्स्ट क्षेत्र मिलता है अगर हम

play12:28

अन्य यूजर्स को इस डॉक्यूमेंट के बारे में

play12:32

कुछ जानकारी देना चाहते हैं तो हम इसे

play12:34

यहां टाइप कर सकते हैं मैं टाइप करूंगी

play12:37

प्लीज फाइंड अटैच अ डॉक्यूमेंट फॉर

play12:40

टेस्टिंग पर्पस काइंडली मॉडिफाई और सजेस्ट

play12:43

एज पर द परमिशन गिवन टू यू थैंक्स रेड बकी

play12:47

अंततः शेयर करने की इस प्रक्रिया को पूरा

play12:50

करने के लिए सेंड बटन पर क्लिक करें यह

play12:53

अन्य यूजर्स को हमारे मैसेज के साथ एक

play12:55

ईमेल नोटिफिकेशन और शेयर किए हुए

play12:58

डॉक्यूमेंट का लिंक भेजेगा एक बार फिर

play13:00

शेयर बटन पर क्लिक करें फिर एडवांस्ड पर

play13:03

क्लिक करें अब एसटी लिबरी ऑफिस यूजर के

play13:07

लिए हम शेयरिंग मोड को कैन कमेंट में

play13:10

बदलेंगे

play13:11

अंततः सेव चेंजेज बटन पर और फिर डन पर

play13:16

क्लिक करें और इस डॉक्यूमेंट को बंद करें

play13:19

अब मानिए कि दोनों यूजर्स ने शेयर किए हुए

play13:23

डॉक्यूमेंट में कुछ संशोधन किए हैं जब हम

play13:26

कुछ समय बाद वो डॉक्यूमेंट दोबारा खोलते

play13:29

हैं तो हम अन्य शेयर्ड यूजर्स के द्वारा

play13:32

किए गए एडिट्स देख सकते हैं क्योंकि एसटी

play13:35

लिब्र ऑफिस @ gmail.com के पास केवल सुझाव

play13:39

की अनुमति थी तो हम उस यूजर द्वारा दिए गए

play13:42

सुझाव देख सकते हैं अपने माउस को सुझाव

play13:45

बॉक्स पर टिक और क्रॉस मार्क्स के ऊपर

play13:47

लाएं टिक मार्क बताता है एक्सेप्ट सजेशन

play13:51

और क्रॉस मार्क बताता है रिजेक्ट

play13:54

सजेशन अब मैं एक सुझाव को स्वीकार करती

play13:57

हूं और दूसरे को छोड़ देती

play14:00

हूं हम यहां

play14:02

0808 आई एम बकी से एक सुझाव देख सकते हैं

play14:06

और यहां हम रिजॉल्व बटन देख सकते हैं कैन

play14:10

एडिट विकल्प के साथ यूजर कमेंट टेक्स्ट पर

play14:13

क्लिक करके उस कमेंट का उत्तर दे सकते हैं

play14:17

कमेंट थ्रेड को हटाने के लिए रिजॉल्व बटन

play14:20

पर क्लिक करें हम इस डॉक्यूमेंट में 0808

play14:24

आईम बकी के द्वारा किए गए किसी भी संशोधन

play14:27

को नहीं देख सकते हैं याद करें कि

play14:29

डॉक्यूमेंट में इस यूजर को एडिट की अनुमति

play14:32

थी अतः हम यह कैसे पता कर सकते हैं कि उस

play14:36

यूजर ने क्या बदलाव किए थे उसके लिए हम

play14:39

अपनी रिवीजन हिस्ट्री देख सकते हैं इसे

play14:42

खोलने के लिए हम फाइल पर और फिर सी रिवीजन

play14:46

हिस्ट्री पर क्लिक करेंगे हम देख सकते हैं

play14:50

कि

play14:51

0808 आई एम बैकी ने कुछ बदलाव किए और यह

play14:55

अलग रंग में दिखता है हम एसटी ऑ gmail.com

play15:00

द्वारा दिए गए सुझावों को भी अलग रंग में

play15:03

देख सकते हैं और अवश्य ही ओनर होने के

play15:06

नाते हम अपना कार्य अलग रंग में देखेंगे

play15:10

अब रिवीजन हिस्ट्री विंडो को बंद करते हैं

play15:13

डॉक्यूमेंट शेयर करने का एक अन्य तरीका है

play15:16

शेयर बटन पर क्लिक

play15:18

करें ऊपरी दाए कोने पर शेयर विद अदर्स

play15:22

विंडो में हम गेट शेरेबल लिंक टेक्स्ट देख

play15:26

सकते हैं इस पर क्लिक करें यह कहता है एनी

play15:29

वन विद द लिंक कैन व्यू यह इस डॉक्यूमेंट

play15:33

के लिए एक लिंक बनाता है अब हम यह लिंक

play15:36

किसी भी ईमेल आईडी को भेज सकते हैं जिसका

play15:39

मतलब है कि कोई भी जिसके पास यह लिंक है

play15:42

उस डॉक्यूमेंट को देख सकता है इसके साथ हम

play15:45

इस ट्यूटोरियल के अंत में आ गए हैं इसको

play15:47

सराच करते हैं इस ट्यूटोरियल में हमने

play15:50

सीखा

play15:58

प्रयोग करना दिए गए लिंक पर उपलब्ध वीडियो

play16:01

स्पोकन ट्यूटोरियल प्रोजेक्ट को सारांश

play16:03

करता है कृपया इसे देखें और डाउनलोड करें

play16:07

हम कार्यशाला चलाते हैं और ऑनलाइन टेस्ट

play16:10

पास करने वालों को प्रमाण पत्र देते हैं

play16:13

अधिक जानकारी के लिए कृपया हमें लिखें

play16:15

स्पोकन ट्यूटोरियल प्रोजेक्ट भारत सरकार

play16:17

के एमएचआरडी के एनएम ए आईसीटी द्वारा निधि

play16:21

बद्ध है इस मिशन पर अधिक जानकारी इस लिंक

play16:24

पर उपलब्ध है आईआईटी बॉम्बे से मैं श्रुति

play16:28

आर्य आपसे विदा लेती हूं इस ट्यूटोरियल को

play16:30

देखने के लिए और हमसे जुड़ने के लिए

play16:33

धन्यवाद

Rate This

5.0 / 5 (0 votes)

Étiquettes Connexes
Google DriveDocument CreationFile SharingFile UploadFolder OrganizationGoogle DocsTech TutorialWeb BrowserOnline ToolsProductivity
Besoin d'un résumé en anglais ?