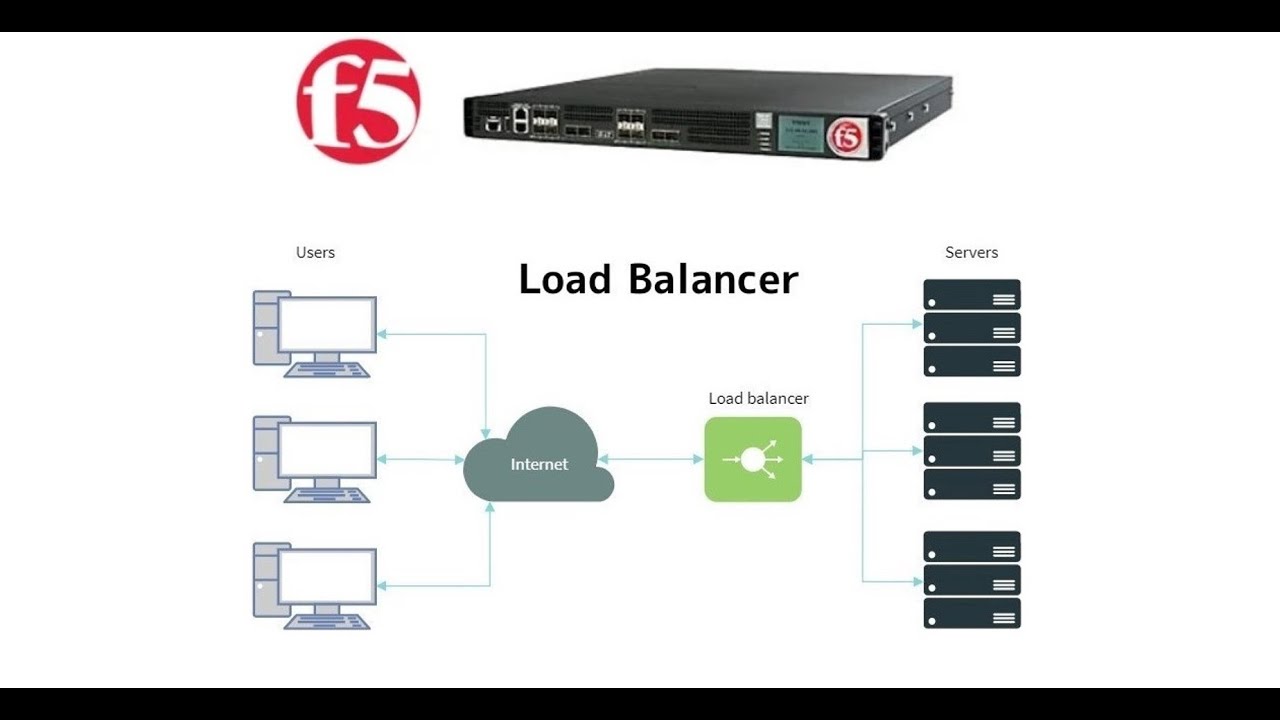
5. Setup F5 Big-IP LAB || Configuring VM Network Adapters || F5 Big-IP LTM
Summary
TLDRThis tutorial guides viewers on setting up a lab in VMware Workstation for F5's big-ip appliance. It covers downloading the image file, importing it into VMware, accessing via CLI, and configuring VMware Networking with vmnet1, vmnet2, and vmnet3. The video also instructs on connecting network adapters for the big-ip appliance and other virtual machines according to a predefined lab topology. Attention to detail in network configuration is emphasized to avoid issues in the lab setup.
Takeaways
- đ Downloaded F5 Big-IP image from F5 website and imported into VMware Workstation.
- đ Accessed the appliance through CLI using default credentials.
- â° Licenses were sent to the registered email and received within 30 minutes.
- đ» Demonstrated VMware Networking configuration for those with limited exposure.
- đ Added three VMware networks: vmnet1, vmnet2, and vmnet3 with specific subnets.
- đ Defined network addresses for lab topology: 192.168.0.0/24, 172.16.1.0/24, and 10.1.1.0/24.
- đ« Turned off DHCP services for the created networks.
- đ„ïž Connected client machine to vmnet2 and web servers to vmnet3.
- đ Configured Big-IP network adapters to connect to respective VM networks.
- đ Emphasized the importance of careful configuration to avoid lab issues.
- đ Next tutorial will cover setting up the management IP address and activating licenses.
Q & A
What is the purpose of the tutorial?
-The purpose of the tutorial is to guide viewers on setting up a lab environment using VMware Workstation with F5 BIG-IP, including downloading the image file, importing it, accessing the appliance, and configuring networking.
Where can the F5 BIG-IP image file be downloaded from?
-The F5 BIG-IP image file can be downloaded from the F5 website.
What is the importance of the license mentioned in the tutorial?
-The license is crucial as it allows the activation and use of the F5 BIG-IP appliance. It is sent to the registered email address and is to be activated as part of the setup process.
What is the first step in preparing the lab environment?
-The first step is to add VMware networks in VMware Workstation, specifically vmnet1, vmnet2, and vmnet3.
What are the network addresses defined for vmnet1 in the lab topology?
-The network address for vmnet1 is defined as 192.168.0.0 with a subnet mask of 255.255.255.0.
How is the DHCP service handled for each network in the lab?
-For each network (vmnet1, vmnet2, vmnet3), the DHCP service is unchecked to disable it as per the lab setup instructions.
What is the role of vmnet2 in the lab topology?
-Vmnet2 has a network address of 172.16.1.0 with a subnet mask of 255.255.255.0 and is used to connect the client machine as per the lab topology.
Which network does vmnet3 correspond to in the lab setup?
-Vmnet3 corresponds to the network with an address of 10.1.1.0 and a subnet mask of 255.255.255.0, which is used to connect the web servers.
How are the network adapters of the BIG-IP appliance connected in the lab?
-The BIG-IP appliance's network adapters are connected to the respective VM networks: Management Port to vmnet1, External Port to vmnet2, and Internal Port to vmnet3.
What is the significance of the fourth network adapter on the BIG-IP appliance?
-The fourth network adapter on the BIG-IP appliance is not used in this setup and can be removed or left as per user preference.
What should be noted while defining the VM networks and connecting them to network adapters?
-It is important to be careful with the IP schemes and the connections between the VMware networks and the virtual machines' network adapters to avoid issues that could hinder the lab setup.
What will be the focus of the next tutorial?
-The next tutorial will focus on setting up the management IP address on the F5 BIG-IP through CLI and proceeding with the activation of the licenses received via email.
Outlines
đ» Setting Up VMware Networking for F5 BIG-IP Lab
This paragraph provides a step-by-step guide on setting up VMware networking for an F5 BIG-IP lab. It starts with recalling the previous tutorial's actions, such as downloading the F5 BIG-IP image file, importing it into VMware Workstation, and accessing it via CLI with default credentials. The tutorial then moves on to configuring the VMware networking by adding three networks (vmnet1, vmnet2, and vmnet3) with specific network addresses tailored to the lab's topology. Each network is set up without DHCP services and with the appropriate subnet masks. The process involves opening VMware Workstation, navigating to the Virtual Network Editor, and adjusting settings to match the lab requirements.
đ Connecting Virtual Machines to VMware Networks
The second paragraph explains how to connect virtual machines to the newly created VMware networks. It details the process of assigning specific IP addresses to a client machine and web servers, ensuring they are correctly connected to vmnet2 and vmnet3 respectively. The paragraph also covers the configuration of the BIG-IP's network adapters to match the lab topology, including the Management Port, External Port, and Internal Port, each connected to the appropriate vmnet. The importance of accurate configuration is emphasized to avoid issues that could hinder lab progression.
đŹ Preparing for BIG-IP Management and License Activation
The final paragraph summarizes the tutorial's content and provides a preview of the next tutorial. It mentions the receipt of licenses via email and the intention to set up the management IP address on the F5 BIG-IP through CLI in the upcoming tutorial. The speaker encourages viewers to subscribe to the YouTube channel for further updates and thanks them for watching.
Mindmap
Keywords
đĄFY big-ip image file
đĄVMware Workstation
đĄCLI
đĄLicenses
đĄVMware Networking
đĄLab Topology
đĄDHCP
đĄManagement Port
đĄExternal Port
đĄInternal Port
đĄNetwork Adapters
Highlights
Introduction to the tutorial series on setting up a lab with F5 BIG-IP in VMware Workstation.
Downloading the F5 BIG-IP image file from the F5 website and importing it into VMware.
Accessing the BIG-IP appliance through CLI using default credentials.
Receiving BIG-IP licenses via email and the importance of checking the registered email.
Introduction to VMware Networking configuration for the lab setup.
Adding VMware networks: vmnet1, vmnet2, and vmnet3.
Defining network addresses for vmnet1 as 192.168.0.0/24.
Disabling DHCP services for vmnet1.
Setting up vmnet2 with a network address of 172.16.1.0/24.
Configuring vmnet3 with a network address of 10.1.1.0/24.
Applying changes to the VMware network settings for them to take effect.
Connecting the BIG-IP Management Port to vmnet1.
Connecting client machines to vmnet2 as per the lab topology.
Connecting web servers to vmnet3 in the lab setup.
Detailed steps on how to connect network adapters to the appropriate VMware networks.
The importance of accurate network configuration to avoid issues in the lab.
Preview of the next tutorial: setting up the management IP address on F5 BIG-IP and activating licenses.
Encouragement for viewers to subscribe to the YouTube channel for more tutorials.
Transcripts
hello everyone welcome to my YouTube
channel nude Networks
just to recall in our previous tutorial
we have downloaded FY big-ip image file
from F5 website
and imported that file into our VMware
Workstation
we have access the appliance through a
CLI using the default credentials using
a root user
and
if you remember when we were downloading
at that time the notified the notice we
have received from on the F5 website
that the licenses will be sent to your
registered email address within next 30
minutes
so guys we have received that in our
email but before we proceed with the
activation of the licenses uh this
particular tutorial I have kept for
showing you the VMware Networking
configuration
maybe many of our colleagues might be
aware how to set up this lab in the
VMware Workstation but I will be showing
so that you will have a better
understanding those who have a limited
exposure on this will have a better
understanding
so to prepare this lab the very first
thing what we are going to do is we will
be adding the VMware networks in our
VMware Workstation we will add vmnet1
vmnet and then pmnet3 let's open our
VMware Workstation uh click on edit over
here then go to Virtual Network editor
then over here in Virtual Network editor
click on Change setting
we are going to add three networks and
on these three networks we are going to
define the network addresses as per our
lab topology so VM Network one VM net
one
the network address will be
192.168.0.0 24.
let's add the network from here drag
down menu you can select VM net1
keep all the settings as default just
uncheck this because we don't need DHCP
services
and the subnet IP over here we will
change it as per our lab topology which
will be
192.168.0.0 and the subnet will be
255.255.255.0
so we have added VM Network one and
defined the address over here subnet
address
let's add vmnet also click on OK
and in VM net we need
172.16.1.0 24. so in vmnet2
what we are going to do all the things
will be as default just uncheck this
DHCP service from here and Define the
subnet IP 172.16.1.0
the subnet mask will be 255.255.255.0
and the third network which is vmnet3
it will be
10.1.1.0 24.
we let's add vmnet3 okay
and as usual keep the default settings
as default just uncheck this DHCP
service from here and Define subnet
10.1.1.0 and the subnet mask will be
255.255.255.0
Let's cross check once yes it is
10.1.1.0
so once you have added this network
click on apply starting over here
oh
for the changes to take effect
click ok
so guys we have added all this three VM
Networks now the second thing what we
are going to do is
see if you will see the big IP has the
ports as per our laptopology one will be
a Management Port another will be the
external port and one will be the
internal Port so this is basically your
physical host
and the Management Port will be
connected to vmnet1 we are not going to
do anything over here but yes on the
management Port the big IP Management
Port we are going to connect to VM net
one but before uh configuring the
network adapters for the big IP very
first we will be connecting the network
adapters for our and machines so we will
see
the client machine over here like the
machine which is on the external side
okay it has a IP address
172.16.1.15 and it is supposed to be
connected to vmnet so the very first
thing what we are going to do we will
connect the network adapter of this
machine to vmnet2 let's go to VMware
Workstation over here and you will have
a client machine right so this client
machine we will connect vmnet to as per
our lab topology so we have created VM
net to write just added this over here
uh in network adapter select vmnet and
click ok
so basically we have
connected this machine to the VM net as
per our lab topology
let's connect this web servers also
which we have already installed so this
web servers will be connected to vmnet
so let's connect this as well the web
server one will be connected to
VM net the as per our lab topology
choose this as VM net3 and click ok
similarly the web server 2 will be
connected vmnet3 you can see and the web
server 3 will be also connected the
network adapter of vmnet the network
adapter of web server 3 also will be
connected to
VM net 3 as you can see over here
so guys till now what we did we have
created three VM networks VM net one
vmnet2 vmnet3 with the subnet IB as per
our lab topology we have added the
network adapter the VM networks as per
our laptop will be the client machine
network adapter is connected to vmnet2
the web server
network adapters are connected to vmnet
moving on the last part which is
remaining is
connecting the network adapters of the
big IP to the VM networks accordingly as
per our laptopology so what I have done
like we have three ports the Management
Port we have the internal port and we
have the external port and the
Management Port is supposed to be
connected to VM Net One the external
Port is supposed to be connected to
vmnet2 and the internal Port is supposed
to be connected to vmnet theme
so we will go to VM
workstation over here
just right click over here and go to
settings
to edit this machine you will see that
you have four network adapters for this
machine however the fourth network
adapter is of no use you can simply
remove this from here or if you want to
keep it it's okay it's up to you so guys
uh what we are going to do just let me
open this here the management interface
which is supposed to be connected to
vmnet one has per hour lab topology we
are going to connect this to network
adapter the first one so let's go and do
it the network adapter will be our
to this particular editor adapter will
be our manage will be connecting to the
Management Port so go to custom and say
VM net one
similarly the network adapter 2 which is
our
external interface
will be connecting to will be connecting
to vmnet
this this second Port will be your
external Port of the in a big F5 big IP
so let's connect this to vmnet 2. and
the network adapter 3 let me show you
this as well the network adapter t
will be VM net 3 which is it will be
connecting to internal
pmnet3 to network adapter t
let's custom this and click on vmnet 3
and click on OK over here
so guys uh this is how you will be
setting up your lab you will be defining
the VM networks and just add a note of
one thing that the configuration which
we have done now is very much important
if you do a mistakes over here there is
a possibility you may face issue and you
won't be able to proceed further with
the lab so when you are defining a VM
Network be careful about the IP schemes
and connecting the
VMware Network to your network adapters
of the virtual machines so you can just
add a note of this thing and you will
never face the issues while doing the
lab for the
so guys that's all about the VMware
Networking and setting up your lab in
the VMware Workstation so
in the next tutorial what we are going
to do is very first we are going to set
up our management IP address on the
F5 big-ip through a CLI and we will
proceed with the activation of the
licenses the licenses which we have
received in our email and that I have
shown you in the previous tutorial
that's all in this tutorial guys thanks
for watching if you haven't subscribed
to my YouTube channel yet please
subscribe it now see you in the next
tutorial
Voir Plus de Vidéos Connexes
4. Install F5 Big-IP LTM in VMware || How to get free F5 load balancer licences || F5 Big-IP LTM
3. Prerequisites to setup F5 lab || How to install Webserver on windows 10 machine || F5 Big-IP LTM
6. License Activation and Initial Setup Wizard || F5 Big-IP LTM
How to Install VMware vSphere Hypervisor ESXi 6.7 on VMware Workstation 15
1. Introduction to F5 Big IP || LTM (Local Traffic Manager)
How to Configure LAN Segments in VMware Workstation Pro
5.0 / 5 (0 votes)