How LED Works - Unravel the Mysteries of How LEDs Work!

The Engineering Mindset
30 Apr 202319:06

Summary

TLDRThis video script delves into the workings of LEDs, explaining how these light-emitting diodes produce various colors by manipulating the semiconductor material inside. It covers the fundamental principles behind diodes and LEDs, their energy efficiency compared to incandescent lights, and the different types and applications of LEDs, including multi-color and high-powered LEDs. The script also touches on the importance of resistors in protecting LEDs from excessive current and introduces the concept of PN junctions in semiconductors, which are key to the color of light emitted. Additionally, it discusses the role of data brokers and the use of Incogni for privacy protection.

Takeaways

  • 🚀 LEDs, or light-emitting diodes, emit light when a voltage is applied across them due to the semiconductor material inside.
  • 🔍 Shining light onto an LED can reverse the process, producing a small voltage, demonstrating the dual nature of LEDs as light and electricity converters.
  • 🌈 The color of the light produced by an LED is determined by the semiconductor material used, with different materials emitting different wavelengths of light within the visible spectrum.
  • 🔆 LEDs are more energy-efficient than incandescent lights because they do not require heat to produce light, reducing energy consumption and heat generation.
  • 🔌 The polarity of an LED is crucial; it only illuminates when the anode is connected to the positive side and the cathode to the negative.
  • 🔍 The flat edge on an LED casing typically indicates the cathode side, helping to identify the correct connection polarity.
  • 💡 There are various types of LEDs, including through-hole, surface-mount devices (SMD), high-powered, and multi-color LEDs, each suited for different applications.
  • 🛠️ LEDs require a current-limiting resistor to prevent damage from excessive current, with the brightness controlled by varying the current or voltage.
  • 🔄 Bi-directional and RGB LEDs can change colors or mix colors to produce a range of hues, including white light, by controlling the current to individual diodes within the unit.
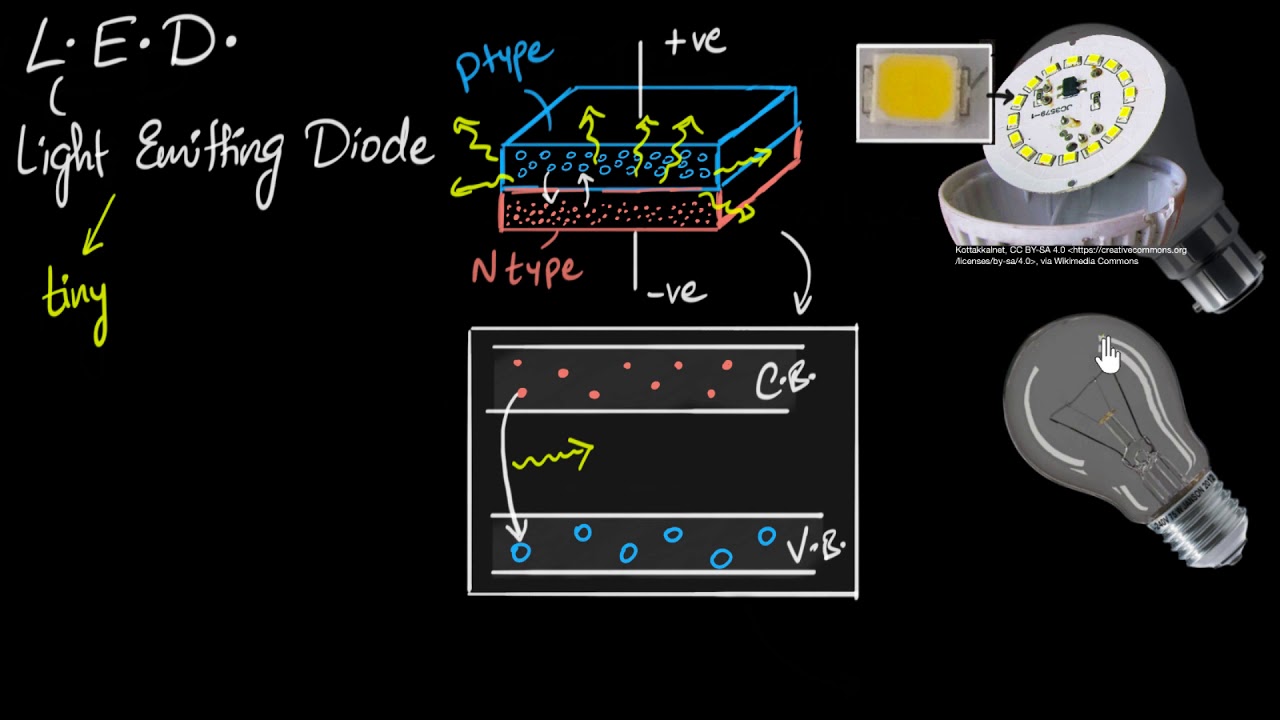
  • 🔬 The semiconductor material in LEDs is made by combining elements like gallium and arsenic, with impurities added to create n-type and p-type layers, which determine the emitted light color.
  • 🌐 The development of LED technology has led to the creation of energy-efficient lighting solutions, such as LED bulbs, which are now widely used.

Q & A

  • What is the basic principle behind the light emission of an LED?

    -An LED emits light when a voltage is applied across it, causing electrons in the semiconductor material to recombine with holes, which releases energy in the form of photons.

  • How does an LED symbol differ from a standard diode symbol in engineering drawings?

    -An LED symbol is similar to a diode symbol but includes arrows that indicate light emission, distinguishing it from a standard diode which does not emit light.

  • What is the range of wavelengths for visible light to human eyes?

    -Visible light to human eyes has a wavelength range of approximately 400 to 700 nanometers.

  • Why do standard diodes become hot, unlike LEDs?

    -Standard diodes become hot because they produce photons in the near-infrared range, which are absorbed by the casing and converted to heat. LEDs, on the other hand, produce very little heat due to their different semiconductor materials and photon emission range.

  • What is the typical wavelength of the infrared light emitted by an LED in a TV remote?

    -The typical wavelength of the infrared light emitted by an LED in a TV remote is around 940 nanometers, which is outside the visible spectrum for humans.

  • What is the main reason LEDs are more energy efficient compared to traditional incandescent lights?

    -LEDs are more energy efficient because they do not need to produce heat to emit light, unlike incandescent lights which generate a lot of heat through the collisions of electrons with atoms in the filament.

  • What does the flat edge on one side of a through-hole LED indicate?

    -The flat edge on one side of a through-hole LED indicates the cathode side of the LED, helping to identify the correct polarity for connection.

  • What is the purpose of the yellow phosphorus layer over a blue LED in some light bulbs?

    -The yellow phosphorus layer over a blue LED in some light bulbs is used to combine with the blue light to produce a white light, as the mixture of yellow and blue light appears white to the human eye.

  • How can the color of an LED be changed by altering its semiconductor material?

    -The color of an LED can be changed by altering the semiconductor material used in its construction. Different materials and their mixtures produce different band gaps, resulting in photons of different wavelengths and thus different colors of light.

  • What is the role of a resistor in an LED circuit?

    -A resistor in an LED circuit is used to limit the current flow and protect the LED from being destroyed by an excessive amount of current. It also helps to control the brightness of the LED by varying the current.

  • How can the brightness of an LED be controlled?

    -The brightness of an LED can be controlled by varying the current supplied to it. This can be achieved by using a resistor to set the current in the circuit or by using an LED driver that provides a constant current.

Outlines

00:00

🔌 Understanding LEDs and Their Applications

This paragraph delves into the functioning of Light Emitting Diodes (LEDs), explaining how they emit light when a voltage is applied across them due to the semiconductor material inside. It contrasts LEDs with standard diodes, highlighting the visible light emission of LEDs within the human-visible spectrum of 400 to 700 nanometers. The script also touches on the use of LEDs in various applications, such as TV remotes emitting infrared light, and the energy efficiency of LEDs compared to incandescent lights. The paragraph introduces different types of LEDs, including through-hole and surface mount devices (SMD), and discusses the significance of the flat edge on LEDs, which indicates the cathode side.

05:00

💡 Exploring LED Colors, Polarity, and Circuitry

The second paragraph focuses on the different colors of light emitted by LEDs, which are determined by the semiconductor material rather than the color of the LED case. It explains the importance of connecting the anode and cathode correctly to illuminate the LED and provides tips for identifying the polarity of an LED when the leads are trimmed or not easily distinguishable. The paragraph also covers various types of LEDs, such as bi-color and RGB LEDs, which can produce a spectrum of colors by controlling the voltage and current to each LED. Additionally, it discusses the use of resistors to protect LEDs from high currents and the role of LED drivers in ensuring stable operation.

10:04

🔍 The Inner Workings of LEDs and Semiconductors

This paragraph provides an in-depth look at the internal structure of LEDs, including the anode and cathode leads, the epoxy resin casing, and the semiconductor layers that produce light. It explains the concept of a PN junction and how it forms a barrier that prevents the flow of electrons until a sufficient voltage is applied. The script also discusses the process of creating semiconductors by adding impurities to silicon to form n-type and p-type layers, and how the energy levels and band gaps of these materials determine the color of light emitted by the LED. It further explains how different semiconductor materials, such as gallium arsenide and gallium phosphide, can be combined to produce a range of colors, including white light, which has led to the widespread use of LED bulbs.

15:06

🌐 The Science Behind Semiconductors and Color Production

The final paragraph explores the atomic structure and energy levels that underpin semiconductor behavior, explaining how electrons move between the valence and conduction bands. It details how different semiconductor materials, such as silicon, gallium arsenide, and gallium phosphide, have varying band gaps that affect the wavelength and color of the emitted light. The paragraph concludes by illustrating how mixing different ratios of these materials can produce a wide range of colors, including the primary colors red, green, and blue, which can be combined to create any color, including white light. It also mentions the use of incogni for data privacy and encourages viewers to continue learning about electronics through provided links and social media channels.

Mindmap

Keywords

💡LED

LED stands for Light Emitting Diode. It is a semiconductor device that emits light when an electrical current passes through it. In the video, LEDs are the central theme, with various types and applications being discussed, such as through-hole LEDs, SMD LEDs, and RGB LEDs.

💡Semiconductor

A semiconductor is a material that has electrical conductivity between that of a conductor and an insulator. In the context of the video, semiconductor material is used in LEDs to produce light through the recombination of electrons and holes, which emit photons.

💡Photon

A photon is a quantum of light and other electromagnetic radiation. The script explains that LEDs emit photons in the visible light spectrum, which is why we can see the light they produce.

💡Wavelength

Wavelength is the distance between two successive points in a wave that are in phase with each other. The video discusses how different wavelengths of photons correspond to different colors in the visible light spectrum, which is how LEDs of various colors are made.

💡PN Junction

A PN Junction is a boundary or interface between two types of semiconductor material, p-type and n-type, which join together to form a diode. In the video, the PN Junction is where the recombination of electrons and holes occurs, resulting in the emission of light in LEDs.

💡Diode

A diode is a two-terminal electronic component that allows current to flow primarily in one direction. The video script contrasts LEDs with standard diodes, noting that while both are made from semiconductors, LEDs are designed to emit light in the visible spectrum.

💡Visible Spectrum

The visible spectrum refers to the range of wavelengths of light that are visible to the human eye, typically from 400 to 700 nanometers. The video explains how LEDs emit light within this range, allowing us to see different colors.

💡Infrared Light

Infrared light is a type of electromagnetic radiation with wavelengths longer than visible light, typically around 940 nanometers as mentioned in the script. It is used in applications like TV remotes, which emit infrared light that is invisible to the human eye but can be detected by cameras.

💡SMD

SMD stands for Surface Mount Device. It is a type of LED, as well as other electronic components, that are mounted directly onto the surface of a circuit board. The video mentions SMD LEDs as being smaller and used in compact designs, such as in light bulbs.

💡RGB LED

An RGB LED is a type of LED that contains red, green, and blue LEDs within a single package. The video explains how these can be controlled to produce a wide range of colors, including white, by mixing the light from the individual colored LEDs.

💡Resistor

A resistor is a passive electronic component that opposes the flow of electric current in a circuit. In the context of the video, resistors are used to limit the current flowing through LEDs, preventing them from being damaged by excessive current.

Highlights

LEDs produce light through a semiconductor material that emits energy as photons when voltage is applied.

LEDs and diodes operate on the principle of semiconductor materials, but LEDs emit visible light photons for humans.

The visible light spectrum for humans ranges from 400 to 700 nanometers, which produces different colors.

LEDs are used in various applications, including TV remotes that emit infrared light with a wavelength of around 940 nanometers.

Standard diodes produce near-infrared photons absorbed by the casing and converted to heat, unlike LEDs which are cooler.

Incandescent lights generate a lot of heat, while LEDs are more energy efficient as they don't need to produce heat to emit light.

Different types of LEDs include through-hole, SMD, high-powered, and bi-color LEDs for various applications.

LEDs with color lenses or transparent versions emit different colors based on the semiconductor material, not the case color.

LEDs illuminate when connected correctly with the anode to positive and cathode to negative, and polarity can be identified by the flat edge on the LED case.

Resistors are used to protect LEDs by reducing current and turning electrical energy into heat.

LEDs can be manually flashed or automated with circuits involving resistors, capacitors, and transistors.

RGB LEDs contain red, green, and blue LEDs that can be mixed to create any color, including white light.

LEDs require a specific voltage and current to operate without damage, which can be controlled with LED drivers.

LEDs are made of semiconductor materials with a PN junction that emits photons of specific wavelengths when powered.

Different semiconductor materials like gallium arsenide and gallium phosphide are used to produce a range of visible light colors in LEDs.

The color of the LED light is determined by the wavelength of the emitted photon, which depends on the semiconductor material used.

By mixing different semiconductor materials, any color of light, including white, can be produced in LEDs.

Transcripts

play00:00

sponsored by incopy why does this led

play00:03

produce a red light but this one

play00:05

produces a blue line when we apply a

play00:08

voltage across an LED it produces light

play00:11

it all comes from a tiny piece of

play00:14

semiconductor material inside which is

play00:17

emitting energy as photons but if we

play00:20

shine a light onto the LED then we are

play00:22

firing photons back into it so the

play00:25

process reverses and it will also

play00:27

produce a small voltage

play00:30

80ds look something like this they come

play00:33

in different shapes colors and sizes for

play00:36

different applications LED stands for

play00:38

light emitting diode we use this symbol

play00:41

in engineering drawings for LEDs notice

play00:44

it looks very similar to a diode symbol

play00:47

except it has these arrows that indicate

play00:50

that light is being emitted LEDs and

play00:52

diodes both work on the same principle

play00:55

it's just a semiconductor material in

play00:58

the middle of some electrical connectors

play01:00

they both emit photons but only the LED

play01:03

emits photons in the range visible to

play01:06

humans and that's when the photon has a

play01:08

wavelength of around 400 to 700

play01:11

nanometers we've received different

play01:13

colors depending on the wavelength of

play01:16

the photon in this range

play01:18

FM radio signal is also a photon wave

play01:21

but it's around 3 meters

play01:23

Wi-Fi signal is smaller at around six

play01:26

centimeters and a medical x-ray is Tiny

play01:29

at around

play01:30

0.01 nanometers but we can't see any of

play01:34

these because they are outside of our

play01:36

visible spectrum have you ever noticed

play01:39

there's an LED in your TV remote

play01:41

this emits infrared light the photon has

play01:45

a wavelength typically around

play01:47

940 nanometers so humans can't see it

play01:51

however you can see it on the camera of

play01:53

your phone

play01:54

inside the semiconductor we just have

play01:57

electrons combining with holes and

play02:00

releasing photons in the process we will

play02:02

learn how it works in more detail later

play02:05

on in this video now a standard diode

play02:07

uses different materials in its

play02:09

semiconductor layer which produce

play02:11

photons in the near infrared range these

play02:15

are absorbed by the casing and converted

play02:17

to heat so dodes become hot but LEDs

play02:21

produce very little heat unlike

play02:23

traditional incandescent lights which

play02:25

generate a lot of heat in this design

play02:28

the electrons collide with atoms in the

play02:30

filament and these collisions produce

play02:32

heat the filament heats up so much it

play02:35

produces visible light

play02:37

LEDs don't need to produce heat to

play02:40

produce light and so they are much more

play02:42

energy efficient most of you will

play02:45

recognize this type of LED the five

play02:48

millimeter through hole type but have

play02:51

you ever noticed one side has a flat

play02:53

Edge

play02:54

tell me what you think this is for in

play02:56

the comment section and I'll give you

play02:57

the answer later on in this video

play03:00

through-hole LEDs are perfect for

play03:02

learning electronics we can buy them in

play03:04

bulk very cheaply and I'll leave a link

play03:07

for you in the video description for

play03:09

where you can buy them these can be

play03:10

inserted into test boards or even

play03:13

soldered into printed circuit boards we

play03:16

can get smaller three millimeter

play03:18

versions or even larger 10 millimeter

play03:21

versions typically they are Dome shaped

play03:23

but there are other shapes available

play03:25

like this square one we also get SMD

play03:28

type which stands for surface mount

play03:31

device these are soldered to circuit

play03:33

boards to allow compact designs these

play03:36

versions are much smaller some like this

play03:39

one are so small you would need a

play03:41

microscope to solder them we usually

play03:43

find SMD LEDs used in our light bulbs

play03:46

this one is actually a blue LED it just

play03:50

has a layer of yellow phosphorus over it

play03:52

and that's because the yellow and blue

play03:54

light combined makes a white light we

play03:57

can also get these very high powered

play03:59

LEDs which are basically just lots of

play04:02

LEDs packed tightly together and are

play04:04

often used for torches and also flood

play04:06

lights

play04:07

LEDs can produce such Bright Lights

play04:10

though we can see them from a great

play04:12

distance but wait who is that oh no it's

play04:15

a data broker he's copying all our

play04:18

online personal information and selling

play04:20

it for a profit luckily our sponsor

play04:22

incogni will find and remove your

play04:25

information

play04:26

we all know that when we interact with

play04:28

apps and websites we give away

play04:30

information like our location history

play04:32

names and aliases logging credentials

play04:35

social security number phone numbers

play04:38

search history interests Etc these are

play04:41

all collected by data Brokers to form an

play04:44

extensive profile about you and then

play04:47

sold for example banks credit and

play04:49

investment companies might buy

play04:51

information about your financial status

play04:53

your background and your employment

play04:55

insurance companies might buy

play04:57

information about your health now you

play05:00

can manually contact each data broker

play05:02

yourself or you can use incogni to

play05:05

automate and track the process for you

play05:07

you can try it right now and the first

play05:09

100 people to use my code engineering

play05:12

mindset using the link below will get 60

play05:15

percent off do check it out links down

play05:18

below LEDs come in various different

play05:20

color lenses but we can also get

play05:23

transparent versions which emit

play05:25

different color light bytes too the

play05:27

cases are only colored to make it easy

play05:30

for us to tell what color light will be

play05:32

produced is actually just the material

play05:35

inside the semiconductor layer that

play05:37

produces the different colors of light

play05:39

and not the color of the case we will

play05:42

learn how that works later on in this

play05:44

video LEDs only illuminate when we

play05:47

connect the anode lead to the positive

play05:49

and the cathode to the negative take a

play05:52

blue LED and a 3 volt coin battery

play05:55

notice it only illuminates when

play05:58

connected a certain way it's easy to

play06:01

identify the correct polarity because

play06:03

the longest lead of the LED is the anode

play06:06

but what if the LED leads have been

play06:09

trimmed well don't worry because one

play06:12

side of the LED's case has a flat Edge

play06:15

and this indicates the cathode side

play06:17

additionally inside we can notice that

play06:20

there are two metal plates the larger

play06:23

plate is the cathode with snd LEDs we

play06:26

find a small dot on the top sometimes

play06:30

this is used to indicate the anode other

play06:32

times this is for the cathode so you'll

play06:35

have to check the manufacturer's

play06:36

datasheet or test it yourself in this

play06:39

example the LED illuminates when the

play06:42

positive is connected to the dot side on

play06:44

the back we find a marking but this

play06:47

again could mean either the anode or

play06:49

cathode here we can see the LED

play06:51

illuminates when connected like this

play06:54

we can manually flash LEDs by using a

play06:58

switch or we can use a simple circuit

play07:01

like this resistor capacitor and

play07:03

transistor circuit to automate this and

play07:06

here is the schematic for that circuit

play07:08

but these blinking LEDs will turn on and

play07:12

off by themselves automatically at a

play07:14

certain frequency there's also these

play07:16

type which change color by themselves in

play07:19

a fast or slow transition

play07:22

inside is a tiny controller that sets

play07:25

the frequency and here is the schematic

play07:27

for that circuit then we have

play07:29

bi-directional LEDs these can change

play07:32

between two colors inside there are two

play07:35

LEDs connected in opposite ways so when

play07:39

current flows this way one LED turns on

play07:42

and when current flows the other way the

play07:44

other LED turns on only one LED can be

play07:47

turned on at a time however we can get

play07:50

these three pin bio color type we can

play07:53

manually switch them between one color

play07:56

the other color or both colors together

play07:59

these have two LEDs inside but they

play08:03

share a terminal

play08:04

then we have four pin RGB LEDs these

play08:08

have three separate LEDs inside a red a

play08:12

green and a blue and these all share a

play08:15

terminal we can't activate them

play08:17

separately two at a time to mix the

play08:19

colors or all three to make a white

play08:22

light we can control the voltage and

play08:25

current to each led to make any color we

play08:28

wish and here is the schematic for that

play08:30

circuit now if you look closely at your

play08:33

monitor you can see the same thing is

play08:35

happening here too lots of tiny

play08:38

multi-color LEDs by the way I've left

play08:41

links for these LEDs in the video

play08:43

description down below but where have

play08:46

you seen these LEDs used or where could

play08:48

you use them let me know in the comment

play08:50

section down below if we try to connect

play08:53

this led to this nine volt battery it

play08:56

will instantly be destroyed inside the

play08:59

LED is a thin wire the battery will try

play09:02

to push so many electrons through this

play09:05

wire that it just breaks

play09:07

so we use a resistor to reduce the

play09:10

current of electrons and you can watch

play09:13

my video on how resistors work to learn

play09:15

more the resistor removes energy from

play09:18

the circuit to protect the LED it is

play09:21

literally turning the electrical energy

play09:23

into heat to remove it the battery is

play09:26

providing 9 volts the resistor removes

play09:29

around 7 volts and the LED will remove

play09:32

the remaining two volts

play09:34

the resistor is setting the current for

play09:36

the circuit we can vary the current to

play09:39

control the brightness of the LED but

play09:41

when we vary the voltage Supply the

play09:44

current will also vary the

play09:46

manufacturer's datasheet will tell us

play09:48

the rated voltage and current this led

play09:50

is rated for 20 milliamps but we can go

play09:54

slightly above or below this and it will

play09:56

work fine the lower we go the dimmer the

play09:59

LED will shine but if we go too high the

play10:03

LED will be destroyed that's why we find

play10:06

LED drivers inside light bulbs and also

play10:10

dedicated units powering strip lighting

play10:12

this lamp runs off of 230 volts the

play10:16

rectifier is changing the alternating

play10:18

current into direct current and the

play10:20

capacitor is smoothing this out this

play10:23

chip is providing a constant current to

play10:25

the LEDs so that they don't flicker this

play10:29

USB light strip is incredibly simple the

play10:32

USB port provides a 5 volt Rail and a

play10:35

ground Rail between them is just a

play10:38

resistor and an LED each set is

play10:40

connected in parallel which means we can

play10:43

cut this to almost any length the more

play10:45

LEDs we remove the lower the current

play10:48

will be when we look at an LED we notice

play10:51

there are two metal leads which connect

play10:53

to the main body the longest lead is the

play10:56

anode and the shortest lead is the

play10:58

cathode the body is molded from an epoxy

play11:01

resin these are often colored just to

play11:04

make it easier to tell what color the

play11:06

LED light will be on the side of the

play11:08

case is a flat Edge this indicates the

play11:11

cathode side looking inside the LED case

play11:14

we see that both the anode and the

play11:16

cathode leads each have a metal plate at

play11:19

the end and these are separated by small

play11:22

Gap the plates stop the knees from

play11:24

turning the larger plate also indicates

play11:27

the cathode side on the cathode plate we

play11:30

typically find a cone shape within the

play11:32

cone we find a small p piece of

play11:34

semiconductor material made from a layer

play11:37

of n-type material with a layer of

play11:40

p-type material on top of this this

play11:42

forms a p n Junction

play11:44

a thin wire then runs between the ano

play11:47

terminal and the p-type material to

play11:50

complete the circuit when the LED is

play11:52

powered photons are emitted from the PN

play11:55

Junction of the semiconductor which

play11:58

produces the colored light the cone

play12:00

shape helps reflect the light out of the

play12:02

top of the LED case

play12:04

the color of the light depends on the

play12:07

wavelength of the photon being emitted

play12:09

from the semiconductor and that depends

play12:12

on the material being used electricity

play12:15

is the flow of electrons electrons flow

play12:18

easily through conductors like copper

play12:20

but they can't flow very easily through

play12:22

insulators like rubber the n-type layer

play12:26

has lots of free electrons and the

play12:28

p-type layer is missing some electrons

play12:30

but it has lots of holes that electrons

play12:34

can go and sit in

play12:35

electrons are negatively charged so the

play12:39

letter N just lets us know which side

play12:41

has a negative charge as electrons are

play12:45

negative we consider the holes to be

play12:47

positive and so we use the letter P to

play12:50

make the semiconductor for a normal

play12:52

diode we just use silicon this has four

play12:56

electrons in its valence shell the atoms

play12:58

will share these to become stable so

play13:01

where do the electrons and holes come

play13:03

from well we add some impurities like

play13:06

phosphorus which has five electrons in

play13:08

its valence shell these are shared with

play13:11

the Silicon atoms but it will leave one

play13:13

electron spare

play13:15

this electron is free to move to other

play13:18

atoms and so this is our n-type layer

play13:21

for the p-type layer we add some

play13:23

aluminum which only has three electrons

play13:25

in the valence shell it doesn't have

play13:28

enough to share with all of its

play13:29

neighboring atoms so there will be a

play13:32

hole where an electron can move too we

play13:35

now have a layer with two many electrons

play13:37

and also a layer with not enough

play13:39

electrons this joins to form the PN

play13:42

Junction

play13:43

at this Junction we get a depletion

play13:46

region

play13:47

some of the electrons move across to

play13:49

fill the holes and some of the holes

play13:51

move across but this will create a

play13:54

barrier with a slightly positively

play13:56

charged region and a slightly negatively

play13:58

charged region

play14:00

this creates an electric field which

play14:02

prevents more electrons moving across

play14:05

when we connect a battery electrons will

play14:08

flow and we call this a forward bias but

play14:11

if the voltage is too small then we

play14:14

can't break this barrier

play14:16

with a normal diode we can see the

play14:19

barrier is around 0.5 to 0.7 volts this

play14:23

is the minimum voltage required for

play14:26

current to flow but with a red LED it's

play14:29

much higher around 1.7 volts the

play14:33

manufacturer will provide a chart like

play14:35

this which shows the forward current at

play14:37

a certain forward voltage we can see

play14:40

that it starts at around 1.7 volts

play14:43

and we can see that at 2 volts we should

play14:46

see around 20 milliamps of current

play14:49

in this example that's exactly what we

play14:52

see

play14:52

now looking at a simple ball model of an

play14:55

atom we have the nucleus at the center

play14:58

which contains all the protons and

play15:00

neutrons

play15:01

then we have a number of orbital shells

play15:03

where electrons can sit

play15:05

each shell can hold a certain number of

play15:08

electrons and an electron needs to have

play15:11

a certain energy to be accepted into

play15:13

that shell the further the distance of

play15:16

the shell the more energy is required

play15:19

the outermost shell is the valence band

play15:22

just beyond this is the conduction band

play15:24

electrons that reach this band can break

play15:27

free from the atom in a conductor like

play15:30

copper the conduction band is very close

play15:33

so the electrons can easily move but in

play15:37

an insulator like rubber the conduction

play15:39

band is too far away so the electrons

play15:42

can't escape but with a semiconductor

play15:45

like Silicon the conduction band is just

play15:48

a short distance away so it will act

play15:51

like an insulator but when we apply a

play15:53

voltage the electron in the valence

play15:56

shell can break free

play15:58

in the Silicon semiconductor like a

play16:00

diode the electron is jumping from the

play16:03

n-type conduction band to the p-type

play16:06

valence band the valence band has less

play16:08

energy than the conduction band so the

play16:11

electron needs to lose some energy to be

play16:14

accepted into this lower band it does

play16:17

that by releasing a photon in Silicon it

play16:21

needs to lose around 1.1 electron volts

play16:24

to be accepted the energy of this photon

play16:27

is equal to a wavelength of around

play16:30

1127 nanometers and I'll show you how to

play16:34

calculate that in just a moment that

play16:37

means the Silicon diodes emit near

play16:39

infrared light which humans can't see

play16:43

so instead of silicon scientists mix

play16:46

gallium and arsenic to form the

play16:49

semiconductor

play16:50

then they add some impurities to this to

play16:53

form the n-type and the p-type layers

play16:56

this semiconductor has a larger band gap

play16:58

of around

play17:00

1.424 electron volts and this produces

play17:03

an 870 nanometer wavelength which is

play17:07

better but still too high then they

play17:10

tried gallium phosphide which has a band

play17:12

gap of 2.26 electron volts and this

play17:16

results in a wavelength of 548

play17:19

nanometers which is perfect because the

play17:22

human eye can see this and we see this

play17:24

as green

play17:26

so then scientists realize that by

play17:29

blending the mixture of gallium arsenic

play17:31

with gallium phosphide

play17:33

they could achieve any color between

play17:35

these two points

play17:38

so if we mixed 60 gallium arsenic with

play17:41

40 gallium phosphide we would get around

play17:45

1.7 electron volts

play17:48

we can convert that to a wavelength

play17:49

using this formula so we drop these

play17:52

numbers in to get this equation and this

play17:55

gives us a wavelength of around 705

play17:58

nanometers which produces a red light so

play18:03

if we mixed 15 gallium arsenic with 85

play18:06

gallium phosphide then this would give

play18:09

us 2.13 electron volts which is a

play18:12

wavelength of 580 nanometers and this

play18:16

would give us yellow

play18:18

so by mixing different materials

play18:20

together to form the semiconductor this

play18:23

will create different colored lights

play18:25

once red green and blue could be

play18:28

produced we can mix these colors to

play18:30

produce any color we need including

play18:33

white light and when white light was

play18:35

possible LED bulbs became widely used

play18:39

don't forget click the link down below

play18:41

and the first 100 people to use my code

play18:43

will get 60 percent off in cogni check

play18:47

out one of the videos on screen now to

play18:49

continue learning about Electronics

play18:51

engineering and I'll catch you there for

play18:52

the next lesson don't forget to follow

play18:54

us on Facebook Twitter LinkedIn

play18:56

Instagram Tick Tock and the

play18:58

engineeringmindset.com

Rate This

5.0 / 5 (0 votes)

Etiquetas Relacionadas
LED ScienceLight Emitting DiodesData PrivacyIncogni SponsorElectronicsSemi-ConductorsEnergy EfficiencyRGB LEDsCircuit DesignDIY Electronics
¿Necesitas un resumen en inglés?