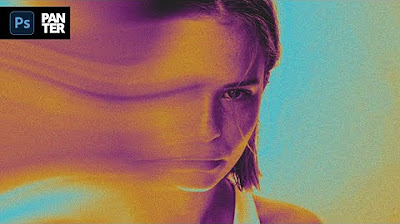
SIMPLE INK BLEED EFFECT TUTORIAL | ADOBE PHOTOSHOP
Summary
TLDRIn this Photoshop tutorial, the creator demonstrates how to create a dynamic text effect with a combination of Gaussian Blur, Motion Blur, Threshold adjustment, and Ripple effects. Starting with a simple text layer, the tutorial walks through adding blurs and adjustments to achieve a blurred, motion-filled effect, then incorporates texture overlays and a color range selection for the final look. The tutorial concludes with tips on using textures and grain effects to enhance the visual impact, giving viewers the tools to add their unique flair to the design.
Takeaways
- 😀 Start by using the Type Tool in Photoshop to create your text.
- 😀 Make sure your text is visible by changing its color to black or another contrasting color.
- 😀 Apply Gaussian Blur (Filter > Blur > Gaussian Blur) to give the text a soft blur effect.
- 😀 Convert the text layer to a Smart Object to preserve editability.
- 😀 Use Motion Blur (Filter > Blur > Motion Blur) at a 0-degree angle to create a directional blur effect.
- 😀 Adjust the blur amount to achieve the desired focus effect on your text.
- 😀 Add a Threshold adjustment to control the amount of bleed and refine the text’s appearance.
- 😀 Use the Ripple effect (Filter > Distort > Ripple) to add jagged edges to your text.
- 😀 Merge all layers together (Command + E) to combine the effects into a single layer.
- 😀 Use the Color Range tool to select and isolate the black areas of your text, then create a new layer for them.
- 😀 Add textures and adjust the blending mode (e.g., Lighten or Screen) to enhance the visual effect of the text and background.
Q & A
What is the first step when starting the Photoshop tutorial in the video?
-The first step is to grab the type tool and write the text. Initially, the text is white, so it needs to be changed to black for visibility.
How does the blur effect work in this tutorial?
-The Gaussian blur is applied to the text first, and the amount of blur is adjusted based on the text size. A motion blur is then applied with an angle of zero degrees, and the number is modified to determine the focus of the blur.
What is the purpose of the Threshold effect?
-The Threshold effect is used to adjust the amount of bleed in the text. By playing around with the slider, the user can control how defined or blurred the edges of the text appear.
What should you do if the effect doesn't look right after adding the Threshold?
-If the effect doesn't look good, you can adjust the settings of the motion blur or the Gaussian blur to tweak the overall effect.
What is the Ripple effect used for in this tutorial?
-The Ripple effect is used to add jagged edges to the text, giving it a more dynamic, distressed appearance.
What does the 'Command E' shortcut do in the context of this tutorial?
-'Command E' is used to merge all layers together so that the ink bleed effect can be separated from the background. This prepares the image for further editing.
Why is the color range tool used in the tutorial?
-The color range tool is used to select the black portions of the text. This allows the user to isolate the text from the background and work with it separately.
What is the purpose of duplicating the selection using 'Command J'?
-Duplicating the selection creates a new layer containing just the text, making it possible to change the background color without affecting the text.
How can textures enhance the design in this tutorial?
-Textures can be added to the design to give it more depth and visual interest. By changing the blending mode to 'Lighten' or 'Screen,' dark textures can affect the inside of the text, creating a cool effect.
What is the final step in the tutorial, and what does it involve?
-The final step involves adding a paper texture to the background. After resizing it, the design is complete. Additional textures can be added to further enhance the effect.
Outlines

Dieser Bereich ist nur für Premium-Benutzer verfügbar. Bitte führen Sie ein Upgrade durch, um auf diesen Abschnitt zuzugreifen.
Upgrade durchführenMindmap

Dieser Bereich ist nur für Premium-Benutzer verfügbar. Bitte führen Sie ein Upgrade durch, um auf diesen Abschnitt zuzugreifen.
Upgrade durchführenKeywords

Dieser Bereich ist nur für Premium-Benutzer verfügbar. Bitte führen Sie ein Upgrade durch, um auf diesen Abschnitt zuzugreifen.
Upgrade durchführenHighlights

Dieser Bereich ist nur für Premium-Benutzer verfügbar. Bitte führen Sie ein Upgrade durch, um auf diesen Abschnitt zuzugreifen.
Upgrade durchführenTranscripts

Dieser Bereich ist nur für Premium-Benutzer verfügbar. Bitte führen Sie ein Upgrade durch, um auf diesen Abschnitt zuzugreifen.
Upgrade durchführenWeitere ähnliche Videos ansehen
Easy Blur Effect Tutorial | Premiere Pro 2021
How to Use Motion Blur in Photoshop

Mudahnya Membuat Animasi Logo Brand DJI - Tutorial After Effect

How to Create a Smooth Zoom Transition in Premiere Pro

How to Remove Acne - Photoshop Tutorial For Beginners 2024
5 Title Animations in After Effects | After Effects Tutorial
5.0 / 5 (0 votes)
