JWT Authentication with Node.js, React, MySQL | Node JS Authentication With JSON Web Token

Code With Yousaf
29 Mar 202317:27

Summary

TLDRThis tutorial covers the implementation of JWT (JSON Web Tokens) for authentication in a Node.js application. After setting up the signup and login pages and storing user records in MySQL, the instructor demonstrates how to generate a token upon successful login, store it on the client-side, and use it for subsequent API requests to verify user authentication without requiring re-login. The video guides through installing JWT, creating a login route to generate tokens, storing tokens in local storage, and setting up a server-side route to verify tokens, ensuring a secure and efficient user authentication process.

Takeaways

  • 😀 The video discusses implementing JWT (JSON Web Tokens) authentication with Node.js.
  • 🔐 It follows up on previous videos that covered creating signup and login pages and saving records in a MySQL database.
  • 🛠️ The first step is to install JSON Web Token on the server side using npm or yarn.
  • 🗝️ JWT works by generating a token for the user upon successful login, which is then stored client-side.
  • 👤 The token is used for subsequent API requests to verify the user's identity without needing to re-authenticate.
  • 📈 The video provides an example of how JWT can simplify the process of requesting data like posts or comments after initial login.
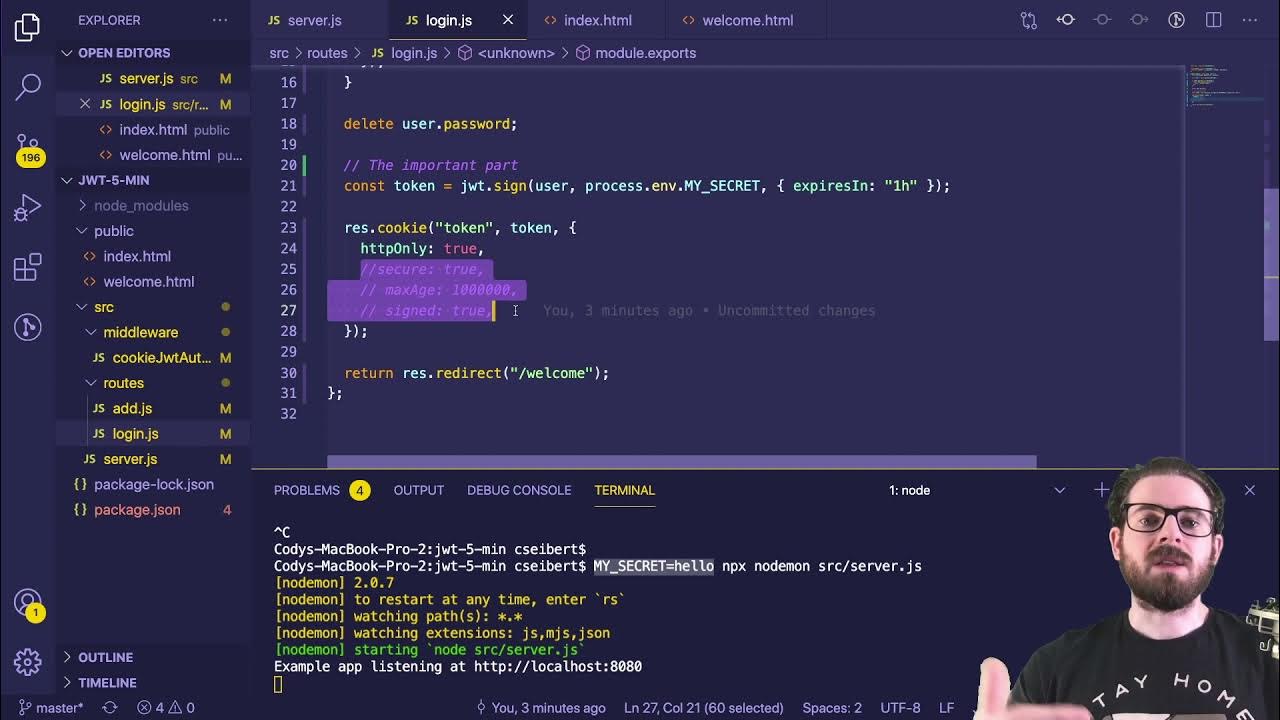
  • 💻 The server-side code demonstrates how to generate a token using JWT with a secret key and an expiration time.
  • 🔄 After login, the token is sent back to the client and can be stored in local storage for future use.
  • 🔑 The server includes a route to check user authentication by verifying the JWT token.
  • 📱 On the front end, the token is sent with API requests in the headers to authenticate the user.
  • 🔍 The video concludes with a demonstration of the authentication check, showing how the server responds differently based on token validity.

Q & A

  • What is JWT and how does it work?

    -JWT stands for JSON Web Token. It is a compact, URL-safe means of representing claims to be transferred between two parties. The token is generated by the server after successful authentication and is stored on the client-side. Each time the user makes a request to an API, the token is sent to the server for verification. If the token matches the server's records, the server responds with the requested data.

  • Why is JWT preferred over session cookies for authentication?

    -JWT is preferred over session cookies because it allows for stateless authentication, which is more scalable in distributed systems. It reduces the need for server storage and can be easily used across different domains and services.

  • What is the first step to implement JWT in a Node.js application?

    -The first step to implement JWT in a Node.js application is to install the 'jsonwebtoken' package on the server side. This can be done using npm with the command 'npm install jsonwebtoken' or using yarn with 'yarn add jsonwebtoken'.

  • How is the JWT token generated in the Node.js server?

    -In the Node.js server, after successful login verification, the server generates a JWT by using the 'jsonwebtoken' library. It takes the user's ID and a secret key, along with an expiration time, to create the token.

  • Where should the secret key for JWT be stored in a production environment?

    -In a production environment, the secret key for JWT should be stored in an environment variable (e.g., in a .env file) to keep it secure and not hard-coded into the application's source code.

  • How long does a JWT token last in the given example?

    -In the provided script, the JWT token is set to expire in 300 seconds, which is approximately five minutes.

  • How is the JWT token sent to the client-side in the application?

    -After the token is generated on the server, it is returned as part of the response to the client-side. The client-side application then stores this token, typically in local storage.

  • What is the purpose of storing the JWT token in local storage on the client-side?

    -Storing the JWT token in local storage allows the client-side application to easily access the token for subsequent requests to the server, ensuring that the user remains authenticated without needing to log in again.

  • How does the server verify the JWT token for subsequent API requests?

    -The server verifies the JWT token by extracting it from the request headers, using the 'jsonwebtoken' library's verify method with the secret key. If the token is valid and not expired, the server processes the request; otherwise, it returns an error.

  • What happens if the JWT token is not provided or is invalid?

    -If the JWT token is not provided or is invalid, the server responds with an error message indicating that a token is required or that the token is not authenticated.

  • How can the user check their authentication status using JWT in the front-end?

    -In the front-end, a button is provided that, when clicked, sends a request to the server with the JWT token. The server then checks the token's validity and responds with the authentication status.

Outlines

00:00

🔐 Implementing JWT Authentication with Node.js

This paragraph introduces the topic of implementing JSON Web Token (JWT) authentication with Node.js. It mentions previous videos where the user's sign-up and login pages were created and saved to a MySQL database. The focus of this video is to demonstrate the use of JWT for authentication purposes. It explains the process of installing JWT on the server side using npm or yarn and how JWT works by generating a token for the user upon successful login, which is then stored on the client side. The token is used to authenticate the user for subsequent API requests without the need for re-authentication.

05:01

🛠 Generating JWT with a Secret Key

The paragraph explains the process of generating a JWT in a Node.js application. It emphasizes the importance of using a private key for JWT generation, which should be stored in a .env file for security. The script demonstrates how to generate a token with an expiration time of five minutes using the secret key. The token is then returned to the client-side upon successful login, along with a message indicating successful authentication. The paragraph also discusses how to handle the token on the client side, including storing it in local storage and using it for subsequent API requests.

10:02

📡 Creating an Authentication Route to Verify JWT

This section details the creation of an authentication route on the server side to verify JWTs. It describes how to extract the token from the request headers and verify it using the secret key. If the token is valid, the server responds with a message indicating successful authentication. The paragraph also covers the creation of a function to verify the JWT, which checks if the token is available and valid. If the token is not available or fails verification, an error message is returned. The function is then used as middleware to protect routes that require authentication.

15:03

🔄 Using JWT for API Requests and Authentication Checks

The final paragraph discusses how to use the JWT for making authenticated API requests from the client side. It explains how to store the token in local storage upon successful login and how to include the token in the headers of subsequent API requests. The server then uses the middleware to verify the token with each request, ensuring that the user is authenticated. The paragraph also includes a demonstration of how the authentication process works in practice, showing the server's response when the token is present and when it is missing, thus emphasizing the importance of JWT for secure and efficient user authentication.

Mindmap

Keywords

💡JWT

JWT stands for JSON Web Token. It is an open standard that defines a compact and self-contained way for securely transmitting information between parties as a JSON object. This information can be verified and trusted because it is digitally signed. JWTs can be a great solution for authentication in modern web applications. In the video, the speaker discusses how to implement JWT with Node.js to authenticate users after they log in, ensuring that they don't need to log in again for subsequent requests.

💡Node.js

Node.js is an open-source, cross-platform JavaScript runtime environment that executes JavaScript code outside of a browser. It allows developers to use JavaScript to write command-line tools and for server-side scripting—running scripts server-side to produce dynamic web page content before the page is sent to the client. In the script, Node.js is used as the server-side platform to handle authentication using JWT.

💡Authentication

Authentication is the process of verifying the identity of a user, device, or system. It is a key aspect of information security and is crucial to prevent unauthorized access to resources. In the video, authentication is discussed in the context of using JWT to confirm that a user is who they claim to be after logging in.

💡MySQL

MySQL is an open-source relational database management system. It is widely used for developing applications due to its performance, reliability, and ease of use. In the script, MySQL is mentioned as the database where user records are saved after registration.

💡Server-side

Server-side refers to the back-end of an application, where the majority of the processing takes place. This is in contrast to client-side, which runs in the user's browser. In the video script, server-side is mentioned in the context of installing JWT and handling the logic for generating and verifying tokens.

💡Client-side

Client-side refers to the front-end of an application, which is what the user interacts with directly. It typically runs in the user's web browser. In the video, client-side is discussed in relation to storing the JWT in local storage and sending it with requests to the server.

💡Token

In the context of web security, a token is a string of characters that an authenticated user receives after logging in. This token is then sent with subsequent requests to authenticate the user. In the video, the generation and use of tokens are central to the JWT implementation process.

💡Middleware

Middleware in Node.js is a function that has access to the request object (req), the response object (res), and the next middleware function in the application’s request-response cycle. Middleware functions can perform a variety of tasks, such as logging, authentication, data validation, and more. In the script, middleware is used to verify the JWT token on the server-side.

💡Local Storage

Local storage is a way for web pages to store information locally within the user's browser. This information is stored as key/value pairs and can be retrieved later. In the video, local storage is mentioned as a method for storing the JWT securely on the client-side.

💡.env file

The .env file is used to load environment variables in a Node.js application. It is a good practice to store sensitive information such as API keys, database passwords, and secret keys in .env files to keep them out of the source code. In the video, the speaker mentions that in a real application, the secret key for JWT should be stored in a .env file.

💡API

API stands for Application Programming Interface, which is a set of routines, protocols, and tools for building software applications. APIs define how software components should interact. In the script, APIs are discussed in the context of server-side endpoints that require authentication, such as retrieving user posts or profile information.

Highlights

Introduction to implementing JWT authentication with Node.js

JWT is used for maintaining user sessions after login

JWT token is generated upon successful login and stored client-side

JWT token is sent with each API request for server verification

JWT eliminates the need for repeated logins for accessing different APIs

Installation of JSON Web Token package using npm or yarn

JWT is imported and used in the server-side code after successful login

A secret key is required for JWT which should be stored in an .env file in a real application

The token is generated with an expiration time, for example, 5 minutes

The generated JWT is returned to the client along with other login data

Front-end code handles the received JWT and stores it in local storage

A button is created on the front-end to check user authentication status

Backend API is set up to verify the JWT token

Middleware is created to verify the JWT token from the request headers

If the token is valid, the user's ID is passed to the next middleware

The front-end uses the stored JWT token to make authenticated API requests

A demonstration of how the system responds when the JWT token is missing

Conclusion and a call to action for viewers to subscribe and like the video

Transcripts

play00:00

hi everyone this is a very important

play00:02

topic in how to implement JWT

play00:06

authentication with no.js in previous

play00:09

video we created our sign up and also

play00:12

the login pages and we saved the records

play00:15

in my SQL database

play00:16

and in this video we will Implement how

play00:19

to use GWT with node.js okay in the

play00:22

previous previous video we implemented

play00:25

our sign up forum and we registered the

play00:28

account and also we implemented our

play00:30

login Forum okay and we checked that

play00:32

whenever we logged in successfully we

play00:34

should go to our home page okay so we

play00:37

implemented it in the previous video so

play00:38

for that video you have the link in the

play00:40

description how to use it we use session

play00:42

cookies and also saved registration and

play00:46

also back check the login pages so we

play00:49

did all this in the previous video so in

play00:51

this video just use the gw2 or Json web

play00:55

token how to use that okay so the first

play00:58

thing is that we should install that in

play01:00

our server side Okay so

play01:09

so in this server side we will install

play01:12

Json web token we will come here to the

play01:14

terminal into the server side inside

play01:16

here we will add NTM installed

play01:19

Json Vapor token

play01:23

if you are using yarn just yarn add Json

play01:26

with token so I have already installed

play01:28

that let's check it see Json web token I

play01:30

have installed that okay so now let's

play01:32

use that

play01:34

so before starting let's check it how it

play01:36

works okay how this this Json web token

play01:40

works okay for example

play01:42

um here is the user okay

play01:44

the user logged into the system okay

play01:46

this is the login

play01:48

and they press the button

play01:50

okay and it log into the server okay the

play01:53

server

play01:56

verified okay it login successfully okay

play01:58

it generate a token for user

play02:07

a generator token for the user okay it's

play02:09

stored on the client side and this user

play02:12

okay whenever the user again request to

play02:14

an API okay to the server okay it

play02:16

requests for example like a Facebook

play02:18

okay whenever you log in you are

play02:20

requesting for posts for comments for

play02:22

your profile for something else so again

play02:25

it should check that yeah so it we

play02:28

should login again you whenever you are

play02:30

requesting for example for posts okay

play02:32

you need this should verify you is it

play02:35

the user that you are logged in with us

play02:36

or not are you authenticated with or not

play02:38

either so it to can help with us to just

play02:42

verify it based on the token okay this

play02:44

is a user which is logging with us which

play02:46

is verified with us which is

play02:47

authenticated okay no need for again to

play02:49

login uh back for the posts or comments

play02:53

are for the profile so let's see just

play02:55

the choker the token if that was uh

play02:58

authenticated it means the token matched

play03:00

with the server where there is the the

play03:01

token it that match so no need again to

play03:04

login for that uh API okay so let's see

play03:07

for example there are money users okay

play03:09

so it will check all the users so it

play03:12

just shows the data the related to that

play03:14

user okay so this is very strong

play03:17

um the token is very strong okay so it

play03:19

it is just simple when we are requesting

play03:22

for other apis so it helps us um and it

play03:25

authenticate the user that is it the

play03:27

user that he is claiming or not so it is

play03:30

all about that

play03:33

so let's move now back

play03:38

so to use that first of all we will come

play03:40

to our server side code okay server side

play03:42

okay here we are logging it to the

play03:45

system okay this is the login route API

play03:47

that we have written okay in the login

play03:49

whenever we successfully logged into the

play03:51

system okay so in the login system here

play03:55

this is the code that we are plugging

play03:57

successfully okay it means that our

play04:00

password and username is correct so here

play04:03

we will just use now gwg so first you

play04:05

will import JWT so for that we will

play04:08

write

play04:10

import JWT from

play04:12

Json web token after importing that

play04:15

let's use it so whenever we logged in

play04:18

successfully so here we will use that

play04:20

now

play04:23

okay so first of all we will just take

play04:25

the ID from our records okay this one

play04:28

the ID that we have okay we will just

play04:30

take this ID so let's come here to our

play04:32

code

play04:33

and const ID is equal to the data we are

play04:37

getting here okay this data this is in

play04:39

our HIV that's okay whenever we run the

play04:41

query we will get an array so we will

play04:43

just take the 0 the first row and we

play04:46

will take the idea of that after getting

play04:49

the idea of that now we will use the GWT

play04:52

foreign

play05:00

[Music]

play05:06

key this should be a private key okay

play05:10

um in the real application that should

play05:12

be in that EnV file okay you should have

play05:14

a DOT EnV file in your startup site code

play05:16

and you should store that there in check

play05:19

from that eme file but now we are just

play05:21

testing so I will just write something

play05:23

like uh GWT if I just write like this or

play05:28

secret key okay

play05:30

secret key

play05:32

and after that we will pass another

play05:34

object so in that objective like we will

play05:37

pass expires in for example expires in

play05:40

like 300 okay it will just take around

play05:42

five minutes okay so I thought so it

play05:46

will generate a two conference okay

play05:47

let's assign that to our variable

play05:50

const token is equal to so this method

play05:54

will just generate a token for us and we

play05:57

will store that in the token variable

play06:02

so after generating the token so now we

play06:04

will just pass a return that is our

play06:06

client said okay to our front end so to

play06:09

return that instead of just forcing this

play06:11

message we will just write

play06:14

message

play06:17

or I have it right let's assign

play06:22

login true okay it means login is true

play06:25

and also we will pass our token and also

play06:29

we can pass

play06:31

uh the data okay that will return okay

play06:34

let me just simply fast that to our

play06:36

front end so whenever we logged in

play06:38

successfully we will generate a token

play06:40

and we just pass that to our front end

play06:42

so now let's move to our front-end site

play06:44

code okay in let's come to the let's

play06:49

uh let's come to the login to the front

play06:52

end and here to the SRC to the login

play06:55

in this league log in whenever we submit

play06:57

our button this is the submission code

play06:59

okay so we will pass this like in API in

play07:02

our server side and here we will get the

play07:04

results so whenever we succeeded but

play07:06

right now we are not getting this

play07:08

message we will get some

play07:12

result

play07:16

.data that

play07:18

let's check it we will return this login

play07:22

okay

play07:24

data.login whenever we return on the

play07:27

login if it was true so it will run this

play07:29

code okay so we will come to this party

play07:32

so just simply let's stick it okay that

play07:34

we are returning okay we are going to

play07:37

pack our home page or not let's check it

play07:39

now let's come back and refresh it

play07:42

and let's come in here enter the

play07:44

password let's login Crystal login

play07:46

button C yes correct

play07:50

so whenever we come here so now we will

play07:54

just so what you will do now with our

play07:56

token so we will store our token in your

play07:59

local storage okay it is a good way

play08:00

maybe your yeah we will store that in a

play08:03

local storage

play08:06

so before storing that and the local

play08:08

storage we will come here yes the user

play08:11

interface we will create a button here

play08:12

okay whenever we press that we will just

play08:15

check is the user authenticated or not

play08:17

okay by pressing that we will access the

play08:20

for example user information okay so

play08:22

whenever the user free starting that

play08:24

button so we will check is

play08:27

to access this information or not this

play08:29

first of all create a button

play08:32

yeah let's come here to the home page

play08:35

just come here Yahoo

play08:37

and here create a button inside this

play08:43

uh check art okay

play08:53

okay check out so now let's whenever we

play08:56

click on this

play08:57

on click let's add a class name to this

play09:02

button button

play09:05

primary

play09:07

and whenever we press the this button so

play09:11

we will call

play09:14

let's create this function

play09:18

um

play09:25

yeah and the lot is equal to

play09:28

it will create a function and here we

play09:30

will call our backend API so for that I

play09:33

will use axis

play09:35

reported that has imported data

play09:38

um just git okay and we will call

play09:42

Sim Sim to this API this will be our

play09:45

route

play09:49

and let's assign it but instead of this

play09:51

we will just check auth we will call

play09:54

this route okay check out we will create

play09:57

that later there okay so then we will

play10:00

get a result

play10:01

we will just cancel

play10:03

log the result

play10:06

cage if there was any error

play10:10

console.log here

play10:12

okay so we never replace this button we

play10:15

will call this function inside that we

play10:17

will just call this route and we will

play10:19

check we will then display the result so

play10:22

let's create this route okay let's come

play10:24

here to the server and let's click that

play10:26

here

play10:27

he will just up that gate

play10:31

in here cheek

play10:34

okay same to that we will create a

play10:36

like this

play10:41

okay so after that we will get request

play10:45

and response

play10:49

we will just return

play10:57

CDs are authenticated

play11:10

so before running this route okay for

play11:13

example we are passing this

play11:15

authentication message to the front end

play11:16

we will check is the user authenticated

play11:19

or not so for that I will create another

play11:21

function so I will name it verify JWT I

play11:27

will create this function now and before

play11:29

running this we will call this function

play11:31

if that return result true so then we

play11:33

will learn this otherwise not okay so

play11:36

let's create that

play11:37

Advanced verify GWT is equal to

play11:42

we will create a function we will get

play11:44

request response and that's your next

play11:46

middleware

play11:50

let's run that now

play11:54

so here first of all we will get our

play11:55

token from the headers okay we will

play11:57

write counts token is equal to request

play12:01

that leaders

play12:03

[Music]

play12:04

and from the edges we will get access

play12:07

for example we will name it axis token

play12:10

first we will get our token okay now we

play12:13

will check if the token if the token was

play12:15

not available okay

play12:18

so then just return

play12:23

s

play12:26

we need

play12:28

token

play12:30

please provide it

play12:33

or next time

play12:35

okay else if the token was available so

play12:38

then we will just verify it now

play12:41

so so verify it will like GWT

play12:45

dot verify

play12:47

in inside the verify the first we will

play12:54

then we will like our secret key okay

play12:56

the key that we had before we assigned

play12:58

before yeah this key okay we should

play13:00

write it manually like this

play13:03

it

play13:05

okay so after that we will just edit a

play13:09

function

play13:11

there will be error or decoded

play13:19

so if we get an error we will just

play13:23

return result.json

play13:26

not authenticated

play13:30

okay else

play13:33

we will just return

play13:35

um first of all we will write like a

play13:37

request dot user ID for example is equal

play13:41

to decoded

play13:43

decoded dot ID so it means that we are

play13:47

passing our ID to the next route okay so

play13:50

the next round to go further for the

play13:52

next rounds so we will call next

play13:55

uh middleware now

play13:59

yeah so after writing this we did we

play14:02

implemented it in our server side

play14:06

so now let's move to our front end so

play14:09

their whenever we get this response okay

play14:11

first of all we should store our token

play14:13

okay the token that we got in this login

play14:15

we should store that and local storage

play14:18

so let's come here and in the login so

play14:21

whenever we log in successfully yeah

play14:24

login successfully so we should store

play14:25

that and the local storage local storage

play14:28

that's it item

play14:30

and we will name it token

play14:32

and after that we will assign a result

play14:34

the data

play14:37

that token that we returned okay

play14:40

the name of that was uh token okay so

play14:43

let's check that

play14:45

see the token that we return okay

play14:49

so after that when we return the token

play14:52

so we should

play14:54

now use it

play14:55

let's move to our

play14:57

function that we created let's come here

play15:00

yeah we were at the home page okay we

play15:03

were at the home page so we said

play15:04

whenever we click this button so we

play15:06

would like to call this function so

play15:08

after that we never recall this so we

play15:10

should call this authentication okay

play15:12

this API cheat auth okay we should call

play15:15

this check out this one okay so we

play15:18

should do uh pass our token also so here

play15:22

we should pass with the headers at this

play15:24

token okay that we used okay this one

play15:26

access token we should pause this in the

play15:28

heaters so let's write something like

play15:30

this

play15:34

heaters

play15:37

and we will name it like this that we

play15:40

did in our server cell okay access token

play15:48

and we will pass our token to this local

play15:51

storage that git item

play15:55

the name of that was token

play16:01

yeah everything is

play16:03

working so now we will check that

play16:08

so let's move to our front end so to run

play16:10

this okay so first of all let's refresh

play16:12

the page yeah let's log in okay after

play16:15

logging so let's move to the console

play16:18

what we are getting from our server side

play16:20

okay let's to the console so let's press

play16:22

this check out okay to check that let's

play16:24

press it

play16:26

see regard the result that authenticated

play16:28

okay so if I remove the authentication

play16:31

the token so let's come here to the

play16:33

application let's come here local

play16:34

storage and here let's remove this okay

play16:37

let's delete it so let's come back to

play16:40

the console

play16:41

and let's press now this uh check out

play16:44

okay so let's press it see we got we

play16:47

need to please provide it for next time

play16:49

okay it means there is no token with us

play16:51

okay so it was the response that we got

play16:55

from our server side

play16:57

see if there was no token so please

play16:58

provide it if that was verified so we

play17:01

will get this result okay if that it

play17:04

means that there was no error so we move

play17:06

back to the next round so we got the

play17:08

result that authenticated

play17:10

so it was all about implementing uh JWT

play17:13

in node.js so I hope this video was

play17:17

helpful for you if you like this video

play17:18

so please subscribe our YouTube channel

play17:21

and also like this video on coming down

play17:22

if you have any questions so please

play17:24

comment down that thanks for watching

Rate This

5.0 / 5 (0 votes)

Ähnliche Tags
JWTNode.jsAuthenticationWeb SecurityAPILoginSignUpMySQLCodingTutorial
Benötigen Sie eine Zusammenfassung auf Englisch?