Part Modeling - Create a Shell Feature

Craig Hughes
30 Apr 202205:13

Summary

TLDRThis video provides a tutorial on preparing for the Autodesk Fusion 360 Certified User Exam by focusing on creating a shell feature in Fusion 360. The instructor demonstrates how to create and shell a solid object, explaining key operations such as removing faces and adjusting wall thicknesses. The video covers practical applications like 3D printing and how to use the section analysis tool to inspect the shell. The tutorial concludes by emphasizing the importance of mastering these tasks for exam success and encourages viewers to continue studying and practicing.

Takeaways

  • 🔧 The video focuses on the Autodesk Fusion 360 Certified User Exam, covering specific exam objectives.
  • 📐 The feature discussed in this video is creating a shell feature in Fusion 360, a common part modeling technique.
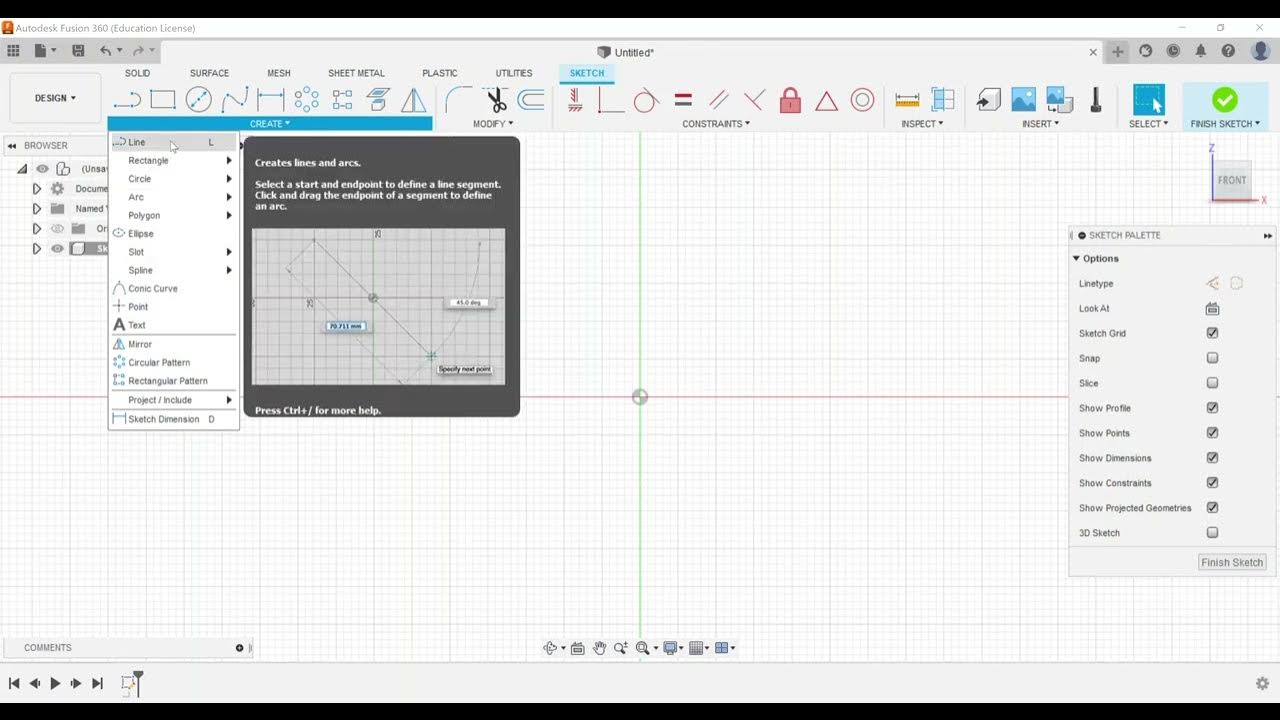
  • 🚀 To create a shell, the user begins by creating a sketch of a cylinder, which is extruded to a desired height (e.g., 4 inches).
  • ✂️ The shell command allows users to remove selected faces (like the top face of a cylinder) to create hollow structures, such as a cup.
  • ⚙️ The shell thickness can be adjusted for both inside and outside walls, with an example of 0.125 inches for the thickness of the shell.
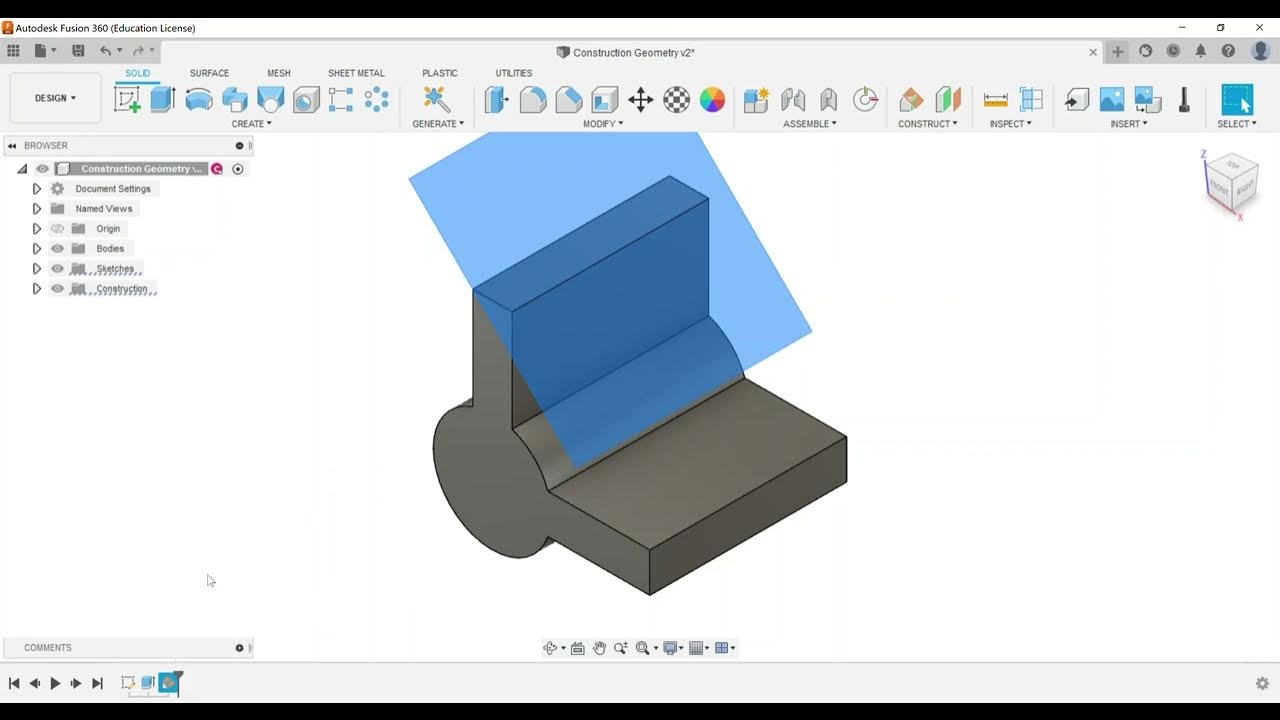
  • 🛠️ Section analysis is used to visualize the shell and assess the thickness of the walls inside the model.
  • 🔄 Users can undo or delete the shell feature to return the object to its original solid form and try different shell settings.
  • 🔍 Another method is to shell the entire body without removing any faces, which results in a hollow object without altering the outer appearance.
  • 📏 Section analysis can also be applied to measure dimensions like the distance from the center of the part to the edge.
  • 📚 The video encourages viewers to keep practicing these techniques for the Autodesk Fusion 360 Certified User (ACU) Exam.

Q & A

  • What is the focus of the video in relation to the Autodesk Fusion 360 Certified User Exam?

    -The video focuses on preparing for the Autodesk Fusion 360 Certified User Exam by discussing the shell feature, which is part of the exam's part modeling section.

  • How do you create a basic 3D model for shelling in Fusion 360?

    -To create a basic 3D model, start by creating a sketch of a cylinder (5 inches in diameter), extrude it to about 4 inches, and then use the shell feature to hollow it out.

  • What does the shell feature in Fusion 360 do?

    -The shell feature in Fusion 360 hollows out a solid body by removing one or more faces and creating a uniform wall thickness for the remaining part.

  • How can you apply the shell feature to create a container-like shape?

    -To create a container shape, select the top face of the cylinder, apply the shell feature, and set the inside wall thickness (e.g., 0.125 inches). This removes the top face and hollows out the rest of the object.

  • What is the difference between setting an inside thickness and an outside thickness when using the shell feature?

    -Setting an inside thickness reduces the material from the inside of the object, while setting an outside thickness removes material from the outer surface. You can also combine both for custom wall thickness.

  • What is the purpose of the section analysis tool in Fusion 360?

    -The section analysis tool allows you to cut through the object to visualize and inspect the internal structure of a model, including the effects of the shell feature.

  • What is the benefit of using the shell feature for 3D printing purposes?

    -The shell feature can reduce print time and material usage by hollowing out the object, though it may result in a less structurally strong model.

  • How do you shell an entire body without removing any faces in Fusion 360?

    -To shell an entire body without removing faces, simply select the body instead of individual faces, and set the desired wall thickness. The object will be hollow inside, but its outer shape remains intact.

  • What happens when you use the shell feature but don’t remove the top face of the cylinder?

    -If you don’t remove the top face, the shell feature will hollow out the interior of the cylinder, but the top surface will remain, creating a completely closed hollow object.

  • Why is the shell feature important for the Autodesk Fusion 360 Certified User Exam?

    -The shell feature is important because it is frequently tested in the exam, requiring candidates to demonstrate their ability to hollow out objects, use section analysis, and measure dimensions of the shelled part.

Outlines

00:00

🔧 Overview of Autodesk Fusion 360 Shell Feature

The video introduces an objective from the Autodesk Fusion 360 Certified User Exam, specifically focusing on creating a shell feature. The process starts with creating a simple cylinder using the sketch and extrusion tools. Afterward, the shell feature is introduced through the 'Modify' panel, demonstrating how to remove a face to create a hollow object (e.g., a cup). The thickness of the walls can be adjusted, with examples of different thicknesses like 0.125 and 0.25 inches. The visual differences between inside and outside shell thickness adjustments are explained, showing how users can customize their models.

05:02

📏 Using Section Analysis for Precision

The creator demonstrates how to apply the section analysis tool under the 'Inspect' panel. This tool allows users to view the internal shell structure, ensuring the desired thickness is applied throughout the object. In this case, a thickness of 0.125 inches is set. The section analysis helps to visualize the part's cross-section, aiding in confirming that the shelling process was done correctly. After reviewing, the shell is deleted, and the command is run again, showing an alternative method to hollow out an object without removing the top face, making it useful for 3D printing.

🚀 Advantages of Shelling for 3D Printing

The video emphasizes the benefits of shelling for 3D printing purposes, particularly reducing print time and material usage by hollowing out objects. The section analysis is applied again to demonstrate how the body looks internally after hollowing without removing the faces. This technique can be useful when a hollow body is desired without compromising too much structural strength. The creator also points out how section analysis helps verify the changes made to the model.

📐 Exam Tip: Shell and Section Analysis

The creator explains that the Autodesk Fusion 360 exam might include tasks that involve shelling an object and using section analysis to measure dimensions. An example is provided where users may be required to measure from the center of the part to its edge using section analysis, showcasing the practical application of this feature in exam scenarios.

📚 Wrapping Up the Shell Feature Overview

The video concludes with a summary of the shell feature and its importance for the Autodesk Fusion 360 exam. Viewers are encouraged to practice using the shell and section analysis features, review other exam objectives, and reach out for help if needed. The creator encourages continuous preparation for success on the first exam attempt.

Mindmap

Keywords

💡Fusion 360

Fusion 360 is a cloud-based 3D modeling software used for product design, manufacturing, and engineering. In the video, it is the primary tool being discussed, particularly in the context of preparing for the Autodesk Fusion 360 Certified User Exam. The video walks through using this software's shell feature for modeling objects like a hollow cylinder or cup.

💡Shell Feature

The shell feature is a function in Fusion 360 that creates a hollow space inside a solid model by removing a face and specifying wall thickness. In the video, the shell feature is used to create a hollow cylinder with a set thickness for its walls, demonstrating how it works and explaining its applications for 3D printing and modeling.

💡Sketch

A sketch in Fusion 360 refers to the 2D design that forms the foundation of a 3D model. The video begins by creating a cylinder through a sketch, which is later extruded and shelled. The initial creation of a sketch is a key step in modeling objects in Fusion 360.

💡Extrude

Extrusion is the process of converting a 2D sketch into a 3D object by extending it along a set axis. In the video, after creating the sketch of a cylinder, the user extrudes it to give it a height of four inches, turning the 2D circle into a 3D cylinder.

💡Modify Panel

The Modify Panel is a section within Fusion 360’s interface that provides options for altering or modifying 3D models. In the video, the user navigates to the Modify Panel to access the shell feature and customize the shape of the cylinder by removing faces and setting wall thickness.

💡Wall Thickness

Wall thickness refers to the specified distance between the inner and outer surfaces of a shelled object. The video demonstrates setting various thicknesses (e.g., 0.125 inches or 0.25 inches) to see how the model's walls change. The concept is important for structural integrity and 3D printing.

💡Section Analysis

Section analysis is a tool used to visualize the internal structure of a 3D model by creating a cross-sectional view. In the video, the section analysis tool is used to inspect the hollowed interior of the cylinder after applying the shell feature, showing how the thickness is applied to the walls.

💡3D Printing

3D printing is the process of creating physical objects from digital 3D models, layer by layer. The video mentions how shelling a model in Fusion 360 can reduce material usage and print time, making the shell feature beneficial for preparing objects for 3D printing, especially for non-solid structures.

💡Face

A face in 3D modeling refers to the flat or curved surfaces that make up the outer boundaries of a solid object. In the video, the face of the top of the cylinder is removed using the shell feature, allowing the object to become hollow like a cup. The manipulation of faces is a key aspect of using the shell feature.

💡ACU Exam

The Autodesk Certified User (ACU) Exam is a certification test for demonstrating proficiency in Autodesk tools like Fusion 360. The video is designed to help users prepare for this exam, focusing on specific objectives like using the shell feature. The video suggests that understanding how to apply features like shelling is crucial for passing the exam.

Highlights

Introduction to Autodesk Fusion 360 Certified User Exam and overview of shell feature preparation.

Creation of a sketch and extrusion of a cylinder to demonstrate the shell command.

Demonstration of creating a shell feature by removing the top face of a cylinder to make a cup-like structure.

Explanation of setting wall thicknesses (inside, outside, and both) and their impact on the final model.

Example of changing the thickness to 0.25 inches and observing the changes in the model.

Using section analysis to inspect the shell and verify thickness changes in the model.

How to delete the shell feature and return to the original solid model.

Introduction of an alternative method for creating a hollow cylinder without removing faces.

Benefits of hollow models for 3D printing, including faster print times and material savings.

Setting the shell thickness for the entire body and using section analysis to examine the interior.

Clarification on why the shell command might not visually change the exterior but impacts internal structure.

Further explanation of using grips to manipulate the section view and examine different parts of the model.

Potential exam questions involving shell feature and section analysis for measuring dimensions.

Final review of the shell feature and its importance in the Autodesk Fusion 360 exam.

Encouragement to continue practicing and studying for the Fusion 360 Certified User Exam.

Transcripts

play00:01

hey everyone another video here on the

play00:04

autodesk fusion 360 certified user exam

play00:08

and we're going to take a look at

play00:09

another exam objective

play00:11

for

play00:13

a little bit of preparation for that

play00:14

exam so if we check under the part

play00:17

modeling section we're going to be

play00:19

looking at creating a shell feature

play00:22

within fusion 360. so i'm going to move

play00:25

into fusion and the easiest way to do

play00:27

this is we're going to go ahead and

play00:28

we're going to click on create a sketch

play00:30

and i'm just going to create a

play00:33

cylinder

play00:35

that is maybe about 5 inches in diameter

play00:39

and we're going to finish the sketch

play00:41

and i'm going to extrude this to be

play00:44

maybe about four inches

play00:47

and what we're going to do is we're

play00:48

going to look at again under the modify

play00:50

panel we're going to go to shell

play00:52

and when i select it

play00:54

it first looks for what are the faces or

play00:56

the bodies so here's one of two things

play00:58

that we've got to look at is either when

play01:00

we go to select

play01:02

this we're going to remove

play01:04

the face

play01:05

and it's also going to shell the body so

play01:07

if we don't want to go through and do

play01:09

that

play01:10

then we want to make sure that we look

play01:12

at just the bodies so i usually have to

play01:14

open this up from the browser to be able

play01:17

to select that so here's what i'm going

play01:18

to do is we're going to go ahead and

play01:20

we're going to do a first operation and

play01:22

then i'll show you the second way to

play01:23

kind of handle that so i'm going to

play01:24

select the top because i want to remove

play01:27

that face and to make like maybe like a

play01:29

cup or something that i can put

play01:31

something into this container that i

play01:33

have so then i set the inside thickness

play01:35

of the walls let's say an eighth of an

play01:37

inch so that's the inside you can also

play01:40

change the you know whether it be inside

play01:42

or outside so you can see the outside it

play01:45

so it goes out from the outside to shell

play01:47

and then it goes through and creates you

play01:49

can see the highlighted blue

play01:51

it's going to create a outside thickness

play01:53

of 0.5

play01:54

or you can do both

play01:56

to where you want to you want to go

play01:58

through and change those thicknesses and

play02:00

again i'm just using the grips and you

play02:02

can also specify

play02:03

i'm going to go ahead and do an inside

play02:04

thickness just because it's very common

play02:08

so here i'm going to change it to maybe

play02:09

0.25 you can see how thick the walls

play02:12

would be

play02:13

based on that or we could change this to

play02:16

0.125

play02:17

and you can see how much thinner the

play02:19

walls get so that's a difference between

play02:21

an eighth of an inch and a quarter of an

play02:22

inch so i'm gonna go ahead and say okay

play02:24

and the shell is then gonna shell out

play02:26

the part so then that way that again the

play02:29

top is removed and these even the bottom

play02:31

face and the sides all have a thickness

play02:34

of an eighth of an inch or 0.125 so that

play02:37

is one way to do so i'm also going to

play02:40

grab under the inspect panel the section

play02:42

analysis if i select the work plane you

play02:45

can also see how the shell gets applied

play02:48

and we are able to go through and see

play02:50

that

play02:51

based upon the section lines that you

play02:53

see from the solid that's left

play02:56

so i'm going to go ahead and hit cancel

play02:58

just because i don't want to set that

play02:59

section analysis in yet so i'm actually

play03:01

going to go down here and i'm going to

play03:02

delete this shell

play03:05

so which will bring back our full solid

play03:07

i'm going to run the shell command again

play03:09

now if i don't want to go through and

play03:11

remove the faces maybe i just want a

play03:12

hollow cylinder so this could also be

play03:15

maybe a little bit beneficial for some

play03:17

3d printing purposes so especially if

play03:19

you're just making some objects and you

play03:21

don't want to have a solid object you

play03:22

can go through and just you know shell

play03:24

it out leads to faster print time it's

play03:26

not going to maybe be as structurally

play03:28

strong but you can go through and do

play03:31

that so rather than go through and

play03:32

choose the faces there i'm gonna go over

play03:34

and choose the body

play03:35

and then i can go ahead and set what

play03:37

thickness that i want it to be we'll do

play03:39

0.125 again it highlights the entire

play03:41

body again you can't really see those

play03:43

walls change or anything like that but

play03:45

i'm gonna go ahead and say i'm gonna use

play03:46

the same settings and i'm gonna say okay

play03:49

so it doesn't really look like anything

play03:51

happened but here's what's gonna happen

play03:53

here when i run the section analysis and

play03:55

i choose that same work plane you can

play03:57

see here

play03:59

here's what the inside looks like so the

play04:01

top just didn't get removed but it's

play04:03

completely hollow on the inside and as

play04:06

you turn these work planes using the

play04:07

grips

play04:08

you can go through and see what kind of

play04:11

what kind of shape that you might have

play04:13

so that's kind of what's going on

play04:15

with this particular part

play04:17

is we're shelling it out i'm going to

play04:19

hit cancel on the section analysis there

play04:22

and that's kind of how

play04:23

we utilize the shell feature and a lot

play04:26

of times what they'll do in the fusion

play04:27

360 exam they'll have you shell

play04:30

something and then they want you to

play04:32

maybe use the section analysis and then

play04:34

measure how far what kind of dimension

play04:36

that you would have maybe from the

play04:38

center of the part to the edge or

play04:39

something like that so that's really

play04:42

kind of the

play04:44

really the extent of the shell feature

play04:46

for the fusion 360 exam so

play04:50

hopefully this was a good benefit to you

play04:52

to review and uh this concludes our

play04:55

shell feature

play04:56

exam objective so check out other videos

play04:59

for other spotlighted exam objectives if

play05:01

you need help contact me

play05:03

otherwise keep studying keep trying out

play05:06

and keep preparing for that acu exam in

play05:09

order for you to be successful on that

play05:10

first attempt

Rate This

5.0 / 5 (0 votes)

Ähnliche Tags
Fusion 360shell feature3D modelingexam prepdesign tipscertificationAutodesksection analysis3D printingpart modeling
Benötigen Sie eine Zusammenfassung auf Englisch?