AutoCAD Tutorial for Beginners - 4

CAD CAM Tutorials
15 Mar 202020:51

Summary

TLDRIn this tutorial, the presenter expresses gratitude for 200k+ subscribers before diving into key AutoCAD commands. The video covers several methods for drawing circles, including center-radius, center-diameter, two-point, and three-point options. It also explains how to use commands like mirror, hatch, and object snap tracking for precision in design. The tutorial demonstrates creating tangent circles, customizing hatches, and locating points using object references. The video promises more exercises and future tutorials aimed at civil, interior, and electrical engineers, making it ideal for AutoCAD enthusiasts looking to enhance their skills.

Takeaways

  • 😀 The video creator thanks their audience for reaching 200k subscribers, crediting their encouragement for the milestone.
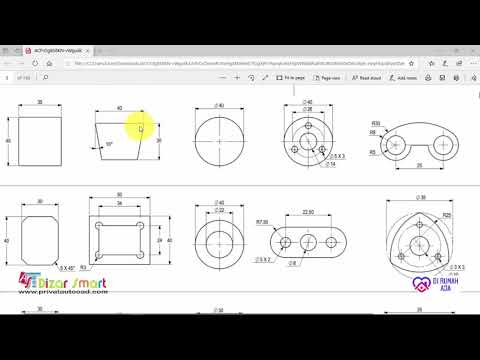
  • 📐 The tutorial covers various options for creating circles using the 'Circle Command,' such as Center-Radius, Center-Diameter, Two-Point, and Three-Point methods.
  • ✏️ It explains how to create a circle tangent to two objects, including lines and circles, using the 'Tan-Tan Radius' option.
  • 🔄 The 'Mirror Command' is demonstrated, showing how to mirror objects across a specified axis without erasing the original objects unless desired.
  • 🖌️ The 'Hatch Command' is introduced, which allows users to create hatching patterns inside objects, with options for scaling, angles, and color adjustments.
  • 🌈 Gradient hatches can be applied by selecting gradient patterns, colors, and adjusting transparency for different visual effects.
  • 📐 The 'Object Snap Tracking' feature helps locate points based on reference points without needing to draw reference lines, aiding in accurate placement.
  • 🔍 The tutorial details how to edit hatches by changing patterns, scaling, or separating them into individual elements.
  • ⚙️ Associative hatches automatically update if the shape of the object they fill is changed, providing a dynamic workflow.
  • 📝 The next tutorial will include exercises and continue lessons tailored to civil, interior, and electrical engineers.

Q & A

  • What are the different methods to create a circle in this tutorial?

    -The tutorial covers various methods to create a circle, including center radius, center diameter, two-point, three-point, tangent-tangent radius, and tangent-tangent-tangent methods.

  • How do you create a circle using the center diameter method?

    -To create a circle using the center diameter method, you need to specify the center point, then move your cursor to set the diameter and input the desired value, such as 400.

  • How can you create a circle passing through two points?

    -You can create a circle passing through two points by selecting the two-point option, clicking the first point (e.g., the endpoint of a line), and then the second point.

  • What is the difference between a 'two-point' circle and a 'three-point' circle?

    -A two-point circle passes through two specified points, while a three-point circle passes through three points, often used for creating circles within polygons like triangles.

  • How does the 'tangent-tangent radius' method work?

    -The tangent-tangent radius method allows you to create a circle tangent to two objects, which can be either lines or circles, by specifying the tangent points and inputting the desired radius.

  • What is the purpose of the mirror command?

    -The mirror command allows you to create a mirror image of selected objects across a specified mirror line, and you can choose to either keep or erase the original object.

  • How can you adjust the scale and angle of hatch patterns?

    -You can adjust the scale of hatch patterns by changing the hatch pattern scale value. To change the angle, specify the desired angle (e.g., 45 degrees for vertical lines).

  • What are the different hatch patterns available in the tutorial?

    -The tutorial mentions ANSI hatch patterns, architectural hatch patterns (like brick and concrete), and other patterns such as sand and gravel.

  • How do you create a gradient hatch and customize its colors?

    -To create a gradient hatch, select the gradient option, choose the desired colors and patterns, and apply them to the object.

  • What is object snap tracking and how does it help in drawing?

    -Object snap tracking allows you to locate points based on the alignment of other reference points without creating additional reference objects, useful for creating centered or aligned objects.

Outlines

00:00

📘 Introduction to Tutorial and Circle Command Options

The speaker begins by expressing gratitude for reaching over 200k subscribers and introduces a tutorial focused on AutoCAD commands. The tutorial covers various options for creating circles using different methods: center-radius, center-diameter, two-point, three-point, and tangent to two objects (tan-tan radius). The speaker also demonstrates how to create a circle tangent to two circles and how to create a circle from the outside by specifying tangent points. The tutorial is part of a series, with a link to the complete playlist provided in the video description.

05:01

🔄 Exploring Mirror Command and Hatch Patterns

The second paragraph delves into the use of the mirror command in AutoCAD, explaining how to mirror objects across a specified line. The speaker demonstrates the process, including the option to erase the source object after mirroring. Additionally, the tutorial covers the hatch command, which is used to create hatching lines within objects. Various hatch patterns are discussed, including ANSI and architectural patterns, and the speaker shows how to adjust the scale and angle of the hatch lines, as well as how to change the color and transparency of the hatch.

10:04

🎨 Customizing Hatch Patterns and Object Visibility

This section continues the discussion on hatching, focusing on customization options such as setting the origin for the hatch pattern, editing existing hatches, and creating solid or gradient hatches. The speaker also explains how to control the hatch area by selecting boundary objects and adjusting island detection settings. Techniques for making hatches transparent and bringing them to the front of other objects are also covered, ensuring that the hatches are visually distinct and properly layered in the drawing.

15:11

🔄 Using Object Snap Tracking for Precise Point Location

The fourth paragraph introduces object snap tracking, a feature that helps in locating points relative to other points without creating additional reference objects. The speaker demonstrates how to use object snap tracking to find the center of a rectangle by snapping to midpoints and using the tracking feature to find the exact center point. The tutorial also touches on using object snap tracking for creating projected views from a top view, such as creating a front view by projecting lines and points from the top view.

20:14

🔚 Conclusion and Upcoming Tutorials

In the final paragraph, the speaker concludes the tutorial and announces upcoming exercises based on the content covered. They also mention that further tutorials will be available for civil, interior, and electrical engineers. The speaker thanks the viewers for their time and engagement, signaling the end of the current tutorial session.

Mindmap

Keywords

💡Circle Command

The Circle Command is a tool used to create circles in design software by defining different parameters such as center point and radius. In the video, multiple methods of creating circles are demonstrated, including center-radius, center-diameter, and passing through two or three points, showing the versatility of this command in different design contexts.

💡Center-Radius Method

The Center-Radius Method is a way to create a circle by first specifying the center point and then defining the radius. This is one of the basic methods shown in the video to generate a circle. The tutorial demonstrates how a user can input the radius value, such as '400,' to create a circle of that dimension.

💡Two-Point Circle

A Two-Point Circle is a method where a circle is created by selecting two points through which the circle passes. In the video, this technique is illustrated by creating a circle that passes through two specific points on different lines, demonstrating how designers can use this method to position circles precisely in relation to other objects.

💡Tan-Tan Radius

The Tan-Tan Radius method creates a circle that is tangent to two objects and has a specific radius. This command is highlighted in the tutorial as a way to create a circle tangent to both a line and a circle, or two circles, and users are shown how to define the radius, such as '400,' to complete the circle.

💡Mirror Command

The Mirror Command is a tool used to create a mirrored copy of an object across a specified axis. The video explains how this command can be used to replicate objects symmetrically on the opposite side of a line, and the option to either keep or delete the original object after mirroring is also covered.

💡Hatch Command

The Hatch Command fills areas with patterns or solid colors, useful for distinguishing sections in designs. In the video, the Hatch Command is used to create patterns like 'ANSI34' inside defined objects. The user is shown how to modify properties like scale, angle, and transparency of the hatch to customize the look of the design.

💡Associative Hatch

Associative Hatch refers to the property where the hatch pattern adjusts automatically when the boundary object changes shape. The video demonstrates how this feature updates the hatch pattern dynamically as the object’s geometry is altered, ensuring consistency in the design.

💡Object Snap Tracking

Object Snap Tracking helps designers locate precise points based on the alignment of other objects without the need for reference lines. The tutorial shows how to use snap tracking to locate the center of a rectangle and create a circle at that point without drawing additional guidelines, emphasizing efficiency in the design process.

💡Gradient Hatch

Gradient Hatch allows designers to fill objects with color gradients rather than solid fills or patterns. In the video, this is demonstrated by selecting color combinations and gradient styles for filling selected areas, showcasing how gradients can be used to add depth and visual appeal to designs.

💡Match Properties

Match Properties is a feature used to apply the same attributes from one object to another. The video explains how this tool can transfer hatch patterns, colors, and other properties between different objects, making it easier for users to maintain consistent styles throughout a project.

Highlights

Tutorial begins with gratitude for reaching over 200k subscribers.

Introduction to the circle command options.

Explanation of creating a circle using the center-radius method.

Demonstration of the center-diameter method for circle creation.

Tutorial on creating a circle passing through two points.

Guide on creating a circle using the three-point method.

Introduction to the tan-tan radius method for creating tangent circles.

Example of creating a tangent circle to two objects.

Tutorial on creating a circle tangent to three objects using tan-tan-tan.

Explanation of the mirror command and its usage.

Demonstration of mirroring objects without erasing the source.

Guide on using the hatch command to create hatching lines.

Tutorial on adjusting hatch pattern scale and angle.

Explanation of changing hatch color and background color.

Guide on setting the origin for hatch patterns.

Introduction to editing existing hatches using the hatch editor.

Tutorial on creating solid hatches and controlling hatch areas.

Explanation of object snap tracking for locating points.

Demonstration of creating projected views using object snap tracking.

Conclusion and预告 of upcoming tutorials for civil, interior, and electrical engineers.

Transcripts

play00:00

At first I would like to thank you all for 200k plus subscribers. This is your

play00:06

encouragement that made it possible. Let's start with this tutorial. In this

play00:15

tutorial we are going to learn all the options from the circle command then we

play00:22

will learn about hatch then mirror and object snap tracking

play00:31

if you are interested in previous tutorials from this series the link to

play00:36

complete playlist is given in the description

play00:41

click on the arrow below the circle command we have already seen how to

play00:46

create circle using center radius method then next is Center diameter click on it

play00:54

in this at first we will have to give the center point for the circle click

play00:59

Center Point then take your cursor away then you will have to specify diameter

play01:04

of your circle suppose diameter is 400 enter so it will create circle of 400

play01:11

diameter then next is

play01:15

two point circle suppose I will create one object suppose I have this line and one

play01:25

more line

play01:30

suppose I want to create one circle passing through these two points then

play01:38

click here and click one two point option then click first point first

play01:44

point will be end point of this line click there then click on this end point

play01:50

same way suppose I want to create circle passing through these two points

play01:56

again click here select two point click on this end point and this end point so

play02:04

in this way you can create circle passing through two points

play02:10

and next is three point suppose I will create one triangle

play02:16

using polygon command I will give number of sides as 3 enter then I will use this

play02:23

edge method then specify first end point take your cursor away and click suppose

play02:31

I want to create a circle passing through three midpoints of this triangle

play02:37

for that click here and click on three point then first point will be the

play02:44

midpoint of this line click there and click here and click here so in this way

play02:51

it has created a circle passing through these three points same way you can

play02:57

create a circle passing through these three points the command you have used

play03:02

comes automatically on the top if you want to use that command again then

play03:08

there is no need to click on this arrow we can directly select that command from

play03:14

here click on three point and select these three end points so in this way

play03:22

you can use 3-point circle and next is tan-tan radius using tan tan radius you

play03:30

can create circle tangent to two objects those two objects can be either two

play03:36

lines two circle or one line and one circle click on it then suppose I want

play03:44

to create circle tangent to this circle click on the circle and tangent to this

play03:51

line click on it then you will have to

play03:54

specify the radius suppose radius is 400 enter so here it has created a circle

play04:03

tangent to this circle and this line same way you can create circle tangent

play04:09

to two circles also click on tan tan radius then click on this circle and this

play04:17

circle then give the radius I will keep 400 as it is press Enter so in this way

play04:24

it has created circle tangent to these circles now it has

play04:29

created circle tangent in this way suppose I want tangent circle from

play04:36

outside like this then for that you will have to specify tangent point in that

play04:44

particular areas again click on tan tan radius then if we create circle from

play04:54

outside then that circle will roughly touch in this area so click one point in

play05:01

this area and other point in this area then specify the radius suppose radius

play05:08

is 1200 enter so here it has created circle from outside so in this way you

play05:18

can use tan tan radius command then next is tan tan tan

play05:23

this will create circle touching three objects those can be three lines three

play05:30

circles or mix of them click on tan tan tan then suppose I want to create one

play05:36

circle tangent to this circle click on it this line and this line so it has

play05:44

created a circle touching these three objects same way suppose I want to

play05:49

create circle tangent to these three circles click on tan tan tan then click

play05:57

on this circle this circle and this circle so in this way you can use different

play06:02

options from circle command then next is mirror command

play06:10

suppose I want to mirror this object on the opposite side on this side and for

play06:18

that click on mirror keyboard shortcut for mirror is MI Enter click on mirror

play06:27

then select object you want to mirror I want to Mirror all these objects and

play06:33

press ENTER then specify first point of mirror line so I want to mirror it

play06:40

around this line

play06:43

therefore take first point of this line so I will take this intersection point

play06:48

and this intersection point then specify whether you want to erase source object

play06:56

so here I don't want to erase the source object if you click on yes the

play07:02

previously selected objects will be erased I don't want to do that therefore

play07:08

I will click on No so in this way this object has been mirrored around this line

play07:14

we will try one more time click on mirror then select object you want to

play07:21

mirror enter then suppose I want to mirror around this line so I will give

play07:29

here first point then take your cursor below then if you want mirror

play07:33

line to be straight then you will have to keep this Ortho mode ON then give the

play07:39

second point and again I don't want to erase source object I will click on

play07:44

No we will also see what happens if we erase source object suppose again I

play07:52

will click on mirror then I will select this circle and this circle enter and I

play08:01

will give this end point as a first point of mirror line I will take my

play08:05

cursor up to specify second point and for erase source objects I will click

play08:11

on yes so it has erased the original object and it has kept mirrored objects so

play08:19

in this way you can use mirror command next command is hatch keyboard shortcut

play08:25

for hatch is H enter Hatch is useful to create hatching lines if you create any

play08:32

section click here then at first click here and select your desire hatch

play08:39

pattern they have provided these ANSI hatch patterns then hatch patterns

play08:45

starting with AR are the architectural hatch patterns in

play08:50

architectural there are bricks patterns then concrete

play08:57

then sand if you scroll down there are different patterns has been given then

play09:05

there is a gravel so at first I will choose this ANSI34 then take your cursor

play09:12

inside the object where you want to place the hatch click there

play09:18

Now here it has created this hatch pattern if you want to increase the gap between

play09:24

these lines then for that you will have to increase this scale hatch pattern scale

play09:29

click there and increase it I will make it 5 then press Enter

play09:35

so here the gap between lines is increase so hatch command is still

play09:41

running you can click inside as many objects as

play09:45

you want only ensure that all the objects are visible if some object is not visible

play09:52

then it will not create the hatch if I try to click here now it is not showing

play09:58

the preview so in that case you will have to zoom minus and ensure that complete

play10:04

object is visible then click there then only it will create the hatch and if you

play10:10

want to reduce the gap then you will have to reduce scale

play10:13

suppose if I make it 2 so gap will reduce suppose I will keep the 5 value

play10:19

enter then if you want to change the angle of

play10:23

the lines here you can specify the desire angle now this angle is

play10:29

considered as 0 suppose I want to make it vertical then here you will have to

play10:35

specify angle of 45 and enter so after specifying 45 degree it will make it

play10:41

vertical and if you want to make it opposite then here you will have to give

play10:47

the angle of 90 enter then it will create opposite hatch then if you want to

play10:53

change the color then click here and from here you can choose your desire

play10:59

color and if you apply some background color then from here you can choose the

play11:07

background color if you are not happy with the layout of the lines you can set

play11:15

origin also click on it and suppose I will give origin here so here you can

play11:22

view that the lines are shifted so just click on set origin and give the origin

play11:29

so in that way you can shift the pattern also once all your settings are done

play11:35

then click on close hatch creation so that hatch will be created and if you want to

play11:42

edit this hatch or if you want to edit existing hatch then take your cursor on

play11:47

the hatch once it gets highlighted then click on

play11:51

it so it will bring this hatch editor again then you can make any changes you

play11:57

want suppose I want to change the hatch pattern to this one so as per that it

play12:03

has been updated so as I want larger scale I will make it 20. Once you have

play12:08

done all the changes just click on this tick so it will update your hatch then if

play12:15

you want to give hatch of single color then for that again click on hatch

play12:21

and click here scroll it up and click on this solid if you want to fill the

play12:28

single color click on solid then click the area where you want to create the

play12:33

hatch and from here you can change the color

play12:39

suppose I want to create it inside all these objects

play12:44

and if you want to create hatch by selecting object then for that you will

play12:50

have to click on this select select boundary objects click on it and

play12:55

select the object inside which you want to create the hatch now after selecting

play13:01

this circle it has changed the hatch area now you can control your hatch area

play13:07

by clicking on these options here right now here outer island detection is

play13:14

selected therefore it has created hatch for the outer objects

play13:19

same way if you click on this arrow if you select this normal Island detection

play13:25

then in this case it will not make any changes but if you have inside loops then

play13:32

it will give hatch to alternate loops and if you don't want to consider any

play13:38

objects then click on this ignore Island detection so it will hatch all the

play13:44

objects then click on okay so in this way here hatch is created and if you

play13:52

want to bring hatch ahead of these objects then click on this hatch then

play13:58

right click on it then click on this Draw Order and click on bring to front

play14:04

so all the objects will go behind your hatch and if you want to make your hatch

play14:10

transparent then click on this created hatch

play14:15

and from here you can select your transparency as you make it transparent

play14:20

the objects below the hatch are visible

play14:25

click on okay so in this way you can make your hatch transparent also same way

play14:30

if you want you can give gradient hatch also for a gradient hatch click on this

play14:36

arrow and click on this gradient then right now our select object is ON so I

play14:43

will select this object then from here you can select the layout for your

play14:50

gradient and from here you can choose your desire colors

play14:58

then from here different patterns are available for gradient you can

play15:03

choose your desired pattern and click on OK

play15:10

and if you want to match two hatches suppose here I want this hatch then you

play15:16

can use match properties take your cursor to properties and click on match

play15:20

properties then select source object I will select this hatch then for

play15:26

destination objects I will select this hatch and press Enter so in this way you

play15:32

can mash hatch using match properties and these hatches has been created as

play15:38

associative if you click on this hatch you can see here associative option it

play15:46

is on by default therefore whatever hatches you create those are associative

play15:52

now what happens because of this associative press escape if you change

play15:58

the shape as per that your hatch pattern will also change if I click on

play16:03

this triangle click on this grip and take it up so as per that your hatch is

play16:09

updated so that is associative press escape now here I have created this hatch

play16:18

using single hatch command therefore this complete hatch is connected and

play16:23

single suppose if I want to change this hatch and keep this hatch as it is then

play16:30

I will have to separate hatches to separate this hatch click on options and

play16:36

click on separate hatch so each hatch will be individual then click on OK

play16:45

now here you can select this hatch and you can change its pattern suppose I

play16:53

want here Honey now it is not visible I will have to increase the scale I will make

play16:59

it 10 enter and you can change the background color or object color and

play17:08

click on ok so in this way you can use Hatch command then next is object snap

play17:15

tracking now object snap tracking is useful to locate points with reference

play17:20

to other points suppose here I will create one rectangle

play17:26

now in this rectangle I want to create circle at the center of this rectangle

play17:31

then normally what I have to do I have to create one line from midpoint of

play17:35

this line to this line and then at the midpoint of that line I have to create

play17:41

the circle but using object snap tracking you can locate the center point

play17:46

without creating any reference objects now for object snap tracking you will

play17:51

have to keep this object snap tracking ON when it is ON it is visible in blue

play17:57

color and you will also have to keep this object snap ON then click on this

play18:03

arrow and you will have to tick the object snap which you want to use for

play18:09

tracking so if you have all these settings perfetly done then it will work

play18:16

properly if any one of them is turn off then it will not work

play18:22

click on circle now the center point will be in the line of this midpoint and

play18:29

this midpoint so take your cursor to this midpoint don't click there hold it

play18:35

for some time and take it away you can see that there is green plus sign is

play18:40

created so it is ready for tracking then take your cursor to this midpoint hold

play18:46

it for some time take it away so both the points are marked for

play18:50

tracking then take your cursor in the center so it will locate the center

play18:56

point click there and give the radius so in this way we can locate the point

play19:02

using other reference points so this object snap tracking is also very useful

play19:07

to create projected views suppose this is a top view

play19:11

and using this top view I want to create front view then how to create that click

play19:16

on line then take your cursor to this endpoint and take it away and click now

play19:22

length of this line will be same as length of this line take your cursor to

play19:26

this endpoint take it above and click then take it above give the length enter

play19:33

then again take your cursor to this endpoint take it above and click

play19:40

click on this endpoint enter then press enter to repeat the last command then

play19:46

this portion take your cursor to this quadrant

play19:50

take it above click on this intersection point take it above give

play19:55

the height then again take your cursor to this quadrant take it above click and

play20:01

now if you click here it will connect it to midpoint so what you can do you can

play20:07

take your cursor to this midpoint and take your cursor just zoom it take your

play20:14

cursor to this midpoint and take your cursor on this side now it is tracking

play20:18

that midpoint click there and press Enter

play20:21

so in this way you can use object snap tracking for creating projected views so

play20:28

that's all in the next lecture we will solve some exercises based on what we

play20:34

learn in this tutorial and after that we will also continue tutorials for civil

play20:41

interior and electrical engineers so thanks for watching we will stop here

Rate This

5.0 / 5 (0 votes)

Ähnliche Tags
CAD TutorialCircle CommandHatch PatternsMirror CommandObject SnapDesign Efficiency2D DrawingAutoCAD TechniquesEngineering DraftingCAD Tools
Benötigen Sie eine Zusammenfassung auf Englisch?