Blender Tutorial - Creating a Stormy Ocean
Summary
TLDRThis video tutorial walks viewers through creating a realistic ocean animation in Blender. It covers steps such as applying and customizing ocean materials, setting camera location keyframes to simulate a dynamic camera movement through the ocean, and adjusting render settings for optimal performance. The guide includes tips on adding motion blur, controlling sample rates, and previewing the animation. The tutorial concludes by encouraging viewers to experiment with lighting and materials, and to share their results for further feedback. Overall, it offers a comprehensive approach to crafting a visually appealing ocean scene in Blender.
Takeaways
- 😀 Create a realistic ocean by adjusting the roughness of the material to 0.1 for better visual quality.
- 😀 Apply the ocean material to multiple ocean planes to maintain consistency in the scene.
- 😀 Use keyframes to animate the camera moving through the ocean, adding realism to the scene's flow.
- 😀 Start camera movement around frame 110, diving into the ocean, and rise above it by frame 290.
- 😀 Preview the animation in the rendered view to check the camera's movement and ocean appearance.
- 😀 Ensure that the plane objects used for the ocean are hidden from both the view and the render for a cleaner final result.
- 😀 Enable motion blur to enhance the fluidity and realism of the ocean animation.
- 😀 Reduce the maximum render samples to 50 for quicker rendering without compromising too much on quality.
- 😀 Render a test frame to assess how the ocean and lighting appear, adjusting materials or lighting if needed.
- 😀 Consider adding additional post-processing effects like glare in the compositor for a polished look.
- 😀 Keep experimenting and check out tutorials on lighting to further enhance your ocean scenes in Blender.
Q & A
What is the purpose of applying a roughness value of 0.1 to the ocean material?
-The roughness value of 0.1 is applied to make the ocean surface smoother, improving the visual appearance of the water material for a more realistic effect in the animation.
Why is it important to name the materials in Blender?
-Naming the materials, such as calling it 'ocean,' helps with organization, making it easier to identify and apply them to different objects, especially when dealing with multiple materials in a scene.
What role does the location keyframe play in the camera animation?
-The location keyframe controls the camera's position over time. By adding keyframes at specific frames, the camera smoothly transitions through the scene, such as entering the ocean and emerging from it.
How does the animation preview help in refining the scene?
-Previewing the animation allows the creator to assess the timing, movement, and overall look of the scene before final rendering. This helps in making adjustments to ensure a smooth and realistic effect.
What does turning on motion blur do for the final animation?
-Motion blur adds a realistic blur effect to fast-moving objects in the scene, such as the camera or waves, which simulates the natural blurring that happens when an object moves quickly in the real world.
Why is it recommended to render out a single frame before starting the full render?
-Rendering out a single frame allows you to check the scene's appearance, lighting, and materials before committing to a full render. It helps identify any issues that might need adjustment.
What is the significance of adjusting the maximum samples for rendering?
-Reducing the maximum samples to 50 helps speed up the rendering process by lowering the number of samples per pixel, which is useful for quicker previews or when the scene doesn’t require extremely high-quality rendering.
How can the planes under the camera be hidden from both the view and render?
-By selecting the plane objects and turning off both the visibility in the viewport and the render, you ensure that they are not visible in the final animation, even though they are part of the scene setup.
What are some additional enhancements suggested for the ocean scene?
-Additional enhancements include using lighting tutorials to improve the scene's atmosphere, adding glare effects in the compositor, and adjusting materials for more realistic ocean water.
How can compositing improve the final rendered animation?
-Compositing allows for post-processing effects such as glare, color correction, and depth of field, which can enhance the overall look of the rendered animation and make it appear more polished and visually appealing.
Outlines

هذا القسم متوفر فقط للمشتركين. يرجى الترقية للوصول إلى هذه الميزة.
قم بالترقية الآنMindmap

هذا القسم متوفر فقط للمشتركين. يرجى الترقية للوصول إلى هذه الميزة.
قم بالترقية الآنKeywords

هذا القسم متوفر فقط للمشتركين. يرجى الترقية للوصول إلى هذه الميزة.
قم بالترقية الآنHighlights

هذا القسم متوفر فقط للمشتركين. يرجى الترقية للوصول إلى هذه الميزة.
قم بالترقية الآنTranscripts

هذا القسم متوفر فقط للمشتركين. يرجى الترقية للوصول إلى هذه الميزة.
قم بالترقية الآنتصفح المزيد من مقاطع الفيديو ذات الصلة
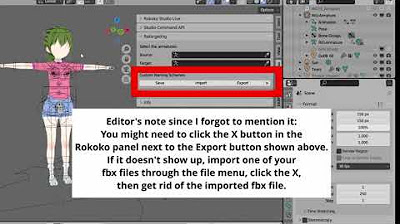
Using Koikatsu animation files in a Blender asset library
Tutorial animasi 3D blender 2.8 bahasa indonesia Pt 5 - Lighting dan Animasi

How To Make Pixel Art In Blender - The Complete Guide

Create butterfly animation with Blender
Beginner Blender 4.0 Tutorial - Part 2: Basic Modelling

3D modeling in Blender: Tiffany & Co. Perfume bottle
5.0 / 5 (0 votes)
