DIY 2005 Hyundai Tucson Alternator Replacement

Josh Anderson Art
22 Nov 201720:21

Summary

TLDRThis video script details a DIY guide to replacing the alternator in a 2005 Hyundai Tucson. The process begins with diagnosing alternator failure through warning signs like dashboard lights. The tutorial covers jacking up the car, removing the front passenger tire, and detaching the battery. It proceeds with releasing the belt tension, disconnecting wires, and removing the faulty alternator. The script then guides through installing the new alternator, reconnecting wires, and adjusting the belt. Finally, it advises on jump-starting the car due to a drained battery and emphasizes the importance of safety and correct tool usage throughout the repair.

Takeaways

  • 🔌 The video is about changing the alternator on a 2005 Hyundai Tucson due to warning signs like dashboard lights indicating a problem.
  • 🚦 The alternator failure was confirmed when the car's lights dimmed and eventually died, necessitating a tow.
  • 🔧 The first step was to jack up the car and remove the front passenger side tire to access the alternator.
  • 🔨 Loosening the lug nuts before lifting the car off the ground was recommended for safety and ease of tire removal.
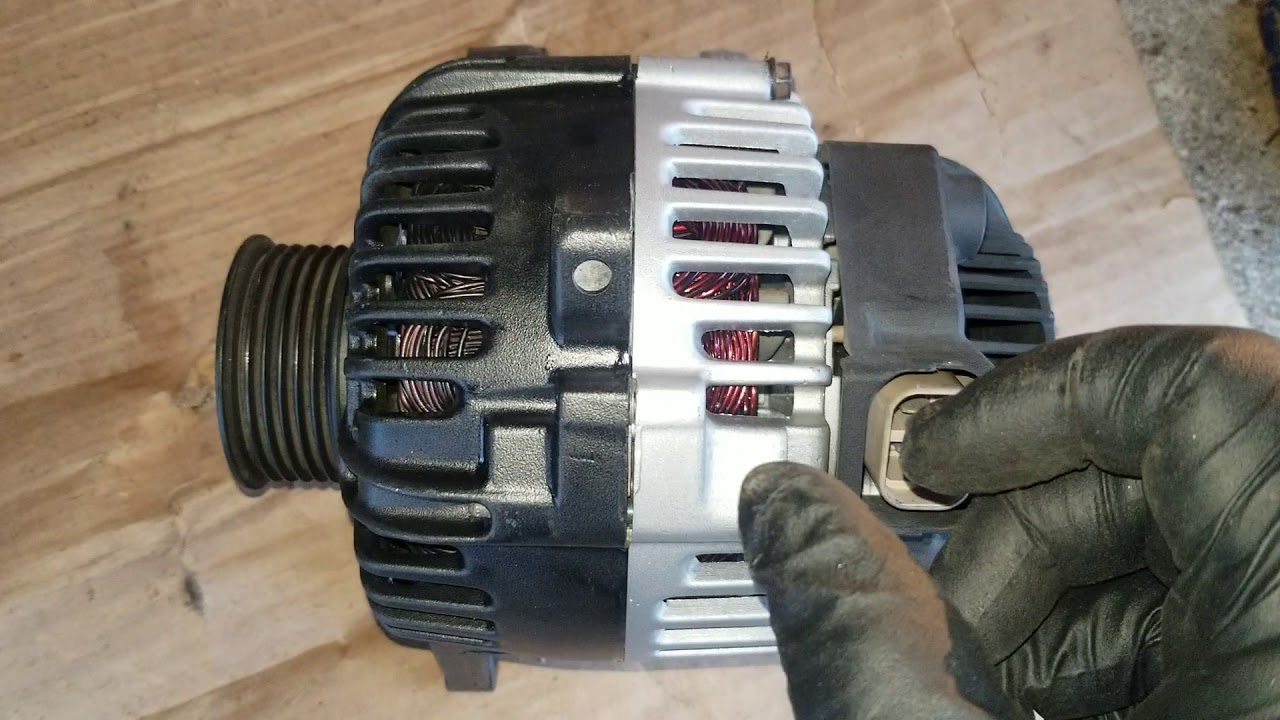
  • 🛠️ The alternator was accessed by removing a plastic guard and disconnecting the battery's negative terminal.
  • 🔄 The alternator pulley tension was released to remove the belt, a crucial step before alternator removal.
  • 🔌 Disconnecting the wires from the alternator involved removing clips and unplugging a wire harness and a power plug.
  • 🔩 The alternator was removed by loosening two main bolts, one of which required a torque wrench for proper removal.
  • 🛡️ The alternator was covered in grease, possibly from a power steering fluid leak, indicating a potential cause of failure.
  • 🔄 The installation of the new alternator involved reversing the removal process, including reconnecting wires and bolts.
  • 🔋 After installation, the car needed to be jump-started due to the battery being drained, highlighting the importance of a functioning alternator for battery charging.

Q & A

  • What is the main issue described in the video script?

    -The main issue described in the video script is the failure of the alternator in a 2005 Hyundai Tucson, which is causing warning lights on the dashboard and eventually leading to the car dying.

  • What are the warning signs that indicate a problem with the alternator?

    -The warning signs include the 'check engine' light and the battery light coming on the dashboard, as well as the car's electrical systems such as the dashboard lights and headlights dimming before the car dies.

  • What diagnostic was performed to confirm the alternator issue?

    -A diagnostic test was run at AutoZone to confirm that the alternator was the problem.

  • Why did the car need to be towed home?

    -The car needed to be towed home because the alternator failed, causing the car to lose power to its electrical systems and ultimately die while driving.

  • What is the first step in the alternator replacement process shown in the video?

    -The first step is to jack up the car and remove the front passenger side tire to access the alternator.

  • What tools are needed to remove the alternator?

    -Tools needed include a jack, jack stands, a tire iron, a ratchet, and various socket wrenches (10mm, 13mm, and 9/16).

  • How many bolts and what types of connections need to be removed to access the alternator?

    -There are two main bolts that hold the alternator, a wire harness clip, and a plug that needs to be disconnected.

  • What is the purpose of releasing tension on the tensioner pulley?

    -Releasing tension on the tensioner pulley allows the belt to be removed from the alternator, which is necessary for its replacement.

  • What is the challenge faced when trying to remove the alternator?

    -The challenge is the limited space to maneuver tools and hands, especially when trying to disconnect the electrical plug and tighten the bolts.

  • What is the procedure for installing the new alternator?

    -The procedure involves positioning the new alternator, connecting the electrical plug and wire harness, and securing it with the appropriate bolts, followed by tightening them to the specified torque.

  • What is the final step before starting the car after the alternator replacement?

    -The final step is to reconnect the battery terminals and ensure all components are in place before attempting to start the car.

  • How is the car jump-started after the battery has been depleted?

    -The car is jump-started by connecting jumper cables from a live car to the dead car's battery terminals, starting the live car, and then attempting to start the dead car.

Outlines

00:00

🔧 Alternator Replacement on a 2005 Hyundai Tucson

The video script details the process of replacing the alternator in a 2005 Hyundai Tucson due to warning signs like dashboard lights indicating a problem. The car owner had a diagnostic test confirming the alternator's failure and experienced a total electrical failure while driving. The script outlines the steps to jack up the car, remove the front passenger tire, and access the alternator by removing a plastic guard and the battery's negative terminal. It also describes the release of the tensioner pulley to remove the belt from the alternator.

05:03

🛠 Disassembling and Preparing for Alternator Replacement

The script continues with the disassembly process of the old alternator, which includes unhooking the wire harness and removing two main bolts. The narrator also mentions creating more room by removing a power steering line fluid bolt. The difficulty of reaching and loosening the electrical nut is highlighted. After removing the alternator, the script describes the cleaning and inspection of the area, noting the presence of power steering fluid which may have contributed to the alternator's failure.

10:04

🔄 Installing the New Alternator and Reconnecting Wires

The script explains the installation of the new alternator, starting with attaching the carriage bolt and positioning the alternator in the engine compartment. It details the process of reconnecting the wire harness and ensuring a secure connection by tightening the nut and making sure the wire is in the correct groove. The video also shows how to reconnect the electrical plug and how to maneuver the alternator into the correct position for final bolt tightening.

15:05

🔩 Final Assembly and Jump-Starting the Car

The final steps include tightening the alternator bolts to the specified torque, reconnecting the power steering line, and reinstalling the plastic guard. The script also covers the process of jump-starting the car after the alternator replacement, emphasizing the importance of connecting jumper cables correctly and allowing the car to run to recharge the battery. The successful start of the car after the jump-start indicates a successful replacement.

20:06

📣 Conclusion and Car Start

The final paragraph of the script is incomplete but suggests a conclusion to the alternator replacement process. It implies that after all the steps have been completed, the car is started to verify the success of the repair, and there is a note on the loud noise the car makes, possibly indicating a need for further attention.

Mindmap

Keywords

💡Alternator

An alternator is an automotive component that generates electricity to power the vehicle's electrical system and recharge the battery while the engine is running. In the video's context, the alternator is the main focus as the 2005 Hyundai Tucson's alternator is being replaced due to malfunction, evidenced by warning lights on the dashboard and a diagnostic test confirming the issue.

💡Warning Signs

Warning signs in this video refer to the indicators on the car's dashboard that signal a potential problem. The script mentions two specific lights—the 'check engine' light and the 'battery' light—that came on as a precursor to the alternator failure. These signs are crucial for diagnosing vehicle issues and are directly related to the video's theme of automotive repair.

💡Diagnostic

A diagnostic test is a procedure used to identify faults in a vehicle. In the script, the car was taken to AutoZone, an automotive retailer, to run a diagnostic test which confirmed the alternator as the faulty component. This process is essential for pinpointing the cause of issues in vehicles and is a key step in the repair narrative.

💡Dash Lights

Dash lights are the indicators or illuminations on a vehicle's dashboard that provide information about the car's status. The script describes how these lights started to dim before the car died, signaling a power issue related to the failing alternator. This is a visual cue for the driver and a critical element in the video's storyline.

💡Jack

A jack is a device used to lift a vehicle off the ground for maintenance or repair purposes. In the video, the car is jacked up to remove the front passenger side tire, which is necessary to access the alternator. The script details the process of using the jack and ensuring safety with jack stands, illustrating a fundamental aspect of automotive repair.

💡Lug Nuts

Lug nuts are the fasteners that secure the wheels to the car's axle. Before jacking up the car, the script mentions the importance of loosening the lug nuts while the car is still on the ground, which is a standard procedure in tire removal and part of the broader process of replacing the alternator.

💡Tensioner Pulley

The tensioner pulley is a component that maintains the correct tension on a belt in a vehicle. In the script, the tensioner pulley is released to remove the belt from the alternator. This step is crucial for accessing and replacing the alternator, as it allows for the removal of the belt that drives it.

💡Wire Harness

A wire harness is a collection of wires bound together to create a single assembly. In the video, the wire harness is one of the connections that need to be disconnected from the alternator during the replacement process. The script describes the process of unclipping and removing this harness, which is an essential step in the alternator replacement.

💡Power Steering Line

The power steering line is part of the vehicle's power steering system that supplies hydraulic fluid to the steering mechanism. In the script, the power steering line is mentioned as a component that may need to be moved or removed to access the alternator. This illustrates the complexity of automotive repair, where multiple systems can interfere with one another.

💡Torque Wrench

A torque wrench is a tool used to apply a specific amount of torque to a fastener, ensuring it is neither under nor over-tightened. The script describes using a torque wrench to tighten the bolts that secure the alternator, which is critical for ensuring the alternator is safely and correctly installed.

💡Jump-Starting

Jump-starting is the process of starting a vehicle with a dead battery by connecting it to another vehicle's battery using jumper cables. The script concludes with the car being jump-started after the alternator replacement, which is necessary to recharge the battery and test the vehicle's functionality post-repair.

Highlights

We're gonna be changing out the alternator on a 2005 Hyundai Tucson.

Warning signs included some lights coming on the dash, indicating a potential alternator issue.

Took the car to AutoZone for a diagnostic, confirming the alternator problem.

The car's lights went dim, the headlights went out, and the car died, necessitating a tow home.

First problem observed: the brake and battery lights were coming on.

Steps to change the alternator include jacking the car up, removing the front passenger side tire, and loosening the lug nuts.

Remove the plastic guard inside the wheel well and disconnect the negative terminal of the battery.

Release tension on the tensioner pulley to remove the belt from the alternator.

Unhook the wires connected to the alternator and remove the bolts securing the alternator.

Rotate the alternator to access the difficult-to-reach electrical nut on the backside.

Install the new alternator by reversing the steps taken to remove the old one.

Reconnect the wire to the post on the new alternator and ensure proper contact.

Reinstall the belt, plastic guard, and battery terminal; ensure everything is tightened correctly.

Jump-start the car if necessary and let it run to charge the battery.

Final step: reconnect the battery cables, reinstall the tire, and ensure the car starts and runs properly.

Transcripts

play00:02

[Music]

play00:13

[Music]

play00:19

[Music]

play00:28

we're gonna be changing out the

play00:30

alternator on a 2005 Hyundai Tucson some

play00:33

of our warning signs for some lights

play00:36

coming on on the dash I think they kind

play00:39

of spell a code out so we took it into

play00:41

autozone had him run a diagnostic and it

play00:44

definitely looks like the alternator I

play00:46

went ahead and ordered one but then like

play00:48

the day I ordered it that night we were

play00:52

driving the car along and all of a

play00:53

sudden like things started going dim

play00:55

like a clock the dash lights and then

play00:57

our headlights went out and then the car

play00:59

pretty much died had had to tow it home

play01:02

so that pretty much spelled out that it

play01:04

was definitely the alternator so here we

play01:07

are we're gonna change that sucker first

play01:09

problem we ever saw these two lights

play01:12

that break and the battery light were

play01:14

coming on so that was sort of our

play01:17

warning sign I didn't know what that was

play01:19

looked it up turns out it's more serious

play01:21

than a glitching panel it's actually

play01:24

showing me that my alternate is probably

play01:26

bi later these lights are right here t1

play01:29

together while we were driving the ABS

play01:32

brake and ESP off all right the first

play01:35

thing we're gonna do is Jack the car up

play01:37

so we can get that tire off front

play01:40

passenger side tire you want the jacks

play01:43

go right here on this this ridged part I

play01:47

know it seems kind of weird because it's

play01:49

thin but we just want the the jack to

play01:53

come up on that how to jack stand ready

play01:55

so we can have the car set down on that

play01:58

all right so our goal is to lift the car

play02:00

up high enough that we can get a little

play02:03

free play under the tire a good thing to

play02:05

do first and loosen your lug nuts before

play02:08

you get the car off the ground okay so

play02:11

like I said while that there's still

play02:13

weight on the tire we're just gonna use

play02:15

the tire iron that come that's in the

play02:17

back of the car right where the spare

play02:20

tire is

play02:25

your Hyundai Tucson should have the jack

play02:29

that comes with it it's by the spare

play02:31

tire in the back not one's gonna give us

play02:33

enough to get this off the ground don't

play02:35

pick your jack right there there's like

play02:38

some bolts there that are gonna make it

play02:40

it won't sit flat

play02:42

[Music]

play02:51

okay so I've got a couple of Jack's

play02:54

downs house I put my floor jack under

play02:56

the front just the triple table backup

play02:59

alright so I'm about to remove the tire

play03:01

[Music]

play03:07

thing a wheel chock like one of your

play03:10

back tires okay so once we've got two

play03:15

tire off this is what you see in here

play03:16

first thing we're gonna have to remove

play03:18

is this this plastic guard right there

play03:22

the ten millimeter bolt they're round up

play03:25

and around there's three more real quick

play03:33

I'm just gonna go ahead and take off the

play03:35

negative terminal of the battery that's

play03:37

a ten millimeter okay so our next step

play03:41

is to release tension on the tensioner

play03:47

pulley so that we can get the belt off

play03:49

of the alternator

play03:50

there's the alternator right there

play03:51

that's alternator pulley

play03:53

there's the belt on it gonna belt my

play03:56

bottom powers belt goes right up to

play03:58

that's the tensioner pulley right there

play03:59

and we're just gonna put the drive of

play04:02

our ratchet in that square right there

play04:06

we're just gonna crank down and pull

play04:08

just to loosen the tension once you get

play04:12

your ratchet in there you're gonna need

play04:13

to pull with your right arm you get the

play04:17

belt off alternator with your left

play04:19

alright so now I've got the handle way

play04:22

up high so I have some leverage it's not

play04:26

as hard as I thought it would be do that

play04:29

and I should all right so the pulley is

play04:31

now off just okay so here's a top view

play04:35

from inside the engine compartment and

play04:38

next is to unhook wires there's three

play04:41

different things you're gonna have to

play04:42

unhook two of them rack of power

play04:44

I think going in and out of the

play04:47

alternator one of just like a wire wire

play04:49

harness actually do that one first we'll

play04:52

go under

play04:53

right here there's just a little clip

play04:56

that that harnesses this wire right

play04:59

there I might already hadn't done but

play05:02

you'll have to pull that clip out of

play05:05

yours here's my new alternator which I

play05:08

ordered from rockauto.com and just to

play05:11

show you what you're gonna be working

play05:12

with so this is where that the wire

play05:16

harness thing plugs in I don't even know

play05:18

how necessary that is cuz mine's been

play05:19

broken that then there's a plug there

play05:22

and then there's this this one will be

play05:25

screwed on with a boot over it I finally

play05:35

decided minute need more room for my arm

play05:41

get in here so I took out this bolt I

play05:44

think that's the power steering line

play05:47

fluid line and that's just a bolt that

play05:50

sort of anchors it I pulled that out so

play05:53

I could push the power steering light

play05:55

out of my way to get my hand back in

play05:58

here cuz it's just barely enough room

play06:00

once I could get my right on through

play06:04

through here and then left hand up

play06:11

through here then I can kind of get both

play06:14

fingers on the plug and use my left hand

play06:17

and my left index finger to push the

play06:21

button on the back and then my right

play06:24

hand just to jiggle it free it's really

play06:26

hard it's not easy

play06:34

you have two half-inch socket 13

play06:44

millimeter fits two of a half-minute

play06:46

seems to fit

play06:48

I'm actually having a really hard time

play06:50

getting my ratchet on that second wire

play06:56

nut back there and so me I might be able

play07:01

to when I pull the alternator out I

play07:04

might be able to reach it better so I

play07:07

might try about we alternate at first

play07:10

and I kind of sliding it out we'll see

play07:12

it so what I'm doing two main bolts that

play07:17

hold the alternator and then the lower

play07:19

one is right here and I just got 9/16 I

play07:25

just took my ratchet on there and it's

play07:29

really tight so I really wanted to use

play07:31

my torque wrench that I have has a

play07:33

really long handle on it so I can get

play07:35

lots of leverage and so I'm just going

play07:39

straight down three it's kind of a

play07:41

wishbone shape to the up to the CV joint

play07:44

anything I'm just going through there

play07:47

and I was able to get enough torque to

play07:50

break that one loose top bolt to the

play07:53

alternators right there of course that

play07:56

one's at twelve Mills there of it now

play07:57

and there's some enough to use a wrench

play08:01

least I have a ratcheting boxing range

play08:11

[Music]

play08:22

okay we actually have it lift it out all

play08:27

right okay so it's still having a hard

play08:36

time getting to that one electrical nut

play08:39

on the backside of the alternator so now

play08:42

I'm gonna try to actually pull the

play08:43

alternator out damn like explaining this

play08:45

hole just to be too small to get it

play08:47

through things getting in the way is

play08:49

this bracket right here that I'm like

play08:52

again I think that's power steering line

play08:55

and it's just a bracket that holds holds

play08:59

it into there there's that 10 millimeter

play09:01

bolt right there and if we pull that out

play09:03

we can get this bracket out of our way

play09:05

we've got that cracked off one of the

play09:07

reasons I think this alternator went bad

play09:09

is there's just stuff all over it which

play09:12

i think is actually a power steering

play09:15

fluid from the top of the engine now

play09:24

with the alternator rotated I can see

play09:27

that and that right there I'm gonna be

play09:30

able to get the camera on it while I

play09:32

undo it so this is the only way I was

play09:36

able to write much work on it I don't

play09:38

know like if you're doing this exactly

play09:40

like me you might not have rotated it

play09:43

the same way so just however you can get

play09:47

[Music]

play09:57

puzzle piece all right so I don't know

play10:03

if you could see that but I pointed the

play10:05

pulley out I pointed the polio through

play10:09

this there we go you can just point the

play10:14

pulley over the axle and then it comes

play10:16

out of the wheel well you can tell this

play10:19

alternator is just covered in grease

play10:21

which I think may be dripping from the

play10:24

power steering fluid I'll take a note of

play10:27

this that wire post right there was a

play10:31

twelve millimeter on the old one

play10:34

and it's a half inch on the new one all

play10:37

right so we are ready to install our new

play10:38

alternator take this carriage bolt from

play10:42

your old one mine was pretty grind up so

play10:44

I just sprayed some degreaser on the

play10:47

bolts and the nuts and you're just gonna

play10:50

slide that one right through there

play10:53

we'll go ahead and just lightly screw on

play10:56

that nut we're not gonna tighten it down

play10:58

or anything but we just want that to be

play11:01

ready to slide down in that little

play11:03

carriage arm inside there so we're just

play11:05

gonna try to reverse how we took out the

play11:07

other one with the plastic armature on

play11:10

the backside toward the inside of the

play11:13

engine and just going like this way so

play11:16

your pulley is facing you before we get

play11:19

it up in there go ahead and take this

play11:20

nut off because that's gonna have to go

play11:22

over the top of that the wire once we

play11:25

slide it down on there and I'm gonna try

play11:27

to position this first where I can

play11:30

really get to that wire and I'm gonna

play11:32

screw the wire down on I'm gonna try to

play11:35

tighten that nut real good before I

play11:38

situate the alternator in and tighten

play11:40

down the bolts that hold it in

play11:52

I think that's gonna help me get that

play12:01

wire see this is from top that side of

play12:05

it and that's where the wire comes down

play12:06

I'll probably have to just blindly fuel

play12:09

around to get it on the post okay

play12:15

finally got the wire on the post so

play12:18

right there this is the boot but I just

play12:22

haven't reached him with my left hand

play12:24

and like you can't see anything you just

play12:27

had to feel it on to the post so you

play12:29

have to get it no so it slides in and

play12:32

they groove part here but now I just

play12:34

need to get the net on and tighten it

play12:36

down and then it needs to slide all the

play12:38

way down so it makes the contact so I'm

play12:40

just gonna actually show you on the old

play12:42

alternator here see how this plastic

play12:46

housing has grooves here and there on

play12:49

the side so basically we're trying to

play12:51

slide that wire on this post and get it

play12:54

to touch flat down on that metal right

play12:57

there it needs to make a good contact

play12:58

and then tighten this nut good and snug

play13:02

a tricky part though is gonna get that

play13:04

to have the wire go in that groove there

play13:06

because I don't have the alternator set

play13:09

where it needs to go yet then after I

play13:13

get that on then I'm gonna set it in

play13:15

where it needs to go and then tighten

play13:17

them okay so what I did is I just I

play13:19

reached in and tightened just thumb

play13:22

thumb screw the nut on just so that the

play13:25

wire can't come off the post while we

play13:27

move it around then I'm gonna situate

play13:30

the alternator the way it's supposed to

play13:33

go and then tighten it okay here's

play13:35

another view from down through the wheel

play13:37

well so see I position the alternator so

play13:43

the pulleys facing out to me now and

play13:46

what that did was that rotated the post

play13:49

there such a way that the wires in the

play13:51

correct place now so now when I tighten

play13:54

the night

play13:55

tighten it right now it means to was

play13:57

able to get it I think sufficiently

play13:59

tight on from here it looks like it's

play14:01

making contact so I'm happy with that

play14:03

now there's a boot that goes over and

play14:06

just need to make sure that covers it

play14:07

probably keeps up moisture okay next

play14:10

step I'm showing you on the old

play14:11

alternator

play14:12

let's put this plug in remember this

play14:14

part is facing toward the engine the

play14:16

pulley is facing out towards where the

play14:18

tire would be hit so the clip part of

play14:20

this plug goes toward the engines I

play14:23

might just have to feel around because

play14:24

it's all on the back there's the right

play14:28

side of the alternator just need to

play14:29

sitting that little year there it's like

play14:31

a cradle just reaching down blindly and

play14:37

try to reach it and plug it and it's not

play14:39

easy that you have a fuel-air until you

play14:41

get it okay I finally got it um there's

play14:44

not much room for that plug down there

play14:46

so you actually have to kind of Palm the

play14:48

alternator lift it up as far as it'll go

play14:51

as you're plugging I'll share yo-yos

play14:53

okay so here's actually how it's sitting

play14:56

in the car and then sew around there

play14:59

like that that's where we're trying to

play15:00

plug it and so actually I got what I did

play15:03

was I just took my hand and sort of palm

play15:04

dinh then lifted it this way at the same

play15:08

time I held the plug with these fingers

play15:10

and pushed it in because behind the plug

play15:13

there's not if this the alternator

play15:15

sitting like that there's not going to

play15:17

be enough room for the plugs

play15:18

lift snap it in and that also lines up

play15:23

this hole where that bolts going to go

play15:27

[Music]

play15:32

right there we're gonna let them we're

play15:35

gonna line up those holes and stick that

play15:37

bolt in tighten it and that was I

play15:40

reaching from behind the axle and

play15:43

everything I reached up through it

play15:45

helped with my left hand

play15:47

[Music]

play15:49

that's bolt then with my right hand if

play15:52

you want to you have to kind of hold the

play15:55

alternator up against that arm and that

play15:58

bracket right there

play16:00

toward you and then line up the hole

play16:02

because you want to make real sure you

play16:04

don't strip out that bolt right there

play16:07

and it should be able to thumb tighten

play16:09

it all the way in or almost all the way

play16:11

in because those it's really highly

play16:14

machined threads in there and that will

play16:17

help you know you're not cross threading

play16:18

it okay so I was only able to find

play16:21

torque specs 406 and newer two songs I'm

play16:26

just gonna go ahead and assume it's the

play16:28

same for the 2005 so that right there is

play16:31

the pivot bolt and it says 14 to 18 foot

play16:35

my own get that set burner torque wrench

play16:38

alright that's a 9/16 everything got the

play16:44

top or the bottom one's quite tightened

play16:46

yes I'm gonna I'm gonna go up here and

play16:49

tighten the top one just cuz the whole

play16:51

thing is a little loose and wobbly

play16:54

remember this one's a 12 millimeter and

play16:56

you have a really tight space right here

play16:59

to get in and so if you have these box

play17:03

in ratchet wrenches man they're so nice

play17:05

to get that would click there we go 14

play17:09

to 16 on the lower one and 11 to 16

play17:12

foot-pounds on this top one low light I

play17:14

don't even think I can get my torque

play17:16

wrench in there I have to have an

play17:18

adapter and my drives to get it down the

play17:20

fist

play17:21

I might just tighten that one down just

play17:23

hope it's close the next step is to get

play17:26

the belt back and remember we just

play17:28

popped our to drive on our ratchet into

play17:31

onto this hold that down it's not too

play17:35

hard just like that swing that down too

play17:37

you get enough slack and then there we

play17:41

go let off okay now I'm just gonna put

play17:45

that bracket back on that goes right

play17:47

here it's just like a mounting bracket

play17:50

where you can hook the power steering

play17:53

- Boehm - and that's a ten millimeter so

play17:57

first we're gonna put the bolt down in

play17:59

the bottom next we're gonna put this

play18:09

little plastic guard back on remember

play18:12

it's three well actually supposed to be

play18:15

four bolts that go on there they're all

play18:17

ten millimeter all right I can't

play18:24

remember if I mentioned it in the video

play18:26

I took off the engine cover just so I

play18:28

could get better access to the side over

play18:31

here and that's just four bolts that are

play18:34

ten millimeter super easy slide that

play18:37

back on those guys yeah good time to go

play18:39

ahead and put the battery posts back on

play18:42

and if you're like me you your car died

play18:45

because the alternator crapped out on

play18:47

you and you had to use up every last bit

play18:50

of juice in battery to get back home

play18:53

somehow

play18:54

and in which case your battery is gonna

play18:56

need to be jump something to say charge

play18:59

it up to do that it's not gonna crash

play19:02

right out all right now let's just get

play19:04

our tire

play19:06

[Music]

play19:16

just a reminder when jumping cars you

play19:18

want to park the cars next to each other

play19:20

both first we're gonna attach the

play19:23

positive jumper cable to the dead car

play19:26

and then positive to the live car and

play19:29

the negative to the live car negative

play19:33

post and then the other end of the

play19:36

negative on the dead car just attach it

play19:38

to the frame somewhere and parked it

play19:40

part of the frame then we're gonna start

play19:43

a live car and let it sit for five

play19:45

minutes and try to start

play19:49

[Music]

play19:59

the moment of truth the car started

play20:02

right up let it run for a while that

play20:04

really charged that battery up

play20:06

disconnect your battery cables in office

play20:12

then you hear how loud that car is that

play20:14

turn next

play20:15

the

play20:17

you

Rate This

5.0 / 5 (0 votes)

相关标签
Alternator ReplacementHyundai TucsonDIY RepairCar MaintenanceMechanic TipsAutozone DiagnosticBattery LightABS BrakeESP OffEngine CompartmentJump-Starting
您是否需要英文摘要?