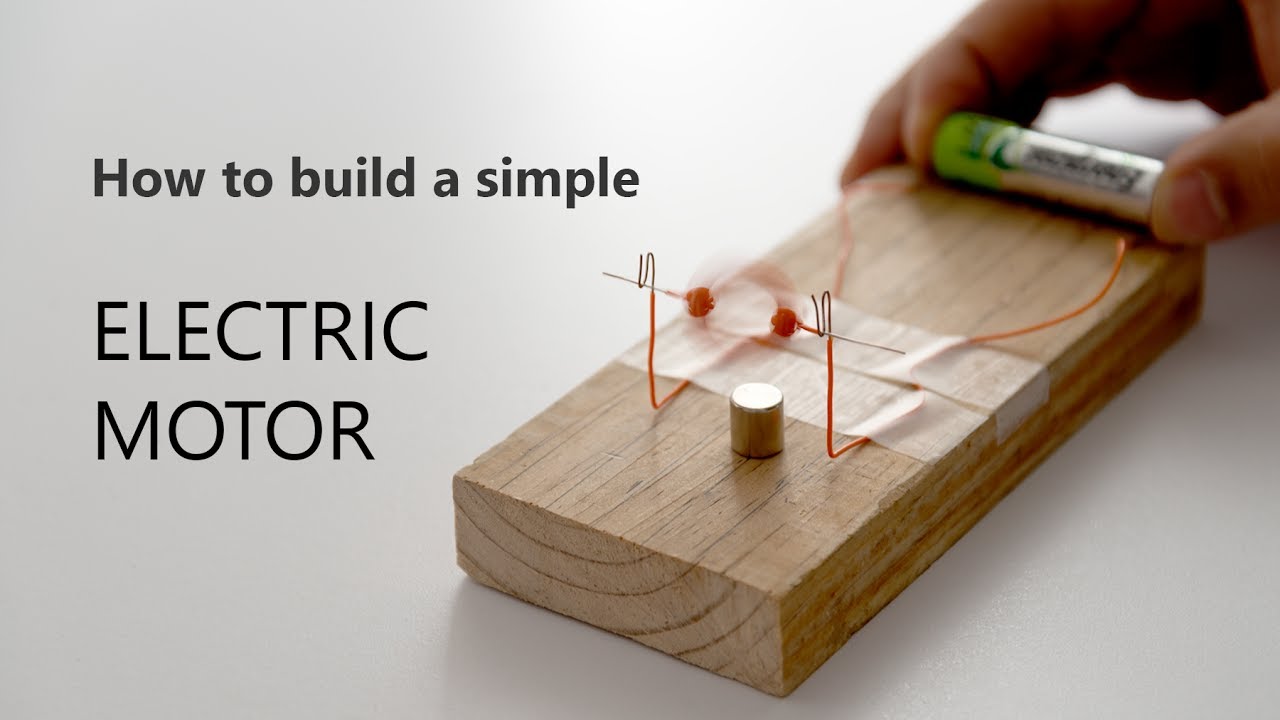
Cara Membuat Generator Sederhana by XII Ilmu Alam 1 MAN Model Palangka Raya Gen34 2015
Summary
TLDRThis video tutorial guides viewers through the process of creating a simple DIY project using basic materials like a bottle, a metal rod, coil wire, LED lights, and magnets. It demonstrates how to wrap the coil, install the LED, and insert magnets into the metal rod to successfully light up the LED. The engaging soundtrack and celebratory clapping highlight the project's success, making it a fun and educational experiment that shows the power of simple materials in creating a working light source.
Takeaways
- 🧪 The video demonstrates a hands-on experiment to generate electricity using simple materials.
- 🥛 A plastic bottle is cut into pieces as part of the setup process.
- 🔩 A metal rod is inserted into the cut bottle pieces to serve as a core for the coil.
- 🌀 A spool wire is tightly wound around the metal rod to create an electromagnetic coil, with around 400 turns.
- 💡 An LED is installed onto the coil assembly to indicate when electricity is generated.
- 🧲 A magnet is placed inside the metal rod and coil to induce a current.
- ⚡ Moving the magnet inside the coil successfully lights up the LED.
- 🎯 The experiment demonstrates the principle of electromagnetic induction in a simple, visual way.
- 🎵 Background music and applause are included to enhance the presentation but are not part of the experiment.
- 🛡️ Safety considerations are implied, such as careful handling of sharp bottle edges and proper wire insulation.
Q & A
What is the main purpose of the demonstration in the video?
-The main purpose is to show how to generate electricity using a simple electromagnetic generator setup that can light up an LED.
Why is the bottle cut at the beginning of the experiment?
-The bottle is cut to create a structure or container in which the metal rod and coil can be assembled.
What role does the metal rod play in this setup?
-The metal rod acts as a core around which the wire coil is wrapped, helping concentrate the magnetic field to generate electricity efficiently.
How is the coil made, and how many turns of wire are used?
-The coil is made by wrapping wire (kawat spul) around the metal rod, and the transcript mentions a total of 400 turns.
What is the function of the LED in the demonstration?
-The LED serves as a visual indicator that electricity is being generated when the magnet moves inside the coil.
Why is a magnet inserted into the metal rod with the coil?
-The magnet is inserted to create a changing magnetic field, which induces an electric current in the coil through electromagnetic induction.
What principle of physics is demonstrated in this experiment?
-The experiment demonstrates electromagnetic induction, where moving a magnet through a coil generates an electric current.
How can you tell that the generator is working?
-The generator is working if the LED lights up, indicating that electric current is being produced.
Could this setup generate enough power for devices other than an LED?
-No, this simple setup produces a small amount of electricity suitable only for low-power devices like an LED.
What are some potential improvements to make this generator more efficient?
-Efficiency could be improved by using stronger magnets, increasing the number of wire turns, using a larger metal core, or reducing resistance in the wire.
Outlines

此内容仅限付费用户访问。 请升级后访问。
立即升级Mindmap

此内容仅限付费用户访问。 请升级后访问。
立即升级Keywords

此内容仅限付费用户访问。 请升级后访问。
立即升级Highlights

此内容仅限付费用户访问。 请升级后访问。
立即升级Transcripts

此内容仅限付费用户访问。 请升级后访问。
立即升级


5.0 / 5 (0 votes)
