Cómo hacer una radio casera (sin pilas) (Experimentos Caseros)
Summary
TLDRIn this DIY tutorial, the creator demonstrates how to build a homemade radio using easily accessible materials. The project requires items like cardboard, copper wire, a tube, metal clips, a razor blade, a soldering tool, and more. The creator carefully guides viewers through the process of creating a working radio, from coiling the copper wire to assembling the components and fine-tuning the radio's signal with the help of a pencil and various connections. The video concludes with a working radio that can pick up signals, offering a fun and educational project for those interested in electronics and radio technology.
Takeaways
- 😀 The project is about creating a homemade radio using easily available materials.
- 😀 The materials required include cardboard or wood, copper wire, paper clips, tacks, razor blades, a soldering torch, and more.
- 😀 A cardboard tube is used as the base for the homemade radio, and the copper wire is wrapped around it in 120 turns.
- 😀 The copper wire needs to be stripped at both ends to remove the enamel coating, allowing for proper electrical connections.
- 😀 Metal paper clips are used throughout the project to hold various components in place on the radio base.
- 😀 A pencil is used for tuning the radio frequency, and it must be modified by inserting a disassembled paper clip into the pencil tip.
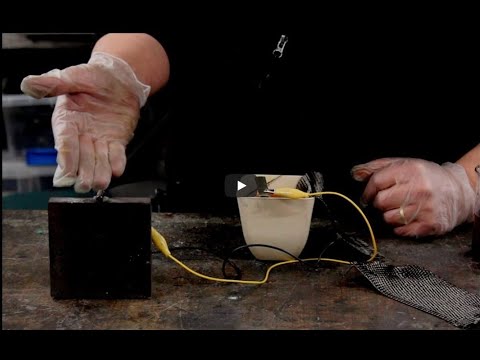
- 😀 The razor blade is heated with a torch and placed onto the board, connecting it with copper wires for electrical conduction.
- 😀 The headphones are connected to the radio, with one side being positive and the other negative, for audio output.
- 😀 A wire is connected to the ground terminal, and a mini-jack input is used to connect to external speakers for sound amplification.
- 😀 The homemade radio requires a long antenna (around 15 meters of copper wire) to boost signal strength and ensure better reception.
Q & A
What materials are needed to create the homemade radio?
-The materials required include a piece of cardboard or wood, a toilet paper or kitchen paper tube, copper wire, metal clips, pushpins, shaving blades, a soldering torch or lighter, an antenna, a graphite pencil, enameled copper wire for winding, pliers, electrician scissors, and headphones.
How do you prepare the copper wire for use in the homemade radio?
-You need to wind the enameled copper wire around the cardboard tube for about 120 turns. Afterward, strip the ends of the wire to remove the enamel, so the copper can make proper connections.
Why is the pencil used in making the homemade radio?
-The pencil, specifically its graphite, is used to help tune the radio. A clip is attached to the pencil to make contact with the graphite, which is crucial for tuning the radio to different frequencies.
What role does the shaving blade play in the homemade radio?
-The shaving blade is heated with a soldering torch or lighter until it glows red. It is then placed on the radio setup, and its metal contacts help in fine-tuning the reception.
What is the purpose of the pushpins in the radio construction?
-Pushpins are used to secure various components, such as the antenna and the shaving blade, to the base of the homemade radio. They also help in connecting the copper wires for proper electrical contact.
How does the homemade radio connect to headphones or speakers?
-The radio connects to headphones or speakers by using wires. The copper wire is used to make the connections between the clips, the shaving blade, and the headphone's cables. The audio output is then routed through the headphones or speakers.
What kind of wire is recommended for winding around the tube?
-It is recommended to use enameled copper wire, which can be found in electrical stores or repurposed from old speakers or televisions. This wire is ideal for winding as it can carry the necessary electrical signal for the radio to function.
How important is the antenna for the homemade radio to work effectively?
-The antenna is quite important as it helps capture radio signals. In the script, a 15-meter copper wire is used for the antenna to enhance signal strength and improve the reception of radio frequencies.
Can the homemade radio work without the antenna?
-Yes, the homemade radio can work without the antenna, but its performance may be less effective. The antenna improves signal strength and range, making the radio more reliable for picking up stations.
What is the purpose of the soldering torch or lighter in the process?
-The soldering torch or lighter is used to heat the shaving blade until it becomes red-hot. This is necessary for the shaving blade to function correctly as part of the radio's tuning mechanism.
Outlines

This section is available to paid users only. Please upgrade to access this part.
Upgrade NowMindmap

This section is available to paid users only. Please upgrade to access this part.
Upgrade NowKeywords

This section is available to paid users only. Please upgrade to access this part.
Upgrade NowHighlights

This section is available to paid users only. Please upgrade to access this part.
Upgrade NowTranscripts

This section is available to paid users only. Please upgrade to access this part.
Upgrade NowBrowse More Related Video

GERADOR EÓLICO CASEIRO: Muito fácil!

VACUM CLEANER | PROJEK P5 REKAYASA TEKNOLOGI | KELOMPOK 2 XI-B

TIDAK USAH BELI AC.. MAHAL!! Buat saja sendiri, lebih hemat, praktis, senyap dan pasti dingin
Cara membuat filter air dari pipa paralon manual backwash
2057 How To Make The Homemade Battery You May Have Been Waiting For

Cara membuat kompos dari batang pisang yang kaya manfaat sebagai penyubur tanaman
5.0 / 5 (0 votes)