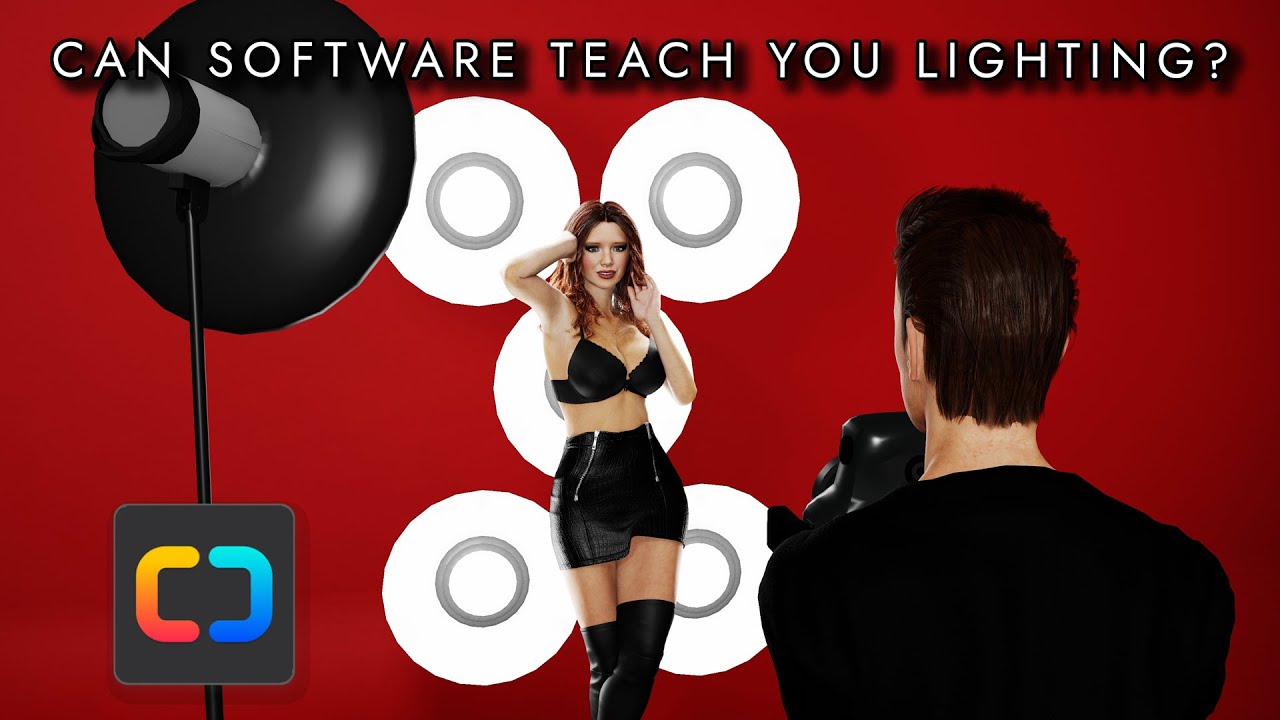
Shotlisting Just Got A LOT Better! Set a Light 3D Review
Summary
TLDR本期视频介绍了一款名为Set a Light 3D的软件,它允许用户创建3D场景并设置不同的灯光、反射器、修饰器、相机和演员,以预览实际拍摄效果。视频制作者分享了自己如何使用软件进行灯光布局设计,并在现实中复制设置,展示了软件的准确性和实用性。尽管需要根据实际灯具进行一些调整,但软件显著提高了设置效率,节省了时间。
Please replace the link and try again.
Q & A
视频更新的主要内容是什么?
-视频主要介绍了一款名为Set a Light 3D的软件,这款软件可以帮助用户创建3D场景并设置不同的灯光、反射器、修改器、相机和演员,以预览实际拍摄时的灯光效果。
Set a Light 3D软件的主要功能是什么?
-Set a Light 3D软件的主要功能是允许用户创建一个基础的3D拍摄场景,并在其中设置各种灯光效果,包括不同色温的灯光、反光板、色光等,以及可以自定义的人物模型和姿势,从而提供一个逼真的预览效果。
为什么作者认为Set a Light 3D软件对他来说非常重要?
-作者认为Set a Light 3D软件对他非常重要,因为在实际拍摄时,尤其是在有严格时间限制和日程安排的情况下,他可以提前在电脑上测试和调整灯光效果,而不需要在现场实际移动任何灯光设备,这样可以节省时间和努力。
Set a Light 3D软件在实际操作中的表现如何?
-在实际操作中,Set a Light 3D软件能够帮助用户大致模拟出实际拍摄场景的灯光效果,但由于使用的灯光设备与软件中的不完全相同,用户还需要在现场根据实际情况对灯光强度进行微调,以达到最佳效果。
作者在视频中使用了哪些特定的灯光设备?
-作者在视频中使用了多种灯光设备,包括Aperture 300D、Sky Panel、Light Tube以及Pavo Tubes等,他还提到了自己的主光源是500瓦特的,而不是软件中的300D。
在视频中,作者提到了哪些关于Set a Light 3D软件界面的信息?
-作者提到了Set a Light 3D软件界面包括一个工作区域,用户可以在此设计3D房间,以及一个预览面板,显示相机所看到的场景。此外,软件还允许用户调整相机的各种设置,如帧率、快门速度等。作者还提到了软件在超高分辨率显示器上有一些缩放问题。
作者在视频中如何验证Set a Light 3D软件的准确性?
-作者通过在软件中创建一个基本的拍摄场景,并设置特定的灯光效果,然后将这些设置应用到实际的拍摄环境中,通过比较软件预览和实际拍摄结果的相似度来验证软件的准确性。
作者在视频中提到了哪些关于Set a Light 3D软件的局限性?
-作者提到,由于他没有使用软件中列出的确切品牌和型号的灯光设备,所以在实际应用中需要对灯光强度进行一些调整,以接近软件中的预览效果。这表明软件虽然提供了一个很好的起点,但在实际应用中可能需要根据具体设备进行微调。
作者在视频中提到了哪些关于Set a Light 3D软件的优点?
-作者认为Set a Light 3D软件的优点在于它能够帮助用户在没有实际移动任何灯光设备的情况下,在电脑上测试和调整灯光效果,这样可以节省时间,减少现场调整的需要,尤其对于有严格时间限制的拍摄项目来说非常有用。
作者在视频中提到了哪些关于Set a Light 3D软件的操作细节?
-作者提到了在软件中可以自定义人物模型,设置不同的姿势和表情,以及可以调整灯光的强度、色温和方向。他还提到了软件中的灯光设备库,包括各种常见的灯光和反光设备,用户可以根据需要选择和调整。
作者在视频中提到了哪些关于Set a Light 3D软件的导出功能?
-作者提到了Set a Light 3D软件允许用户导出灯光布局,可以打印出来或保存到手机上,以便在现场拍摄时作为参考。但他也提到了导出的文件分辨率不是很高,可能需要调整设置以获得更好的质量。
Outlines
🎥 介绍新软件Set a Light 3D
视频开头,主持人介绍了他通过Instagram广告发现的新软件Set a Light 3D。这款软件由Elixir Software公司开发,允许用户创建基本的3D场景,设置不同的灯光、反射器、修饰器、相机和演员,以预览实际的照明效果。主持人强调了这款软件对于快速确定照明设置的重要性,尤其是在时间紧迫或需要快速调整灯光的情况下。
🖥️ 使用Set a Light 3D软件
在第二个段落中,主持人详细展示了如何在Set a Light 3D软件中设置一个独特的照明场景。他提到了软件界面的布局,包括3D房间设计工作区和相机预览面板。他还提到了软件的一些功能,如改变相机角度、控制相机设置、选择不同的灯光和修饰器。主持人通过实际操作展示了如何创建一个具有混合颜色温度的戏剧性场景,并说明了如何导出灯光布局以便在现实中复制。
📸 将软件设置应用于现实场景
最后一个段落中,主持人将软件中的照明设置应用到了现实拍摄场景中。他首先调整了现实中的灯光设备,以匹配软件中的设置,并对强度进行了微调,以达到与软件预览相近的效果。尽管他没有使用软件中显示的精确灯具型号,但他表示软件仍然非常有用,只需稍作调整即可获得接近的效果。最后,主持人邀请观众分享对这款软件的看法,并预告了下一周将发布的关于Blackmagic Ursa Mini Pro 12K的视频。
Mindmap
Please replace the link and try again.
Keywords
💡Ursa Mini Pro 12K
💡Set a Light 3D
💡灯光设置
💡3D环境
💡色温
💡软盒
💡RGB灯
💡曝光
💡负填充
💡光线强度
💡灯光设备
Highlights
介绍了Blackmagic公司提供的Ursa Mini Pro 12K相机的额外使用时间。
分享了通过Instagram广告发现的新软件Set a Light 3D。
Set a Light 3D软件由Elixir Software公司制作,用于创建基础3D场景和灯光设置。
软件能够预览灯光设置的实际效果,对于时间紧迫的拍摄非常有帮助。
软件允许用户在电脑上测试和调整灯光,无需移动实体灯架。
软件中可以自定义人物模型和姿势,以及设置不同的灯光和修改器。
软件提供了多种灯光选项,包括天空面板、环形灯等。
软件界面在不同分辨率的显示器上可能存在缩放问题。
实际操作中,需要根据实际使用的灯光设备调整软件中的设置。
软件导出的PDF或图像分辨率可能不是很高。
在现实中重现软件中的灯光设置,需要微调以达到最佳效果。
软件帮助理解拍摄风格,但需要根据实际灯光设备进行调整。
作者对Set a Light 3D软件的准确性进行了实际测试。
作者在视频中使用了自己的工作室和设备来模拟软件中的设置。
软件对于快速理解和设置复杂的灯光非常有帮助。
作者将在下周五发布关于Blackmagic 12K的视频。
Transcripts
hey what's going on everybody welcome
back to another video and
just wanted to give you guys an update
blackmagic actually let me have
the ursa mini pro 12k for another week
and so if you have
any remaining questions for this i'm
starting to wrap up
this video to be posted next friday
don't forget to comment down below and
make sure you're subscribed so you get
notified
when this comes out but today i want to
talk about my new
favorite piece of software that i
stumbled upon through
a instagram ad and the spaces software
is called
set a light 3d it's made by a company
called
elixir software now what this software
does is basically
allows you to create a basic 3d set
or 3d environment where you may be
shooting
and it allows you to set up different
lights and reflectors and modifiers and
cameras and actors
and basically give you a realistic
preview
of what that lighting setup is going to
look like
now to me this is huge because one of
the things that i've battled with
over the years is knowing exactly
what lights to set up in which way you
see when i'm filming in my own studio
for my own youtube videos
i'm not really under any too much time
pressure i can pretty much play around
with the lights see what works what
doesn't work what i like what i don't
like but if i'm going to
film with like a client for example and
we have a very strict
deadline and schedule for what that
shoot day looks like and
even if it is a little bit more loose
you still have people waiting around
while you're
trying to figure out where to set up
lights the other logistical issue
with playing around with lights is when
you're by yourself it can just take a
lot of effort
to try something new i mean this new set
that i created here
took quite a few hours of playing around
with different lights
different softbox sizes grid no grid
and so that's where a software like this
comes into play
because you can basically do all of that
testing and playing around
on your computer without having to
physically move any light stands around
and instantly see what sort of final
result you're going to
get so what i want to show you guys real
quick today is how accurate
this software actually is so what i want
to do first is go on the
computer go on the piece of software and
create kind of a basic set that is a
little bit more unique and i want to use
maybe a mix of different color
temperatures or different colors in
general
do something a little bit more dramatic
set everything up and then i'll be able
to actually
save the lighting layout that you can
print out or save to your phone
and then in real life i'm going to
copy the exact settings will be a fun
little test
so let's get to it hey we're on my
computer and lighting's terrible
only said one light so that's going to
look all dramatic
but that's fine we're not here for my
face and it goes to the wrong screen
boom here we go we have uh satellite
all set up here and again i'm not going
to go through the
entire interface but basically the
gist of it is over here is kind of your
work area where you can
completely design the 3d room
and then on the right side here you have
basically a preview pane
of what the camera is seeing and so if i
move this around
can change the angles i can go
tripod up tripod down
and you have all these camera controls
and by the way
if all the buttons look super small to
you it's because we're on my 5k
monitor if you have like a 1080p
or 4k monitor the buttons look a lot
bigger
so the software seems to have a little
bit of a scaling issue
on ultra high res uh monitors
but it's personally fine by me i don't
really care
but yeah you can change between full
frame uh different crop factors
aspect ratios your shutter speed pretty
much the
entire thing right so let's go ahead
and get set up i'm actually going to
delete these lights so let's zoom out
here so what we're going to do is i
actually have
a orange backdrop so what i did is kept
the default backdrop and they have a
bunch of like
actual uh colors here
all right so they have savage which i
believe mine is savage
i got the orange one cool and
that's actually not going to be the main
focus i'm going to move this back here
move our dude and what's cool is you can
totally uh customize everything about
this person
and then if we go into posing mode you
can like
do everything i mean these are like
fully rigged bodies
so you can do some pretty crazy
things with it so across the bottom we
can see all of our different
lights and modifiers again a lot of this
is going to be for still photography
but if you go to permanent lighting
again we can see
our sky panels we can see our different
re lights
uh got some other panels over here looks
like kino flows
and then looks like we have a aperture
300d
yep 300d mark ii we got titan tube
lights
got ring lights all the goods all the
basic necessities and so i don't have
titan tubes but the pavo tubes
should uh give off a pretty similar vibe
so
first things first let's go ahead
and get a 300d because i use
nan light lights but they're cobs
so it should do the trick now can i
add a modifier to this
all right so you can't add like a
softbox onto the light
so what i did in the past is i would
just grab one of these like photography
domes one that would have like the
relative size
of my permanent light and it wouldn't be
exact
but kind of the trick for this one i'm
going to try something different
i'm going to try
all right so i want this kind of to the
side of me
i'm going to put it further back because
under
the helper so i have diffusion panel
first let me get my
framing here i want to be at a
i'm gonna say a 45 and then you can of
course change the
intensity of the light oh nice yep you
can change
the reduction so this is actually three
stops it's actually a quarter of a stop
what
am i at 180 degree oh there's my my f8
so i'm gonna go like f4 there we go
that's starting to
look more normal i really like the
performance of this two you can see when
i start to drag around lights the
preview pane in the right
kind of goes real bad quality for a
second and then when
i let go of everything it kind of goes
back to its
uh 1080p preview i'm actually going to
add a negative fill right here because i
don't want that
spill you can see that when i remove it
spilling onto the background
and i want to light that separately all
right so now we got
basic uh setup going on right there
so i'm not really liking the strength
that this
is putting out here let me yeah
just can't delete that all right so
let's say we just throw another
spotlight on it
and we're going to turn down the
intensity i'm going to say like
and we'll yeah we'll keep the lights
stand in frame i kind of dig it
and then on this side of the face i want
kind of a mixed
color temperature so let's see is there
any like
rgb i'm going to take a sky panel
because this is similar to
a rgb light that i have i'm gonna bring
that
intensity down a bunch and we're gonna
go
off a blue light maybe and then what if
we take
a light tube on this side just out of
frame
if i did red alrighty people we kind of
have
the setup this time what i'm gonna go
for i guess
and so if i go to the export section
here we can see that want to
export is this make like a pdf or
something and yeah
just like we saw it's not super
high res or anything maybe i can adjust
those uh
settings but all right so now time to
see if we do this exact setup in real
life
how close will look to this
alrighty first step we have the black
magic pocket
6k uh setup given the good old 12k
rest we have the irix
millimeter cine lens on top i need time
to
lower this guy
by the way i already know someone's
gonna comment about all the crap on my
shirt just knows that uh it's called
having kids
and i don't really care i'm not changing
it for the video so
deal with it but let's see we're trying
to match
[Music]
this guy right here so we can see part
of the wall
so it's not the entire backdrop so it's
kind of at
an angle so let's move
this to where
oh pretty close
[Music]
so we can see on this graph here that
our main
uh settings here oh man i totally
butchered that
working mistake iso 100
i wasn't thinking it's late well here
goes nothing
we are now at iso 100
and t4 right on the mountain
[Music]
all righty so we have all the basic
lights set up
now the most important thing is to kill
all the other sources kill the over top
lights
have our orange background check a light
shooting onto the background
check i have a tube light with a red
hue boom we have a what would be
sky panel check and we have our source
which technically i know i set this up
to do this going through diffusion and
then
having a bounce but softbox will do
so the very last thing that i did from
the computer is i went around to all the
lights
and put them on the exact
intensity levels that it showed on the
computer
if i were to sit down in front of that
camera
and show the angle hopefully the focus
is pretty decent
uh this isn't looking exactly right
the reason this isn't looking exactly
like it is
in the satellite software is because
as i mentioned before i'm only using
lights that are relatively close to the
ones
in the software and this is where the
lack
of video current equipment list
on there is kind of a con because while
this does
get me very close and that makes me feel
like the software is still
useful you do have to compensate for
the different specifics of the lights
for example
my key light is a 500 watt
not a 300 d a 300 watt
from aperture it's also going through a
soft box and which is a different level
of diffusion
tube light this light this light
they're all different power output
settings and so
i'm gonna have to dial it in more and
kind of just play around with the
intensities of all the lights
in order to get it as close as i can to
the uh one in the software so let me
dial it in and see if i can get it a
little
bit closer with some playing around so
i'd say that i have it locked in
to be as close as i can probably get it
with just around
five extra minutes of playing around
with the intensities
i also changed up the angles a little
bit this i moved
more towards the edge so that way you
can actually
it's catching more of the uh orange
background
the blue light was a little too much in
front of me so now it's more directly
on the side also lower the intensity i
moved
the uh red light here a little bit
further away so it was
a little less intense and honestly it's
almost a little disappeared so i
probably could bring it back or raise
the intensity slightly
and then my big key light is essentially
on like
two percent intensity even that's still
looking
a little bit strong but yeah this is
kind of setup
i definitely think that the satellite
software helped
it allowed me to understand what the
style was going to look like
but because i didn't use the exact make
and models
of the lights in there you do have to
play around with the intensities a bit
but it gets you about ninety percent of
the way there
pretty cool so there you guys have it uh
what do you think about this piece of
software do you think it was pretty
close
do you think it was pretty far off and i
still had to tweak things
like i said before all this stuff will
be linked down in the description below
if you want to check it out don't forget
to come back next week for my big black
magic
12k video thanks so much for watching
i'll see you in the next video
浏览更多相关视频
Set A Light 3D Review: Can you learn lighting in a computer?
ZHIYUN MOLUS G60 & X100 🔥
世はまさに大光量時代!COB LIGHTが大人気!小型で100Wを実現!ZHIYUN CX100
¡Por fin mejoro la iluminación de mi estudio! con Molus B100 Zhiyun
😱¡Las luces MÁS POTENTES que he probado, una LOCURA! 🔞| Zhiyun Molus B200 y B500💡
CX100 Review 20240907
5.0 / 5 (0 votes)