Stylar AI Tutorial - New AI for Text to Image & Image to Image
Summary
TLDR在这个教程中,Iman向我们介绍了Styler AI——一款强大的AI图像生成工具。通过详细讲解其文字到图片、图片到图片的功能以及与Adobe Firefly相似的生成填充特性,Iman展示了如何使用Styler AI生成令人惊叹的图像。该工具不仅包含丰富的内置艺术风格,还支持拖放式布局、高分辨率导出和会话式语言提示,使其成为设计师们的理想选择。Iman还分享了如何高效使用文本提示以及Styler AI的多样化编辑特性,从而激发用户的创造力,简化数字图像设计流程。
Takeaways
- 🔍 Styler AI是一个功能强大的AI图像生成工具,支持文本到图像和图像到图像的转换。
- 🎨 该工具提供多种内部艺术风格,包括3D风格、像素风格和粉彩风格,可用于图片风格转换。
- 🖼️ 用户可以创建不同格式和比例的新文档,例如正方形、矩形以及垂直和水平布局。
- 🛠️ Styler AI具有独特的生成填充特性,类似于Adobe Firefly,可用于高精度的图像编辑和修改。
- 👥 该工具提供拖放组合、高分辨率导出和对话式语言提示,使其易于各级设计师使用。
- 💡 新用户可通过注册网站并在界面内创建项目来开始使用Styler AI。
- 📚 在Styler AI的样式库中,样式按标签分类,方便用户选择和应用。
- 📖 写作提示时,应使用清晰的语言并提供详细的说明,以帮助AI生成更接近概念的图像。
- 🖌️ 通过使用文本到图像功能,用户可以根据文本提示将想法转换成图像。
- 📏 图像到图像功能允许用户改变图片的风格,如将图片转换为卡通、动漫、3D等风格。
- 🔄 生成填充特性使用户能够编辑和修改图像的单个元素,提高了在线图像编辑的能力。
Q & A
Styler AI是什么?
-Styler AI是一个强大的AI图像生成工具,它允许用户通过文本提示生成和编辑图片,拥有文本到图像、图像到图像的特性,并提供了类似于Adobe Firefly的生成填充特性来编辑图片。
如何开始使用Styler AI?
-新用户需要在Styler AI的官方网站注册账户,然后在界面内创建项目,就可以开始使用基础的图像编辑和高级生成AI特性了。
Styler AI的关键特点是什么?
-Styler AI的关键特点包括其内部多样的艺术风格,如3D风格、像素风格和粉彩风格等,支持拖放组合、高分辨率导出和使用会话式语言提示进行高级定制。
Styler AI如何简化数字图像设计过程?
-Styler AI通过直观的界面和自然语言处理技术简化了数字图像设计过程,使设计师能够轻松地应用各种艺术风格,并通过拖放和高级定制功能快速生成图像。
如何在Styler AI中创建一个新项目?
-在Styler AI中创建新项目,需要点击新项目图标,输入项目名称,设置长宽比,调整项目尺寸,然后点击应用即可。
Styler AI中的生成填充特性是什么?
-生成填充是一个独特的特性,允许用户利用AI编辑和修改图片的单独元素,如背景去除和多元素合成,提供了层次剪切和高级合并能力。
如何在Styler AI中使用文本到图像功能?
-在Styler AI中,用户可以通过选择一个风格,然后在提示栏中输入文本来使用文本到图像功能。系统会根据输入的文本和选择的风格生成图片。
在Styler AI中撰写提示时有哪些建议?
-撰写提示时应使用清晰的语言,详细准确地描述想法,包括颜色、氛围、光照条件和风格等信息,这有助于AI生成更符合用户想象的图像。
Styler AI如何支持图像到图像的转换?
-通过图像到图像的功能,Styler AI可以改变图片的风格,包括卡通、动漫、3D等风格,用户可以上传原始图片,选择新的风格,AI将根据这些参数生成新的图片。
Styler AI提供哪些导出选项?
-Styler AI允许用户以JPEG或PNG格式导出图片,还提供了图片尺寸增大的选项,但在免费账户中,导出的图片会添加水印,移除水印需要升级账户。
Outlines

This section is available to paid users only. Please upgrade to access this part.
Upgrade NowMindmap

This section is available to paid users only. Please upgrade to access this part.
Upgrade NowKeywords

This section is available to paid users only. Please upgrade to access this part.
Upgrade NowHighlights

This section is available to paid users only. Please upgrade to access this part.
Upgrade NowTranscripts

This section is available to paid users only. Please upgrade to access this part.
Upgrade Now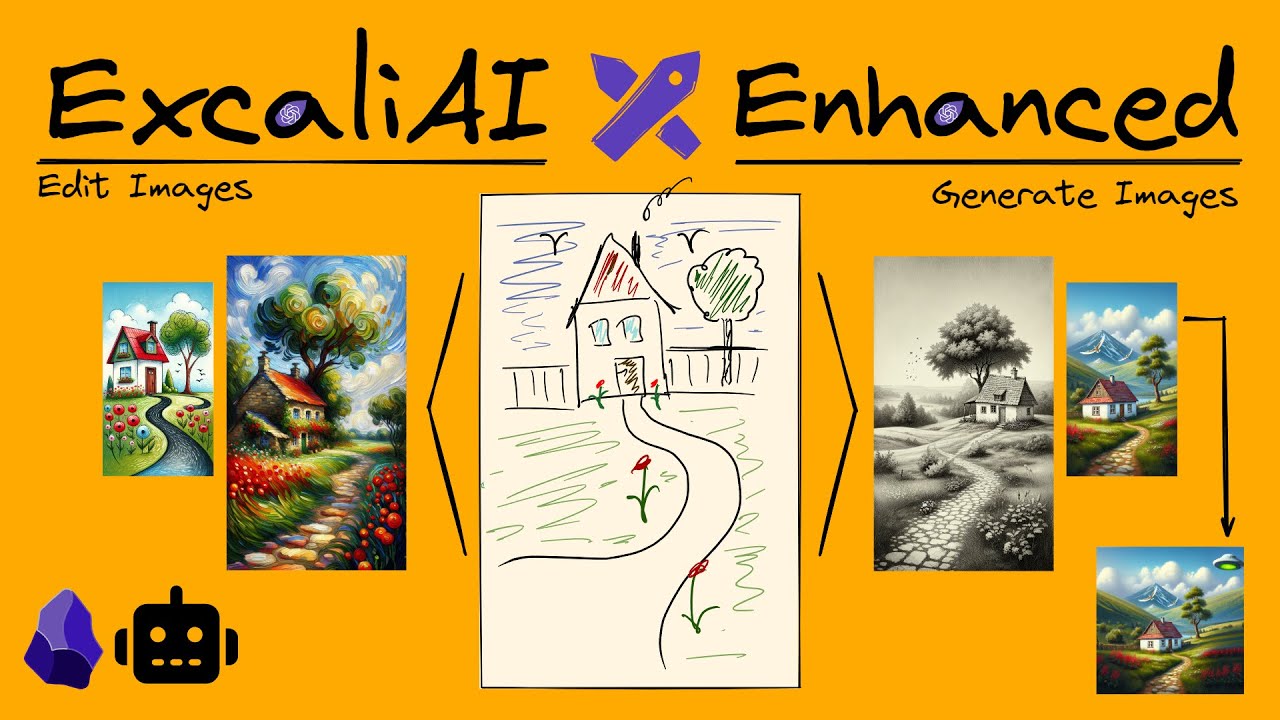


5.0 / 5 (0 votes)
